

Note - The back panel of the SPARCstation 10 system unit has one 25-pin D connector (marked "A/B") providing functionality for two serial ports when used with the optional serial interface Y-cable described and shown in Appendix E. Port A on the Y-cable provides asynchronous and synchronous functionality. Port B on the Y-cable provides asynchronous functionality. Direct connection of other types of cables to the back panel 25-pin D connector provides access to port A or port B only. The Y-cable is required for simultaneous access to both ports.
Before you connect any peripheral devices to your system, you need:
You can leave the power to your SPARCstation 10 system on when you install a printer, terminal, or modem.
You must consult the manual for the specific printer, terminal, or modem for information about what it can do and how to operate it.
The SPARCstation 10 system supports the following kinds of serial devices (among others):
Note - Many of these devices can operate in either RS423 mode or RS232 mode. The serial ports on the SPARCstation 10 system are set to operate in RS423 mode, but they can be configured to operate in RS232 mode (see "Serial Port Requirements" later in this chapter). The owner's manual for the device specifies the device's operating mode.
You
A terminal consists of a screen and keyboard that can be connected to the SPARCstation 10 system to display and enter information. The terminal is a second point of access - in addition to the monitor and standard keyboard - to your system.
A modem is a device that enables the system to communicate with another computer system over telephone lines.
Table D-1 gives the cable requirements for connecting certain types of printers, terminals, and modems mentioned in the remainder of this appendix. For additional information about cables, see Appendix E.
Table D-1 Device Cable Requirements

Note - You must use shielded cables to maintain compliance with FCC, DOC, VCCI, and VDE radio frequency emission limits.
Each

The baud rate is the signaling rate for transmitted data. The maximum baud rate for SPARCstation 10 serial ports is 19200 (19.2K) baud.
Many printers, terminals, and modems can operate in either of two serial modes (as specified by the manual for the device):
The serial ports on the SPARCstation 10 system are set to operate in RS423 mode. If your device can operate in RS232 mode only, you need to configure the serial ports on your system to operate in RS232 mode. Both serial ports must operate in the same mode.
If you use your SPARCstation 10 system in Germany, you must configure the serial ports on your system to operate in RS232 mode.
The serial port modes are controlled by two serial port jumpers on the main logic board. Both jumpers must be set the same. The jumpers are preset to RS423 mode.
The following sections describe how to change the serial port mode jumpers to RS232 mode.
You need the following tools to change the serial port jumpers:
To change the serial port mode jumpers for both ports A and B on the main logic board to RS232 mode:
See "Opening the System Unit" in Appendix B.
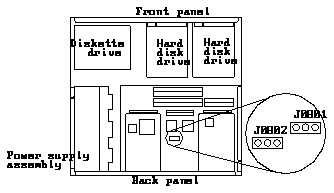
Figure D-1 Locating the Jumpers

Figure D-2 Changing the Jumpers
See "Closing the System Unit" in Appendix B.
For information about setting up and operating your printer, refer to the owner's manual that came with the printer.
You can leave the power to the SPARCstation 10 system on when you connect a printer.
To connect a serial printer to the SPARCstation 10 system:
Read the operator's manual that comes with your printer to determine how to set up the unit for operation.
Locate the power switch on the printer, and make sure it is set to the Off position.
If your printer requires asynchronous RS232 operation, you must change the serial port jumpers in the system unit.
See "Serial Port Requirements" earlier in this appendix.
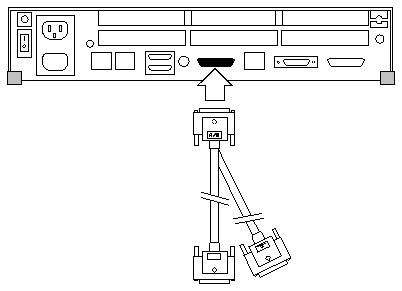
Figure D-3 Connecting the Optional Serial Interface Y-Cable
Consult your terminal operations manual or your dealer if you are not sure whether the terminal you plan to connect is compatible with a Wyse WY50 or DEC VT100.
You can leave the power to your SPARCstation 10 system on when you connect a terminal.
To connect a terminal to the SPARCstation 10 system:
Read the manual that comes with the terminal to determine how to set up the unit for operation. Locate the power switch on the terminal and make sure it is set to the Off position.
If your terminal requires asynchronous RS232 operation, you must change the serial port jumpers in the system unit.
See "Serial Port Requirements" earlier in this appendix.
See Figure D-3.
Most terminals have two ports: a modem port and an auxiliary port. The cable must be connected to the modem port.
The Wyse WY50 serial port requires a male connector. The DEC VT100 serial port requires a female connector.
See the terminal owner's manual for the requirements and location of the serial port on your terminal.
Remove the protective cap from the serial port you want to use. Keep the cap so you can use it later if you disconnect the terminal.
The Wyse WY50 and DEC VT100 terminals have setup menus for controlling terminal operation. The setup options control features that need to be adjusted only once (unless you decide to change how the terminal operates). See the terminal operation manual to find out how to access the setup menu.
Then set the options as follows:
o Wyse WY50: set at Televideo TVI925
o 8 data bits per character
o 1 stop bit
o No parity
o 9600 baud
o XON/XOFF enabled
After you have connected, powered on, and configured the terminal, you must tell your system that it is there. The SPARCstation 10 system needs to know where to send data to display on the terminal, and where to look for data entered from the terminal.
For information about how to set up terminal software, see Chapter 15, "Printer, Terminal, and Modem Software," in the Sun System and Network Manager's Guide.
The SPARCstation 10 system is designed to work with the terminals specified above. To find out which other terminal types the SPARCstation 10 system supports, type more /etc/termcap and press Return.
Although the null modem cable assembly described in Appendix E will probably work with other terminals, you may have to make a custom cable. See the terminal operation manual and Appendix E of this book for information about making a custom null modem cable.
The Hayes Smartmodem 1200
You can leave the power to the SPARCstation 10 system on when you install a modem.
To connect a Hayes or Hayes-compatible asynchronous modem:
Read the manual that comes with the modem to determine the proper setup procedure for the unit. Locate the power switch on the modem and make sure it is set to the Off position.
The default switch settings for the Hayes Smartmodem 2400 are compatible with the SPARCstation 10 system. If you have a Hayes-compatible modem, the switches may not correspond exactly to the Hayes switches. The standard switch settings are provided here so that you can emulate the Hayes standards on other modems.
The standard Hayes switch settings are as follows.
If your modem requires asynchronous RS232 operation, you must change the serial port jumpers in the system unit.
See "Serial Port Requirements" earlier in this appendix.
Plug one end of the modem cable into the serial port on the modem.
See Figure D-3.
After you have connected and powered on the modem, you must tell your system that it is there. The SPARCstation 10 system needs to be configured to know where to send the data that travels over the telephone lines.
For information about how to define modems in the SunOS operating system, see Chapter 15, "Printer, Terminal, and Modem Software," in the Sun System and Network Manager's Guide.
If you use the SPARCstation 10 system with a modem that is not a Hayes-compatible modem, you must:
You have finished Appendix D and know how to do the following:
