
This appendix is divided into two parts. The first half provides a brief overview of the SunDiag diagnostic program and explains how to start and run tests. The second part provides specific information on running xbtest which tests the SBus expansion subsystem.
SunDiag is a system exerciser; its primary purpose is to "stress" Sun(TM) hardware devices and record any errors that result from this testing. SunDiag allows multiprocessing systems to run any number of tests on any or all processors.
By nature, this program also tests system configurations. SunDiag automatically probes for hardware devices when it is started. If the probe does not find a hardware device that is connected to the system under test, that indicates a problem.
System administrators and hardware maintenance personnel use this program the most. The SunDiag interface is easy to use however, and it can be run by anyone who wants to "stress-test" a Sun system.
This appendix provides a brief overview of the SunDiag program. For a detailed description of the program and the individual tests, see the latest version of the SunDiag User's Guide, shipped with SunOS documentation.
You can run the SunDiag System shipped with your SBus Expansion Subsystem in two different modes. These modes vary according to the configuration of your hardware components. The two modes of testing are transparent and nontransparent. These modes are mutually exclusive and you cannot run them both at the same time.
Select this testing mode whenever you have Sbus cards plugged into the SBus Expansion Subsystem.
Use this testing mode when you do not have any SBus cards plugged into the SBus Expansion Subsystem. It will test only the SBus Expansion Subsystem. This mode is normally only used by the production locations and the field service representatives.
The primary way to run SunDiag is from the SunDiag OPEN LOOK® window. This is the window interface shown in Figure A-1. This is the easiest way to run SunDiag tests, and the only one described in detail in this appendix.
SunDiag also has a TTY interface to run tests from a terminal, and individual tests can be run from the command line of a SunOS shell. See the latest version of the SunDiag User's Guide for details.
SunDiag runs on any SPARCserver or SPARCsystem installed with SunOS version 4.1.1 or later. The operating system kernel must be configured to support all of the peripherals to be tested.
The amount of swap space required varies widely with the type and amount of hardware being tested. SPARCsystem servers should have enough swap space to equal twice the amount of on-board memory. In addition, frame buffer tests require additional swap space, and the virtual memory test has special swap space considerations. See the SunDiag User's Guide for more detailed information on swap space requirements.
When you start SunDiag, in SUNVIEW, the SunDiag window appears on your screen, see Figure A-1. The window is divided into four sections:
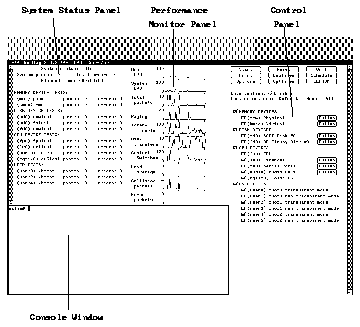
Figure A-1 The SunDiag SUNVIEW Window
Follow these steps to run the SunDiag SunView user interface.
Open a shell and type the following command to start the SunDiag program and bring up the window interface:

Note - This screen display is an example only. The actual message displayed on the screen will depend on the software running on the system.
This command starts the basic SunDiag program. There are a wide variety of options to this command; see the SunDiag User's Guide shipped with SunOS documentation for details on testing other than SBus Expansion Subsystem configurations.
The bottom set of tests are dedicated to testing SBus cards inserted into an SBus Expansion Subsystem. For each slot, the system provides a transparent mode check box and a nontransparent mode check box to activate a test for a particular slot in the SBus Expansion Subsystem, move your cursor to the box and click the select button of your mouse. You cannot select transparent mode and nontransparent mode.
If a device is missing from the control panel, make sure that the device is properly installed.
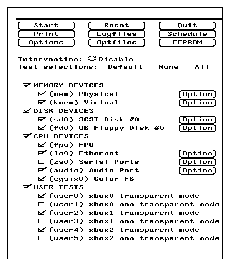
Figure A-2 Typical SunDiag Control Panel
Note - SunDiag enables all available tests when it is invoked. Starting all available tests slows down your system considerably. You can avoid most problems by disabling the virtual memory (vmem) test.
Note - You only need to change the options settings once. SunDiag continues to use your selections each time you run SunDiag.
The test name, xbtest, must match the name that appears on the SunDiag control panel.
This test is divided into two modes of testing: transparent and nontransparent.
After you invoke the xbtest the system will fork into two processes. The first, the parent process, will wait for the exit of the child process and then it will exit. The child process will issue an XAC_WAIT_FOR_ERROR ioctl call and then enter a sleep mode.
When the device driver receives an error, it wakes up and passes an error packet to the child process. The child process dumps the contents of the error packet and then it exits also.
If the system doesn't receive an error message before the end of the test time period, the trap handler routine calls the clear_for_wait_for_error procedure. The program will then exit to the parent process. The system will then return to the Sundiag system control.
This test will perform the following steps:
This test will perform the following steps:
This test will perform the following steps:
This test will perform the following steps:
This test will perform the following steps:
The system will repeat each test ten times. Time-out checks are included to avoid indefinite hangs. Failure of any test should not result in panics although full recovery is not guaranteed.
You can change the time option settings on the option menu. The default time is set to 15 minutes. However, you can change this setting to a different value by entering the number in minutes.
You can run SunDiag in a single test mode. To do this, enter the following command in any shell.
--------------------------------------------------------------

/usr/diag/sundiag/xbtest D=devicename WE T=test_period SD
standard_arguments

--------------------------------------------------------------
Note - The SunDiag "standard arguments are described in Chapter Four of the SunDiag User's Guide.
----------------------------------------------------------------------------------


Arguments
----------------------------------------------------------------------------------
D=devicename    devicename specifies the name of the device to be tested. Up
                to two SBus Expansion subsystems are supported, so the
                choices are: xbox0 and xbox1.

WE              Wait for Error. This option directs xbtest to run in
                transparent mode. This option will run xbtest continually
                until an error is returned, or until the time interval specified
                with the T=test_period option has ended.

T=test_period   Used only with the WE option. test_period specifies how long
                the test will run unless an error is returned, or the test is
                stopped manually. Substitute test_period with the number of
                minutes you want the test to run.   The default is 15
                minutes.

SD              Self Diagnostic test. This options directs xbtest to run in non
                transparent mode.

----------------------------------------------------------------------------------
The following are samples of.usertest commands using the command arguments:
--------------------------------------------------

xbox0 transparent mode, xbtest, S D=xbox0 WE T=1
xbox1 nontransparent mode, xbtest, S D=xbox0 SD

--------------------------------------------------
Whenever there are errors generated by the system, the SunDiag system will display the following error message in the lower left half of the SunDiag SUNVIEW window:
-----------------------------

error status dirty bit n

-----------------------------
The system will return a hex character to indicate the error incurred. The hex number will replace the n. The list of errors is in Table A-1. The character the system returns is in the Bit Number column.
Table A-1 SES Error Status Bit
--------------------------------------------------------


Error Message                           Mnemonic  Bit
                                                  Number
--------------------------------------------------------
cable resend timeout error (dpr1)       crlt1     E

cable parity error (dpr1)               cadp1     D

expansion sbus read error (err ack)     xrea      C

expansion sbus read error (rsvd ack)    xrra      B

expansion sbus read error (late error)  xrle      A

expansion sbus timeout error            xbto      9

write 0 read error                      wrzr      8

buffer write error (err ack)            bwea      7

buffer write error (rsvd ack)           bwra      6

buffer write error (late error)         bwle      5

cable resend timeout error (dpr0)       crtl      4

cable ack timeout error                 cato      3

cable parity error (dpr0)               cadp0     2

cable serial interrupt parity error     csip      1

child not ready error                   cnrd      0

--------------------------------------------------------
The system may return one or more of the error messages listed in Table A-2.
Table A-2 Miscellaneous SunDiag Errors
----------------------------------------------------------

probe xbox device failed
action_on_error ioctl command fail
xbox status ioctl command fail
can not switch to non transparent mode
self diag test failed in TEST_NON_TRANSPARENT count %d
self diag test failed in TEST_XAC_DVMA count %d
self diag test failed in TEST_XBC_DVMA count %d
self diag test failed in TEST_XAC_DVMA.int count %d
self diag test failed in TEST_XBC_DVMA.int count %d
XAC_TRANSPARANT ioctl command fail
XAC_NON_TRANSPARANT ioctl command fail
(device name): main:fork (device name)
XAC_WAIT_FOR_ERROR ioctl command fail
XAC_CLEAR_WAIT_FOR_ERROR ioctl command fail

----------------------------------------------------------
Note - Please refer to the SunDiag 2.4 User's Guide for specific information on testing SBus cards. Test information may also be included in the documentation accompanying the particular device.
