
The information contained in this appendix will illustrate the correct procedure for setting the SCSI target ID and installing the device target ID jumpers on Sun-supported SCSI devices.
Use the information in this appendix to perform tasks required to configure these devices:
The Sun SCSI protocol demands the following parameters:
Table B-1 The Sun Default Target ID Settings
------------------------------------------------------------------------


SCSI Logical Device           SD0  SD1    SD2   SD3/ST2  ST0   ST1   CD   H/A
------------------------------------------------------------------------
SCSI Target ID                3    1      2     0        4     5      6   7

Jumper Positions (binary)     011    001   010   000      100   101  110   111

------------------------------------------------------------------------
Note - Table B-1 shows the Sun default target ID as supplied by the system software for the first SCSI host adapter in a system. SCSI target ID for each particular type of device may be custom modified, by a qualified operator, by reconfiguring the appropriate system file. See the System and Network Administration for the Sun Workstation manual.
Note - Configure the SCSI target ID on a device before installing it in the Sun system. The involved connector or switch may not be accessible after installation is complete.
Configure the SCSI target ID for the device according to its position in the particular Sun system. The method of configuring the device will differ with the device type. The installer configures the device by installing jumpers on a provided connector.
After unpacking the device, inspect it for evidence of damage. If damaged, keep all contents and packing materials for the carrier's agent to inspect. Save packing materials for future use.
Caution -


Figure B-1 Applying the Anti-Static Wrist Strap
Caution -

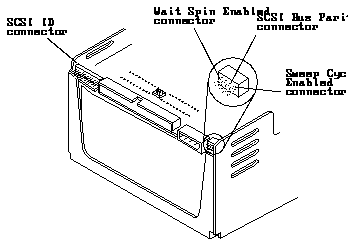
The SCSI ID, SCSI interface, and power connectors are located on the rear panel of the SunCD. Refer to Figure B-2 for the connector locations.
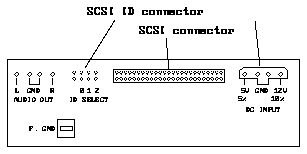
Figure B-2 Connector Locations for the SunCD
Note - A jumper is a small metal sleeve that slides over two neighboring pins in the SCSI ID connector to provide an electrical connection.
Table B-2 SCSI Target ID Settings for the SunCD
-----------------------------------------------------------


SCSI Device      SCSI Target ID Setting  Jumper Position
-----------------------------------------------------------
SunCD            6


Pin designation                                 P  0  1  2

-----------------------------------------------------------
Note - The Sun SCSI Protocol only supports one SunCD on any host adapter or controller at SCSI target ID 6. To install more than one SunCD in any Sun system will require a different host adapter for each device, with the SCSI target ID set to 6.
The SCSI ID, SCSI interface, and power connectors are located on the rear panel of the 2.3 Gbyte tape drive. Refer to Figure B-3 for the connector locations.

Note - A jumper is a small metal sleeve that slides over two neighboring pins in the SCSI target ID receptacle to provide an electrical connection.
-------------------------------------------------


SCSI Device      SCSI Target ID   Jumper Position
                 Setting
-------------------------------------------------
2.3 Gbyte Tape   5
Drive


2.3 Gbyte Tape   4

Drive


-------------------------------------------------
The SCSI ID, SCSI interface, and power connectors are located on the rear panel of the 5.0 Gbyte tape drive. The SCSI ID dip switch is also located on the rear panel of the tape drive. Refer to Figure B-4 for the connector and switch locations.
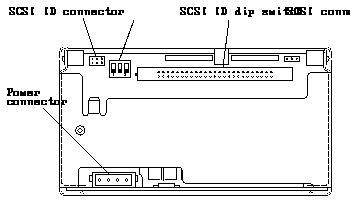
Refer to Figure B-4 for the location of the SCSI ID connector.
Note - A jumper is a small sleeve that slides over two neighboring pins in the SCSI ID connector to provide an electrical connection.
Refer to Table B-4 and change the setting on the SCSI ID dip switch to assign the desired SCSI address.
-------------------------------------


SCSI ID Setting  Dip Switch Position
-------------------------------------
4


5


-------------------------------------
The SCSI ID, SCSI interface, and power connectors are located on the rear panel of the 1.3 Gbyte disk drive. Refer to Figure B-5 for the connector locations.
On the drive there are two SCSI ID receptacle groups mounted in the same housing. Both receptacles groups provide the same function, but they are of different pin and pattern sizes. For use in this pedestal, use the smaller pattern receptacle group to the left in the connector body. Do not use both receptacles groups to set the SCSI target ID.
Note - A jumper is a small metal sleeve that slides over two neighboring pins in the SCSI ID receptacle to provide an electrical connection.
There are four available locations for the disk drive in the tray, and the location of the disk drive will determine which SCSI address it will have (see Figure B-6).
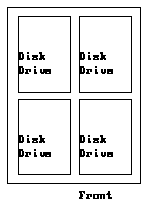
Figure B-6 Four Disk Drives in a SCSI Drive Tray
-----------------------------------------------


SCSI Device      SCSI Address   Jumper Position
                 Setting
-----------------------------------------------
1.3 Gbyte Disk   3
Drive


1.3 Gbyte Disk   1

Drive


1.3 Gbyte Disk   2

Drive


1.3 Gbyte Disk   0

Drive


-----------------------------------------------
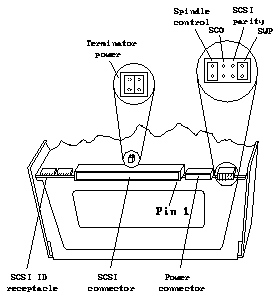
The SCSI ID, SCSI interface, and power connectors are located on the rear panel of the 2.1 Gbyte differential SCSI disk drive. Refer to Figure B-7 for the connector locations.
A jumper is a small sleeve that slides over two adjacent pins in the SCSI ID connector to provide an electrical connection. If the jumpers have not been removed, use the needle-nose pliers to remove them from the SCSI ID connector at the rear of the disk drive.
The jumpers should be installed on the connectors so that the jumper set looks like those shown in Figure B-8.
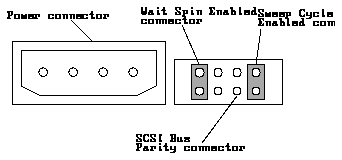
Figure B-8 Connector Locations on the Drive
There are four available locations for the disk drive in the tray, and the location of the disk drive will determine which SCSI address it will have (see Figure B-9).

Figure B-9 Four Disk Drives in a SCSI Drive Tray
Table B-10 SCSI ID Setting for the 2.1 Gbyte Disk Drive
---------------------------------


SCSI ID Setting  Jumper Position
---------------------------------
0 
1 
2 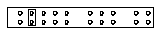
3 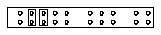
---------------------------------