
This chapter describes how to remove and replace these subassemblies:
This section describes how to remove and replace the disk drive assembly from the unit and to remove and replace disk drives.
Refer to Section 2.1 "Safety Precautions" in Chapter 2.
Refer to Section 2.3 "Tools Required" in Chapter 2.
Refer to Section 3.1.1 "Shutting Down the System and Powering Off All Units" in Chapter 3.
Refer to Section 3.1.2 "Disconnecting the Multi-Disk Pack from the System" in Chapter 3.
Refer to Section 4.1 "Removing the Cover and Attaching a Wrist Strap" in Chapter 4.
To do so grab the adjoining connector firmly in one hand and with the other hand pull the power cable connector from is mating connector. Refer to Figure 5-1.
To do so, lift up on the metal handle of the SCSI connector clip. Remove the SCSI connector clip from the unit. Refer to Figure 5-1.
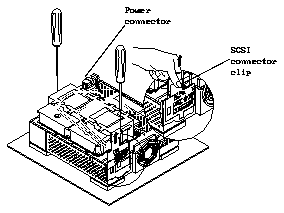
Figure 5-1 Removing the SCSI Connector Clip and Disconnecting the Power Connector
Use a Phillips # 2 screwdriver. Refer to Figure 5-2.
Refer to Figures 5-2 and 5-3.
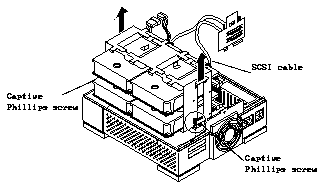
Figure 5-2 Removing the Drive Assembly
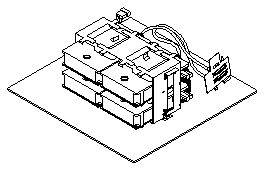
Figure 5-3 Disk Drive Assembly on an Antistatic Mat
Now that you have removed the disk drive assembly, Table 5-1 refers you to the appropriate section to skip to in order to replace the subassemblies.
Table 5-1 Next Steps After Removing the Disk Drive Assembly
------------------------------------------


Internal SCSI Cable Assembly         5-11

Internal Power Cable Assembly        5-14

Replacing a Disk Drive in the Disk   5-16
Drive Assembly

Replacing the Disk Drive Assembly    5-17

Power Supply                         5-21

I/O Bracket Assembly                 5-25

LED Harness Assembly                 5-28

------------------------------------------
Refer to Section 5.1.1 "Removing the Disk Drive Assembly."
You will need to replace this mounting plate on the new disk drive.
Note -
If the system is running the generic operating system kernel of the
Solaris 1.0 operating system (SunOS 4.1.1 Rev. B) or a later release of the Solaris
1.x operating system (any supported SunOS 4.x operating system release), you
must use the factory set SCSI address jumper settings. Refer to Table 5-2.
The generic SCSI device configuration table in the Solaris 1.x operating system
releases defines a maximum of four disk drives for each SCSI bus with
predefined SCSI addresses: 0, 1, 2, and 3.
Figure 5-4 shows seven available SCSI address jumper settings with the drive assembly removed from the unit. The SCSI address jumper settings are factory set to SCSI addresses 0, 1, 2, and 3.
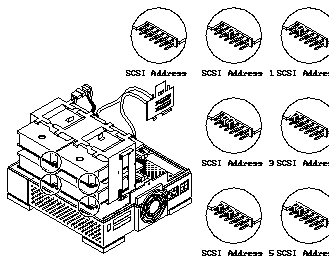
Figure 5-4
Available Disk Drive SCSI Address Jumper Settings
(Drive Assembly Removed from Unit)
Refer to Section 5.1.1 "Removing the Disk Drive Assembly."
Refer to Section 5.1.2 "Removing the Disk Drive from the Disk Drive Assembly."
Refer to Figure 5-5.

Figure 5-5 No Jumpers Installed on Jumper Block by SCSI Data Connector
Refer to Figure 5-4 for the SCSI address jumper settings. Use a needlenose pliers or a blunt end micro tweezers to install or remove jumpers.
Refer to Table 5-2 "Software Requirements" or the operating system requirements (generic version) for the version of the Solaris operating system the computer system is running.
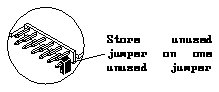
Figure 5-6 Storing an Unused Jumper on One Jumper Pin
Table 5-2 Software Requirements
------------------------------------------------------------------------------------------------------------------------------------


Operating System                                                                  # of other SCSI   # of other SCSI   Multi-Disk
                                                                                  hard disks you    devices you can   Pack SCSI
                                                                                  can connect to    connect to same   addresses
                                                                                  same SCSI bus     SCSI bus


------------------------------------------------------------------------------------------------------------------------------------
Solaris 1.0 operating system                                                      None              Up to 3**         0, 1, 2, 3*
and later Solaris 1.x
operating system releases
(SunOS 4.1.1 Rev. B,
SunOS 4.1.2, SunOS 4.1.3)

Solaris 2.1 operating system                                                      Up to 3**         Up to 3**         Any four of
(SunOS 5.1) and later                                                                                                 the following:*
operating system releases
                                                                                                                      0, 1, 2, 3,
                                                                                                                      4, 5, 6

* SCSI addresses are factory set to 0, 1, 2, and 3.

** In demanding I/O application environments, the Multi-Disk Pack should be the
only unit plugged into a SCSI bus in order to minimize SCSI bus contention and
maximize performance.

------------------------------------------------------------------------------------------------------------------------------------
The configuration jumper settings are identical for every disk drive.
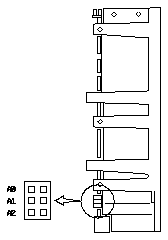
Figure 5-7 Configuration Jumper Settings
Table 5-3 lists the functionality of the configuration jumpers.
Table 5-3 Description of Configuration Jumpers
---------------------------------------


Acronym  Description
---------------------------------------
RS       Reserved

DS       Delayed Start

ME       Motor Enable (Remote Spin-Up)

WP       Write Protect

PE       Parity Enable

SS       Reserved

TP       Term Power from Disk Drive

TP       Term Power to SCSI Bus

---------------------------------------
Refer to Figure 5-8.
Figure 5-8 Disk Drive With Mounting Plate Attached
Refer to Section 5.1.6 "Replacing a Disk Drive in the Disk Drive Assembly."
This section describes how to remove and replace a defective SCSI cable assembly.
Refer to Section 5.1.1 "Removing the Disk Drive Assembly."
Refer to Figure 5-9.
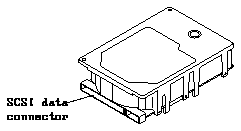
Figure 5-9 Location of SCSI Data Cable on Disk Drive
This frees the SCSI cables.
Refer to Section 5.1.1 "Removing the Disk Drive Assembly."
The connector labeled P6 (the longer end) connects to the top SCSI port. The connector labeled P1 (the shorter end) connects to the bottom SCSI port. Refer to Figure 5-10.
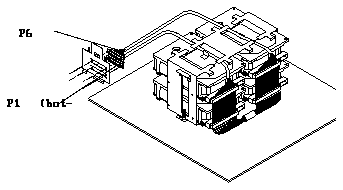
Figure 5-10 Connecting the SCSI Cable to the SCSI Connector Clip
The connectors are keyed. Make sure that you connect the proper connector (labeled P2 through P4) to the proper SCSI connector on the disk drive. Verify that the connections are secure.
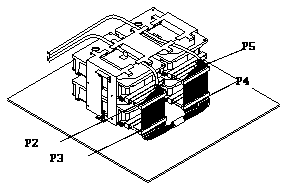
Figure 5-11 Connecting the SCSI Data Cables to the Disk Drives
Refer to Section 5.1.5 "Internal Power Cable Assembly."
Tighten the two Phillips screws securing the disk drive in the disk drive assembly using a Phillips screwdriver.
Refer to Section 5.1.7 "Replacing the Disk Drive Assembly."
This section describes how to remove and replace a defective power cable assembly.
Refer to Section 5.1.1 "Removing the Disk Drive Assembly."
Refer to Figure 5-12. This frees the internal power cable assembly.
Figure 5-12 Location of Disk Drive Power and Data Connectors
Refer to Figure 5-13.
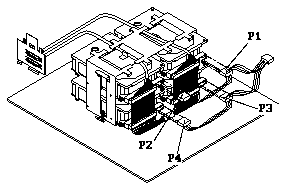
Figure 5-13 Connecting the Power Connectors to the Disk Drives
Refer to Section 5.1.7 "Replacing the Disk Drive Assembly."
Refer to Section 5.1.3 "Setting Jumpers and Preparing the Disk Drive for Installation"
Refer to Figure 5-8.
The side with the disk drive controller board will face down and the data and power connectors should face the power supply.
Refer to Section 5.1.7 "Replacing the Disk Drive Assembly."
To install the disk drive assembly into the unit:
You may have to shift the drive assembly back and forth until the holes are aligned with the captive screws. Refer to Figure 5-14.
Note - Do not use a power screwdriver on a captive screw.

Figure 5-14 Lowering the Drive Assembly
Align the two metal tabs at the bottom of the SCSI connector clip between the plastic molded tabs on the lower SCSI port opening of the unit. Refer to Figure 5-15.
You should see both SCSI connectors in the SCSI connector openings on the rear panel.
The hooks on the top of the SCSI connector clip will lock into place on the rear of the unit.
Note -
Make sure that the SCSI connector clip is completely and
securely inserted.
If it is loose, disconnect the power connector to the power supply and reinstall
the SCSI connector clip again. You may have to install the clip to a low
position in the opening then raise the clip slightly by lifting the clip and
hooking the tabs to attach to the unit and secure the clip.
Refer to Figure 5-15.
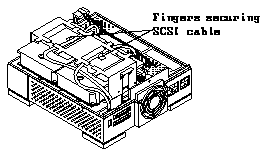
Figure 5-15 SCSI Cable Held in Place by Fingers on Disk Drive Assembly
Refer to Figures 5-16 and 5-13. The connector is keyed.
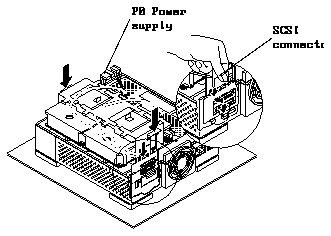
Figure 5-16 Replacing the SCSI Connector Slip and Connecting the Power Supply Cable
Refer to Section 4.2, "Detaching the Wrist Strap and Replacing the Cover" in Chapter 4.
Refer to Section 3.2.1 "Reconnecting the Multi-Disk Pack to the System" in
Chapter 3.
Note - Make sure that a regulated SCSI terminator is attached to the last SCSI device in the daisy-chain. A regulated SCSI terminator has the word "REGULATED" stamped on it.
Refer to Section 3.2.2 "Powering On All Units," in Chapter 3.
This section describes how to remove and replace the power supply.
Refer to Section 5.1.1, "Removing the Disk Drive Assembly."
The fan assembly is mounted on the I/O bracket assembly. Refer to
Figure 5-17.
Refer to Figure 5-17.
Refer to Figure 5-17.
Refer to Figure 5-17.
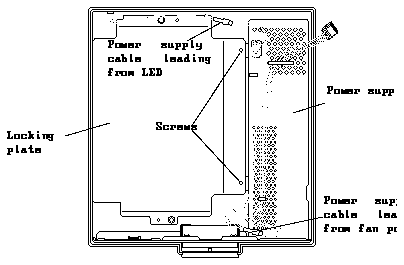
Figure 5-17 Power Supply and Related Parts
Refer to Figure 5-18.
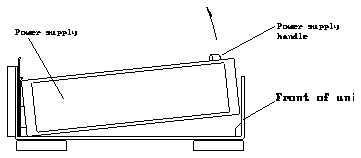
Figure 5-18 Removing the Power Supply
Refer to Figure 5-19.
Refer to Figure 5-19.
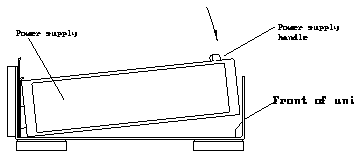
Figure 5-19 Replacing the Power Supply
Use a Phillips #2 screwdriver. Refer to Figure 5-17.
Refer to Figure 5-17.
Refer to Figure 5-17.
Refer to Figure 5-17.
Refer to Section 5.1.7 "Replacing the Disk Drive Assembly."
This section describes how to remove and replace the I/O Bracket Assembly.
Refer to Section 5.1.1 "Removing the Disk Drive Assembly."
Refer to Section 5.2.1 "Removing the Power Supply."
Refer to Figure 5-20.
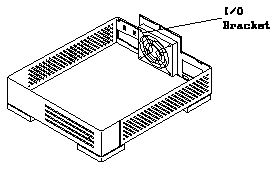
Figure 5-20 Location of I/O Bracket Assembly
Refer to Figure 5-21.
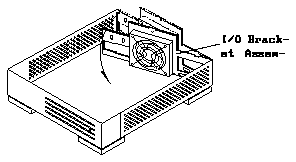
Figure 5-21 Removing the I/O Bracket Assembly
Refer to Section 5.1.1 "Removing the Disk Drive Assembly."
Refer to Section 5.2.1 "Removing the Power Supply."
Insert the two tabs at the left of the unit into the holes of the I/O
bracket assembly.

Figure 5-22 Inserting the I/O Bracket Assembly
Refer to Section 5.2.2 "Replacing the Power Supply."
Refer to Section 5.1.7 "Replacing the Disk Drive Assembly."
This section describes how to remove and replace the LED.
Refer to Section 5.1.1 "Removing the Disk Drive Assembly."
Refer to Figure 5-23.
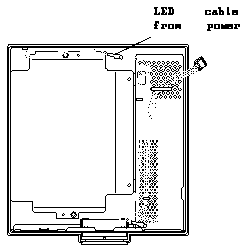
Figure 5-23 Location of LED Cable
Refer to Section 5.1.1 "Removing the Disk Drive Assembly."
Refer to Figure 5-23.
