
This chapter contains information that is essential in preparing your system for service. If you are a qualified service-trained maintenance provider or are in contact with one, be sure to read through this chapter and the safety precautions in the "Safety Agency Compliance" section before starting any of the procedures in this part of the manual.
The information in this chapter is organized in the following manner:
----------------------------------------------


What Are Field Replaceable Units?  page 5-2

Tools You Will Need                page 5-3

Shutting Down the System           page 5-4

Powering Off the System            page 5-5

Removing the Cover                 page 5-6

Replacing the Cover                page 5-7

----------------------------------------------
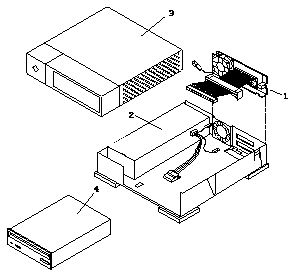
Desktop SunCD Plus Packs (DSPPs) are external SCSI drive units that can be connected directly to a system unit, or daisy chained and placed in a stack. Various parts of the DSPP can be replaced by field replaceable units (FRUs), as illustrated in the following list and figure.
Figure 5-1 Field Replaceable Units
An overview of the tasks required for FRU replacement is shown below:
Figure 5-2 Overview of FRU Replacement Procedure
To remove and replace FRUs, you need the following tools and materials:
Before you can service the DSPP, the system environment must be shut down according to the procedure detailed in your system's handbook. There are several steps to shutting down the system. If any one of these steps is omitted, the system may fail to boot, or may fail to correctly configure the DSPP. Some of these steps include:
Caution -
The system will not recognize the DSPP again unless you follow the shutdown procedures in the handbook for SMCC peripherals. Specifically, Solaris 2.x uses the new touch /reconfigure command to ensure autoconfiguration upon powering on. Be sure to refer to your peripheral handbook for correct shutdown procedures.Turn the on/off switch to the off (O) position for each device in the following order:
DSPPs, External Storage Modules, Desktop Storage Packs/Modules, and other external drive units
Caution - Always allow 10 seconds between turning off the power and turning it back on again. This pause prevents possible damage to power supply components in the system unit.
Once the system unit is powered down and the DSPP is disconnected, perform the following procedure to remove the DSPP's cover.
Figure 5-3 Removing the Desktop SunCD Plus Pack Cover
Set the cover aside.
Once you have finished servicing the DSPP, perform the following procedure to replace the DSPP's cover.
Figure 5-4 Replacing the Cover of the Desktop CunCD Plus Pack
