
The SunCD Plus drive is a read-only, random access CD-ROM device.
It operates on the industry standard SCSI-2 interface at twice the existing
spindle speeds of most CD-ROM drives. The SunCD Plus drive uses 4.76-inch
(120-millimeter), 644 Mbyte compact discs stored in 12-cm plastic caddies.
Since the drive is a read-only device, it cannot write data to a disc.
Data on the compact discs can be in one of the following formats:
Your SunCD Plus drive comes with three caddies and a demonstration disc.
The SunCD Plus drive front panel is shown in Figure 4-1:
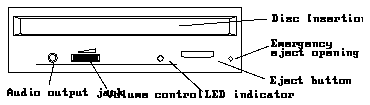
Figure 4-1 SunCD Plus Drive Front Panel
You can plug the following devices into the miniature audio output jack:
Caution -

The dual-color light-emitting diode (LED) indicates the following status:
Note - If the drive remains inactive for a long period, the spindle motor will stop, and the green LED will shut off. The spindle motor will start and the LED will light automatically when the drive receives another command.
Two plastic flaps cover this slot.
To insert a compact disc into your SunCD Plus drive, place the compact disc in the caddy, and insert the caddy into the drive.
These steps are described in more detail in the following sections.
The disc caddy is shown in Figure 4-2.
To place a compact disc in a caddy:
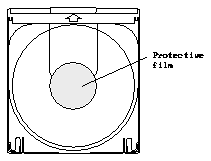
Figure 4-2 Protective Film on the Caddy Lid

Figure 4-3 Opening the Caddy
Note - A compact disc is a single-sided storage medium. It is important to place the disc in the caddy face up, as shown in Figure 4-4.

Be sure the caddy cover is completely closed before you continue.
To insert a caddy into a SunCD Plus drive:
Figure 4-5 shows the proper orientation for the caddy.
The green LED on the front panel lights as the drive acknowledges insertion of the caddy containing the compact disc.
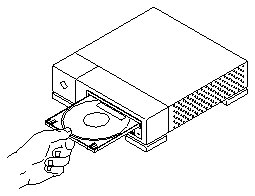
Figure 4-5 Inserting a Disc and Caddy into the DSPP
There are three ways to eject a disc from a SunCD Plus drive.
If you want to use software commands to eject a disc, refer to Solaris 2.x Handbook for SMCC Peripherals or the Solaris 1.x Handbook for SMCC Peripherals.
To eject a caddy manually from a SunCD Plus drive:
The front panel eject button will not eject a disc when the disc is mounted. (See your software manual(s) for information about mounting and unmounting discs.)
The drive ejects the caddy containing the disc.
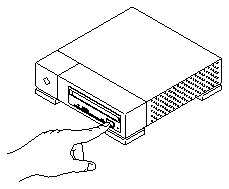
Figure 4-6 Manually Ejecting a CD Caddy
Caution -

If you have unmounted the disc and the eject button does not function, it may be necessary to eject the caddy using the following instructions.
Refer to the power off procedure described in Solaris 2.x Handbook for SMCC Peripherals or the Solaris 1.x Handbook for SMCC Peripherals.
Each compact disc is shipped in a plastic storage box (also called a jewel box).
Caution -

Note - Clean only the non-labelled side of the disc; this is the side containing the data.
If your SunCD Plus drive cannot read a compact disc, the cause could be a dusty or dirty disc. Clean discs with compressed air or with a soft, clean, lint-free, dry cloth. Compressed air removes most accumulations of dust and large dirt particles and is available in cans at many camera stores.
Caution -

If spraying with compressed air fails to remove the dirt on a disc, then use these guidelines to wipe the disc:
Figure 4-7 shows the correct and incorrect ways to clean a compact disc.

Figure 4-7 Cleaning a Compact Disc
