
The Sun Microsystems Prestoserve product provides a new approach to accelerating system performance. It reduces the frequency of disk I/O access by caching the written data blocks in non-volatile memory. Prestoserve then flushes the cached data to disk asynchronously.
In addition to introducing you to Prestoserve, this chapter provides hardware installation procedures that are specific for the SBus Prestoserve card. Hardware installation instructions for the SPARCstation and SPARCserver NVSIMM are located in the SPARCstation 10/SPARCserver10 and SPARCstation 20/SPARCserver 20 NVSIMM Installation Guide that comes with the NVSIMM hardware. Hardware installation instructions for the SPARCcenter(TM) 2000 and the SPARCserver(TM) 1000 are located in the service manual that comes with each of these systems.
The installation procedure differs depending on your operating system. Use the information in Table 1-1 to determine which installation chapter is appropriate for your system.
Table 1-1 Installation Task Map
-------------------------------------------------------------------------------


Activity                                                               Chapter
-------------------------------------------------------------------------------
Installation of Prestoserve hardware                                   1

Installation of Prestoserve software for SunOS 4.x operating system    2

Installation of Prestoserve software for Solaris 2.x operating system  3

Using the Prestoserve software under normal conditions                 4

Using the Prestoserve software under abnormal conditions               5

-------------------------------------------------------------------------------
The Prestoserve product is implemented using either an SBus card or an NVSIMM installed on the CPU board of your system.
The Sun Prestoserve SBus card is a high-performance, single-width card that is installed on the CPU board. This card provides all of the high-level functions that are associated with other much larger boards, yet the card measures just 3x5-inches. An on-card PROM provides configuration support that identifies Prestoserve to the system. This SBus card is designed for operation in systems that are running SunOS version 4.x, Solaris 1.x, or Solaris 2.x.
Physically, the NVSIMM contains SRAM chips and a battery, with power control circuitry, grouped together in a single in-line memory module. The acronym "NVSIMM" stands for the type of memory module used with desktop and server systems, and stands for:
Each NVSIMM contains memory, a battery, and power controller circuitry, which ensure that the memory is not lost when the system is shut-down or halts because of an abnormal condition.
Prestoserve provides these capabilities:
Sun Prestoserve is compatible with Sun-4m, Sun-4c, and Sun-4d system architectures that support OpenBoot. These architectures include:
Table 1-2 System Architecture, OS Release, Machine Type
--------------------------------------------------------


System        Possible OS        Possible Machine Type
Architecture  Release
--------------------------------------------------------
Sun-4c        SunOS 4.x or,      SPARCstation 2 or
                                 SPARCstation IPX, IPC
              Solaris 1.0 or,

              Solaris 2.x

Sun-4m        SunOS 4.1.2 or,    SPARCserver 630MP or,
              Solaris 1.x or,    SPARCserver 670MP or,
              Solaris 2.x        SPARCserver 690MP or,
                                 SPARCstation 10

                                 SPARCstation 20

                                 SPARCserver 10

                                 SPARCserver 20

Sun-4d        SunOS 4.x or,      SPARCserver 1000 or,
              Solaris 1.0 or,    SPARCcenter 2000
              Solaris 2.x


--------------------------------------------------------
Caution -

To minimize risk of ESD damage:
The SBus Prestoserve card and the NVSIMM have been tested for electromagnetic interference (EMI) compliance (USA FCC, Canada DOC, Japan VCCI, Germany VDE). When installed and operated in accordance with this Guide, the EMI class marked on your Sun Workstation's label remains the same.
To use the Sun Prestoserve option you must install the Prestoserve hardware before you install the Prestoserve software.
Note - This section contains installation information for the SBus card, similar information for NVSIMMs is contained in the SPARCstation 10/ SPARCserver10 and SPARCstation 20/ SPARCserver20 NVSIMM Installation Manual and the system service manual that comes with your system.
Prestoserve uses lithium batteries that are designed to protect data when the system power is off or if there is a power shortage.
The SBus card is shipped with the batteries disabled. You must enable the batteries before you install the hardware.
Caution -

Follow these steps to enable the SBus card battery:
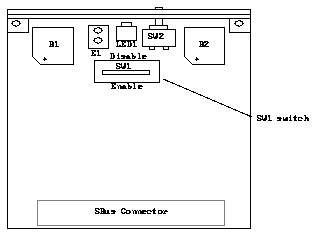
Refer to Figure 1-1.
Use the documentation that came with your system for specific instructions on installing the Prestoserve SBus or NVSIMM card in your system.
After the hardware is installed you must determine your operating system before you can proceed with the software installation.
The Prestoserve SBus card is designed for installation in systems that are running SunOS 4.x, Solaris 1.0, and Solaris 2.x. However, the software installation procedure is different for each system. Therefore, you must determine which operating system you are using in order to determine which installation chapter to refer to.
The SPARCstation 10/SPARCserver 10 and SPARCsetation 20/SPARCserver 20 NVSIMMs only work in systems running the Solaris 2.2 or later operating system. The SPARCserver 1000 and SPARCcenter 2000 NVSIMMs only work in systems running the Solarix 2.x operating system.
Note -
If you are
To determine which version of the operating system you are running:
If you are running Solaris 1.x (SunOS 4.x) proceed to Chapter 2 for software installation instructions. If you are running Solaris 2.x proceed to Chapter 3 for software installation instructions.
