
This chapter explains how to remove a disk drive and how to install a 1.05 Gbyte hard disk drive in the SPARCstation 2 system.
Before you begin:
The information in this chapter is presented in the following manner:
Note - See Appendix B for descriptions of SCSI ports, types of connections, SCSI termination, and cable length.
Refer to the next page for a graphical representation on how to remove the cover; to attach a wrist strap; and to replace the cover. The figure is supported by the procedures presented on this page.
Gently push the cover forward about 1/2 inch (13 mm) so that the plastic tabs clear the chassis.
The wrist strap provides grounding between your body and the chassis for static electricity.
Caution -

When you are finished working within the SPARCstation 2 system:

Refer to the next page for a graphical representation on how to remove a disk drive from the chassis and how to remove the drive mounting bracket. The figure is supported by the procedures presented on this page.
The procedure for replacing a drive requires that you remove the drive bracket from the previously installed drive and install it on the replacement drive since a bracket is not shipped with the replacement drive.
Caution - Do not disconnect the power cord from the system unit power outlet or from the wall outlet. This connection provides the ground path necessary to safely remove and install the hard disk drive.
See Chapter 1, "Before You Start."
Drive position 0 is located in the corner of the chassis. Drive position 1 is located between the diskette drive and Drive position 0.
Place the removed drive on an antistatic surface.

Figure 4-2 Removing a Disk Drive
This section describes the procedures to install a 1.05 Gbyte disk drive into the SPARCstation 2 chassis. If you are installing only one disk drive, place that drive in Drive position 0 (in the corner).
You can order the following types of drive kits:
If you ordered a complete drive kit, the shipping box should contain the following components:
The first step for an installation is to unpack the disk drive from the shipping box. Compare the packing list with the hardware you received. Place the drive on an antistatic surface, such as the antistatic bag the drive was shipped in, with the PCB side up. Save the box and the packing material in case you have to ship the drive at some future date.
The drive you have received is a standard connector, 1.05 Gbyte SCSI disk drive. It is approximately 1 inch high and 3.5 inches wide. It supports fast SCSI at 10 Mbytes per second. Turn to the next page to view graphical representations of the Conner and of the Seagate 1.05 Gbyte drives and compare them with your drive to determine which vendor manufactured it.
While all performance specifications are exactly the same for both drives, the jumper locations and settings are different for each drive. Once you have identified which drive you have, only follow the instructions for that specific drive.
Once you have determined which drive you have, you should inspect it to locate the jumpers and to verify their settings (as described in the following section).
If you ordered just a replacement drive, the shipping box should only contain one of the two 1.05 Gbyte low profile disk drives shown below:

Figure 4-3 The Seagate 1.05 Gbyte Disk Drive

Figure 4-4 The Conner 1.05 Gbyte Disk Drive
Perform the following procedure to unpack and inspect the drive. Starting with the Seagate drive, refer to the next page for graphical representations of the two drives on what to look for on your drive. The figures are supported by the procedures presented on this and the following pages of this section.
Note - Have the wrist strap attached and the external power cord connected to the chassis and to the power outlet when you handle the drive to verify the jumper settings. Do not have the system powered up when you do this.
See Figure 4-5 for the Seagate drive and Figure 4-7 for the Conner drive. These drawings represent how the jumpers should be set when you receive your drive.
For the Seagate drive, see Table 4-1 for a description of each jumper, and Table 4-2 for the target address settings.
For the Conner drive, see Table 4-3 for a description of each jumper, and Table 4-4 for the target address settings.
See Figure 4-2 to identify the drive positions.
If the settings are the same, leave them as they are. If the settings are not the same, change them to match the settings in the figure. Use needlenose pliers to install or remove jumpers.
If the settings are the same, leave them as they are. If the settings are not the same, change them to match the settings in the figure. Use needlenose pliers to install or remove jumpers.

Figure 4-5 General Jumper Locations and Position 0 Settings of the Seagate Drive
See Table 4-1 for a description of the configuration jumper on the Seagate drive, and Table 4-2 for the target address jumper settings.
Table 4-1 Configuration Jumper Descriptions of the Seagate Drive
---------------------------------------


Acronym  Description        Factory Set
---------------------------------------
SS       (Reserved)         No

DS       Delayed Start      No

ME       Motor Enable       Yes

WP       Write Protect      No

PE       Parity Enable      Yes

TE       Terminator Enable  No

TP       Term Power from    No
         Drive

TP       Term Power to      No
         SCSI Bus

---------------------------------------
Table 4-2 Target Address Jumper Descriptions of the Seagate Drive
-----------------------------------------------


Target Address Jumper  Description  Factory Set
-----------------------------------------------
A0                     ID Select    Yes

A1                     ID Select    Yes

A2                     ID Select    No

-----------------------------------------------
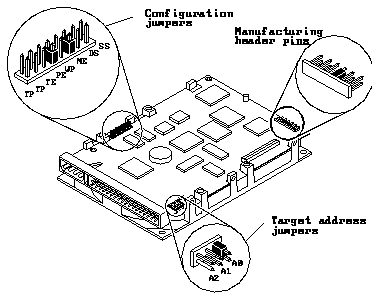
Figure 4-6 Position 1 Target Address Settings for the Seagate Drive
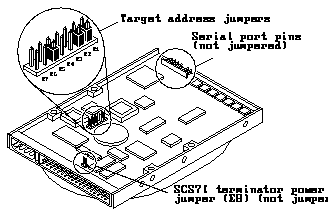
Figure 4-7 General Jumper Locations and Position 0 Settings of the Conner Drive

Figure 4-8 Position 1 Target Address Settings of the Conner Drive
See Table 4-3 for a description of each jumper on the Conner drive, and Table 4-4 for the target address settings.
Table 4-3 Jumper Descriptions of the Conner Drive
-------------------------


JUMPER  DESCRIPTION
-------------------------
E1      ID Select

E2      ID Select

E3      ID Select

E4      (Reserved)

E5      Motor Enable

E6      Delay Spin

E7      Disable Parity

E8      SCSI Terminator
        Power

-------------------------
Note - The E3, E4, E6, E7 and E8 jumpers, and all of the serial port pins are not to be jumpered.
Table 4-4 Target Address Settings of the Conner Drive
-----------------


TARGET  E1  E2  E3
-----------------
0

1       X

2           X

3       X   X

4               X

5       X       X

6           X   X

-----------------
The 1.05 Gbyte hard disk drive is a Small Computer Systems Interface (SCSI) device. Each SCSI device in your system needs a specific and unique SCSI ID. Refer to the software handbook that is appropriate for your operating system to determine which SCSI addresses are available to you.
Perform the following procedure to determine the number of internal disk drives in your computer system and their SCSI addresses:
Refer to the appropriate software handbook.
You should now see the ok prompt.
A list of the devices attached to the SCSI bus of the host should be displayed.
If you need references to help with the listed commands, see the appropriate handbook.
Refer to the table below for the SCSI target address settings for a drive in either Drive position 0 or Drive position 1. These settings are only recommendations and you must change them according to your specific configuration.
Note - Do not duplicate SCSI target address settings on the same SCSI bus.
Table 4-5 SCSI Settings
------------------------------------------------


DRIVE       JUMPER SETTINGS     SCSI TARGET
POSITION                        ADDRESS SETTINGS
------------------------------------------------
Position 0  A0/E1-Jumpered      3

            A1/E2-Jumpered

            A2/E3-Not Jumpered

            E4-Not Jumpered

            E5-Jumpered

            E6-Not Jumpered

            E7-Not jumpered

Position 1  A0/E1-Jumpered      1

            A1/E2-Not Jumpered

            A2/E3-Not Jumpered

            E4-Not Jumpered

            E5-Jumpered

            E6-Not Jumpered

            E7-Not jumpered

------------------------------------------------
Refer to the next page for a graphical representation on how to install the drive mounting bracket and how to install a disk drive. The figure is supported by the procedures presented on this page. Regarding the drive mounting bracket, if grommets (small screw-type connectors) came with your drive kit, do not use them. Grommets are used to install disk drives into other SPARCstation systems, such as the SPARCstation 10 system. The 1.05 Gbyte disk drive and its plastic mounting bracket are secured to the chassis by four mounting tabs and two locking tabs. These tabs fit into corresponding slots in the bottom of the chassis.
Refer to Figure 4-9 to identify the drive positions.
Fasten the bracket to the drive by inserting and tightening the four screws of the bracket to the bottom of the drive. If needed, remove the bracket from the old drive. If the bracket is already attached to the drive, go to the next step.
The connectors are keyed so that they can only fit one way.
Align the four mounting tabs on the bottom of the mounting bracket with the slots on the bottom of the chassis.
Listen for a click when the two rear locking tabs become firmly seated in their slots.

Figure 4-9 Installing a Disk Drive
System configuration occurs after a system is successfully powered on. If the system shutdown was performed according to the procedure in the software handbook, your system should automatically configure when you power on the system.
To complete the installation of the 1.05 Gbyte Low Profile disk drive into your SPARCstation 2 system:
