
This chapter describes how to remove, replace, or configure the replacement
parts.
----------------------------


MBus Module    page 11-1

SBus Cards     page 11-10

SIMMS          page 11-18

System Board   page 11-37

OpenBoot PROM  page 11-52

NVRAM          page 11-55

----------------------------
The SM20 (33 MHz) and SM30 (36 MHz) MBus modules are not supported in
the S10BSX service code system.
Caution -

Hot surface. Avoid contact. Surfaces are hot and may cause
personal injury if touched.
1. Remove the cover and attach a wrist strap.
See Chapter 7, "Internal Access."
2. Push back both MBus module retainers.
See Figure 11-1.
3. If the system has two MBus modules (slot 1 on the top of slot 0), and the
defective module is in slot 0, remove the top MBus module first.
4. Install the card extractor on the MBus module.
See Figure 11-1.
Caution -

Hot surface. Avoid contact. Surfaces are hot and may cause
personal injury if touched.

Figure 11-1
Installing the Extractor on a Single-Width MBus Module
5. Remove the MBus module.
a. Hold both ends of the extractor.
b. Pull up gently on the MBus module until the connector is out of the
slot.
See Figure 11-2.

Figure 11-2
Removing a Single-Width MBus Module
6. Remove the MBus module extractor from the MBus module.
Save the extractor for future use.
7. Place the MBus module on an antistatic surface.
8. Repeat steps 2 through 7 to remove an MBus module from slot 0.
11.1.2
Installing a Single-Width MBus Module
1. Remove the cover and attach a wrist strap.
See Chapter 7, "Internal Access."
2. Push the rear retainers back.
See Figure 11-3.
3. Insert the back edge of the module between the metal (lower) and plastic
(upper) tabs on the back panel.
The connector on the MBus module should face the appropriate
MBus slot. See Figure 11-3.
Note -
MBus slot 0 (the lower MBus slot) must have a module installed or the
system will not work.

Figure 11-3
Installing a Single-Width MBus Module
4. Hold the corners of the MBus module near the connector and press down
firmly until the module sits into the socket.
Make sure the module is fully inserted into the socket.
Caution -

Excessive force may bend or damage the pins.
5. Lock the arms of the rear retainers on the MBus module, pushing them
over the edge of the module.
See Figure 11-4. If the module is not fully inserted into the MBus slot
connector, the card retainers may not lock over the edge of the module.

Figure 11-4
Locking down MBus Module Retainers
6. Repeat steps 2 through 5 to replace an MBus module in slot 1.
7. Remove the wrist strap and replace the cover.
See Chapter 7, "Internal Access."
8. Reconnect any peripherals to the system.
9. Power on the system.
See Chapter 6, "Power On and Off."
1. Remove the cover and attach a wrist strap.
See Chapter 7, "Internal Access."
2. Push back two MBus module retainers and two SBus card retainers next
to the MBus slot. See Figure 11-5.
Caution -

Hot surface. Avoid contact. Surfaces are hot and may cause
personal injury if touched.
3. Remove four screws and rectangular washers from the MBus module and
backplate.
See Figure 11-11. Save the screws and washers for future use.
4. Remove the MBus module.
a. Hold both ends of the MBus module.
b. Pull up on the MBus module until the connector is out of the slot.
See Figure 11-5.
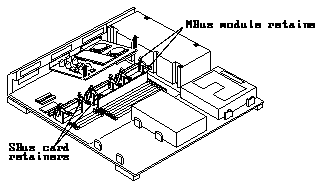
Figure 11-5
Removing a Double-Width MBus Module
5. Place the MBus module on an antistatic surface.
6. Repeat steps 2 through 4 to remove a MBus module from slot 0.
1. Remove the cover and attach a wrist strap.
See Chapter 7, "Internal Access."
2. Push the MBus module retainers and the two SBus card retainers close to
the MBus slots back.
See Figure 11-6.
3. Insert the module backplate into the system back panel.
Double-width MBus modules have a backplate like an SBus card. It installs
like an SBus card. The connector on the MBus module should face the
appropriate MBus slot. See Figure 11-6.
Note -
MBus slot 0 (the lower MBus slot) must have a module installed or the
system will not work.
Figure 11-6
Seating the Double-Width MBus Module Backplate, Side View
4. Place your hands on the corner of the MBus module and to the right of the
MBus and the connector. Press down firmly until the module sits into the
socket.
See Figure 11-7. Make sure the module is fully inserted into the socket.
Caution -

Your hands should be on either side of the MBus connector. Do not
press on both ends of the MBus module because there is only one connector on
the module.
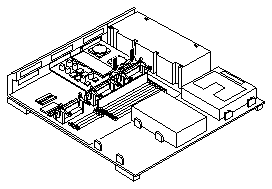
Figure 11-7
Installing a Double-Width MBus Module
5. Lock the arms of the retainers on the MBus module, pushing them over
the edge of the module.
See Figure 11-8. If the module is not fully inserted into the MBus slot
connector, the card retainers may not lock over the edge of the module.
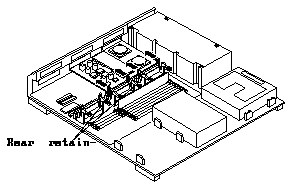
Figure 11-8
MBus Module Retainers
6. Install the four screws and rectangular washers into the MBus module
backplate.
Install the washers vertically. See Figure 11-11.
7. Repeat steps 2 through 6 to replace an MBus module in the top slots.
8. Remove the wrist strap and replace the cover.
See Chapter 7, "Internal Access."
9. Reconnect any peripherals to the system.
10. Power on the system.
See Chapter 6, "Power On and Off."
The system board has four locations for SBus cards. See Figure 11-9.
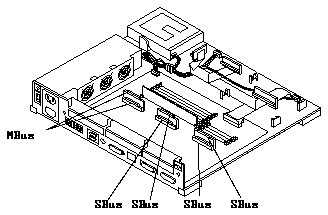
Figure 11-9
SBus Slot Locations
Note -
SBus card retainers are installed on SBus cards. SBus card extractors
are different from SBus retainers. Use SBus card extractors to remove SBus
cards from the system unit. An SBus extractor was shipped with the system
unit.
1. Remove the cover and attach a wrist strap.
See Chapter 7, "Internal Access."
2. Push the rear card retainers back from the edge of the SBus card.
See Figure 11-10.
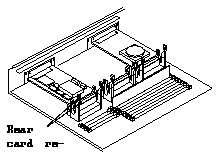
Figure 11-10
Pushing the Rear Card Retainers Away from the SBus Card
3. For the S10 service code only, remove the washers and screws from the
two holes adjacent to the SBus card on the back panel.
See Figure 11-11.
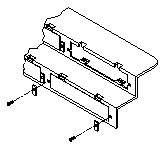
Figure 11-11
Removing Washers and Screws - S10 Service Code
4. Insert the legs of the card extractor into the holes on the SBus card.
See Figure 11-12.
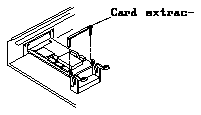
Figure 11-12
Installing or Removing the Card Extractor
5. Hold both ends of the card extractor. Pull upwards slowly until the
connector is out of the slot.
See Figure 11-13 and Figure 11-14.
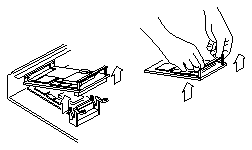
Figure 11-13
Removing a Single-Width SBus Card
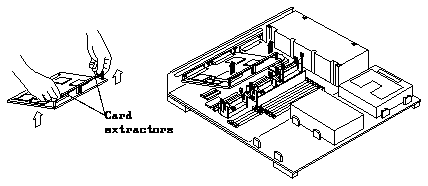
Figure 11-14
Removing a Double-Width SBus Card
6. Remove the card extractor from the SBus card:
a. Bend one leg of the extractor slightly to the outside until the hook
clears the hole in the SBus card.
See Figure 11-12 and Figure 11-16.
b. Remove the other side of the extractor which should come out easily
without bending.
7. Place the SBus card on an antistatic surface.
1. Place the SBus card on an antistatic surface.
2. If required for your card, set the jumpers or switches on the card.
See the manual for your SBus product.
3. If the card you are installing has tabs on the backplate, remove the
adapter bracket.
a. Remove the two screws attaching the adapter bracket to the backplate.
See Figure 11-15.

Figure 11-15
Removing the Adapter Bracket from the SBus Card
b. Save the adapter bracket and the screws. You can use them when
installing SBus cards in other systems.
4. Remove the SBus card retainer from the SBus card:
a. Bend one leg of the retainer slightly to the outside until the hook
clears the hole in the SBus card.
b. Remove the other side of the retainer which should come out easily
without bending it.
See Figure 11-16.
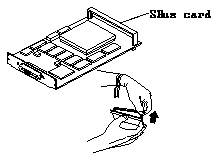
Figure 11-16
Removing the Retainer from the SBus Card
5. Push both rear card retainers back on the system board.
See Figure 11-10.
6. Slide the card at an angle into the back panel of the system. Hook the card
backplate under the lip on the back panel. Be sure the card backplate
shows through the slots on the back panel.
The connector(s) for your card may not line up with other connectors in the
back panel. See Figure 11-17.
Figure 11-17
Inserting the SBus Card
7. Align the plug with the socket. Gently press the corners of the card to
push the plug into the socket. Do not force the card or you may damage
the pins on the card.
See Figure 11-18.
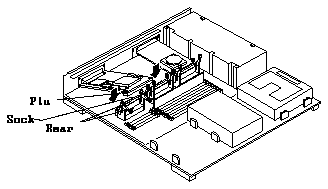
Figure 11-18
Inserting the SBus Card
8. Push the rear card retainers forward over the edge of the SBus card.
See Figure 11-18.
9. For the S10 service code only, insert the washers and screws you removed
earlier vertically (narrow side across) into the two screw holes adjacent to
the SBus card on the back panel.
See Figure 11-19.
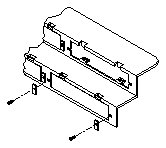
Figure 11-19
Inserting a Washer and a Screw to Secure the SBus Card - S10 Service Code
Only
10. Repeat steps 1 through 9 to install top SBus cards.
This section describes how to remove and replace:
-
DSIMMs (Dynamic Single Inline Memory Modules)
-
VSIMMs (Video Single Inline Memory Modules)
-
NVSIMMs (Non-volatile SIMMs)
The SPARCstation 10 system supports two DSIMM capacities:
The installation and removal procedure is the same for both DSIMM capacities.
11.3.1.1
Removing a DSIMM
Caution -

DSIMMs installed in your SPARCstation 10 system must be
specifically designed to operate in it. Do not remove DSIMMs from a different
Sun system and install them in a SPARCstation 10 system.
1. Remove the cover and attach a wrist strap.
See Chapter 7, "Internal Access."
2. Locate the DSIMM slot location of the DSIMM you need to remove.
See Figure 11-20.
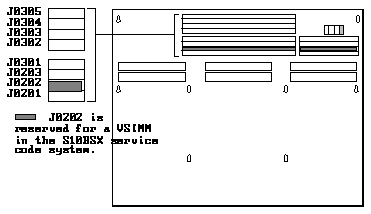
Figure 11-20
DSIMM Slot Locations on the System Board
3. Place an antistatic surface next to the system.
4. Pull the ejection lever (A) in the opposite direction of the DSIMM you
want to eject.
5. Pull up on the other side (B) of the DSIMM.
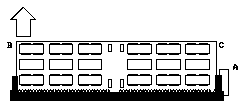
Figure 11-21
Pulling the DSIMM Ejection Lever
6. Pull up on both corners (B and C) of the DSIMM until the board clears
the socket.
7. Place the DSIMM on an antistatic surface.
11.3.1.2
Installing a DSIMM
1. Remove the cover and attach a wrist strap.
See Chapter 7, "Internal Access."
2. Locate the DSIMM slots on the system board.
Slot J0202 is reserved for a VSIMM in the S10BSX service code model. Slot
J0301 may be used for a VSIMM, NVSIMM, or a DSIMM. You can use all
other slots for DSIMMs.
See Figure 11-20.
3. Place the DSIMM on an antistatic surface.
Table 11-1 shows the installation sequence.
Table 11-1
DSIMM Installation Sequence
----------------------------------------------------------


Installation         Slot    Installation Sequence,   Slot
Sequence, S10BSX             S10 Service Code
Service Codes

----------------------------------------------------------
1                    J0201   1                        J0201

2                    J0304   2                        J0304

3                    J0203   3                        J0203

4                    J0302   4                        J0302

5                    J0303   5                        J0303

6                    J0301   6                        J0301

7                    J0305   7                        J0305

8*                   J0202*  8                        J0202

*Reserved for VSIMM

----------------------------------------------------------
Note -
Slot J0201 must always have a DSIMM installed in order for the system
to function properly. Install each additional DSIMM following the sequence
shown in Table 11-1.
4. Holding the DSIMM at its edges, place it into the DSIMM plastic guides.
5. Insert with the center vertical chip facing the system unit back panel.
See Figure 11-22. Be sure the center vertical chip is visible and that the key
notch is as shown.

Figure 11-22
DSIMM - Back Panel View
6. Place the insertion tool grooved surface at a 90-degree angle on the
DSIMM board upper edge.
See Figure 11-23.
7. Place the heel of each hand on each side of the insertion tool's pushing
surface. Press firmly with both hands on the tool until the DSIMM snaps
into place.
See Figure 11-23.
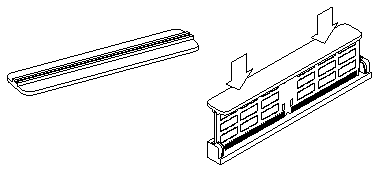
Figure 11-23
Inserting the DSIMM Using the DSIMM Insertion Tool
8. Remove the insertion tool.
9. Remove the wrist strap and replace the cover.
See Chapter 7, "Internal Access."
Note -
VSIMMs are only supported on the S10BSX service code systems.
Two VSIMM capacities are supported:
11.3.2.1
Removing a VSIMM - S10BSX Service Code
1. Shut down and power off the system.
See Chapter 6, "Power On and Off."
2. Remove the cover and attach a wrist strap.
See Chapter 7, "Internal Access."
3. Locate the VSIMM slots on the system board.
Note the VSIMM slot location (J0202 or J0301) of the VSIMM you need to
remove. See Figure 11-25.
4. Place an antistatic surface next to the system.
5. Pull the ejection lever (A) in the opposite direction of the VSIMM you
want to eject.
See Figure 11-24 and Figure 11-28.

Figure 11-24
Pulling the VSIMM Ejection Lever - Shown from the System Rear Panel
6. Pull up on the other side (B) of the VSIMM.
7. Pull up on both corners (B and C) of the VSIMM until the board clears the
socket.
8. Place the VSIMM on an antistatic surface.
11.3.2.2
Installing a VSIMM - S10BSX Service Code
1. Remove the cover and attach a wrist strap.
See Chapter 7, "Internal Access."
2. Locate the VSIMM slots (J0202 and J0301) on the system board.
See Figure 11-25.
Note -
Slot J0201 always must have a DSIMM installed. Slot J0202 is reserved
for the single factory-installed VSIMM in the S10BSX service code model.
Slot J0301 may be used for a DSIMM or an additional optional VSIMM. When
slot J0301 is used for a VSIMM, the auxiliary video board must be installed on
the system board to enable video output.
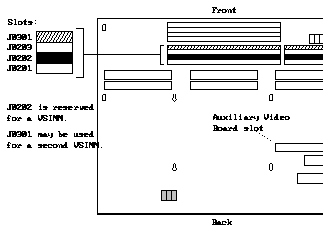
Figure 11-25
Location of SIMM Slots on System Board
3. Identify the proper VSIMM installation sequence.
See Table 11-2.
Table 11-2
VSIMM Installation Sequence
---------------------------------


Installation Sequence      Slot
---------------------------------
1 (factory pre-installed)  J0202

2                          J0301

---------------------------------
4. Holding the VSIMM at its edges, place it into the VSIMM plastic guides.
Insert the surface with the plastic cover facing the system unit back panel.
See Figure 11-26.
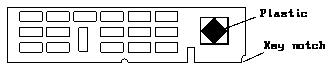
Figure 11-26
VSIMM - Back Panel View
5. Place the insertion tool grooved surface at a 90-degree angle on the center
of the VSIMM board upper edge.
See Figure 11-27.
6. Place the heel of each hand on each side of the insertion tool's pushing
surface. Press firmly with both hands on the tool until the VSIMM snaps
into place.
See Figure 11-27.
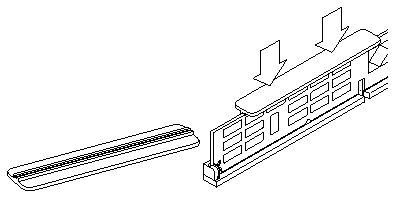
Figure 11-27
Inserting the VSIMM
7. Remove the insertion tool.
Note -
If you installed a VSIMM in slot J0301, you must install an auxiliary
video board on the system board. This board provides video output for the
VSIMM. See Section 11.3.4, "Auxiliary Video Board."
8. Remove the wrist strap and replace the cover.
See Chapter 7, "Internal Access."
Caution -

The NVSIMM must be specifically designed to operate in the
SPARCstation 10 system. Do not remove an NVSIMM from a different Sun
system and install it in a SPARCstation 10 system.
The NVSIMM can only be used on systems running the Solaris` 2.2 or later
operating system.
11.3.3.1
Removing the NVSIMM
1. Shut down and power off the system.
See Chapter 6, "Power On and Off."
2. Remove the cover and attach a wrist strap.
See Chapter 7, "Internal Access."
3. Locate the NVSIMM ejector level located on the side towards the power
supply.
4. Align the system so that the ejector lever is on your left.
5. Rotate the ejection lever (A) toward the system back panel.
See Figure 11-28.

Figure 11-28
Using the NVSIMM Ejector Lever
6. Pull up on the other side (B) of the NVSIMM.
See Figure 11-29.
7. Pull up on both corners (B and C) of the NVSIMM until the board clears
the socket.
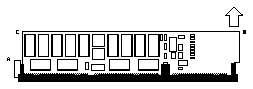
Figure 11-29
Removing the NVSIMM - Rear View
8. Place the NVSIMM on an antistatic surface.
11.3.3.2
Installing a NVSIMM
1. Shut down and power off the system.
See Chapter 6, "Power On and Off."
2. Remove the cover and attach a wrist strap.
See Chapter 7, "Internal Access."
3. Locate the NVSIMM slots on the system board.
There are four double-width SIMM connectors on the mother board.
However, only two of the small slots have pins installed. Install the
NVSIMM in the fourth slot, J0301 as shown in Figure 11-30.
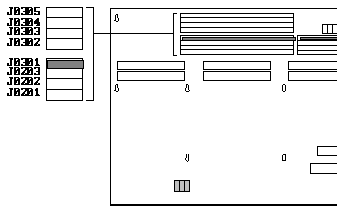
Figure 11-30
NVSIMM Location on the System Board
4. Place the NVSIMM on the antistatic surface.
5. Enable the battery.
a. Locate the jumper on the battery side of the NVSIMM.
See Figure 11-31.
b. Move the jumper to the battery ON position.
Caution -

Once you turn the battery ON do not move or remove the jumper.
Any data contained in the NVSIMM memory will be lost if the jumper is
moved.

Figure 11-31
NVSIMM - Battery Side
6. Holding the NVSIMM at its edges, line up the notch with the area
between the two SIMM sockets. The surface with the battery must face
the system unit front panel. The notched edge of the SIMM will be near
the edge of the board.
See Figure 11-32.
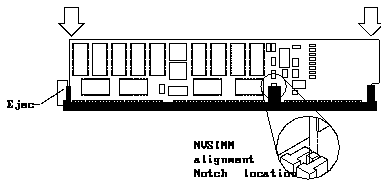
Figure 11-32
Aligning the NVSIMM in the Socket - Rear View
Note -
Use care when lining up the center notch on the NVSIMM with the
connector frame. If the notch is not properly lined up the NVSIMM could be
damaged when you attempt to press it firmly in place.
7. Identify the insertion tool and its grooved surface.
See Figure 11-33.
8. Place the grooved surface of the insertion tool at a 90-degree angle,
centered on the top edge of the NVSIMM.
a. Align the top edge of the NVSIMM with the groove on the insertion
tool.
b. Center the insertion tool on the NVSIMM to ensure even pressure
during insertion.
The insertion tool is not as long as the NVSIMM. See Figure 11-33.
c. Place the heel of each hand on each side of the insertion tool's pushing
surface, and press firmly with both hands on the tool until the
NVSIMM snaps into place.
Use an equal force with both hands to prevent damage to the NVSIMM
and socket.

Figure 11-33
Installing the NVSIMM
Caution -

Ensure that the NVSIMM is firmly seated in the socket. If it is not,
serious errors could occur when you power on the system.
9. Remove the insertion tool. Place it aside.
Do not leave the tool inside the system.
10. Remove the wrist strap and replace the cover.
See Chapter 7, "Internal Access."
If you install a VSIMM in slot J0301, you must install an auxiliary video board
into the system to provide video output for the second VSIMM. The
SPARCstation 10 system can accommodate one auxiliary video board.
11.3.4.1
Removing an Auxiliary Video Board - S10BSX Service Code
1. Shut down and power off the system.
See Chapter 6, "Power On and Off."
1. Remove the cover and attach a wrist strap.
See Chapter 7, "Internal Access."
2. Locate the Auxiliary video board.
See Figure 11-34.
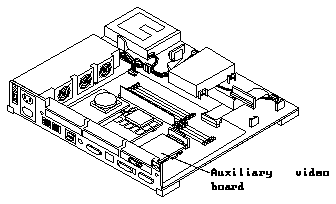
Figure 11-34
Auxiliary Video Board Installed
3. If an SBus card is seated above the auxiliary video board, remove the
SBus card. See Section 11.2, "SBus Cards."
4. Remove the auxiliary video board by pulling on both edges of the
auxiliary video board until the connector is out of the slot.
See Figure 11-35.
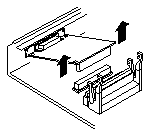
Figure 11-35
Removing the Auxiliary Video Board
5. Place the auxiliary video board on an antistatic surface.
11.3.4.2
Installing an Auxiliary Video Board - S10BSX Service Code
1. Shut down and power off the system.
See Chapter 6, "Power On and Off."
2. Remove the cover and attach a wrist strap.
See Chapter 7, "Internal Access."
3. Locate the auxiliary video board connector.
See Figure 11-36.
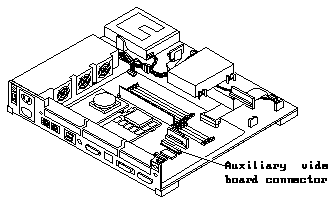
Figure 11-36
Location of Auxiliary Video Board Connector
4. Remove the SBus filler panel for SBus slot 2. Squeeze in on the filler
panel spring tabs and lift up and out.
See Figure 11-37.
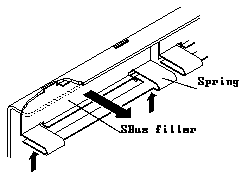
Figure 11-37
Removing the SBus Filler Panel (Without Plastic Tabs) from SBus Slot 2
5. Insert the back edge of the auxiliary video board between the tabs on the
back panel.
See Figure 11-38.
6. Push the auxiliary video board connector into the socket.
See Figure 11-38.
a. Hold the corners of the auxiliary video board connector.
b. Press down firmly until the auxiliary video board is firmly seated.
Caution -

Excessive force may bend or damage the pins.

Figure 11-38
Installing the Auxiliary Video Board
7. Remove the wrist strap and replace the cover.
See Chapter 7, "Internal Access."
8. Reconnect any peripherals.
1. Shut down and power off the system.
See Chapter 6, "Power On and Off."
2. Remove the cover and attach a wrist strap.
See Chapter 7, "Internal Access."
3. Remove all SBus cards, MBus Modules, and the auxiliary video board
(S10BSX service code systems only).
See Section 11.1, "MBus Module" Section 11.2, "SBus Cards," and
Section 11.3.4, "Auxiliary Video Board."
4. Remove all SIMMs.
See Section 11.3, "SIMMS."
5. Disconnect the internal drive connector (J0601) and the DC power
connector (J1501) from the system board.
See Figure 11-39.
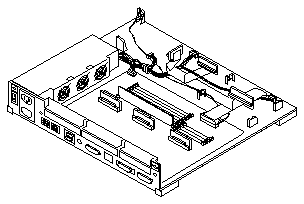
Figure 11-39
Disconnecting the Internal Drive Connector and the DC Power Connector
6. Remove the system board.
a. Remove the lock block by loosening the screw located in its center.
See Figure 11-40.
b. Loosen the two captive retainer screws at the rear of the chassis.
See Figure 11-40.
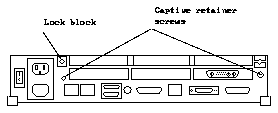
Figure 11-40
Captive Retainer Screws and Lock Block Location
c. Slide the board toward the front of the chassis.
See Figure 11-41.
Figure 11-41
Removing the System Board
d. Tilt the rear side of the board and lift it up and over the rear of the
chassis.
7. Place the board on an antistatic surface.
1. Remove each filler panel from the replacement system board so the rear
panels of the defective and the new system board look the same.
a. If the system unit has screws and washers securing filler panels,
remove the screws and washers from each filler panel to be removed.
See Figure 11-42. Save the screws and washers for future use.
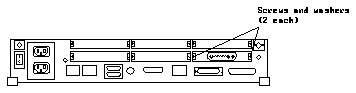
Figure 11-42
Location of the Screws and Washers Securing the Filler Panel
b. Follow Step i if the filler panel has screws and washers. Follow step ii
if the filler panel does not have screws and washers.
i. Pull the filler panel gently away from the rear panel.
See Figure 11-43. The panel releases toward the front of the system.
Some system may have plastic tabs on the filler panel. Press the tabs
down to release the filler panel from the system. Go to step c.
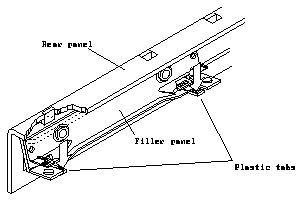
Figure 11-43
Removing the Filler Panel (With Plastic Tabs)
ii. Squeeze the filler panel spring tabs and lift the filler panel up and
out and set aside.
See Figure 11-44.
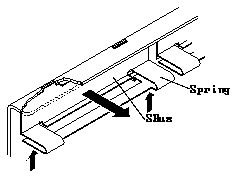
Figure 11-44
Removing the SBus Filler Panel (Without Plastic Tabs)
c. Repeat these steps to remove additional filler panels.
2. Set the jumpers on the system board.
See Section 11.4.3, "Setting Jumpers."
3. Install the new system board.
a. Orient the board over the chassis so the connectors are facing the rear
of the chassis.
b. Tilt the connector side of the board. Lower the board into the chassis
and slide it to the rear of the chassis
The eight locating posts in the chassis should fit the eight slots on the
system board. See Figure 11-45.
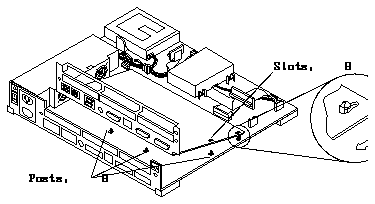
Figure 11-45
Lowering the System Board into the Chassis
c. Connect the DC power connector (P1) to the system board (J1501).
See Figure 11-46.
d. Connect the internal drive connector to the system board (J1601).
See Figure 11-46.
Figure 11-46
Connecting the Power and Internal Drive Connectors
4. Tighten the captive retainer screws at the rear of the chassis.
Do not overtighten these screws. See Figure 11-47.
5. Insert and tighten the screw through the lock block. Do not overtighten
the screw.
See Figure 11-47.
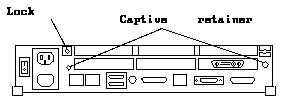
Figure 11-47
Installing the Lock Block
6. Remove the parts and components from the defective system board.
Install them on the new system board.
7. Detach the wrist strap and replace the cover.
See Chapter 7, "Internal Access."
This section describes how to set the following jumpers:
-
ISDN (on S10 service code models only)
11.4.3.1
Setting Serial Port Jumpers
There are two serial port jumpers on the system board. See Figure 11-48. The
jumpers are factory-set in RS423 mode. The ports can be re-set as RS232 mode
(for connection to a X.25 network in Europe or Australia).
Note -
The serial port jumper is the only jumper block you need to set for the
S10BSX service code model.
To move the jumper settings from RS423 mode to RS232 mode:
Set the two serial port jumpers using needlenose pliers.
See Figure 11-48.
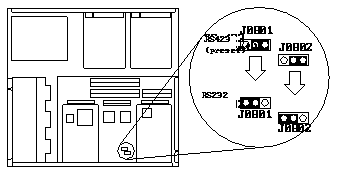
Figure 11-48
Setting the Serial Port Jumpers
11.4.3.2
Setting Clock Speed Jumpers - S10 Service Code
Note -
There are no clock speed jumper on the S10BSX service code. The
S10BSX service code model system clock speed runs only at 80 MHz. No
action is necessary for the S10BSX service code.
This section describes the jumper settings for two different types of system
boards - a system board with three jumper blocks to set the clock speed and a
system board with one jumper block to set the clock speed. You must set the
system clock speed jumpers on the S10 service code system board to ensure
correct operation of the MBus module. Use Table 11-3 and Table 11-4 to
determine the correct jumper settings for your system. Use Table 11-3 if you
know your system model number; or use Table 11-4 to find the jumper settings
based on your MBus module numbers.
Table 11-3
System Clock Speed Jumper Settings Based on SPARCstation Model
----------------------------------------------------------


SPARCstation 10       Jumper    System Clock    CPU Clock
Model Number          Setting   Speed, MHz      Speed, MHz
----------------------------------------------------------
Model 20              B         66              33

Model 30              B         72              36

Model 40              A         80              40

Model 41              A         80              40

Model 412 (2 x SM41)  A         80              40

Model 51              A         80              50

Model 512 (2x SM51)   A         80              50

Model 514 (2x SM51X)  A         80              50

----------------------------------------------------------
Table 11-4
System Clock Speed Jumper Settings Based on MBus Module
----------------------------------------------------------------------


MBus                        Part      Jumper   System Clock   CPU Clock
Module                      Number    Setting  Speed          Speed
----------------------------------------------------------------------
SM20                        501-2218  B        66 MHz         33 MHz

SM30                        501-2215  B        72 MHz         36 MHz

                            501-2239

SM40                        501-2219  A        80 MHz         40 MHz

                            501-2358  A        80 MHz         40 MHz

SM41                        501-2258  A        80 MHz         40 MHz

                            501-2270

SM51                        501-2352  A        80 MHz         50 MHz

SM 51X                      501-2431  A        80 MHz         50 MHz

----------------------------------------------------------------------
If the system has three clock speed jumpers, See the next section "System
Boards with Three Clock Speed Jumpers J1401, J1403, J1404." If the system has
one clock speed jumper, See the section "Single Clock Speed Jumper - System
Boards With Clock Speed Jumper J1401."
This type of board has three jumpers (J1401, J1403, J1404). All three jumpers
must be set for either mode A operation, or mode B operation, based on the
system model number or MBus modules installed.
Set the clock speed jumpers to Mode A or Mode B.
See Table 11-3 or Table 11-4 and Figure 11-49 or Figure 11-50. Move the
jumpers to the correct positions using needlenose pliers.
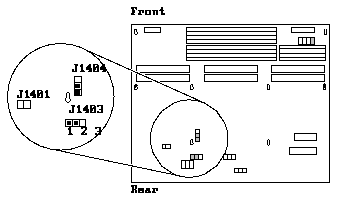
Figure 11-49
Mode A Clock Speed Jumper Speed Setting (3-Jumper Board)
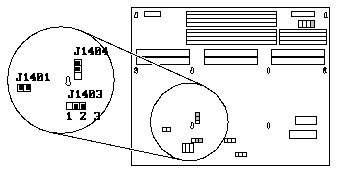
Figure 11-50
Mode B Clock Speed Jumper Speed Setting (3-Jumper Board)
Note -
There is no jumper for clock speed on the S10BSX service code model.
This type of board has only one jumper (J1401). This jumper must be set for
either mode A operation or mode B operation, based on your system model
number or MBus modules installed.
Set the clock speed jumpers to Mode A or Mode B.
See Table 11-3 or Table 11-4 and Figure 11-51 or Figure 11-52. Move the
jumpers to the correct positions using needlenose pliers.
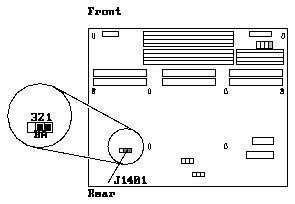
Figure 11-51
Mode A Clock Speed Jumper Speed Setting (1-Jumper Board)
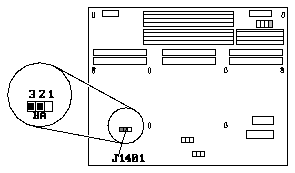
Figure 11-52
Mode B Clock Speed Jumper Speed Setting (1-Jumper Board)
11.4.3.3
Setting ISDN Jumpers - S10 Service Code
Table 11-5 and Figure 11-53 show the ISDN jumper configuration and location
on the S10 service code system board.
Table 11-5
ISDN Jumper Settings for the S10 Service Code System Board
-----------------------------------------------------


ISDN Jumpers Installed       ISDN Jumpers Removed
-----------------------------------------------------
Termination on system board  Termination at the wall

-----------------------------------------------------
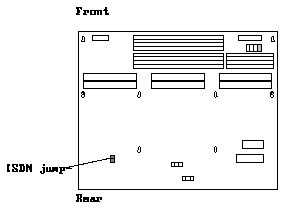
Figure 11-53
Setting ISDN Jumpers - S10 Service Code
This section describes how to remove and replace the OpenBoot PROM.
11.4.4.1
Removing the OpenBoot PROM
1. Remove the cover and attach a wrist strap.
See Chapter 7, "Internal Access."
2. Remove any SBus cards from slot 2 and 3.
See Section 11.2, "SBus Cards."
3. Remove the optional auxiliary video board (S10BSX service code only).
See Section 11.3.4, "Auxiliary Video Board."
4. Pry the OpenBoot PROM out of its socket slowly and evenly with an IC
extractor or a small flat-blade screwdriver.
See Figure 11-54 (S10BSX service codes) or Figure 11-55 (S10 service code).
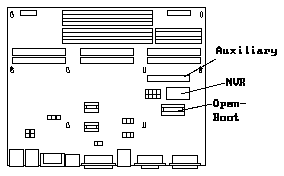
Figure 11-54
Location of NVRAM and OpenBoot PROM (S10BSX Service Code)
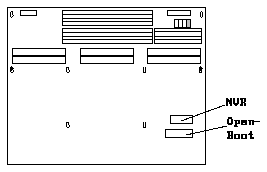
Figure 11-55
Location of NVRAM and OpenBoot PROM (S10 Service Code)
5. Place the OpenBoot PROM on an antistatic surface.
11.4.4.2
Replacing the OpenBoot PROM
1. Hold the OpenBoot PROM at the edges. Match the notch on the
OpenBoot PROM with the notch on the socket. See Figure 11-56.
Do not touch the pins.

Figure 11-56
Orientation of the OpenBoot PROM
2. Carefully align the pins. Insert the OpenBoot PROM in the socket. Press
down firmly until the pins are seated in the socket. See Figure 11-56.
Note -
Inserting the chip backwards will damage the chip.
3. Install the SBus cards in slot 2 or 3 (if you removed them).
See Section 11.2.2, "Installing an SBus Card."
4. Install the optional auxiliary video board (if you removed it, S10BSX
service code only).
See Section 11.3.4, "Auxiliary Video Board."
5. Detach the wrist strap and replace the cover.
See Chapter 7, "Internal Access."
This section describes how to remove and replace the NVRAM (Non-Volatile
Random Access Memory) chip.
11.4.5.1
Removing the NVRAM Chip
1. Shut down and power off the system.
See Chapter 6, "Power On and Off."
2. Remove the cover and attach a wrist strap.
See Chapter 7, "Internal Access."
3. Remove any SBus cards from slot 2 and 3.
See Section 11.2, "SBus Cards."
4. Remove the optional auxiliary video board (S10BSX service code only).
See Section 11.3.4, "Auxiliary Video Board."
5. Locate the NVRAM chip on the system board.
See Figure 11-54 or Figure 11-55.
6. Hold the NVRAM chip carrier on both ends and lift it straight up.
Gently wiggle the chip carrier as necessary.
7. Put the NVRAM in its chip carrier on an antistatic surface.
11.4.5.2
Replacing the NVRAM Chip
1. Locate the NVRAM location on the system board.
See Figure 11-54 or Figure 11-55.
2. Carefully align the pins and insert the NVRAM chip in the socket.
The carrier is keyed so the NVRAM can be installed only one way.
3. Push the NVRAM chip into the carrier until it sits tightly in the socket.
4. Detach the wrist strap and replace the cover.
See Chapter 7, "Internal Access."
5. Power on the system.
