
This chapter contains the following sections:
-
Removing Power from the System
-
Removing the System Unit Cover
-
Attaching the Wrist Strap
Before turning off system power, shut down the operating system to avoid loss
of data.
1. If your system is not a standalone, notify users that the system is going
down.
See the Solaris Handbook for the procedure.
2. Back up the system files and data.
See the Solaris Handbook for the procedure.
3. Shut down the system.
4. Turn the power off to the monitor and all peripherals connected to the
system.
5. Remove DC power from the system by pressing the Standby side of the
power switch on the back panel.
See Figure 2-1.
Note -
After the Standby switch is pressed, it returns to its original position.

Figure 2-1
Standby Switch
When the power is off, the LED on the right front of the system is not lit and
the fans are not running. See Figure 2-2.
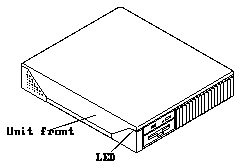
Figure 2-2
Front Panel LED Location
Warning -

When the Power On/Standby switch is pressed and the AC power
cord remains connected to a power outlet, hazardous AC voltage is still present
in the power supply primary.
6. Detach all cords and cables connected to the system unit except for the AC
power cord.
The AC power cord provides the grounding path for safely discharging
static electricity. Note where each cord and cable attaches to the system
unit.
1. Loosen the Phillips-head screw on the right corner of the back panel.
When tightened, this screw holds the cover to the back panel.
See Figure 2-3. Do not loosen the screw near the Power On/Standby switch.
This screw holds the power supply in place.
2. Loosen the Phillips-head screw securing the lock block to the cover.
Remove the lock block and put it aside.
See Figure 2-3.

Figure 2-3
Lock Block and Corner Screw
Caution -

When removing or installing the cover, grasp the cover by the rear
and front edges only.
3. Grasping the cover at the back of the machine, lift it up and toward the
front of the unit. When the cover is at a 60-degree angle to the chassis,
push the cover away from the front panel, freeing the cover hinge tabs
from the chassis slots. Put the cover aside.
See Figure 2-4.

Figure 2-4
Removing the Cover
1. Unwrap the first two folds of the wrist strap and wrap the adhesive side
firmly around your wrist.
See Figure 2-5.

Figure 2-5
Grounding Wrist Strap to Power Supply
2. Peel the liner from the copper foil at the opposite end of the wrist strap
and attach the copper end of the wrist strap to the top of the power supply
metal case.
Make sure you contact the power supply metal case and not the labels. See
Figure 2-5.
