SPARCprinter E
500-Sheet Feeder Guide


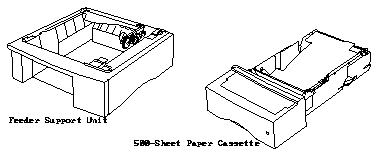
The SPARCprinterTM E printer 500-sheet paper feeder consists of a feeder support unit and 500-sheet paper cassette. This document tells you how to install, troubleshoot, and remove the cassette for moving or packing the printer.

The paper cassette holds approximately 500 sheets of 16-24 lb (60-90 g/m2) B5, executive, letter, A4, or legal paper. Like the standard 200-sheet paper cassette, it handles plain paper, letterheads, transparencies, and paper labels. It also supports card stock. See the SPARCprinter E Hardware Installation and User's Guide for a complete list of supported paper sizes.

The printer has an autoconnect feature that allows it to recognize the 500-sheet feeder when it has been installed. This means you do not have to reset the printer after you install it. You simply choose Tray 2 as the paper source from the operator panel or from your printer software.

Installing the 500-Sheet Feeder

To connect the 500-sheet feeder, you will:

    1. Connect the feeder support unit.
    2. Load the 500-sheet paper cassette.
    3. Adjust the 500-sheet paper cassette tension.
    4. Verify the installation.

Connect the Feeder Support Unit

    1. Turn the printer power Off (O) and unplug the power cord from the printer.
    2. Disconnect all cables attached to the printer.
    3. Set the support unit on a flat, stable surface.
    4. Ask someone to help you lift the printer and position the printer above the feeder support unit.

Caution -

Make sure your fingers are not under the printer when you place it on the support unit.

    5. Lower the printer onto the support unit. Be sure the edges of the printer and the support unit are aligned.

    6. Reconnect any cables that you disconnected.
    7. Plug the power cord into an electrical outlet.

Load the 500-Sheet Paper Cassette

Note - Fill the paper tray to its maximum capacity and adjust the spring tension the first time you use the cassette. This adjustment must be done whenever you change printing materials and at full capacity.

    1. Move the paper stop in the paper cassette to the correct position for the size of paper you are loading.
      a. To remove the paper stop, grasp it firmly on both sides and pull it straight up.
      b. Insert the bottom tab of the paper stop at a slight angle into the appropriate paper position slot on the bottom of the paper cassette.
      c. Press the side tabs of the paper stop into the appropriate paper position slots on the sides of the paper cassette. The paper size is indicated in two locations: bottom and side of the cassette.

    2. Lower the paper stop arm into the slot on the side of the cassette.

    The printer automatically determines paper size by the position of the paper stop arm.

    3. Press the tab on the adjustable guide and slide the guide to the outer edge of the cassette.

    4. Flex the paper back and forth. Do not fold or crease the paper. Straighten the edges on a level surface.

    5. Select the print side of the paper.
      a. If you are loading letterhead paper, place the printed side face down with the top of the page nearest the paper cassette tab.

      b. If you are not loading letterhead paper:

      Check the paper package label to see if one side is designated "print first" or "better print quality." Place this side down.

      Check the paper curl by holding the paper straight up. Any time curl is apparent, the curl side should be down in the paper cassette.

    6. Press down on the paper cassette tab, insert the paper, and slide the paper under the metal stop at the forward end of the cassette.

    Make sure all the paper fits under the metal stop. The paper should be inserted all the way in, flush against the metal stop. Do not lift the metal stop to load paper. Ensure that the paper is not bent or wrinkled.

    For the feeder to function properly, you need to adjust the tension. The following section describes how to adjust the paper cassette tension.

Adjust the Paper Cassette Tension

Note - You must adjust the paper cassette spring tension each time you load a different type of paper or media to make sure the paper feeds correctly. The cassette must be filled to capacity when the adjustment is made.

    1. Locate the purple wheel and purple arrow on the side of the cassette.
    2. Turn the wheel until the arrow is aligned with the pointer.

    If the arrow is not aligned with the pointer, turn the wheel toward the plus sign (+) to raise the arrow or toward the minus sign (-) to lower the arrow.

    3. Press and release the paper stack several times to make sure the paper moves freely.

    If the arrow and the pointer are not aligned, turn the wheel to realign them.

    4. Press and hold the tab on the adjustable guide and slide in the guide so it lightly touches the side of the paper stack.

    Make sure the paper is not buckled. Remove creased or wrinkled paper. The edge of the paper stack must be straight for the adjustable guide to work properly.

    5. Close the top cover of the paper cassette.
    6. Insert the paper cassette into the feeder support unit.

Verify the Installation

When the 500-Sheet Feeder has been correctly installed, the printer will recognize Tray 2 as an available paper source. You can check this from the operator panel.

    1. Make sure the printer power is On (|) and the Ready status message appears on the display.
    2. Select MENUS.
    3. Select PAPER MENU.
    4. Select Paper Source.

    If Tray 2 does not appear as a paper source, repeat the installation procedure. The printer must be seated correctly on the support unit for it to recognize that the 500-Sheet Feeder has been installed. If an error message appears, see the SPARCprinter E Hardware Installation and User's Guide for more information.

You can now select Tray 2 as a paper source from the operator panel or from your software application.

You can have the paper feed from Tray 2 or link Trays 1 and 2 together so that paper alternates feeding from one tray and then the other.

To link the Trays 1 and 2:

    1. Select MENUS.
    2. Select PAPER MENU.
    3. Select More.
    4. Select More again.
    5. Select Tray Linking.
    6. Select Tray 1&2.

The printer will save this configuration and return to the previous menu.

    7. Press the Ready button.

    This will return to the Main Menu and you will see Tray 1&2 on the operator panel.

Note - If you did not specify the 500-Sheet Tray option during initial software setup, you will need to remove and reinstall the printer software configuration and specify the Tray 2 option. You will not be able to use this option until you perform the software reconfiguration. Refer to the SPARCprinter E Software Installation and User's Guide for more information.

Moving the Feeder

If you want to move the printer to another location or pack the printer or feeder for shipping, you need to remove the feeder.

    1. Turn the printer power Off (O) and unplug the power cord from the electrical outlet.
    2. Disconnect any cables attached to the printer.
    3. Grasp the base of the printer, lift it straight up, and lower it alongside the feeder support unit.

Note - You may need help lifting the printer.

    4. Reconnect the printer cables.
    5. Plug the power cord back into an electrical outlet and turn the power On.

    The printer is now ready for use.

Troubleshooting

To clear paper jams from the 500-Sheet Feeder:

    1. Remove the 500-sheet paper cassette.
    2. Remove jammed paper by pulling it toward the front of the printer.
    3. Open the top cover and check inside the printer for paper jams.

Figure 1 shows the internal paper path through the printer with the 500-sheet feeder and optional duplexer installed. Paper will be drawn from the 500-sheet paper cassette or from the upper cassette (the 200-sheet or the duplex paper cassette), depending on which one you specify when you print.

    Figure 1 Paper Path

For additional troubleshooting information, see the SPARCprinter E Hardware Installation and User's Guide .