Procedure
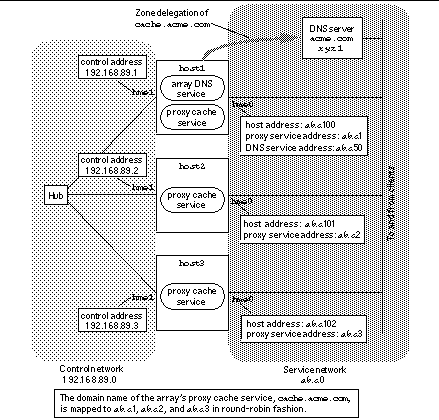
Figure 1-1 shows an example of a Netra Proxy Cache Array. In Figure 1-1, the service network is the network over which a Netra Proxy Cache Server communicates with clients. The control network is an isolated subnet over which array members exchange availability and load information.
Figure 1-1 Example Netra Proxy Cache Array Configuration

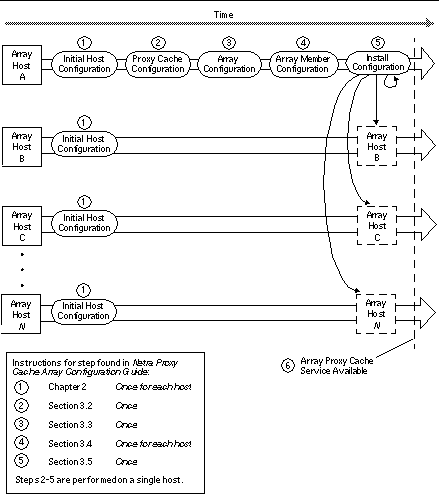
Figure 1-2 illustrates the sequence of steps required to configure Netra Proxy Cache Array.
Figure 1-2 Array Configuration Sequence

Gather Information
To summarize the data you need for initial configuration...
For a single Netra Proxy Cache Server:
-
An IP address for the server.
For a Netra Proxy Cache Array:
-
For each host in Netra Proxy Cache Array, you need three IP addresses, the address associated with the host name (which remains fixed to a host), a service address associated with the proxy cache service (which is subject to moving to a different host in the array), and a control address. The host and service addresses have the same subnet number. The control address has a different subnet number from that used for the host and service addresses.
-
For one host in the array, you need an IP address in addition to those mentioned above: a service address for the DNS that runs on that host. This address has the same subnet number used for the host and service addresses.
-
You need a DNS domain name for the subdomain (zone) formed by the array. For example, if your domain name is acme.com, you might choose cache.acme.com.
Chapter 1 of the Netra Proxy Cache Array Configuration Guide explains the concepts of service and control addresses.
For both server and array, you will need information--such as names of local domains and parent servers--beyond what is described here, to configure the proxy cache service. These requirements are spelled out in Chapter 1 of the appropriate Configuration Guide. For both individual server and array, Chapter 1 has forms for you to fill out, to guide you through the information-gathering process.
Set Up Your Hardware
See Sections 2.1 and 2.2 of the Netra Proxy Cache Array Configuration Guide or, for an individual server, see Section 2.1 of the Netra Proxy Cache Server Configuration Guide.
-
Uncrate your Netra Proxy Cache Server(s) as illustrated in the Netra Proxy Cache 30 Hardware Setup Instructions.
-
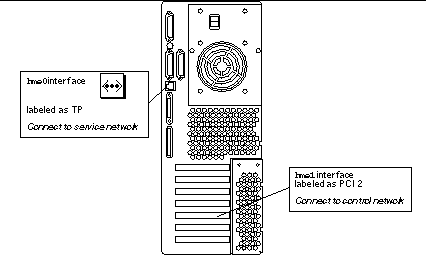
For an individual server, connect your Netra Proxy Cache Server to the network. For an array, connect each of your Netra Proxy Cache Servers to the service and control networks.
See Figure 1-3 for the locations of the service and control network interfaces.
Figure 1-3 Location of Service and Control Network Interfaces

Perform Network Interface Configuration
You can perform network interface configuration using the TTY method or the diskette method. The TTY method requires that you establish a serial connection to your Netra Proxy Cache Server, as described in Appendix A of the Netra Proxy Cache Array (or Server) Configuration Guide.
See Section 2.3 of the Netra Proxy Cache Array Configuration Guide or Section 2.2 of the Netra Proxy Cache Server Configuration Guide for descriptions of the TTY and diskette methods of network interface configuration.
Use a Browser to Complete Initial Host Configuration
See Section 2.4 of the Netra Proxy Cache Array Configuration Guide or, for an individual server, see Section 2.3 of the Netra Proxy Cache Server Configuration Guide.
Use a Browser to Perform Initial Host Configuration on Remaining Hosts in Array (Array Only)
Repeat preceding two steps for each Netra Proxy Cache Server in your array.
Use a Browser to Perform Proxy Cache Service and (for Array) Array Configuration
See Sections 3.1 through 3.4 in the Netra Proxy Cache Array Configuration Guide or, for an individual server, see Sections 3.1 and 3.2 of the Netra Proxy Cache Server Configuration Guide.
For the Netra Proxy Cache Array, this step corresponds to Step 2 through Step 4 in Figure 1-2 and is performed on one array machine for all machines in the array.
Use a Browser to Install Configuration
See Section 3.5 in the Netra Proxy Cache Array Configuration Guide or, for an individual server, see Section 3.3 of the Netra Proxy Cache Server Configuration Guide.
For the Netra Proxy Cache Array, this step corresponds to Step 5 in Figure 1-2 Figure 1-2 and is performed on one array machine for all machines in the array.
Use a Browser to Back Up Your Configuration
See Section 3.6 in the Netra Proxy Cache Array Configuration Guide or, for an individual server, see Section 3.4 of the Netra Proxy Cache Server Configuration Guide.
Modify Your Enterprise DNS to Delegate Zone (Array Only)
See Section 3.7 in the Netra Proxy Cache Array Configuration Guide.
Your existing DNS needs to be aware of the new subdomain formed by the Netra Proxy Cache Array.
- © 2010, Oracle Corporation and/or its affiliates
