Using the workshop_install GUI
This section describes the steps to follow to use the workshop_install GUI.
-
Start workshop_install by typing:
# ./workshop_install
Note -Do not type an ampersand (&) to run workshop_install in the background.
-
When prompted, decide in which directory you want to install your software.
See "Previous Software Releases" if you want to install this new Sun WorkShop release on a machine with previous Sun WorkShop releases.
The software will be installed by default in /opt.
Okay to use the default, /opt? <y|n>:
The installation directory you choose is your default installation directory for this workshop_install session.
-
To install the software in a directory other than /opt, type n and the location where you want the software installed.
-
To install in /opt, type y.
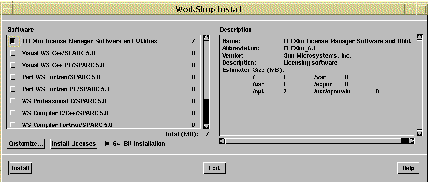
After a few moments, the WorkShop Install window opens (see Figure 3-1).
Figure 3-1 WorkShop Install Window (SPARC Platform)

-
-
Decide if you want to install only 32-bit packages or both 32-bit and 64-bit packages.
Note -The default installation for the SPARC platform installs both 32-bit and 64-bit packages.
-
If you want to install both 32-bit and 64-bit packages, skip to Step 4.
-
If you want to install only 32-bit packages, deselect the checkbox next to 64-Bit Installation at the bottom of the WorkShop Install window. By deselecting the checkbox next to 64-Bit Installation, you are asking that only 32-bit packages be installed (all 64-bit-specific packages will be skipped during installation).
-
-
Click the checkbox next to FLEXlm License Manager Software and Utilities in the WorkShop Install window to install FLEXlm 6.1.
Note -If your application server and your license server are different machines, install FLEXlm 6.1 license manager software on your license server, not on your application server (install your Sun WorkShop development tools on your application server).
You must install FLEXlm version 6.1 (available with this release) to get the new sunwlicd vendor daemon binary; otherwise, licensing will not function properly.
If you are upgrading to FLEXlm 6.1 from an earlier FLEXlm version, you will automatically bring down your license manager during the upgrade. After you install your new licenses in Chapter 4, Installing Your Licenses, the license installation tool will start your license manager again. During the upgrade, your licensed software will be unavailable.
-
Click the checkboxes next to the Sun WorkShop development tools you want to install.
Use your Proof of License Certificate to determine which software you purchased.
Install your software development tools on your application server (your application server and your license server can be the same machine).
When you click the checkbox next to a Sun WorkShop development tool, you are asking to install all product components. In Step 6, you can customize your installation and deselect product components from installation.
To install Sun WorkShop online document collections (in AnswerBook2 format), scroll down and click the checkbox next to WS AnswerBook2 Document Collections 5.0. After you install your Sun WorkShop AnswerBook2 document collections, you must add the Sun WorkShop AnswerBook2 document collections to your AnswerBook2 Documentation Server. For information about adding and working with document collections, see Installing and Administering an AnswerBook2 Server online in the AnswerBook2 Help Collection, in your Solaris printed documentation, or on the web at http://docs.sun.com. For information about downloading AnswerBook2 Documentation Server software packages and viewing Sun WorkShop AnswerBook2 document collections, see Chapter 6, Viewing Online Documents.
-
Decide if you want to customize the software installation.
If you do not want to customize your software installation, skip to Step 9.
Follow these steps to customize the installation (deselect product components) of your Sun WorkShop software:
-
In the left side of the WorkShop Install window, click on the name of the Sun WorkShop tool to be customized.
-
Click Customize.
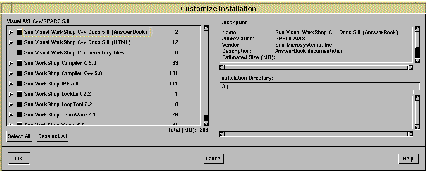
The Customize Installation window opens (see Figure 3-2) with the list of components for the software tool you selected.
Click Deselect All, and then click the checkbox next to the components you want to install.
To get software component descriptions, click on the name of the component in the left side of the Customize Installation window.
To view a software tool's components, click the arrow to the left of the component name in the left side of the Customize Installation window. See also Table A-3 in Appendix A, Sun WorkShop Products and Packages for product package components.
Note -If you deselect a software tool for installation that has a component that is required by another piece of software, the checkbox next to the component required by another piece of software in the left side of the window changes from selected to half-filled.
If you want to change the default installation directory for the product you are customizing, type the name of an alternate installation directory in the Installation Directory text box in the Customize Installation window. With your cursor still in the Installation Directory text box, press Return.
Figure 3-2 Customize Installation Window

-
-
Click OK in the Customize Installation window.
-
Repeat Step 6 and Step 7 as necessary to customize the installation of your Sun WorkShop development tools.
-
Click Install in the WorkShop Install window.
The software you selected is installed by workshop_install.
Note -To interrupt installation, click Interrupt Installation in the Installing Software - Progress window that opens after you click Install. To stop installation and close the workshop_install interface, first type ps -ef | grep installer at a command line, and then type the kill command to stop the installer executable. See the ps and kill man pages for more information.
A pop-up window appears when the installation is complete.
-
Click OK in the pop-up window when the installation is complete.
-
Click Exit in the WorkShop Install window.
Click Yes in the pop-up window to exit without installing license keys. You will install your licenses in the next chapter.
-
Install the required operating system and product patches by typing the following at a command line:
# ./install_required_patches
To get patch information, type help at the install_required_patches prompt. Then follow the instructions on the screen to install all the patches for this release.
Note -Run the install_required_patches script on each application server.
Read the README files in each of the patch directories to understand the fixes addressed by the patches.
To access current Sun WorkShop product patches, see the following web site:
http://access1.sun.com
-
If you mounted the product directory during a remote installation, unmount by typing:
# cd /
# /usr/sbin/umount /remote_products
-
Exit from superuser privileges by typing:
# exit
-
If you performed a remote installation, follow these steps (if you did not perform a remote installation, skip to Step 16):
-
Exit from the remote machine by typing:
% exit
-
Regarding the NFS server, follow these steps if they apply:
If nfsd was already running, type the following command:
# /usr/sbin/unshare /cdrom/devpro_v6n1_platform
If you manually started nfsd, stop it by typing:
# /etc/init.d/nfs.server stop
-
Remove the following line from the /etc/dfs/dfstab file:
share -F nfs -o ro /cdrom/devpro_v6n1_platform
-
Exit from superuser privileges by typing:
# exit
-
-
Disable client access by typing the following:
% /usr/openwin/bin/xhost - target-machine
Note -Be sure to type the minus sign (-) in the xhost command.
-
Review the README files located in the top directory of the software you installed.
-
Set your PATH and MANPATH variables by following the steps in "PATH and MANPATH Variables".
- © 2010, Oracle Corporation and/or its affiliates
