Accessing NFS File Systems
You can access files on NFS servers using Network Neighborhood or Windows Explorer similar to the way you access Microsoft or Netware file services. You access an NFS file system in the following ways.
-
Using NFS Servers - You can find an icon for NFS Servers on the Entire Network screen from Network Neighborhood. When you access it, you see a list of all the NFS servers on your local subnet. If the NFS server you need is part of your local subnet, you can browse its file system and map its folders to network drives. If the NFS server exists outside your subnet, you can easily add the server to the subnet. If you know the name of the folder you want to access, you can also map it to a network drive using the Tools menu of Windows Explorer or Windows NT Explorer.
-
Using NFS Automount Maps - These maps provide a means of accessing file systems, independent of their actual network location. You do not need to browse for servers or know the name of the server and its directories. Instead, you browse for the automount map that points to the file system. You can access the server's folders the same way you would those of an NFS server, browsing files or mapping drives.
Accessing NFS Servers
On a Windows 95 or Windows NT system, you can access NFS servers using Network Neighborhood. You can browse for NFS servers on your local subnet, or add NFS servers from outside your local subnet. You can also map a drive letter to an NFS server.
The multiple provider router (MPR) component of Microsoft Windows uses the universal naming convention (UNC) for specifying network resource names, and Solstice NFS Client uses two NFS conventions. Because of this use of multiple conventions, Solstice NFS Client's file-name mapping feature differs in detail from the file-name mapping used by Windows 95 and NT.
Windows 95 and Windows NT use this naming convention:
The Solstice NFS Client conventions include:
Solstice NFS Client must convert the NFS and automount formats to UNC format to enable processing by Windows 95 and Windows NT.
You can use UNC everywhere (that is, from the Map Network Drive dialog box, a Windows application, or a DOS box). NFS and automount formats can be used only when mapping a drive from a Map Network Drive dialog box.
On Windows NT, NFS format can also be used when mapping a drive from DOS with the net use command. See "Mapping Network Drives" for more information.
How UNC and NFS Names Differ
UNC resource names use the format \\server\share. The server is the computer on which the shared component is located. The share is the network resource name, usually an exported file system or a printer, that is being shared.
NFS file-name conventions use the format server:/directory1/directory2. An important function of the Solstice NFS Network Provider is to translate the NFS network resource names into the UNC format that is recognized by Windows 95 and Windows NT. This translation creates an alias for an NFS resource name.
Aliases are created when you map a drive or browse a file system.
How an Alias is Created
An alias is actually a combination of two aliases: a server alias and a share alias. The server alias is usually identical to the NFS server name minus the domain name. The exception occurs when you access two servers with the same name in different domains. For example, if the server sarge.bread.com is on your subnet and you add the server sarge.roses.com, the first sarge would be assigned the alias sarge, and the second might be assigned sarge~1. Network Provider stores both the NFS server name and its corresponding server alias.
Network Provider creates a share alias to match the name of the last subdirectory in a network path that you browsed or to which you mapped a drive.
Aliases Created When You Browse
If you browse servers in Network Neighborhood, the Solstice NFS Client Network Provider creates server aliases for all active NFS servers on your subnet. Network Provider first broadcasts to the NFS network servers on the local subnet, and any servers you have added. For each network server that responds, Network Provider translates the NFS name into a server alias. After server aliases are created, the list of responding servers is displayed in Network Neighborhood.
When you browse a particular server, Network Provider creates share aliases for the server's exported file systems. At this point, you can connect to those exports using the UNC format. When you browse a subdirectory within an export, a share alias is created only if you map a drive to the subdirectory. The share alias corresponds to the name of the last subdirectory in the path.
Aliases for Automount Maps
When you browse NFS automount maps or map a drive to an automount point, Network Provider creates a server alias for the automap and share aliases for the autokeys and subdirectories. For example, if you browsed the automount map for /home/joeuser, a server alias for /home and a share alias for /joeuser would be created. You could then use UNC format to access the directory.
Once Solstice NFS Client has created a UNC alias, you can connect to the network resource using either a UNC or NFS resource name format. When you enter the NFS name for a network resource, the Network Provider checks the entry for that name and uses the UNC name to connect the network resource on Windows 95 or NT. If no alias is found, Network Provider generates one automatically from the NFS name.
Aliasing Multilevel Directories on Windows 95
On a Windows 95 system, the multiple provider router (MPR) recognizes only UNC format (\\server\mount_point), and will not allow the mapping of path names consisting of more than two components. If you try to map more than two components, for example, \\server\mount_point\directory, to a drive letter, you will get an error.
If you want to map a drive to a subdirectory beneath the exported mount point, you must use NFS format. Windows does not recognize NFS formatted network resource names, but the MPR passes those names along to other network providers running on the computer. The NFS syntax, server:/mount_point/directory/subdirectory, lets you connect to a server using a multiple-level directory path. Windows MPR knows multiple-level NFS path names are not valid UNC names and just passes them on to the Solstice NFS Client Network Provider.
Solstice NFS Client handles the two-component limitation on path names by creating an alias for the full UNIX path of a network resource in the correct format. For example, the NFS resource name:
server:/mount_point/directory/subdirectory1/subdirectory2
is aliased as:
\\server\subdirectory2.
In summary, alias creation is the key to successful network resource connection. Aliases are created in one of two ways:
-
Browsing NFS resources with Network Neighborhood
-
Using the NFS resource name convention when making connections
Aliasing Multilevel Directories on Windows NT
In contrast to Windows 95, Windows NT allows you to use multiple-level UNC path names when mapping a drive. Solstice Network Provider creates an alias when you map a drive using either the NFS or UNC path formats. You do not need to browse a file system in order to create an alias.
If you map a drive to the file system /usr/doctools/dp on the server bluebird, using either the NFS path bluebird:/usr/doctools/dp or the UNC path \\bluebird\usr\doctools\dp, the resulting server alias would be \\bluebird and the share alias would be \dp.
You could then use the UNC format name in a Windows application or from DOS, using either the alias \\bluebird\dp or the full path \\bluebird\usr\doctools\dp.
If you look at your network drive connections through Windows NT's My Computer, or use the net use command in DOS, you see the full paths rather than the aliases of your network drives.
Mapping Network Drives
You can map an NFS network drive from:
-
Network Neighborhood
-
Windows Explorer
-
Other parts of the Windows 95 or Windows NT user interface, such as My Computer (using a toolbar icon)
-
Microsoft's net use command from a DOS prompt
Any time Windows 95 and Windows NT give you access to a drive, you can map it. Some applications may also provide drive mapping capability from the Open and Save As dialog boxes.
The following procedures describe several ways to map a network drive.
To Map a Network Drive from Network Neighborhood on Windows 95
-
Open Network Neighborhood and double-click Entire Network.
Network Neighborhood displays a list of workgroups, including workgroups labeled NFS Automount Maps and NFS Servers.
-
Double-click NFS Servers.
Network Neighborhood displays a list of all active NFS servers on your local subnet.
-
Double-click any NFS server.
Network Neighborhood displays a list of shared directories on that server.
-
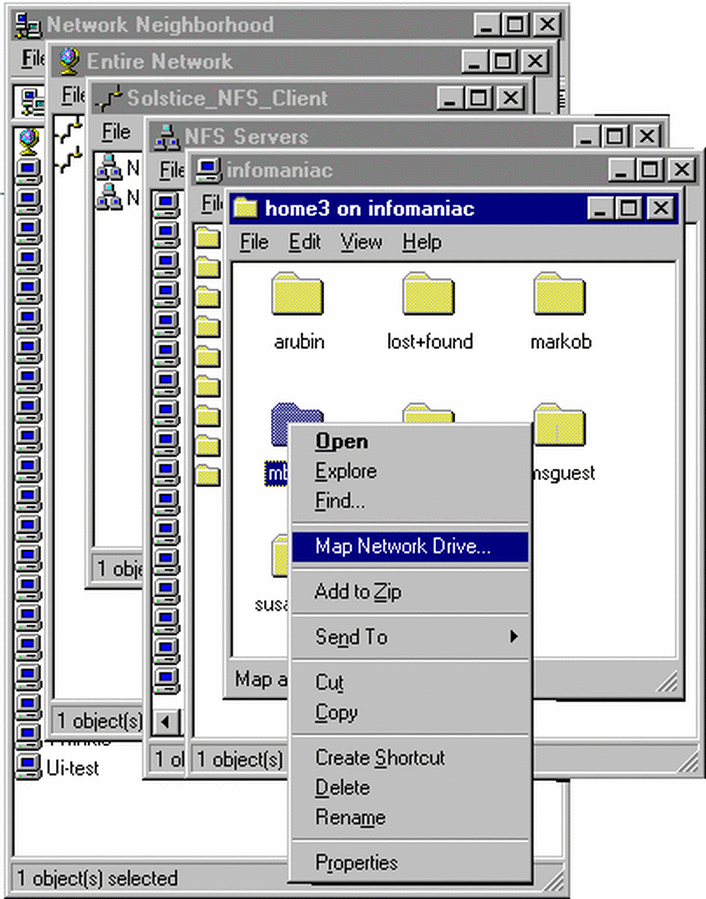
Select the folder to map to a network drive. Right click on the directory, select Map Network Drive (Figure 3-1), and then click OK.
Figure 3-1 Mapping a Network Drive on Windows 95

To Map a Network Drive from Network Neighborhood on Windows NT
-
Open Network Neighborhood and double-click Entire Network.
Network Neighborhood displays two icons labeled Microsoft Windows Network and Solstice_NFS_Client.
-
Double-click the Solstice_NFS_Client icon.
Network Neighborhood displays workgroups labeled NFS Automount Maps and NFS Servers.
-
Double-click the NFS Servers workgroup.
Network Neighborhood displays a list of all active NFS servers on your local subnet.
-
Double-click any NFS server.
Network Neighborhood displays a list of exported folders on that server.
-
Select the folder to map to a network drive. Right-click on the folder, then select Map Network Drive (Figure 3-2).
Figure 3-2 Mapping a Network Drive on Windows NT
To Map a Network Drive from Windows Explorer
-
Click the Start button, point to Programs, and then click Windows Explorer or Windows NT Explorer.
-
From the Tools menu, click Map Network Drive.
The Map Network Drive dialog box opens.
-
In the Path text entry box, type the NFS name of the network resource to which you want to connect.
Be sure to use the correct case (upper, lower, or mixed) for the server and directory names as they appear in the UNIX file system.
If you enter the NFS name spooky:/fun/house, for example, Network Provider creates an alias for the NFS resource and stores it. The next time you connect to this network resource, you can specify either its NFS file name (spooky:/fun/house) or its alias (\\~spooky\house).
You can also use automount syntax here, using the format /automap/autokey/dir1/dir2
For example, if your home directory is an automount point, you could enter a path similar to /home/joeuser. See "Browsing NFS Automount Maps" for more information about automounting.
Note -Solstice NFS Client does not support the Connect As feature of drive mapping on Windows NT. To connect a drive, you must use your login name.
To Map a Network Drive Using a UNC Name on Windows 95
On Windows 95, you can specify the alias for a network resource only if it already exists. If you have connected to this resource before, the Solstice network has created and stored an alias for it. If you are not sure whether the alias exists, use Explorer or My Computer to browse the network.
-
Click the Start button, point to Programs, and then click Windows Explorer.
-
From the Tools menu, click Map Network Drive.
The Map Network Drive dialog box opens.
-
In the Path text entry box, type the tilde (~) character followed by the alias. For example:
\\~spooky\house
To Map a Network Drive Using a UNC Name on Windows NT
On Windows NT, you can specify the full path to a network resource in UNC format. If you have not connected to this resource before, the Solstice network creates and stores an alias for it as it makes the connection. You do not need to browse the network before using a UNC name.
-
Click the Start button, point to Programs, and then click Windows NT Explorer.
-
From the Tools menu, click Map Network Drive.
The Map Network Drive dialog box opens.
-
In the Path text entry box, type the tilde (~) character followed by the alias. For example:
\\~spooky\house
Browsing NFS Servers
The Solstice NFS Client software uses the implicit drive mapping capability of Windows 95 and Windows NT to mount servers transparently when you browse for NFS servers. This implicit mapping process lets you look at and access files on NFS servers without mapping a network drive first.
To Browse for NFS Servers on Windows 95
-
Open Network Neighborhood and double-click Entire Network.
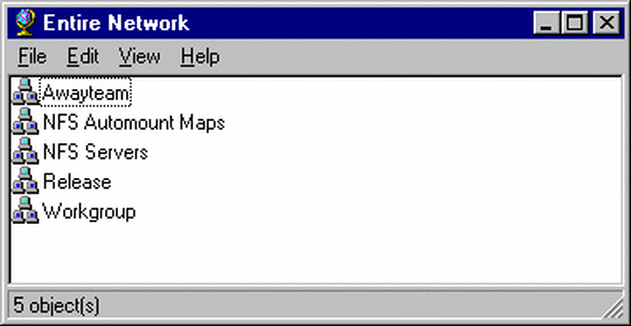
Network Neighborhood displays a list of Microsoft network workgroups, including workgroups labeled NFS Servers and NFS Automount Maps (Figure 3-3).
Figure 3-3 Browsing NFS Servers in Network Neighborhood
-
Double-click on the NFS Servers workgroup.
Network Neighborhood displays a list of all active NFS servers on the local subnet to which your machine is attached (Figure 3-4).
Figure 3-4 NFS Servers Listed in Network Neighborhood

-
Double-click any NFS server.
Network Neighborhood displays a list of exported folders on that server.
Note -You will see the alias for the network resources you browse. To see the NFS names, click Details from the View menu. The aliases are listed under Name, and the corresponding NFS names are listed under Comment.
-
Access these folders as you would folders on your local computer.
To Browse for NFS Servers on Windows NT
-
Open Network Neighborhood and double-click Entire Network.
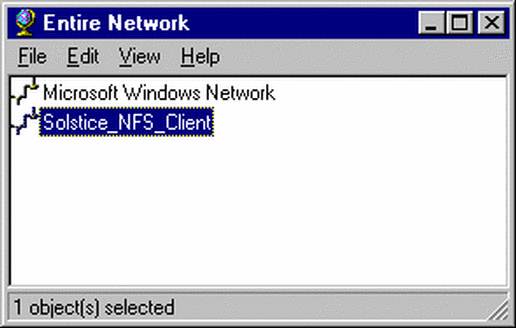
Network Neighborhood displays workgroups labeled Microsoft Windows Network and Solstice_NFS_Client (Figure 3-5).
Figure 3-5 Selecting Solstice_NFS_Client Workgroup
-
Double-click Solstice_NFS_Client.
Network Neighborhood displays workgroups labeled NFS Servers and NFS Automount Maps.
-
Double-click the NFS Servers workgroup.
Network Neighborhood displays a list of all active NFS servers on your local subnet (Figure 3-6).
Figure 3-6 NFS Servers in Network Neighborhood on Windows NT

To Add an NFS Server Outside the Local Subnet on Windows 95
-
Open Network Neighborhood and double-click Entire Network.
Network Neighborhood displays a list of Microsoft network workgroups, including workgroups labeled NFS Servers and NFS Automount Maps.
-
Right-click NFS Servers and then select Add/Remove NFS Servers.
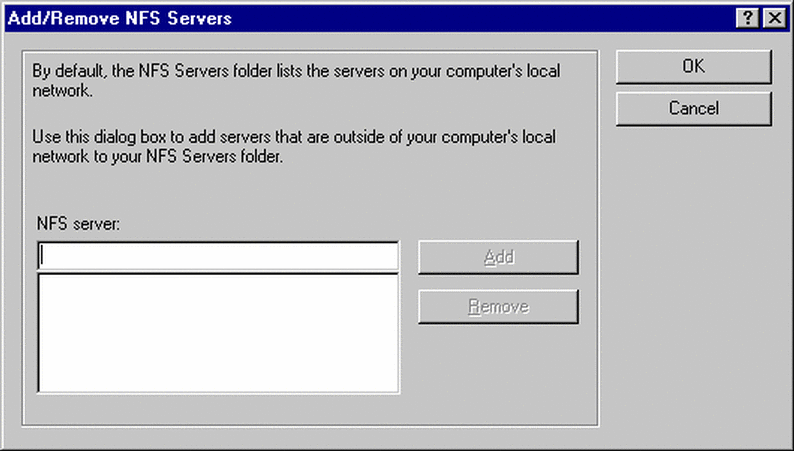
The Add/Remove NFS Servers dialog box opens (Figure 3-7).
Figure 3-7 Add/Remove NFS Servers Dialog Box
-
Type the name of an NFS server that is not on the local network and then click Add.
Repeat this step for each server you want to add.
-
Click OK to close the Add/Remove NFS Servers dialog box.
To Add an NFS Server Outside the Local Subnet on Windows NT
-
Open Network Neighborhood and double-click Entire Network.
Network Neighborhood displays workgroups labeled Microsoft Windows Network and Solstice_NFS_Client.
-
Double-click Solstice_NFS_Client.
Network Neighborhood displays workgroups labeled NFS Servers and NFS Automount Maps.
-
Right-click NFS Servers and then select Add/Remove NFS Servers.
The Add/Remove NFS Servers dialog box opens (Figure 3-7).
-
Type the name of an NFS server that is not on the local network and then click Add.
-
Click OK to close the Add/Remove NFS Servers dialog box.
To Remove an NFS Server Outside the Local Subnet on Windows 95
-
Open Network Neighborhood and double-click Entire Network.
Network Neighborhood displays a list of Microsoft network workgroups, including workgroups labeled NFS Servers and NFS Automount Maps.
-
Right-click NFS Servers and then select Add/Remove NFS Servers.
The Add/Remove NFS Servers dialog box opens (Figure 3-7).
-
Select an NFS server to remove and then click Remove.
-
Click OK to close the Add/Remove NFS Servers dialog box.
To Remove an NFS Server Outside the Local Subnet on Windows NT
-
Open Network Neighborhood and double-click Entire Network.
Network Neighborhood displays workgroups labeled Microsoft Windows Network and Solstice_NFS_Client.
-
Double-click Solstice_NFS_Client.
Network Neighborhood displays workgroups labeled NFS Servers and NFS Automount Maps.
-
Right-click NFS Servers and then select Add/Remove NFS Servers.
The Add/Remove NFS Servers dialog box opens (Figure 3-7).
-
Select an NFS server to remove and then click Remove.
-
Click OK to close the Add/Remove NFS Servers dialog box.
Browsing NFS Automount Maps
In addition to browsing NFS servers, Solstice NFS Client lets you browse NFS automount maps. The maps can be either NIS/NIS+ automount maps, or local automount maps. These maps contain information about other computers on your network.
The Solstice NFS Client Automounter is an NFS automounter. It enables administrators to define mount points without regard to their actual location on a network. Automount maps provide the links between file system names and their actual locations. For example, a file system name of /dat/pcapps could map to a network location of appserver:/export/pcapps. This location could change with a simple update to the automount maps.
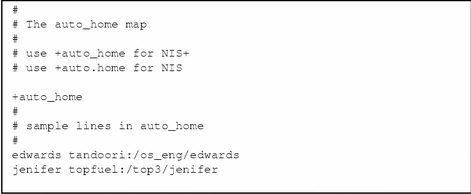
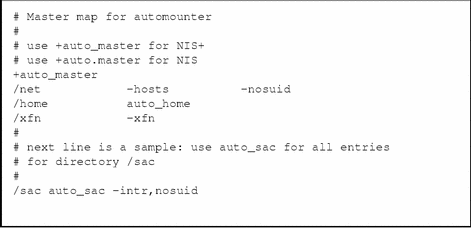
The Solstice NFS Client automount maps use the same format as the NIS/NIS+ automount maps in Solaris. The Solstice NFS Client installation program installs two required automount maps in the C:\Program Files\Solstice\Etc directory, auto_home and auto_master. These files must reside in this directory whether you use a local name service or NIS/NIS+. Figure 3-9 and Figure 3-8 show slightly modified versions of these two files. For more information on the format of these files, see the UNIX man page for automount (enter man automount on a Solaris workstation command line), and consult the Solaris system administration documentation.
You can view NIS/NIS+ maps on a Solaris machine by entering:
ypcat -k auto.home |
or
niscat auto_home |
If your network does not use NIS or NIS+, your computer will use the locally installed automount maps. These files must reside in your C:\Program Files\Solstice\Etc directory.
Home Automount Map
The auto_home file requires an entry for each user. To edit the automount maps, use a 32-bit editor (like WordPad) to prevent Windows from converting the file names to 8.3 DOS names.
Figure 3-8 A Home Automount Map
Master Automount Map
The auto_master file is read only at startup so you must reboot after editing it. However, the auto_home file is read as "needed" so it does not require a reboot after editing.
Figure 3-9 A Master Automount Map
Configuring NIS or NIS+
To browse NIS or NIS+ maps, you must configure either NIS or NIS+ as your Solstice naming service. Configure the naming service by entering the domain and IP address of your NIS or NIS+ server, following the directions in "To Configure NIS or NIS+".
To see the host name of your NIS server, use the following command on a Solaris system:
ypwhich |
To see the IP address of your NIS server, use the following command:
ypcat hosts | grep hostname |
To see the domain name and IP address of your NIS+ server, use the following command:
niscat -o org_dir |
To Configure NIS or NIS+
-
In Control Panel, double-click the Network icon.
-
For Windows 95, click the Configuration tab.
-
For Windows NT, click the Services tab.
-
-
Double-click Solstice NIS/NIS+ Naming Services, or select Solstice NIS/NIS+ Naming Services and click Properties.
The Solstice NIS/NIS+ Naming Services Properties dialog opens.
-
Click Enable NIS or Enable NIS+ to enable the appropriate name service for your network.
-
Enter the name service domain.
The name service domain is the complete name of your domain, usually ending in .COM, .EDU, .NET, .ORG and so on. To find out the domain name, enter the command below on a Solaris system on your subnet.
/bin/domainname
-
Specify a name server search order.
Select a name service and click Up or Down until the service you want is at the top of the list. The NIS or NIS+ service does not need to be at the top of the list for you to browse automount maps.
To Browse NFS Automount Maps on Windows 95
-
Open Network Neighborhood and double-click Entire Network.
Network Neighborhood displays a list of Microsoft network workgroups, including workgroups labeled NFS Servers and NFS Automount Maps.
-
Double-click the NFS Automount Maps workgroup.
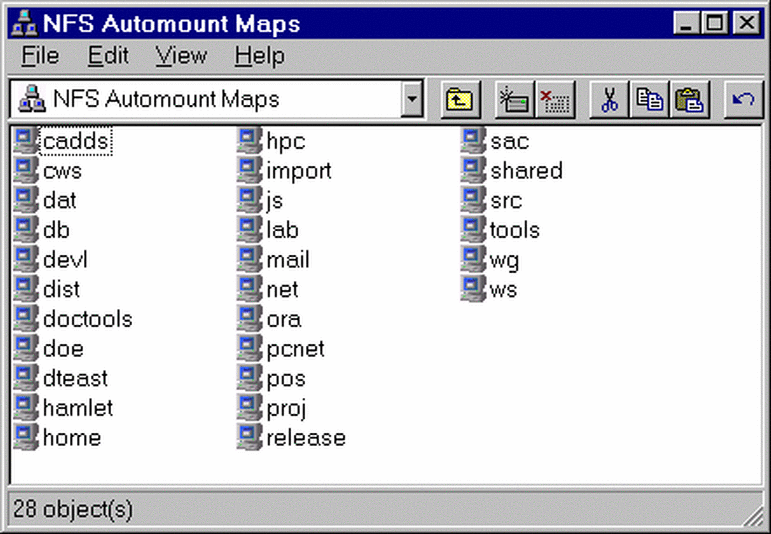
Network Neighborhood displays a list of the local NFS automount maps on your machine, or a list of NIS/NIS+ automount maps (Figure 3-10).
Note -If your network uses NIS/NIS+ but you do not see NIS/NIS+ automount maps, you may need to configure NIS or NIS+, as explained in "Configuring NIS or NIS+".
Figure 3-10 NFS Automount Maps Listed in Network Neighborhood
-
Double-click any NFS automount map.
Network Neighborhood displays a list of all NFS mount points defined in the automount maps.
-
Access these automount points as you would folders on your local computer.
Note that you can open an automount point and map a network drive to a folder within it by right-clicking the folder, selecting Map Network Drive, and clicking OK in the Map Network Drive dialog box.
To Browse NFS Automount Maps on Windows NT
-
Open Network Neighborhood and double-click Entire Network.
Network Neighborhood displays workgroups labeled Microsoft Windows Network and Solstice_NFS_Client.
-
Double-click Solstice_NFS_Client.
Network Neighborhood displays workgroups labeled NFS Servers and NFS Automount Maps.
-
Double-click the NFS Automount Maps workgroup.
Network Neighborhood displays a list of the local NFS automount maps on your machine, or a list of NIS/NIS+ automount maps (Figure 3-10).
-
Double-click any NFS automount map.
Network Neighborhood displays a list of all NFS mount points defined in the automount maps.
-
Access these automount points as you would folders on your local computer.
User Profiles and Connected Drives
Windows 95 and Windows NT differ in the way persistent drive mappings are treated when different users log in to a system.
Due to the default behavior of Windows 95, a network drive specified to be reconnected on login is mapped whenever a user logs in to Windows 95 on that computer. You can, however, set up Windows 95 so that drive mappings are associated with specific users. See the Solstice Network Client Administration Guide for information about user profiles.
In Windows NT 4.0, each user account has a unique user profile by default. As a result, drive mappings are associated with specific users. However, if you want all users to be reconnected to the same network drives when they log in, you can take advantage of the mandatory user profile ability of Windows NT Server 4.0 to give users identical environments. See the Windows NT documentation for more information about mandatory user profiles.
To Set Up Custom User Profiles on Windows
-
Click the Start button, point to Settings, click Control Panel, and then double-click Passwords.
The Passwords Properties dialog box opens.
-
Click the User Profiles tab.
-
Click the option button labeled "Users can customize their preferences and desktop settings."
The previously grayed-out User Profile Settings become active.
-
Click the options to turn settings on and off.
Use What's This help to determine what settings you need.
- © 2010, Oracle Corporation and/or its affiliates
