Mapping Network Drives
You can map an NFS network drive from:
-
Network Neighborhood
-
Windows Explorer
-
Other parts of the Windows 95 or Windows NT user interface, such as My Computer (using a toolbar icon)
-
Microsoft's net use command from a DOS prompt
Any time Windows 95 and Windows NT give you access to a drive, you can map it. Some applications may also provide drive mapping capability from the Open and Save As dialog boxes.
The following procedures describe several ways to map a network drive.
To Map a Network Drive from Network Neighborhood on Windows 95
-
Open Network Neighborhood and double-click Entire Network.
Network Neighborhood displays a list of workgroups, including workgroups labeled NFS Automount Maps and NFS Servers.
-
Double-click NFS Servers.
Network Neighborhood displays a list of all active NFS servers on your local subnet.
-
Double-click any NFS server.
Network Neighborhood displays a list of shared directories on that server.
-
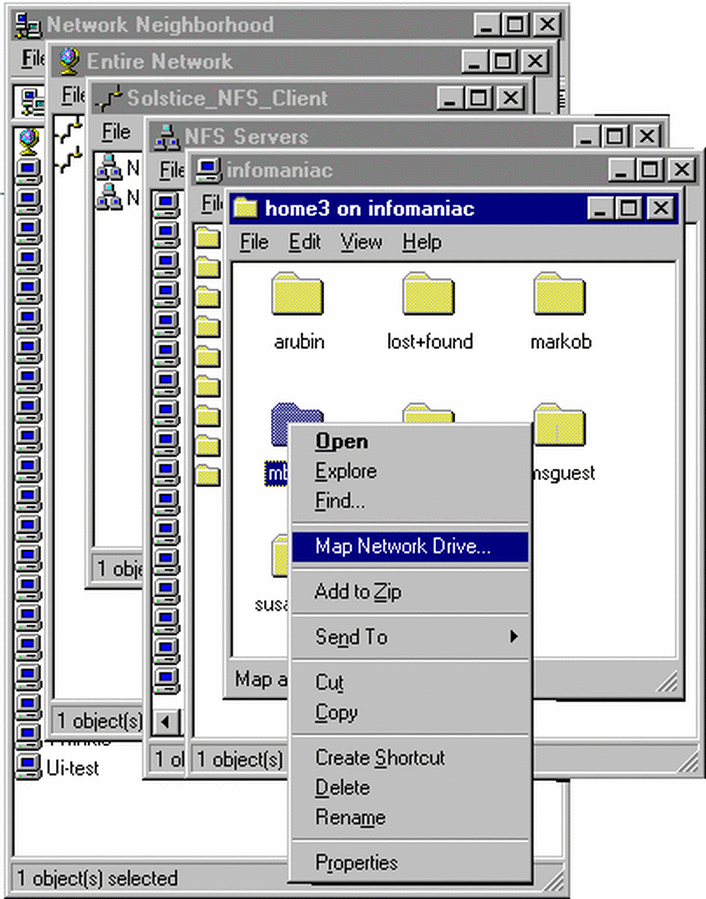
Select the folder to map to a network drive. Right click on the directory, select Map Network Drive (Figure 3-1), and then click OK.
Figure 3-1 Mapping a Network Drive on Windows 95

To Map a Network Drive from Network Neighborhood on Windows NT
-
Open Network Neighborhood and double-click Entire Network.
Network Neighborhood displays two icons labeled Microsoft Windows Network and Solstice_NFS_Client.
-
Double-click the Solstice_NFS_Client icon.
Network Neighborhood displays workgroups labeled NFS Automount Maps and NFS Servers.
-
Double-click the NFS Servers workgroup.
Network Neighborhood displays a list of all active NFS servers on your local subnet.
-
Double-click any NFS server.
Network Neighborhood displays a list of exported folders on that server.
-
Select the folder to map to a network drive. Right-click on the folder, then select Map Network Drive (Figure 3-2).
Figure 3-2 Mapping a Network Drive on Windows NT

To Map a Network Drive from Windows Explorer
-
Click the Start button, point to Programs, and then click Windows Explorer or Windows NT Explorer.
-
From the Tools menu, click Map Network Drive.
The Map Network Drive dialog box opens.
-
In the Path text entry box, type the NFS name of the network resource to which you want to connect.
Be sure to use the correct case (upper, lower, or mixed) for the server and directory names as they appear in the UNIX file system.
If you enter the NFS name spooky:/fun/house, for example, Network Provider creates an alias for the NFS resource and stores it. The next time you connect to this network resource, you can specify either its NFS file name (spooky:/fun/house) or its alias (\\~spooky\house).
You can also use automount syntax here, using the format /automap/autokey/dir1/dir2
For example, if your home directory is an automount point, you could enter a path similar to /home/joeuser. See "Browsing NFS Automount Maps" for more information about automounting.
Note -Solstice NFS Client does not support the Connect As feature of drive mapping on Windows NT. To connect a drive, you must use your login name.
To Map a Network Drive Using a UNC Name on Windows 95
On Windows 95, you can specify the alias for a network resource only if it already exists. If you have connected to this resource before, the Solstice network has created and stored an alias for it. If you are not sure whether the alias exists, use Explorer or My Computer to browse the network.
-
Click the Start button, point to Programs, and then click Windows Explorer.
-
From the Tools menu, click Map Network Drive.
The Map Network Drive dialog box opens.
-
In the Path text entry box, type the tilde (~) character followed by the alias. For example:
\\~spooky\house
To Map a Network Drive Using a UNC Name on Windows NT
On Windows NT, you can specify the full path to a network resource in UNC format. If you have not connected to this resource before, the Solstice network creates and stores an alias for it as it makes the connection. You do not need to browse the network before using a UNC name.
- © 2010, Oracle Corporation and/or its affiliates
