Attaching a System Board
This section gives a broad overview of the actions that occur when you execute DR attach. For step-by-step instructions using the GUI, see "To Attach a Board With Hostview". Or for instructions using the CLI, see "To Attach a Board Using the Command Line Interface (CLI)" .
You can attach system boards that are present in the machine, powered on, and not part of an active domain (that is, not being used by an operating environment). These unattached boards may have been hot-swapped into the domain after the domain was booted, blacklisted when the domain was booted, or detached from another domain.
Note -
If the system board has been hot-swapped into the domain, you should use the thermcal_config(1M) command immediately after the board has been powered on.
Prior to attaching a board, diagnostics are run on the board, requiring that at least one processor be present on the board and not be blacklisted. After you have selected an eligible board and a target domain, the DR attach operation proceeds through two operations: init attach and complete attach.
Init Attach
During the init attach phase, DR diagnoses and configures the selected board, preparing it and its devices for attachment to the operating environment. During this phase, DR performs the following tasks:
-
Adds the board to the board list of the target domain in the domain_config(4) file on the SSP.
-
Runs hpost -H on the board to configure it. hpost(1M) isolates the board on the Sun Enterprise 10000 system centerplane by placing it into a single-board hardware domain (refer to the hpost(1M) man page).
Note -Depending on the presence on memory and I/O devices on the board, the hpost testing level could be different for subsequent attach operations.
-
Runs obp_helper -H which loads download_helper to the board, and takes the processors on the board out of reset mode, allowing them to spin in download_helper.
-
Reconfigures the centerplane and board domain mask registers, placing the board in the target hardware domain.
DR displays the output of these hpost(1M) and obp_helper(1M) operations, including the steps that succeeded and those that caused exceptions.
If hpost(1M) and obp_helper(1M) succeed, the operating system is notified and requests OBP to probe the board. The operating environment then scans the OBP device tree and adds the devices to its configuration, but the drivers are not loaded.
After the init attach phase is completed, the OBP board configuration can be displayed to confirm which devices are present on the board. You can then enter the complete attach phase, or you can abort the operation.
If you abort the operation, DR removes the board configuration from the operating environment data structures and removes the board from the domain_config(4) file, leaving the board in a state where it is not assigned to any domain. The board can then be removed from the system by using hot swap, left in the system unattached, or attached at a later time.
Complete Attach
During the complete attach phase, DR attempts to complete the attach operation by making the resources that are hosted by the new system board available to the operating environment. If a problem occurs that prevents the attachment of any device on the board, the dr_daemon(1M) logs that problem in the system message buffer. To determine which devices were successfully attached, display and check the domain configuration for the board.
After a board is successfully attached, you have the option of reconfiguring the I/O devices. Refer to "Reconfiguration After a DR Operation" in the Sun Enterprise 10000 DR Configuration Guide for more information. This operation can take several minutes to complete.
Attach Buttons
When you perform an attach operation using the Hostview GUI (which transparently calls a separate executable: drview(1M)), the following buttons appear at various times during the attach process:
-
init attach - Begins the attach operation (see "Init Attach"). After the operation has completed successfully, the label on this button changes to complete.
-
complete - Completes the attach operation (see "Complete Attach").
-
reconfig - Automatically reconfigures the device directories in the domain. You may want to run the reconfiguration operation after attaching a board (refer to "Reconfiguration After a DR Operation" in the Sun Enterprise 10000 DR Configuration Guide).
-
abort - Cancels the attach operation. This button is enabled after the init attach operation has been successfully completed (see "Init Attach").
-
dismiss - Terminates the step that is currently in progress, but leaves the board in its current state (Present, init attach, In Use). You can remove the DR attach window by choosing dismiss at any point during the attach operation. The dismiss button terminates any work being done on the SSP for the attach operation. For example, if hpost(1M) is running when you click dismiss, that hpost(1M) process is terminated. Note that dismiss does not terminate work being done on the host by way of RPCs to the dr_daemon(1M). After an RPC is initiated, the host completes the RPC regardless of whether or not the calling program is waiting for the RPC to finish. The host dr_daemon(1M) keeps track of the progress of the attach operation. After the init attach operation completes successfully, it remembers this state. Therefore, you can dismiss the window, then return to the DR operation later and complete or abort the attach.
To Attach a Board With Hostview
Note -
Before you perform the following steps, you should read "Attaching a System Board".
-
From Hostview, select the proper view of the system from the View menu.
Choose the view that contains the board you want to attach.
-
From Hostview, select the board you want to attach.
-
From Hostview, choose Configuration > Board > Attach.
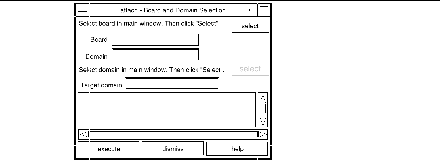
The attach Board and Domain Selection window is displayed.
Figure 2-1 The Attach Window

-
The Board field is automatically filled in for you. If the board is part of a domain, the Domain field is also filled in for you. (You can also manually edit these fields.)
-
In the main Hostview window, use the View menu to select the domain to which you want to attach the board.
-
Click the bottom Select button.
The Target Domain field is automatically filled in for you. (You can also manually edit that field.)
-
Click the execute button.
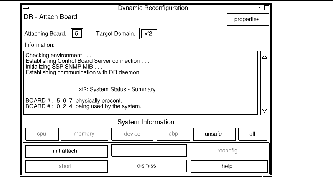
If any errors occur, the error messages appear in the main Hostview window. Otherwise, the Dynamic Reconfiguration window is displayed with the init attach button visible.
Figure 2-2 The DR Window With the Init Attach Button

-
Clicking on the init attach button begins the first phase of the board attach process. First, the system updates the SSP domain.config(4) file by adding the system board to the board list of the target domain. Next, the system uses hpost(1M) to self-test the system board. After the self-test is complete, the board is made visible to the running target domain by merging it into the hardware domain by modifying the centerplane and the system board hardware registers. Finally, during the conclusion of the init attach, OBP probes the new board to discover what CPU, I/O, and memory resources are present on the board. When this phase is finished, the caption on the button changes to complete. Before you click the complete button, however, you may want to view the domain information to verify that you want to proceed, as described in "Viewing Domain Information".
Typically, the init attach operation can take a few minutes to complete. Output from the hpost(1M) command is directed to the Information pane of the Dynamic Reconfiguration window.
If the init attach fails, look for the cause in the output in the Information pane. After you have determined the cause, you may want to choose init attach again.
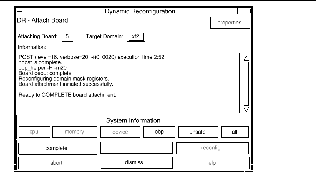
If the init attach operation completes successfully, the window changes with the complete button enabled.
-
Figure 2-3 The DR Window With the Complete Button

The complete operation normally takes less than one minute to finish. When it has successfully completed, DR displays the following message:
Board attachment completed successfully
The system board resources--processors, memory, and I/O devices--are now available to the operating system.
You can view the domain information about the newly attached board by using the buttons (CPU, Memory, Device, and so forth), as described in "Viewing Domain Information".
 Caution -
 Before you choose the reconfig button, be sure to read "Reconfiguration After a DR Operation" in the Sun Enterprise 10000 DR Configuration Guide.
-
Click the dismiss button.
The DR attach operation is complete.
To Attach a Board Using the Command Line Interface (CLI)
Before you perform the following steps, read "Attaching a System Board". The process of attaching a board is very similar whether you use Hostview or dr(1M). The basic concepts are not repeated in this section.
The dr(1M) shell was introduced in Chapter 1. A quick reference guide is available in the dr(1M) application by using the help command.
-
Set SUNW_HOSTNAME to the appropriate domain by using the domain_switch(1M) command.
% domain_switch domain_name
-
Use the dr(1M) command in an SSP Window to bring up the dr(1M) prompt.
In the following example, the target domain is called xf3.
% dr
Checking environment...
Establishing Control Board Server connection...
Initializing SSP SNMP MIB...
Establishing communication with DR daemon...

		xf3: Domain Status - Summary

BOARD #: 0 1 2 5 6 8 9 10 11 13 physically present.
BOARD #: 4 7 being used by the domain.
dr>
-
Begin the init_attach(1M) operation for the designated board.
In this example, board 6 is being attached to xf3 domain.
dr> init_attach 6
Initiate attaching board 6 to domain xf3.
Adding board 6 to domain_config file.
/opt/SUNWssp/bin/hpost -H40,28
Opening SNMP server library...

Significant contents of /export/home/ssp/.postrc:
blacklist_file ./bf
redlist_file ./rf
Reading centerplane asics to obtain bus configuration...
Bus configuration established as 3F.
phase cplane_isolate: CP domain cluster mask clear...
...
phase final_config: Final configuration...
Configuring in 3F, FOM = 2048.00: 4 procs, 4 SCards,
1024 MBytes.
Creating OBP handoff structures...
Configured in 3F with 4 processors, 4 SBus cards,
1024 MBytes memory.
Interconnect frequency is 83.294 MHz, from SNMP
MIB.
Processor    frequency is 166.631 MHz, from SNMP
MIB.
Boot processor is 6.0 = 24
POST (level=16, verbose=20, -H28,0040) execution
time 3:07
hpost is complete.
obp_helper -H -m24
Board debut complete.
Reconfiguring domain mask registers.
Board attachment initiated successfully.

Ready to COMPLETE board attachment.
-
Abort or complete the attach operation.
-
After the system successfully completes the init_attach(1M) operation, you can use the drshow(1M) OBP display to see an inventory of the board resources.
dr> drshow board_number OBP
-
If you wish to abort the attach operation, use the abort_attach(1M) command.
dr> abort_attach board_number
-
If you wish to complete the board attach operation, use the complete_attach(1M) command.
dr> complete_attach 6
Completing attach for board 6.
...Checking IDN state of domain_name_a :
UP
Issuing IDN UNLINK (domain_name_a)
Verifying IDN UNLINK...
IDN (XM) UNLINK succeeded (domain_name)
...Checking IDN state of domain_name_a :
UP
...Checking IDN state of domain_name_b :
UP
Initiating IDN LINK...
IDN LINK succeeded (domain_name_a + domain_name_b)
Board attachment completed successfully.
dr>
After you successfully attach the board, all of the drshow(1M) displays become available.
-
-
Use the drshow(1M) to display the I/O information for the newly attached board.
dr> drshow 6 IO

		SBus Controllers and Devices for Board 6

---------------------- Sbus 0 : Slot 0 : SUNW,pln0
-------------

device    opens  name                    usage
------    -----  ----                    -----
ssd0         0   /dev/dsk/c1t0d0s0
ssd16        0   /dev/dsk/c1t1d0s0
ssd32        0   /dev/dsk/c1t2d0s0
ssd48        0   /dev/dsk/c1t3d0s0
ssd64        0   /dev/dsk/c1t4d0s0
ssd80        0   /dev/dsk/c1t5d0s0

---------------------- Sbus 0 : Slot 1 : SUNW,pln2
-------------

device    opens  name                    usage
------    -----  ----                    -----
ssd96        0   /dev/dsk/c2t0d0s0
ssd97        0   /dev/dsk/c2t0d1s0
...
-
Type exit to terminate this dr(1M) session.
dr> exit
%
The SSP login shell prompt is again displayed.
- © 2010, Oracle Corporation and/or its affiliates
