| C H A P T E R 7 |
|
Introduction to Sun 3270 Pathway Recorder |
This chapter describes how to use the Sun 3270 Pathway Recorder to completely encapsulate access to a 3270 end-system within an opaque Java object. It contains the following topics:
Sun 3270 Pathway Recorder is a tool that enables a developer to create Java source and object code that corresponds to a fixed navigation through a portion of a 3270 application. It records the keystrokes that a user performs and produces Java code that recreates these actions. If the remote system sends non-3270 data to the recorder, the connection is terminated. The recorder does not permit the recording of non-3270 sessions.
This example uses the Sun MTP sample transaction ACCT, which is a 3270 application that enables a 3270 user to determine the account number of a person when that person's surname and first name are supplied. This transaction displays these 3270 screens.
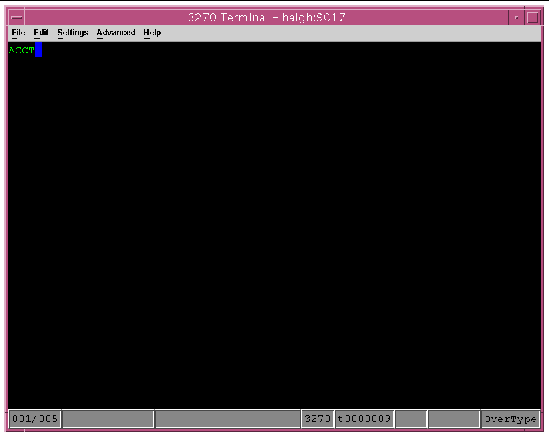
The user starts the transaction by typing ACCT on a blank transaction screen and pressing Enter. See FIGURE 7-1.
When the ACCT main screen is displayed, the user types the surname and first name of the person being queried and presses Enter. See FIGURE 7-2.
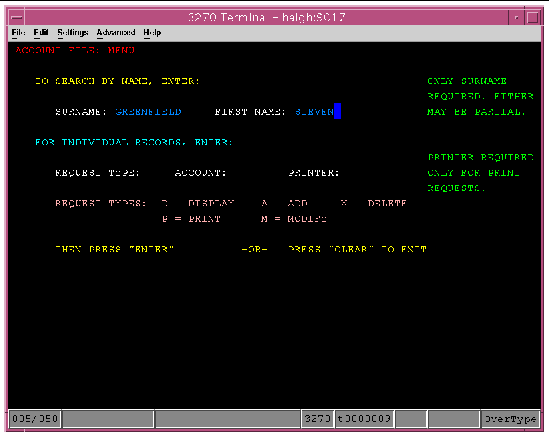
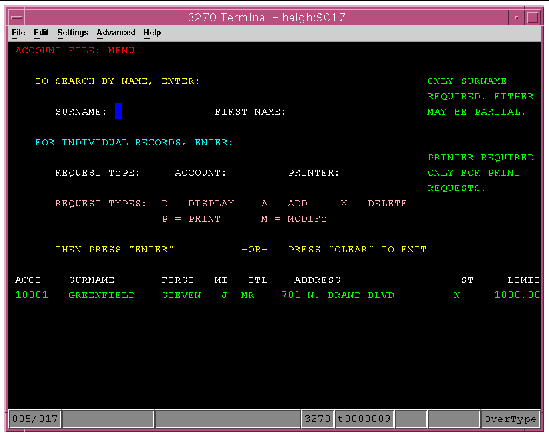
FIGURE 7-3 shows the details for the queried person.
The user ends the transaction by pressing Clear in the 3270 emulator screen.
When programming in Java, create a single Java object to which the input parameters (setSurname and setFirstName) are initially supplied, and from which to obtain the output parameter (getAccountNumber). For example:
AccountQueryObject aqo = new AccountQueryObject(); aqo.setSurname("Smith"); aqo.setFirstName("John"); aqo.performWork(); String s = aqo.getAccountNumber(); |
where the aqo.performWork() call instructs the AccountQueryObject to obtain the account number of the specified user.
Using the Sun 3270 Pathway Bean, you can implement classes such as AccountQueryObject by making calls to the Sun 3270 Pathway Bean as follows:
However, this is a tedious task for a large 3270 application and is error-prone. Sun 3270 Pathway Recorder enables you to easily create objects, such as AccountQueryObject, by interacting with a 3270 emulator.
The Sun 3270 Pathway Recorder is installed as part of the Sun 3270 Pathway installation. Follow the procedures in this section to start it on various platforms.
On Solaris or UNIX systems, there are two ways to start the Recorder.
1. Ensure that the required level of JRE is on your path.
See Obtaining a Java Runtime Environment (JRE).
2. Run the recorder shell script located in the bin directory of the product installation.
1. Ensure that the required level of JRE is on your path.
See Obtaining a Java Runtime Environment (JRE).
2. Run the executable JAR file located in the lib directory of the product installation.
Change to the lib directory and type the following command:
There are three ways of starting the Recorder.
2. Select Start  Programs
  Sun 3270 Pathway 2.0.0
  Recorder.
 Run the pathway_recorder.exe program located in the bin directory of the product installation.
 Run the executable JAR file located in the lib directory of the product installation.
Change to the lib directory and type the following command:
After starting the recorder, you can create a navigation class, which is a Java class that drives a Sun 3270 Pathway Bean. For this example, access to a Sun MTP TN3270 end-system with the ACCT transaction available is desirable. If you do not have access, the principles still apply. The following sections create a class named AccountQueryObject using the recorder. This obtains a user's account number when the user's first name and surname are supplied.
See Starting the Sun 3270 Pathway Recorder.
2. On the recorder main screen, select File  New, which displays the New Navigation Class window.
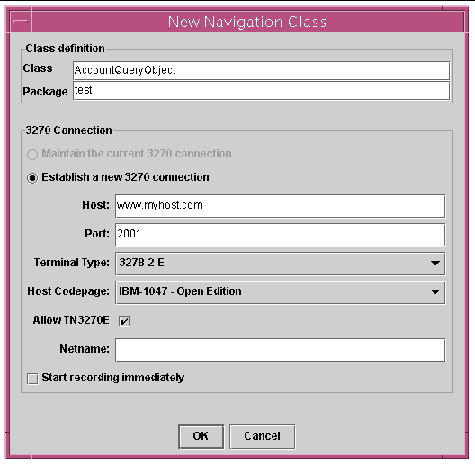
3. Type the name of the Java class, for example, AccountQueryObject.
4. Type the Java package name for this class, for example, test.
5. Type the Host and Port, and select the Terminal Type for the TN3270 end-system, for example:
You also have the option to specify if you want to Allow TN3270E and to specify the netname for the terminal.
The following figure shows the Sun 3270 Pathway Recorder main screen.
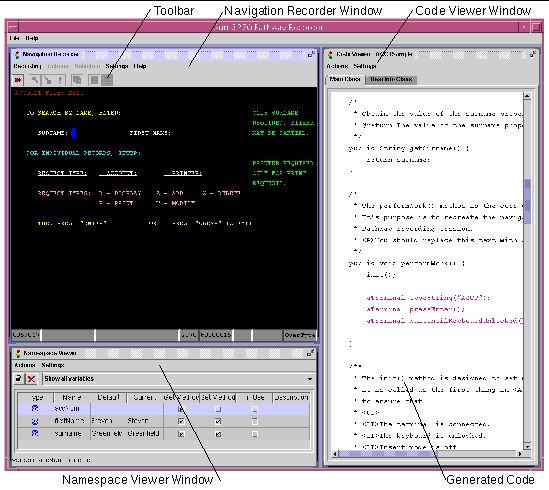
The sections of this window are as follows:
When the Navigation Recorder is in recording mode, all interaction with the 3270 emulator causes the generation of code in the Code Viewer window, which calls the Sun 3270 Pathway Bean to perform the recorded actions.
1. On the Navigation Recorder window, press Clear to ensure that the emulator displays a blank transaction screen.
2. Start recording by selecting either the Start option from the Recording menu of the Navigation Recorder window or by pressing the toolbar button.
3. On the 3270 emulator, type the transaction ID ACCT and press Enter.
The Code Viewer window generates the code as you type.
The lines of code in the Code Viewer window are grouped together into interactions. Interactions are the actions taken by the terminal user between each occurrence of pressing a 3270 Action Identifier (AID) key. An interaction includes a line of code that waits for the 3270 host to respond to the AID key.
After you type ACCT and press Enter, the window shown in FIGURE 7-2 is displayed in the Navigation Recorder window. Type the surname and first name of the person whose account details you want to query. The surname and first name are values that are supplied to the generated Sun 3270 Pathway navigation class at runtime; in other words, they are input parameters. You define an input parameter by creating a variable in the Namespace Viewer window.
1. Select the Create option from the Actions menu or use the Create A New Variable button on the toolbar
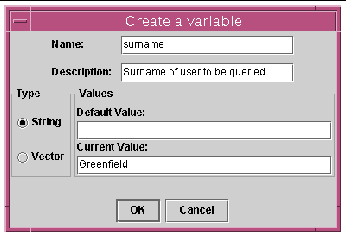
2. When the Create a variable window is displayed, make the following entries:
a. Type the variable name; for example, surname.
b. In the Description field, type a brief description of the variable.
c. In the Type area, select String.
d. In the Current Value field, type a value; for example, Greenfield.
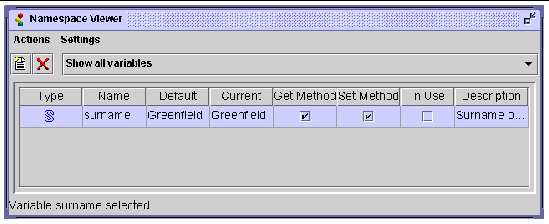
In the Namespace Viewer window an entry for the surname variable is displayed.
In the Code Viewer window the following lines of code are generated:
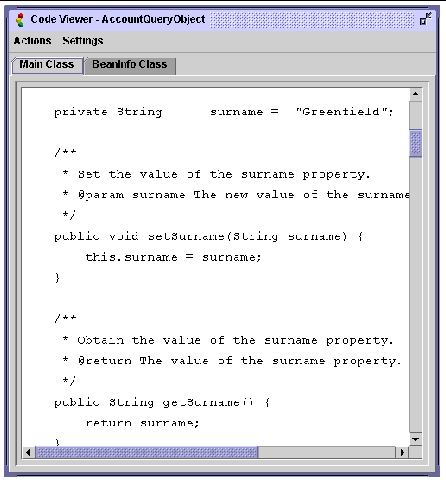
This code shows the declaration of a String variable named surname and a pair of accessor methods named setSurname and getSurname, which you can use to access this variable from outside the generated class.
After an input parameter is defined, the recorder can enter it at the 3270 emulator.
1. On the Actions menu select the Type a variable option or use the toolbar button.
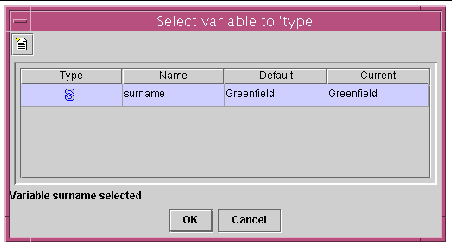
2. Select the surname variable.
1. The current value of the surname variable (for example, Greenfield) is entered into the 3270 emulator as if a user had typed the string.
2. The generated code is displayed in the Code Viewer window as:
4. You can now press the Tab key in the 3270 emulator to move the cursor to the next field where you type the First Name.
This generates another line of code:
5. Repeat the process of creating and entering another input parameter named firstName with a value of Steven.
After you complete this entry and press Enter, the Code Viewer window shows the following lines of code for the entire interaction:
term.typeString(surname); term.tab(); term.typeString(firstName); term.pressEnter(); term.waitUntilKeyboardUnlocked(); |
The 3270 emulator now shows the account number for Steven Greenfield, which are the five characters beginning in row 17, column 2. This is the information that you want to extract. To make this information available to code that calls the navigation class at runtime, you must define a variable.
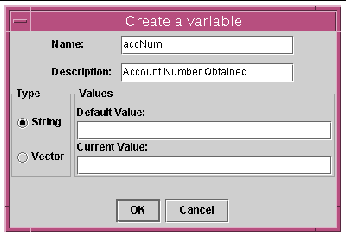
1. Select the Create option from the Actions menu or use the Create A New Variable button on the toolbar
2. When the Create a variable window is displayed, make the following entries:
a. Type the variable name; for example, accNum.
b. In the Description field, type a brief description of the variable.
c. In the Type area, select String.
|
Note - Because you are going to use this variable as an output variable, it is not necessary to specify a default or current value. |
After you create the variable, you can select it.
1. Make sure you are in Flow Selection mode.
On the Navigation Recorder window, select Selection  Flow Selection, or click the Flow Selection toolbar button.
2. Using a click-and-drag action, select the five characters from the 3270 emulator screen where the Account Number appears.
This action does not generate any code.
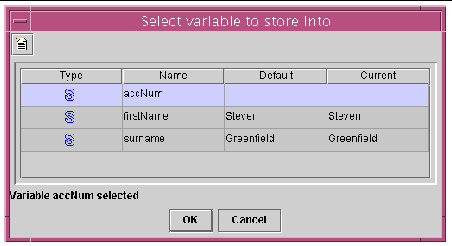
3. After the area is highlighted, you can select the Store Highlighted Area option from the Actions menu or use the corresponding toolbar button.
The dialog box shown in FIGURE 7-11 is displayed.
 [ D ]
[ D ]
4. Select the accNum variable that you just created.
6. The following code is generated in the Code Viewer window:
accNum = term.getReadableString(1281,5);
The generated code extracts the five-digit account code from offset 1281 of the 3270 emulator's display buffer using the getReadableString() method of the Sun 3270 Pathway Bean. This means that any character on the 3270 emulator that looks like a space character is returned as a space, even if it is a null or attribute byte. For additional information about getReadableString(), refer to the Sun 3270 Pathway Bean API definition.
This section describes how to complete the recording process and save the navigation class.
1. Press Clear on the 3270 emulator screen to exit the ACCT transaction.
2. Type the CSSF LOGOFF transaction and press Enter on the 3270 emulator to exit the terminal session.
3. Select the Stop option from the Recording menu of the Navigation Recorder window or use the corresponding toolbar button.
1. On the recorder main window, select File  Save.
Save.
2. In the dialog box, verify the class and package names.
If they are not correct, type the correct names in the Class and Package fields.
3. Select a directory into which to save the output files.
See To Save Navigation Classes to the Disk for more information about the dialog box.
Based on the previous example, the following output files are generated for a class named AccountQueryObject:
AccountQueryObject.java AccountQueryObjectBeanInfo.java AccountQueryObject.ManifestStub AccountQueryObject.jar |
AccountQueryObject.java is the source code of the Sun 3270 Pathway-generated class. You can use this source file in the development environment of your choice (along with the Sun 3270 Pathway Bean) to build your own Java applications.
AccountQueryObjectBeanInfo.java and AccountQueryObject.MaifestStub are files required to compile AccountQueryObject.java and turn it into a Java Bean.
A built version of this Java Bean is generated as AccountQueryObject.jar. You can include this precompiled Java Bean into your development environment instead of the Java source code.
The following example shows how to call a Sun 3270 Pathway navigation class from Java code.
AccountQueryObject aqo = new AccountQueryObject(); aqo.setSurname("Smith"); aqo.setFirstName("John"); aqo.performWork(); String s = aqo.getAccountNumber(); |
Examine the source code for the navigation class to see how it works. A sample of a Sun 3270 Pathway-generated bean and a segment of code to call it is in the INSTROOT/samples/recorder directory.
Copyright © 2003, Sun Microsystems, Inc. All rights reserved.