This appendix explains how to use the Migration Tool that comes with Netscape Certificate Management System. This executable command-line script extracts database contents (as stored in the Informix database) and certificate/key data (as stored in flat-file DBM databases) from Certificate Server 1.x and places the data in three platform-independent files that can be transferred by diskette, tape, or FTP to a Certificate Management System 4.x installation area for importing into the new system. This appendix has the following sections:
<server_root>/bin/cert/tools/migrate/<platform>
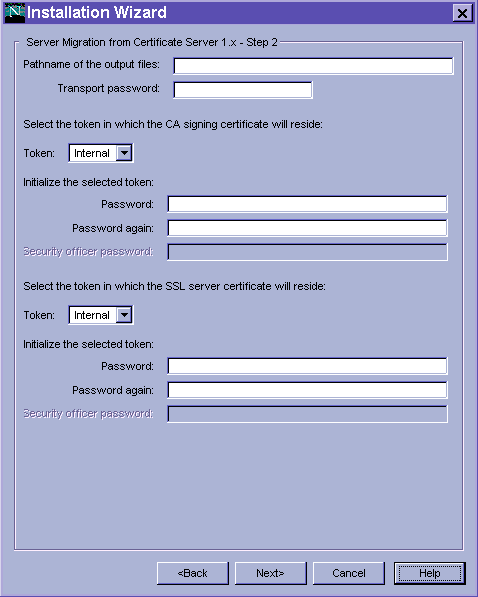
To begin the migration process, you enter the migrate command and its arguments in a command shell, provide database information and passwords, and monitor the output in the shell window.
You have stopped the instance of Certificate Server 1.x that you will migrate.
The global variable INFORMIXSQLHOSTS is undefined.
You are able to run the Migration Tool as a user with permission to read magnus.conf, CASigningKey.db, ServerCert.db, and ServerKey.db in the config/ directory of the Certificate Server 1.x instance.
The user running the Migration Tool has read and write permissions in the output directory.
On AIX, the directory containing Informix is /usr/informix (the default). If Informix has not been installed in /usr/informix, you can make a symoblic link from there to the actual installation directory.
On Windows NT, the location of the Informix DLLs is in the PATH environment variable. If not, the Migration Tool will fail because it cannot find ISQLT07C.DLL. For example, if the Informix installation directory is c:\informix, PATH must include c:\informix\bin.
Use the following command in a Unix or DOS command shell:
migrate certsrvroot=<directory> outputdir=<directory>

	dbrootdir=<directory> servername=<name> help
The certsrvroot directory must be the directory that contains the config directory for the server instance. For example, if the Certificate Server 1.x instance config directory is /opt/ns-home/cert-server/config, use / opt/ns-home/cert-server as the certsrvroot parameter.
Arguments
The migrate command takes the following arguments:
There are two stages to the migration process. The Migration Tool first connects to the Informix database, extracts database records, and writes them out to an LDIF file in the specified output directory. It then opens the flat files containing the key and certificate information, and transfers that information to ASCII files in the output directory.
The tool prompts for the Informix database name and login:
STARTING Informix Data Base migration...

  ENTER the existing "Certificate Server 1.x" Informix Data Base
Information:

    Informix Data Base name [cmsdb]: <data base name>

    Informix Data Base login name [cmsdbusr]: <db administrative login>

    Informix Data Base password: *********
  CONNECTED to Informix Data Base...

  MIGRATING certificate records...

    Extracted 1 cert record(s)

    Extracted 2 cert record(s)

    ...

  MIGRATING last serial number...

  MIGRATING certificate revocation list...

SUCCESSFULLY completed Informix Data Base migration;

GENERATED "database_add.ldif" and "database_mod.ldif" files!
If the migration of data from the Informix database fails, the tool describes the Informix error and asks whether to continue or exit. If you choose to continue, certificate and key migration proceeds. See Informix manuals to find the source of the problem, fix it, then run the tool again to extract the Informix data.
Starting Database migration...

CMS -- UNLOGGABLE FAILURE: [VENDORLIB] Vendor Library Error:

Cannot open file `sql.iem'; Cannot open file `os.iem' (-461)(4)
migrate: error: Could not connect to database!

Continue migration [y|n]: y
In this example, the user chooses to continue with the second phase of the migration, then go back and run the tool on the right machine to migrate the Informix database information to CMS.
After the Migration Tool has migrated the records from the Informix database, it converts and exports the SSL server and CA signing certificate chains.
STARTING Certs and Keys Data Base migration...

  SUCCESSFULLY dumped Server Certificate Chain!

  SUCCESSFULLY dumped CA Signing Certificate Chain!

  ENTER a new "CMS 4.x" Transport password

  used to protect the private key material:

    Transport password: ********

    Verify Transport password: *********
If the transport password and the verify transport password entries are not the same, the following message appears, and the tool exits:
Transport and verify transport passwords are not the same
If the transport password does not conform to the two minimum quality rules, one of the following messages appears:
The transport password must be a minimum of 8 characters

The transport password must contain both alphabetic and numeric
characters
After this message, the password prompt appears so you can enter a new password.
  ENTER the existing "Certificate Server 1.x" password

  used to protect SSL Server Key data:

    SSL Server Key password: ********

  SUCCESSFULLY dumped SSL Server Key!

  ENTER the existing "Certificate Server 1.x" password

  used to protect CA Signing Key data:

    CA Signing Key password: *********
If either password is incorrect, an error message appears and the tool exits. See Exit Codes and Error Messages.
  SUCCESSFULLY dumped CA Signing Key!

SUCCESSFULLY completed Certs and Keys Data Base migration;

GENERATED "keycerts.dat" file!Starting Certs and Keys migration...
Exit Codes and Error Messages
When the Migration Tool exits, it provides an exit code and displays an explanatory message. If the data migration process is successful, the Migration Tool returns the code 0 and prints the success message. If an error occurs, the tool returns one of the error codes and prints an error message. In some cases, you will be asked if you want to continue when an error ocurrs. If you answer `no', the tool exits with the status listed. Table A.1 describes the success and error exit codes and messages.
Table A.1 Exit codes and conditions
When you run the Migration Tool, the files database_add.ldif, database_mod.ldif, and keyscerts.dat are generated and placed in the output directory (specified by the outputdir argument):
Contents of the 1.x Informix database t_certificate_record table. The entries are in standard ldif format for use with the ldapmodify -a command.
Contents of the 1.x Informix database, from the CRL and last_serial_number tables. The entries are formatted for use with the ldapmodify command.
An ASCII file containing the private keys (RSA only), public-key certificates (X.509 v3 format) for the signing key and certificate, and the SSL key and certificate. The file contains the full certificate chains of these keys and certificates.
This section only applies if you are migrating from any UNIX platform to Windows NT or from Windows NT to any UNIX platform.
The output of the conversion will be overwrite any files with the original names: # mv database_add.ldif database_add.ldif.orig # mv database_mod.ldif database_mod.ldif.orig # mv keyscerts.dat keyscerts.dat.orig
The output of the conversion will be overwrite any files with the original names:
# mv database_add.ldif database_add.ldif.orig

# mv database_mod.ldif database_mod.ldif.orig

# mv keyscerts.dat keyscerts.dat.orig
Use sed to convert the files to the appropriate format.
# sed -e 's/^M//g' database_add.ldif.orig > database_add.ldif

# sed -e 's/^M//g' database_mod.ldif.orig > database_mod.ldif

# sed -e 's/^M//g' keyscerts.dat.orig > keyscerts.dat
To convert from UNIX to Windows NT, add a Ctrl-M to each line break:
# sed -e 's/$/^M/g' database_add.ldif.orig > database_add.ldif

# sed -e 's/$/^M/g' database_mod.ldif.orig > database_mod.ldif

# sed -e 's/$/^M/g' keyscerts.dat.orig > keyscerts.dat
To get the ^M to show up in the shell commands, press Ctrl-V then Ctrl-M. If this does not work in your shell, run the command in the Bourne shell (/ bin/sh).
The transport password. This is the password you specified and confirmed during the second phase of the migration process.
The required token passwords. Both of these are for the Certificate Management System installation. Depending on what else you have specified during the configuration, you may not need to provide all of the passwords here; the ones you do not need are inactive.
IBM RS/6000, AIX 4.1, 4.2
Sun Sparc, Solaris 2.4, 2.5.1
Intel Pentium, Windows NT 3.51, 4.0