Chapter 6
Tutorial: Customizing the End User Page
- Getting Ready for Development
- Copying a Configuration File
- Changing the Background and Adding a Heading to Browse Pages
- Testing the Change
- Changing the Background and Adding a Heading to Search Results Pages
- Modifying the List of Subcategories in a Browsed Category
- Modifying the List of Documents in a Browsed Category
- Modifying the List of Matching Documents
- Modifying the List of Matching Categories
- Changing the End of The Page
- Finishing Up
Getting Ready for Development
First, you need to set up the development environment so that any changes you make in the configuration and pattern files will take effect immediately. To do this, you need to make a small change in thecsid.conf file. This file lives in the config directory of the directory containing the specific Compass Server. For example, suppose you have installed Compass Server 3.0 in compassdir, and have created a server instance named topper. In this case, the csid.conf file will be in:
compassdir/compass-topper/config/csid.confcsid.conf in a plain-text editor. Search for template-refresh-rate, (it will be close to the end of the file) and set its value to 1 as follows:
template-refresh-rate=1Save the file. Now you need to apply the change to the Compass Server. In the Compass Server Administration interface, select the Apply button, and then select the Load Configuration Files button.
Copying a Configuration File
The next thing to do is to copy thenormal.conf configuration pattern and save it to a new name. This file lives in the templates directory of the directory containing the specific Compass Server. For example, suppose you have installed Compass Server 3.0 in compassdir, and have created a server instance named topper. In this case, the normal.conf file will be in:
compassdir/compass-topper/templates/normal.confnormal.conf file and name it yourcompany.conf.
Open the file yourcompany.conf. Near the top of the file, you see a statement that defines the variable RDM-description. The RDM-description value determines the name of the template as it appears in the menu of templates in the Compass Server End User administration page. Change the value of RDM-description as follows.
RDM-description="Your Company Search and Browse "
Changing the Background and Adding a Heading to Browse Pages
In this section, you'll learn how to modify the content that appears at the top of browse-mode pages, and also how to modify the BODY tag that sets the background characteristics for browse-mode pages. Create the fileyourcompany-bw-top.pat as a copy of normal-bw-top.pat.
Open the file yourcompany-bw-top.pat in a plain-text editor. You'll see a <SCRIPT> tag near the top of the file that defines a series of functions. Don't worry about those for now. Scroll down the file or search for the BODY tag, which starts the actual page. Change the background color to pale yellow:
BODY BGCOLOR="#FFFFEF"Immediately after the
<BODY> tag, add a heading that mentions your company's name, and mention that this is a browse-mode-page, for example:
<H1><FONT COLOR="#FFFF00">Welcome to the Search Page for My Company (Browse-Mode-Page)</FONT></H1>Save the file. Now you need to update the configuration file to use the new pattern file. Edit the file
yourcompany.conf and search for RDM-browse-top. Change the value of RDM-browse-top to yourcompany-bw-top.pat, as follows:
RDM-browse-top=yourcompany-bw-top.patSave the file.
Testing the Change
Before you can test the changes you have made, you need to tell the Compass Server to use your new configuration file. In the Compass Server Administration interface, open the End User page. In the Search/Browse Preferences section, select Your Company Search and Browse in the Templates field, then press the OK button. Stop the server then start it again so that the template change can take effect. Access your server as a client to see the new "YourCompany" browse page. You see that the browse page uses the new pattern file. However, if you submit a search, you'll see that the search page still has a white background. This is because in the fileyourcompany.conf, the value of RDM-search-results-top is still normal-sr-top.pat. The file assigned to RDM-search-results-top defines the BODY tag and the top section of the document for pages generated by submitting searches.
Changing the Background and Adding a Heading to Search Results Pages
In this section, you'll learn how to modify the content that appears at the top of search-results pages, and how to modify theBODY tag that sets the background characteristics for search-results pages.
To make the search results page use a similar heading and background as the browse page, you need to repeat the process you have just gone through.
Create the file yourcompany-sr-top.pat as a copy of normal-sr-top.pat.
Open the file yourcompany-sr-top.pat in a plain text editor. Change the value of the BGCOLOR attribute of the BODY tag to #FFFFCF, which is a slightly darker yellow than the background color used in the browse mode page. Also add a heading immediately below the BODY tag, as follows:
<BODY BGCOLOR="#FFFFCF" TEXT="#000000" LINK="#006666" VLINK="#999999">Save your changes. Edit the file
<H1><FONT COLOR="#22DDCC">Welcome to the Search Page for My Company (Search-Results-Page)</FONT</H1>
<BR>
<BR>
yourcompany.conf, and set the value of the RDM-search-results-top variable to yourcompany-sr-top.pat, as shown:
RDM-search-results-top=yourcompany-sr-top.patSave the file and test your change by submitting a search in the Compass Server End User page. The page that shows the search results should have a yellow background and an introductory greeting.
Modifying the List of Subcategories in a Browsed Category
This section shows how to modify the way that categories are displayed during browsing. (To browse a category, click it in the list of categories in the End User page.) The changes will be simple; you will change the color of the subcategories, and display them as level 4 headings instead of bulleted list items. First, create the pattern files for displaying the subcategories:Modifying the Category-Browse-Top Pattern File
First, open the fileyourcompany-cb-top.pat in a plain-text editor. The contents of this file will be a script that looks like:
<!-- normal-cb-top.pat -->
<SCRIPT LANGUAGE=JavaScript>
var subCategoryCount = 0;This script defines and initializes some variables, such as subCategoryCount. These variables are not used again in this script. They are used by other files in the normal template, but they will not be used again in the new template that you are developing. To keep your file tidy, delete the variable declaration statements. The special variable $$rdm-hits-returned evaluates to the number of hits returned, which is essentially the number of sub-categories in the category being browsed. (This file is used only during browsing.) If the value is 1, it means that the only hit is the browsed category itself, so a value of 2 or more means there are subcategories. The special variable
var subCategoryNameArray = new Object();
var subCategoryIdArray = new Object();
var subCategoryCountArray = new Object();
if ($$rdm-hits-returned > 1) { // 1 just means itself, 2 or more is ok
document.writeln('<FONT SIZE=-1 FACE="arial, helvetica">
<B>$$category Subcategories:</B></FONT>');
}
</SCRIPT>
$$category evaluates to the category that is currently being processed. (There is also another special variable, $$browse-category, which evaluates to the category being browsed. When you browse categories, $$category and $$browse-category both have the same value, since the category being processed is the category being browsed. However, the first time the End User page is opened, no categories are being processed, so $$category has no value.)
If there are any sub-categories, the script writes a line stating the name of the browsed category, followed by the word "Subcategories." For example, if the browsed category is Netscape, the script writes the line: "Netscape Subcategories."
Just to see the effect of making a change, edit the argument to document.writeln so that it prints its line in italics, and uses a more wordy introduction to the list of subcategories. For example, the introduction might say "Netscape: These are the subcategories: ".
There is one tricky issue here, and that is that the $$category variable does not have a value if the root category is being browsed. Thus before using $$category to write the name of the category, you need to check that $$category has a value. You can use the following special syntax:
$$variable[Regardless of whether the root category or another category is being browsed, you can show a message that says "Here are the subcategories" if there are subcategories. To increase the impact of the change, you can change the color of the message. Replace the entiredo this if $$var has value][else do this if $$var has no value]
if clause in the script by the following code:
if ($$rdm-hits-returned > 1) { // 1 just means itself, 2 or more is ok
  document.writeln("<FONT COLOR='#0055FF'><B>");
  // write category name if $$category has a value
  $$category[document.writeln("$$category: ");]
  document.writeln("These are the subcategories:</B></FONT>");
}
The following listing shows the full script with the changes:
<SCRIPT LANGUAGE=JavaScript>Hint. Don't forget that Javascript does not handle punctuations such as " or '. If you wish to use one of these punctuation characters, you need to put a "\" in front of it to escape it. Save your changes.
if ($$rdm-hits-returned > 1) { // 1 just means itself, 2 or more is ok
document.writeln("<FONT COLOR='#0055FF'><B>");
// write category name if $$category has a value
$$category[document.writeln("$$category: ");]
document.writeln("These are the subcategories:</B></FONT>");
}
</SCRIPT>
Modifying the Category-Browse-Hit Pattern File
Open the fileyourcompany-cb-hit.pat in the text editor. (If it doesn't exist, create it as a copy of normal-cb-hit.pat.) This file is called once for each sub-category.
The contents of the file is a script that looks something like:
<!-- Category Hit: $$rdm-hit -->This pattern file accumulates data about each subcategory into arrays rather than writing it out directly. This is because the format used by the normal template to display subcategories depends on the number of sub-categories. If there are more than four subcategories, then they are displayed in a table, and if there are four or less, they are displayed in a bulleted list. We don't know how many subcategories there are until they have all been processed. Thus the
<SCRIPT LANGUAGE=JavaScript>
// compute the amount of stuff under category and write in parens
var cnt = 0;
$$subclassification-count[cnt += $$subclassification-count;]
$$categorized-count[cnt += $$categorized-count;]
subCategoryNameArray[subCategoryCount] = "$$category";
subCategoryCountArray[subCategoryCount] = cnt;
subCategoryIdArray[subCategoryCount] = "$$preserve-id";
subCategoryCount++;
</SCRIPT>
normal-cb-hit.pat file does not write data, it simply accumulates it. The task of writing the data falls to normal-cb-bot.pat, which decides how to write the results based on how many subcategories were found.
However, to keep things simple in this tutorial, you will do away with the conditional criteria for displaying subcategories, and instead display them all as red level four headings, no matter how many there are.
The first thing to do is to delete the entire contents of the file yourcompany-cb-hit.pat. Before doing this, make absolutely sure you are editing yourcompany-cb-hit.pat, and not normal-cb-hit.pat.
After deleting the entire contents of the file, define an <H4> tag, followed by a <FONT> tag that sets the text color to red. Then display the category name ($$category) as a link that, when clicked, invokes the browse() helper function (which is written in JavaScript and defined in the Compass Server) to browse the category. The argument to browse() is the category's id, which is usually equivalent to its name.
<H4><FONT COLOR="red">Then define a script that checks whether the number of subcategories in this category (
<A HREF="javascript:browse('$$id');">
$$category
</A>
$$subclassification-count) is equal to zero. If it is not zero, then write the number of sub-categories in italics.
<SCRIPT LANGUAGE=JavaScript>
  if ($$subclassification-count != 0)
    document.writeln("(<I>" + count + "</I>)");
</SCRIPT>
Finally, close theFONTandH4tags.
</FONT></H4>The following code shows the entire contents of the file after you have made the changes.
<H4><FONT COLOR="red">Save the file.
<A HREF="javascript:browse('$$id');">
$$category
</A>
<SCRIPT LANGUAGE=JavaScript>
if ($$subclassification-count != 0)
document.writeln("(<I>" + count + "</I>)");
</SCRIPT>
</FONT></H4>
Modifying the Category-Browse-Bottom Pattern File
Open the fileyourcompany-cb-bot.pat in the text editor. (If the file doesn't exist, create it as a copy of normal-cb-bot.pat.)
This file contains a complex script. The upshot of the outcome of this script is that if there are more than 4 subcategories, they are displayed in a table. If there are 4 or less subcategories, they are displayed as bulleted lists. However, since we have changed the entire approach to displaying subcategories, you can delete the entire contents of this file.
Just for the sake of it, add a simple remark that will appear at the end of the list of subcategories, as shown:
<P><I>-- end of browsed categories -- </I></P>Save your changes.
Updating the Configuration File
Edit the fileyourcompany.conf. Set the value of the RDM-category-browse-top variable to yourcompany-cb-top.pat; set the value of the RDM-category-browse-hit variable to yourcompany-cb-hit.pat; and set the value of the RDM-category-browse-bottom variable to yourcompany-cb-bot.pat as shown here:
RDM-category-browse-top=yourcompany-cb-top.patSave the configuration file and test your changes by browsing a category in the Compass Server End User page. You should see a message introducing the subcategories, and each subcategory should be listed as a level-four heading instead of a bullet. The number of subcategories in a category should appear in red. You probably expected the subcategory names to appear in red too. And in fact they would have appeared in red, except that they are active links, so they appear in the active link color. Check the difference between browsing the root category and any other category. You should see that when you browse the root category, the category name is not displayed in the introductory message "The subcategories are:" Now submit a search and see what happens. The resultant page does not use the new pattern files. So far you have defined pattern files that are used only by browse-mode pages (except for the top of the page). You need to change the pattern files used by search-results mode pages to change the appearance of pages displayed by submitting a search.
RDM-category-browse-hit=yourcompany-cb-hit.pat
RDM-category-browse-bottom=yourcompany-cb-bot.pat
Modifying the List of Documents in a Browsed Category
You can modify the appearance of the list of documents that belong in a browsed category in much the same fashion that you modified the appearance of the list of subcategories. However, since documents do not have sub-documents, it is easier to modify document listings than it is to modify category listings. In summary, the document-browse-top pattern file introduces the top of the browsed document list. The document-browse-hit pattern file is called to display each document in turn. The document-browse-bottom pattern file displays closing remarks at the end of the list. Thus to modify the introduction to the document list, you need to edit the document-browse-top pattern file. To modify the way each document is displayed, you need to make changes to the document-browse-hit pattern file. To modify the conclusion of the list, you need to modify the document-browse-bottom pattern file. This section does not give step by step instructions for modifying the list of documents in a browsed category. The section "Modifying the List of Matching Documents" gives details for modifying the appearance of a document list.Modifying the List of Matching Categories
This section shows how to modify the appearance of the list of documents that is returned by a search submission. So far in this tutorial, you have modified the top section of both browse-mode and search-results mode pages. You have also modified the appearance of the list of subcategories in a browsed category. When a user submits a search, the search-results list all categories and documents that matched the search criteria. The categories that matched the search criteria are known as matching categories. You can modify the appearance of the list of matching categories in much the same way that you modified the appearance of the list of subcategories. In summary, the category-match-top pattern file introduces the top of the list of matching categories. The category-match-hit pattern file is called to display each matching category in turn. The category-match-bottom pattern file displays closing remarks at the end of the list of categories. Thus to modify the introduction to the category list, you need to edit the category-match-top pattern file. To modify the way each category is displayed, make changes to the category-match-hit pattern file. To modify the conclusion of the list, edit the category-match-bottom pattern file. This section does not give step by step instructions for modifying the list of matching categories, since the steps involved are very similar to those needed for modifying the list of subcategories, as discussed in Modifying the List of Subcategories in a Browsed Category.
Modifying the List of Matching Documents
This section gives instructions for modifying the list of documents that is displayed when you submit a search. These documents are known as matching documents since they match the search criteria.
The document-match-top pattern file introduces the list of matching documents. The document-match-hit pattern file defines the appearance of each document in the list. This file is invoked for each matching document in turn. The document-match-bottom pattern file defines the appearance of the bottom of the matching documents list.
First, create the pattern files for displaying the matching documents:
Modifying the Document-Match-Top Pattern File
In this tutorial, the list of documents will be displayed in a table to make the results look neat and tidy. Each document will be displayed in its own row. Since only one table is needed to contain all the document results, you can start the table in the document-browse-top pattern file, which defines the content that precedes the list of matching documents. Open the fileyourcompany-dm-top.pat in a plain text editor. (If the file does not exist, create it by copying the file normal-dm-top.pat.)
This file checks how many hits were returned. If there are more hits than will fit in a page, it adds the more link. You can modify this file so that it starts the table that displays the matching documents.
At the very end of the file, add a <TABLE> tag, and give the table a border and a white background. The following listing shows the entire contents of the file yourcompany-dm-top.pat after you make these changes.
<FONT COLOR="006666" SIZE=-1 FACE="arial,helvetica">
<SCRIPT LANGUAGE=JavaScript>
if ($$rdm-hit-min > 0 && $$rdm-hits-returned > 0) {// some hits
document.writeln("Document Matches $$rdm-hit-min - $$rdm-hit-max
(of $$rdm-hits-available)");
} else {         // no hits
  if ($$page > 1) {      // nth page
   document.writeln("No Further Document Matches");
  } else {         // first page
   document.writeln("No Document Matches");
  }
}
</SCRIPT>
<BR>
<TABLE WIDTH="100%" CELLPADDING=2 CELLSPACING=0
  BGCOLOR=white BORDER=1>
Defining a List of Alternating Colors
You can use the special variable$$RDM-rotated-color inside hit pattern files to rotate through colors in a pre-defined list. You will use this functionality when displaying the list of matching documents.
First, you need to define the list of colors. Open the file yourcompany.conf, and search for RDM-rotated-colors. Comment out the existing variable binding, and create your own list of colors. You can have as many colors as you like in the list. The following statement sets the list to be a set of two colors including pale green and pale blue.
RDM-rotated-colors="#DDDDFF,#DDFFDD"It is important that there are no spaces in the list, not even after the comma that separates the list items. Save the changes in the configuration file.
Modifying the Document-Match-Hit Pattern File
Open the fileyourcompany-dm-hit.pat in a plain text editor. (If the file does not exist, create it by copying the file normal-dm-hit.pat.)
Inside a document-match-hit pattern file, you can use several special variables to refer to information about the document. These variables include the following (this is not a complete list):
$$title
$$description
$$URL
$$score
$$last-modified
$$classification
$$content-length
$$author
$$RDM--is-first-hit
$$RDM-hit
$$RDM-rotated-color
RDM-rotated-colors in the configuration file. You can use this variable to rotate through a list of colors.
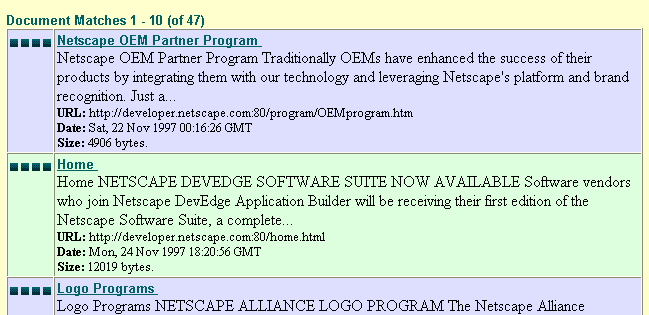
Figure 6.1 A table showing a list of matching documents
Delete the entire content of the fileyourcompany-dm-hit.pat. (Before you do this, make sure you are really editing yourcompany-dm-hit.pat, and not the original normal-dm-hit.pat.)
As the first thing in the file, start the table row for this document. Set the row's background to $$rdm-rotated-color so that it automatically uses the next color in the color list.
<!-- yourcompany-dm-hit.pat -->Write the table cell that shows the score icon. When the user moves the mouse over the icon, the status message displays the numerical score value for this document.
<!-- use table rows for nice clean layout -->
<TR BGCOLOR=$$RDM-ROTATED-COLOR>
<!-- present the score here - use image with nice mouseover -->Write the cell that displays the document details. Create a link. Inside the link, display the document's title if it has one, (that is, if
<TD VALIGN=top ALIGN=right WIDTH="7%">
<A HREF="javascript:void(0);"
<!-- no line break allowed in onMouseOver value -->
onMouseOver="self.status='$$score% Relevant';return true;">
$$RDM-Score-Image</A>
</TD>
$$title has a value) otherwise display the URL. When the user clicks the link, the URL will open.
<!-- present the document details here -->Display the description, if known.
<TD VALIGN=top ALIGN=left WIDTH="93%">
<FONT SIZE="-1" FACE="arial, helvetica">
<A HREF="$$url"><B>$$title[$$title][$$url]</B>
</A></FONT><BR>
$$description[$$description<BR>]Display the URL.
<FONT SIZE=-1>Display the date when the file was last modified, if known. Also display the length of the document and the author, if known.
<B>URL:</B> $$url<BR>
$$Last-Modified[<B>Date:</B> $$Last-Modified<BR>]If the document has a classification (that is, if it is in a category), display a link that displays all the documents in that category. Notice that this code uses the helper function
$$Content-Length[<B>Size:</B> $$Content-Length bytes<BR>]
$$Author[<B>Author:</B> $$Author]
browse().
$$classification[Save your changes. The following listing shows the entire contents of the file
<A HREF="javascript:browse(unescape('$$encode-classification'));">
Find similarly categorized documents.</A>.]
<!-- End the cell and end the row. -->
</FONT>
</TD>
</TR>
yourcompany-dm-hit.pat with the changes.
<!-- yourcompany-dm-hit.pat -->
<!-- use table rows for nice clean layout -->
<TR BGCOLOR=$$RDM-ROTATED-COLOR>
<!-- present the score here - use image with nice mouseover -->
<TD VALIGN=top ALIGN=right WIDTH="7%">
<A HREF="javascript:void(0);"
onMouseOver="self.status='$$score% Relevant';return true;">
$$RDM-Score-Image</A>
</TD>
<!-- present the document details here -->
<TD VALIGN=top ALIGN=left WIDTH="93%">
<FONT SIZE="-1" FACE="arial, helvetica">
<A HREF="$$url"><B>$$title[$$title][$$url]</B></A></FONT><BR>
$$description[$$description<BR>]
  <FONT SIZE=-1>
  <B>URL:</B> $$url<BR>
  $$Last-Modified[<B>Date:</B> $$Last-Modified<BR>]
  $$Content-Length[<B>Size:</B> $$Content-Length bytes<BR>]
  $$Author[<B>Author:</B> $$Author]
$$classification[
<A HREF="javascript:browse(unescape('$$encode-classification'));">
Find similarly categorized documents.</A>.]
</FONT>
</TD>
</TR>
Modifying the Document-Match-Bottom Pattern File
You may have noticed that theTABLE tag defined in the file yourcompany-dm-top.pat has not yet been closed. But don't worry, it will be closed in the file yourcompany-dm-bot.pat.
Open the file yourcompany-dm-bot.pat in a plain text editor. (If the file does not exist, create it by copying the file normal-dm-bot.pat.)
This file is very simple, all it does is close the table and add a break, as shown here:
</TABLE>Save your changes
<BR>
Updating the Configuration File
Edit the fileyourcompany.conf. Set the value of the RDM-document-match-top variable to yourcompany-dm-top.pat; set the value of the RDM-document-match-hit variable to yourcompany-dm-hit.pat; and set the value of the RDM-document-match-bottom variable to yourcompany-dm-bot.pat as shown here:
RDM-Save the configuration file and test your changes by submitting a search in the Compass Server End User page. The documents returned by the search process should be displayed in a table. Each row should display the details of one document, and the rows should have alternating background colors. Hint: If the results do not appear, check that the filedocument-match-top=yourcompany-dm-top.pat
RDM-document-match-hit=yourcompany-dm-hit.pat
RDM-document-match-bottom=yourcompany-dm-bot.pat
yourcompany-sr-bot.pat contains the closing table tag </TABLE>. Also check in the configuration file that RDM-document-match-bottom is set to yourcompany-dm-bot.pat. If the table is not closed, none of the rows will be displayed.
Changing the End of The Page
The final section at the bottom of a browse mode page is defined by the browse-bottom pattern file. The final section at the bottom of a search-results mode page is defined by the search-results-bottom pattern file. If you would like to add a final section to the browse mode page, edit the fileyourcompany-bw-bot.pat as you see fit. If you would like to add a final section to the bottom of a search-results page, edit the file yourcompany-sr-bot.pat as you see fit. Be sure to edit the file yourcompany.conf and set the following variables:
RDM-browse-bottom=yourcompany-bw-bot.pat
RDM-search-results-bottom=yourcomapny-sr-bot.pat
Finishing Up
Hopefully working through this tutorial has helped you understand the process involved in modifying configuration and pattern files, and you are now ready to modify them in whatever way you like. When you have completely finished customizing the configuration and pattern files, be sure to set thetemplate-refresh-rate variable in the file csid.conf back to a high value, such as 3600. This file lives in the config directory of the directory containing the specific Compass Server.
The template-refresh-rate variable determines the interval in seconds between each time the Compass Server gets the latest versions of the configuration and pattern files it needs. If the value has a low value, such as 1, then the Compass Server will spend a lot of its time unnecessarily refreshing the template files in its cache.
[Contents] [Previous] [Next] [Last]
Last Updated: 02/07/98 20:49:01
Any sample code included above is provided for your use on an "AS IS" basis, under the Netscape License Agreement - Terms of Use