server_root/plugins/samples/servletsThis directory contains the following directories:
beans -- Contains example Java Bean files.bookstore -- Contains files for an online bookstore example. This example contains both servlets and JSPs.edemo -- Contains files for a general online store front. This example contains both servlets and JSPs.jsp -- Contains subdirectories that each contain example JavaServer Page examples.make -- Contains example make files for servlets. These are common makefiles containing rules that are included by all other makefiles.servlets -- Contains subdirectories that each contain example Java and makefiles for servlet examples.sessions -- Contains code for SimpleSessionManager.java, which is the default servlet session manager when the Enterprise Server runs in single process mode. This directory also contains the code for SimpleSession.java, which defines session objects, which are the sessions managed by SimpleSessionManager. The source code for SimpleSessionManager and SimpleSession are provided for you to use as the starting point for defining your own session managers if desired. For more information about sessions and session managers, see Appendix A, "Session Managers."http://www.javasoft.com/products/servlet/index.html
SimpleServlet example in the server_root/plugins/samples/servlets/Simple1 directory.
This servlet generates an HTML page that says "This is output from the servlet." as shown in Figure 2.1
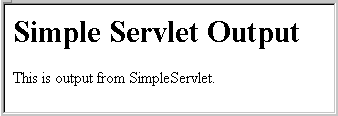
Figure 2.1 Output from SimpleServlet.class
This example defines the main servlet class as a subclass ofHttpServlet and implements the doGet method. The code is shown below:
import java.io.*;
import javax.servlet.*;
import javax.servlet.http.*;
/**
* This is a simple example of an HTTP Servlet that outputs
   a very simple web page.
*/
public class SimpleServlet extends HttpServlet
{
/**
* Handle the GET method by building a simple web page.
*/
public void doGet (
   HttpServletRequest request,
   HttpServletResponse response)
   throws ServletException, IOException
{
   PrintWriter out;
   String title = "Simple Servlet Output";
// Set content type and other response header fields first
response.setContentType("text/html");
   // Then write the data of the response
   out = response.getWriter ();
   out.println("<HTML><HEAD><TITLE>");
   out.println(title);
   out.println("</TITLE></HEAD><BODY>");
   out.println("<H1>" + title + "</H1>");
   out.println("<P>This is output from SimpleServlet.");
   out.println(getServletInfo());
   out.println("</BODY></HTML>");
   out.close();
   }
}
servform.htm - a web page containing a form as shown in Figure 2.2.servlet1 -- a servlet that responds to the form.companynamehosting, design and javadevnumberofpeople. The four possible values are oneplus, tenplus, hundredplus and thousandplus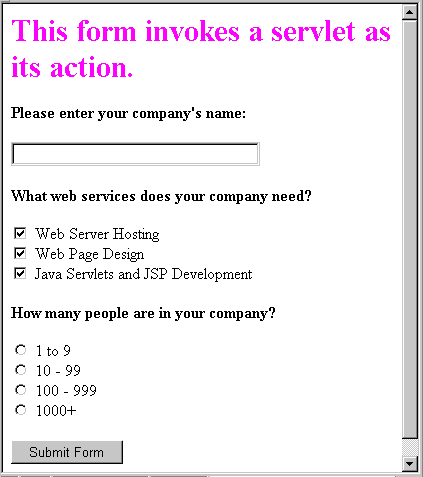
Figure 2.2 This form invokes a servlet as its action
The form's method isGET and the action is servlet1.class.
<FORM METHOD=GET ACTION="servlet/servlet1.class">Click the following link to see the form: (View the source to see the source code).
servform.htm
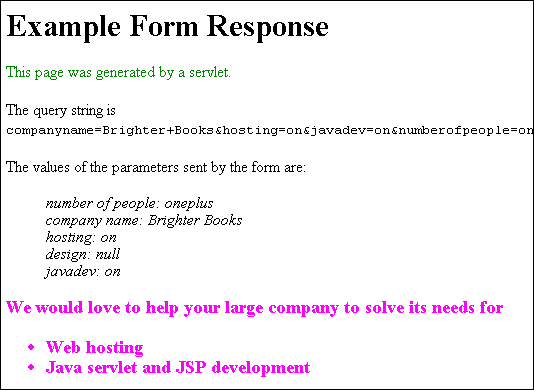
Figure 2.3 An example response from the servlet
This class implements the doGet() method, since it will be invoked by a form that uses the GET method. If the form used the POST method, the class would need to implement the doPost() method.
The source code is shown below.You can also access it through this link: servlet1.java.
import java.io.*;
import javax.servlet.*;
import javax.servlet.http.*;
/**
* This is a simple example of an HTTP Servlet that responds to input
* parameters such as form input.
*/
public class servlet1 extends HttpServlet
{
/**
* The doGet method parses the input parameters and constructs
* an output page based on the information received from the form.
*/
public void doGet (
   HttpServletRequest      request,
   HttpServletResponse     response
) throws ServletException, IOException
{
   PrintWriter out;
   String title = "Example Form Response";
// Set content type and other response header fields first.
response.setContentType("text/html");
   // Get an output stream.
   out = new java.io.PrintWriter(response.getOutputStream ());
   // Print the HTML, HEAD, and TITLE tags.
   out.println("<HTML><HEAD><TITLE>");
   out.println(title);
   out.println("</TITLE></HEAD><BODY>");
   out.println("<H1>" + title + "</H1>");
   out.println("<P><FONT color=green>This page was generated by " +
   "a servlet.</FONT></P>");
   // Print the query string just for informational purposes.
   String queryString = request.getQueryString();
   out.println("<P>The query string is <CODE>" + queryString +
   "</CODE>");
   // Extract the values of the parameters sent by the form.
   // If a parameter does not exist, getParameter() returns null.
   String numberofpeople = request.getParameter("numberofpeople");
   String companyname = request.getParameter("companyname");
   String companysize = "";
   String design = request.getParameter("design");
   String javadev = request.getParameter("javadev");
// Print out the input parameters
   out.println("<P>The values of the parameters sent by the form are:");
   out.println("<BLOCKQUOTE><I>number of people: " + hosting);
   out.println("<BR>company name: " + hosting);
   out.println("<BR>hosting: " + hosting);
   out.println("<BR>design: " + design);
   out.println("<BR>javadev: " + javadev + "</I></BLOCKQUOTE>");
// Construct a customized message encouraging
// the viewer to use our company for its web needs.
   // First test if any skills are needed.
   // If not, construct a generic message.
   // If skills are needed, create an unordered list with
   // a bullet item for each skill selected.
   String skillsneeded = "";
   if ((hosting == null) && (design == null) && (javadev == null))
   {skillsneeded = " all your web server requirements.";
   }
   else
    {   skillsneeded = "<UL>";
      if ((hosting != null) && (hosting.equals("on")))
         skillsneeded += "<LI>Web hosting";
      if ((design != null) && (design.equals("on")))
         skillsneeded +=  "<LI>Web page design";
      if ((javadev != null) && (javadev.equals("on")))
         skillsneeded += "<LI>Java servlet and JSP development ";
      skillsneeded = skillsneeded + "</UL>";
   }
   // Figure out what size company sent the form.
   // Choices are small, small to medium-size, medium-size and large.
   if (numberofpeople == null)
      numberofpeople = "size unknown";
   else if (numberofpeople == "oneplus")
      companysize = "small ";
   else if (numberofpeople == "tenplus")
      companysize = "small to medium-size ";
   else if (numberofpeople == "hundredplus")
      companysize = "medium-size ";
   else companysize = "large";
// Print a message tailored to the company that sent the form.
   out.println("<H3><FONT color=magenta>" +
   "We would love to help your " + companysize + " company" +
   " to solve its needs for " + skillsneeded + "</FONT></H3>");
// Print the closing tags in the HTML page
// and close the output stream.
out.println("</BODY></HTML>");
out.close();
// end the method
}
// end the class
}
servform.htm to the directory of your choice in or under the server's document root. Create a subdirectory called servlet in the directory where you save servform.htm. Save servform.class to the new servlet directory. Register the new servlet directory as a servlets directory, as discussed in the section "Registering Servlet Directories."
To view the form, open servform.htm using an http URL. For example, if you put servform.htm in the document root directory, open it with the URL http://your_server/servform.htm.
/plugins/samples/servlets/jsp.
These examples are simple, introductory examples. For information about creating JavaServer Pages, see Sun Microsystem's JavaServer Pages web page at:
http://www.javasoft.com/products/jsp/index.html
<DISPLAY> which displays information contained in bean objects. The <DISPLAY> tag has the following format:
<DISPLAY property=object:property>where
property can include nested properties, for example:
property:object1:property2:property3Examples of the
<DISPLAY> tag are:
<DISPLAY property=request:method>All JSP pages can implicitly access the
<DISPLAY property=product:version:modificationDate>
request object, which contains information about the request that invoked the page, such as the requested URI, the query string, the content type and so on. The request object has properties such as requestURI, queryString, and contentType.
This example displays information about the current request. It gets all its data from the request object, which is automatically passed to the JSP. This example is the snoop.jsp example in the server_root/plugins/samples/servlets/jsp/snoop directory.
Figure 2.4 shows an example of the output page generated by this JSP.
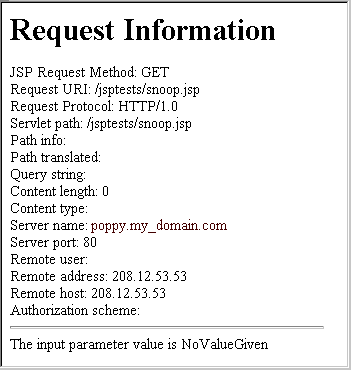
Figure 2.4 Output page generated by snoop.jsp
The source code forsnoop.jsp is:
<HTML>
<BODY>
<H1> Request Information </H1>
JSP Request Method: <DISPLAY property=request:method><BR>
Request URI: <DISPLAY property=request:requestURI><BR>
Request Protocol: <DISPLAY property=request:protocol><BR>
Servlet path: <DISPLAY property=request:servletPath><BR>
Path info: <DISPLAY property=request:pathInfo><BR>
Path translated: <DISPLAY property=request:pathTranslated><BR>
Query string: <DISPLAY property=request:queryString><BR>
Content length: <DISPLAY property=request:contentLength><BR>
Content type: <DISPLAY property=request:contentType><BR>
Server name: <DISPLAY property=request:serverName><BR>
Server port: <DISPLAY property=request:serverPort><BR>
Remote user: <DISPLAY property=request:remoteUser><BR>
Remote address: <DISPLAY property=request:remoteAddr><BR>
Remote host: <DISPLAY property=request:remoteHost><BR>
Authorization scheme: <DISPLAY property=request:authType> <BR>
The input parameter value is <DISPLAY property=request:params:input1 placeholder="NoValueGiven">
</BODY></HTML>
shoeform.htm, that displays a form asking the user to select the kinds of shoes they want to know more about. The action of the form is shoes.jsp. This JSP file gets information about the relevant kinds of shoes from a set of Java beans.(Note that Java beans were originally designed for use with visual tool builders, and they have some overhead that can make them slow when used to retrieve data to display in web pages.)
The discussion of this example has the following sections:
userName.Sandals, HikingBoots and WalkingShoesPOST and the action is shoes.jsp. (It also works if the form's method is GET.)
<FORM METHOD=POST ACTION="shoes.jsp">Figure 2.5 shows an example of the form.
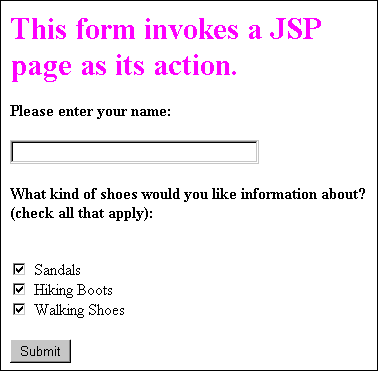
Figure 2.5 This form invokes a JSP as its action
You can view this form live atshoeform.htm.
shoes.jsp responds to the form. It uses the request:params property to access the parameters received from the form.
The output page generated by shoes.jsp prints a welcome message that includes the user's name, as entered in the userName text field in the form. It then displays information about each kind of shoe that was selected. The JSP file gets information about the shoes from Java Beans.
This JSP file demonstrates the following features:
Figure 2.6 shows an example of the output from shoes.jsp:
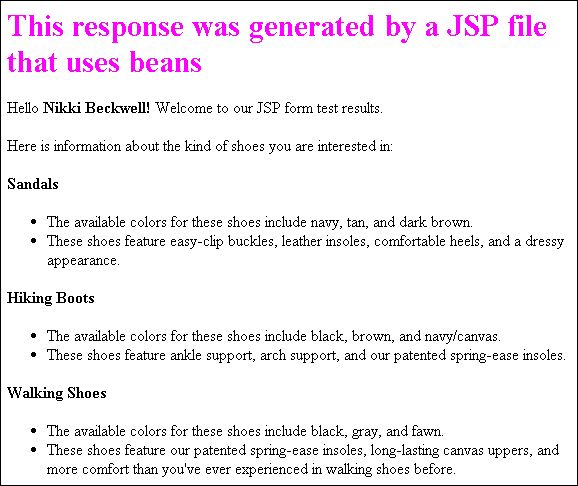
Figure 2.6 A JSP page generated in response to a form submission
You can view the JSP file at:shoes.jsp
request object has a property params whose value is an object that has attributes for each parameter in the query string.
For example, if the following URL is used to invoke a JSP:
http://poppy.my_domain.com/products/shoes.jsp?userName=Jocelyn&Sandals=on&WalkingShoes=onThe
request:params object has properties userName, Sandals, and WalkingShoes.
<INCLUDEIF> JSP tag, which includes a block of JSP and/or HTML code if a given parameter has a specified property.
For example:
<INCLUDEIF PROPERTY="request:params:Sandals" VALUE="on">This code says if, and only if, the input parameters include a parameter named
<H4>Sandals</H4>
</INCLUDEIF>
Sandals whose value is "on", then print <H4>Sandals</H4> to the output page.
For more information about the <INCLUDEIF> tag, and the corresponding <EXCLUDEIF> tag, see the JSP API documentation from Sun Microsystems at:
http://www.javasoft.com/products/jsp/index.html
request object, are always available implicitly to a JSP page. Other objects, such as user-defined objects, are not automatically available to the page, in which case you have to include a <USEBEAN> tag to tell the page which object to use. S
The JSP tag <USEBEAN> creates an instance of an externally defined Java Bean for use within the JSP page. For example, the following code creates an instance of the Sandals bean which is in com/shoes/beans.
<USEBEAN name="sandalA" type=com.jocelyn.beans.sandals lifespan=page>In this case, the
</USEBEAN>
Sandals bean instance exists for the duration of the page.
The following code retrieves the value of the colors property of the Sandals bean.
The available colors for these shoes include
<DISPLAY property=sandalA:colors>
shoes.jsp:
<HTML>
<HEAD><TITLE>When the shoe fits, wear it</TITLE></HEAD>
<H1><FONT color="#FF00FF">
This response was generated by a JSP file that uses beans
</FONT></H1>
<!-- Get the person who sent the form from the userName parameter -->
<P>Hello <B><DISPLAY PROPERTY="request:params:userName">!</B>
Welcome to our JSP form test results.
</B></P>
<!-- Display a bullet item for each kind of shoe selected -->
<P>Here is information about the kind of shoes you are interested in:
<INCLUDEIF PROPERTY="request:params:Sandals" VALUE="on">
   <USEBEAN name="sandalS" type=com.shoes.beans.sandals lifespan=page>
   </USEBEAN>
   <H4>Sandals</H4>
   <UL>
      <LI>The available colors for these shoes include
         <DISPLAY property=sandalS:colors>.
      <LI>These shoes feature <DISPLAY property=sandalS:features>.
   </UL>
</INCLUDEIF>
<INCLUDEIF PROPERTY="request:params:HikingBoots" VALUE="on">
   <USEBEAN name="hikingH" type=com.shoes.beans.hikingBoots
      lifespan=page>
   </USEBEAN>
   <H4>Hiking Boots</H4>
   <UL>
      <LI>The available colors for these shoes include
         <DISPLAY property=hikingH:colors>.
      <LI>These shoes feature  <DISPLAY property=hikingH:features>.
   </UL>
</INCLUDEIF>
<INCLUDEIF PROPERTY="request:params:WalkingShoes" VALUE="on">
   <USEBEAN name="walkingW" type=com.shoes.beans.walkingShoes
      lifespan=page>
   </USEBEAN>
   <H4>Walking Shoes</H4>
   <UL>
      <LI>The available colors for these shoes include
         <DISPLAY property=walkingW:colors>.
      <LI>These shoes feature  <DISPLAY property=walkingW:features>.
   </UL>
</INCLUDEIF>
</BODY>
</HTML>
shoes.jsp file accesses three Java Bean objects, sandals, hikingBoots, and walkingShoes.
These classes all inherit from a superclass Shoes, which defines setter and getter methods for the variables prodName, colors, and features. The subclasses Sandals, HikingBoots, and WalkingShoes simply define their own values for these variables.
The source code for these classes is available through the following links:
A jar file containing all the class files is available at:
For more information about defining Java Beans, see:
http://www.javasoft.com/beans/index.html
shoes.jar (or create it by compiling shoes.java, sandals.java, hikingShoes.java, and walkingShoes.java and then packaging the compiled class files into a JAR file). Put shoes.jar in a subdirectory of your choosing in your Enterprise Server root directory. If you already have a directory where you put JAR files, you can put it in there.
Add the full pathname of the shoes.jar location to the JVM class path, which you can do in the Servlets>Configure JVM Attributes page of the Server Manager interface.
Put shoeform.htm and shoes.jsp together in a subdirectory in or below the Enterprise Server's document root directory. (JSP files do not go in a registered servlet directory.)
NOTE: Note that the link above toTo view the form, openshoes.jspopens a file of the nameshoes.jsp.txt-- save this file from the browser without the.txtextension to save it as a JSP file rather than a plain text file.
shoesform.htm using an http URL. For example, if you put shoesform.htm in the document root directory, open it with the URL http://your_server/shoesform.htm.
Last Updated: 08/12/99 12:39:25
Copyright © 1999 Netscape Communications Corp. All rights reserved.