| Previous Contents Index DocHome Next |
| iPlanet Application Server Admintration Guide |
Chapter 5 Securing Applications
This chapter describes how to implement iPlanet Application Server security.The following topics are included in this chapter:
About Security
About Security
Implementing application security is a joint effort between the application developers and the server administrator: the application developers are responsible for determining what level of security to implement and implementing that level into their applications; the administrator is responsible for managing the users and groups who use the application.The administrator is also responsible for managing authorization to application components within an application. For Java applications using J2EE standard components, authorization is implemented via roles. Roles are created during deployment time using the iPlanet Application Server Deployment Tool and administered using the iPlanet Application Server Administration Tool (For more information about the Deployment Tool see the online Help system that is provided with the tool.). For C++ applications, authorization is implemented via access control lists that are stored in LDAP and managed using the iPlanet Application Server Administration Tool.
This chapter explains how to set up users and groups and then how they are used to secure applications. It also describes how user entries are stored in iPlanet Directory Server and managed using iPlanet Console and LDIF.
Limitations of This Document
This chapter does not explain Directory Server and iPlanet Console in great detail. Rather, it provides descriptions of the basic start-up tasks you must perform when setting up Directory Server in association with your instance of iPlanet Application Server, as well as how to use iPlanet Console to manage users and groups. See iPlanet Directory Server and iPlanet Console documentation for detailed instructions and descriptions of these products.You can find Directory Server documentation installed with your instance of iPlanet Application Server in the following location:
iASInstallDir/manual/en/slapd/
iPlanet Console documentation is available on iPlanet's web site in the following location:
http://docs.iplanet.com/docs/manuals/console.html
What Is LDAP?
Every instance of iPlanet Application Server uses Directory Server to store shared server information, including information about users and groups. Directory Server supports Lightweight Directory Access Protocol (LDAP) versions 2 and 3. LDAP is an open directory access protocol that runs over TCP/IP. It is scalable to a global size and millions of entries. Using Directory Server, you can store all of your enterprise's information in a single, centralized repository of directory information that any application server can access via the network.iPlanet Directory Server is installed with each instance of iPlanet Application Server.
What Is iPlanet Console?
iPlanet Console is a stand-alone Java application. It finds all resources and applications registered in Directory Server, and displays them in a graphical interface. iPlanet Console functions independently of any server, and you can use it from any computer or workstation connected to your enterprise.iPlanet Console is installed with each instance of iPlanet Application Server. You use iPlanet Console to manage users and groups for iPlanet Application Server. You can also use iPlanet Console to launch the iPlanet Application Server Administration Tool, but only for local instances of iPlanet Application Server -- that is, instances of iPlanet Application Server installed on the same machine as iPlanet Console. You must launch remote instances of iPlanet Application Server from the command line or from the Windows NT start menu.
Storing and Managing Users and Groups
The information you specify for each user and group you create is stored in the Directory Server (LDAP) used with your instance of iPlanet Application Server. The information held in Directory Server is shared between all application servers when you have multiple servers supporting an application
Implementing Security
If access to an application consists of authenticating a user's user name and password, the user name and password must be stored in the Directory Server.An application starts the user authentication process by calling the application component—usually a servlet—responsible for user authentication. The user's login privileges are then verified against the list of users stored in Directory Server.
The authentication process verifies access to an application based on a user's name and password. To implement authentication, you must create a user profile, which holds the user name and password, for all users of an application. This procedure is described in .
Once a user is successfully authenticated, access to specific application components implementation depends on the type of application: Java application using J2EE standard components or C++ applications.
Note There are types of authentication other than verification of username and password. For example, some applications authenicate a user via a certificate.
Authorization for J2EE Applications
Access to application components responsible for application security is based on declarative role information defined in the deployment descriptor XML file. Security can also be defined programmatically during development by using security APIs such as isCallerInRole() provided by J2EE. See the Programmer's Guide (Java) for more information.
Authorization for C++ Applications
Access to application components responsible for application security is managed declaratively using access control lists provided in the iPlanet Application Server Administration Tool. Security can also be defined programmatically during development by using the LDAP JDK included with each installation of iPlanet Application Server. See the Programmer's Guide for more information.
Using iPlanet Console to Add Entries to Directory Server
You can use iPlanet Console to create user entries and group entries. A user entry contains information about an individual person or object in the directory. A group consists of all users who share a common attribute. For example, all users in a particular department might belong to the same group.
What Is a Distinguished Name (DN)?
Each of the users and groups in your enterprise is represented in Directory Server by a distinguished name (DN). A DN is a text string that contains identifying attributes. You use DNs whenever you make changes in the directory's users and groups database. For example, you need to specify DN information each time you create or modify directory entries, set up access controls, and set up user accounts for applications such as mail or publishing. The users and groups interface of iPlanet Console helps you create or modify DNs.For example, this might be a typical DN for an employee of iPlanet Communications Corporation:
uid=doe,e=doe@iplanet.com,cn=John Doe,o=Netscape Communications Corp.,c=US
The abbreviations before each equal sign in this example have the following meanings:
DNs may include a variety of name-value pairs. They are used to identify both certificate subjects and entries in directories that support LDAP.
Creating User Entries Using iPlanet Console
User security is best suited for applications that have a small number of known users. You must create a user profile for each user who accesses the application.You must be a Directory Server administrator or a user with the necessary permissions to create a user.
To create a new user entry in the directory using iPlanet Console, perform the following steps:
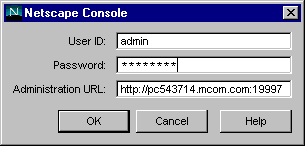
From the Windows Start menu, under Programs, choose iPlanet Server Family, then iPlanet Console 4.0 to open iPlanet Console.
Enter a valid user name and password and click OK.
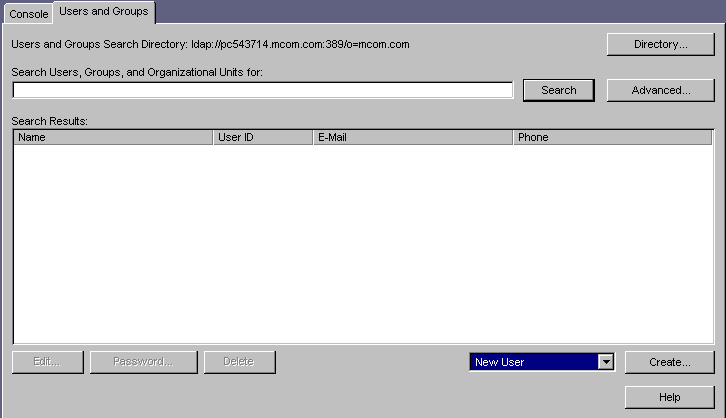
Click the Users and Groups tab.
Use the drop-down list in the lower-right corner of the window to choose New User, then click Create.
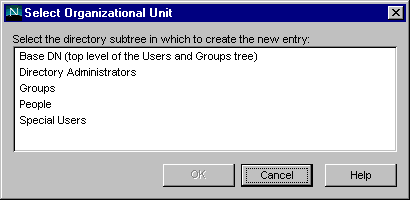
In Select Organizational Unit, click the directory subtree (ou) to which the user will belong, then click OK.
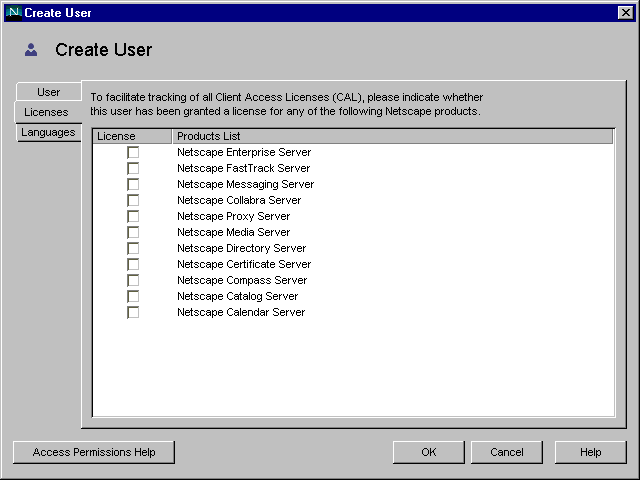
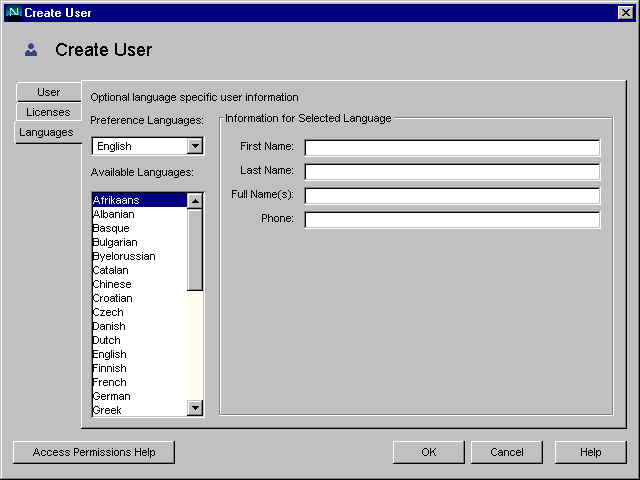
In the Create User window, enter user information.
Full Name(s) is equivalent to the common name (cn) in the directory and is automatically generated based on the First Name and Last Name entered above. You can edit this name as necessary.
Click the Licenses tab.A user ID is automatically generated from the first and last names you enter. You can replace this user ID with one of your choosing. The user ID must be unique from all other user IDs in the directory.
Select the servers this user is licensed to use, then click OK.
(Optional) Click the Languages tab.
Creating Group Entries Using iPlanet Console
A group consists of all users who share a common attribute. For example, all users with DNs containing the attribute ou=Sales belong to the Sales group. Once you create a new group, you add users, or members, to it. You can use three types of groups in your directory: static, dynamic, and certificate groups.
Creating a Static Group
Create a static group by specifying the same group attribute in the DNs of any number of users. A static group doesn't change unless you add a user to it or delete a user from it. For example, a number of users have the attribute department=marketing in their DN. None of those users are members of the Marketing group until you explicitly add each one to the group.To create a static group in the directory, perform the following steps:
In iPlanet Console, click the Users and Groups tab to display the following window:
Use the drop-down list in the lower-right corner of the window to choose New Group, then click Create.
In the Select Organizational Unit window, select the directory subtree (ou) to which the group will belong, then click OK.
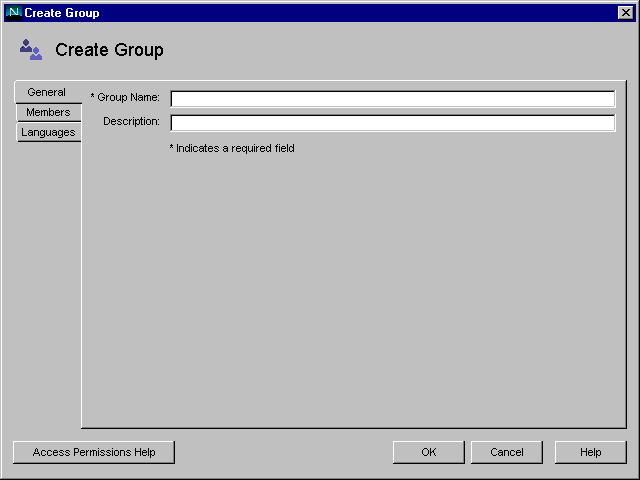
In the Create Group window, enter group information, then click the Members tab.
If you only want to create the group now and plan to add group members later, click OK and skip the rest of this procedure.
In the Members window, click Add or Edit as appropriate.
- To immediately add members to the group, continue to the next step.
Modifying Database Entries Using iPlanet Console
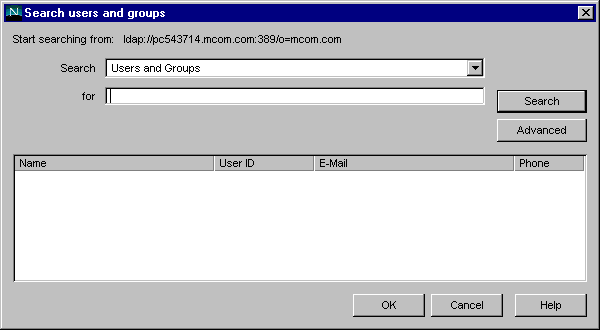
Before you can modify user or group data, you must first use the Users and Groups Search function to locate the user or group entry in the user directory. Then you can select operations from the menu bar to change the entry. The operations you perform apply to all in the Search list.See iPlanet Console documentation for more information.
Using LDIF to Add Entries to Directory Server
You can add entries to Directory Server using LDIF or iPlanet Console. iPlanet Console is described .Directory Server uses the LDAP Data Interchange Format (LDIF) to describe a directory and directory entries in text format. LDIF is commonly used to initially build a directory database or to add large numbers of entries to the directory all at once. You can also add or edit entries using the ldapmodify command along with the appropriate LDIF update statements.
To add entries to the database using LDIF, first define the entries in an LDIF file, then import the LDIF file from Directory Server.
Formatting LDIF Entries
LDIF consists of one or more directory entries separated by a blank line. Each LDIF entry consists of an optional entry ID, a required distinguished name, one or more object classes, and multiple attribute definitions.The basic form of a directory entry represented in LDIF is:
attribute type[;subtype]:attribute value
attribute type[;subtype]:attribute value
You must supply the DN and at least one object class definition. In addition, you must include any attributes required by the object classes that you define for the entry. All other attributes and object classes are optional. You can specify object classes and attributes in any order. The space after the colon is also optional. For information on standard object classes and attributes, refer to the iPlanet Directory Server documentation at:
http://docs.iplanet.com/docs/manuals/directory.html
Modifying Database Entries Using ldapmodify
You use the ldapmodify command-line utility to modify entries in an existing Directory Server database. ldapmodify opens a connection to the specified server using the distinguished name and password you supply, and modifies the entries based on LDIF update statements contained in a specified file. Because ldapmodify uses LDIF update statements, ldapmodify can do everything that ldapdelete can do. Most of Directory Server's command-line utilities are stored in a single location. You can find them in the following directory:iASInstallDir/bin/slapd/server
The remaining three—ldapdelete, ldapmodify, and ldapsearch—are stored in the following directory:
The following is an example of the command used to add a user to an LDIF file:
ldapmodify -h myserverhost -p 389 -D "Directory Manager" -w admin -a -f MyUsersFile
Creating Entries Programmatically
You can also create entries programmatically within an application using the LDAP JDK included with each installation of iPlanet Application Server. See the Programmer's Guide for more information.
Setting Authorization to Access Application Components
Authorization to access application components depends upon the type of application:
For Java Applications (using J2EE standard components), authorization is set via roles. See Setting Role-Based Authorization (for J2EE Applications).
For C++ Applications, authorization is set by permissions in access control lists. See Setting Access Control List Authorization (for C++ Applications).
Setting Role-Based Authorization (for J2EE Applications)
Roles for an application component are set globally for all application components within a module. From the Administration Tool, you can add a role to an application module and set the users and groups who belong to a role. Access is granted to any application component within a module if the requestor is a member of a pre-defined role.If a user is not a member of a role, the application can direct the user to re-login, prompt the user to exit the application, or direct the user to a different part of the application.
Managing Roles for EJBs and Servlets
You use iPlanet Application Server Administration Tool to manage roles of deployed applications. When managing roles, you can specify groups to which users belong and add only groups to the role rather than adding individual users as members to the role. This is useful if you are using individual user-based security; you save the administration maintenance of updating users in the role when users change.For example, if you have created users for an web bank application and a user closes all accounts, you need to remove that user only from the appropriate group or groups, as opposed to removing the user from the groups and any roles.
Note Roles for servlets and EJBs are created in the deployment descriptor XML files before deployment. See the online help that is provided with the Deployment Tool for more information.
To manage a role, perform the following steps:
On the iPlanet Application Server Administrator toolbar, click the Application button to open the Application window.
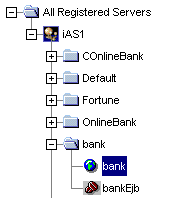
In the left pane, expand the iPlanet Application Server instance where the application is deployed.
Open the application folder and highlight a servlet or EJB icon.
In the left pane, click the roles tab to view the roles and role members that have been defined for this EJB/servlet.
Highlight the role that you want to manage and click the Edit Role button.
To add a group and a user to a role, complete the following:
- The Edit Role dialog box opens showing you all the users and groups that are currently members of this role.
To add a group to a role, in the Available Groups box, highlight one or more groups and click the right-arrow button.
To remove a group or user from a role, highlight the user(s) and or group(s) in the Users/Groups in Role box and click the left-arrow.
Note When you select multiple groups from the Available Groups box, the users in the Available Users box are not displayed.
To add a user to a role, first highlight a group that the user currently belongs from the Available Groups list and then highlight the user(s) in the Users in Group box. Finally click the right-arrow button to add the user to the role.
Setting Access Control List Authorization (for C++ Applications)
Access control lists (ACLs) allow you to set permissions for users and groups. A permission relates to an action the user is allowed to perform, such as read or write.iPlanet Application Server comes with default permissions, but you can also create your own application-specific permissions and ACLs. The information in an ACL is used by the application to verify the permissions of the current user or group for an action the user attempts.
If a user does not have a certain permission, the application can direct the user to re-login, prompt him to exit the application, or direct him to a different part of the application.
Creating an Access Control List
You use iPlanet Application Server Administration Tool to create and manage access control lists (ACLs). When creating an ACL, you can create groups to which users belong and add only groups to the ACL rather than adding individual users as members to the ACL. This is useful if you are using individual user-based security; you save the administration maintenance of updating users in the ACL when users change.For example, if you have created users for an intranet application and a user leaves the company, you need to remove that user only from the appropriate group or groups, as opposed to removing the user from the groups and any ACLs.
To create an access control list, perform the following steps:
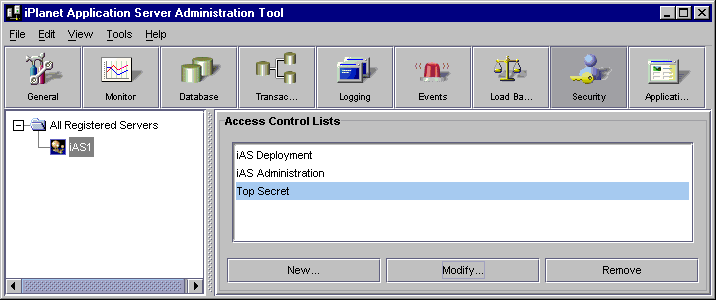
On the iPlanet Application Server Administration Tool toolbar, click the Security button to open the Security window.
Click the New button located at the bottom of the window.
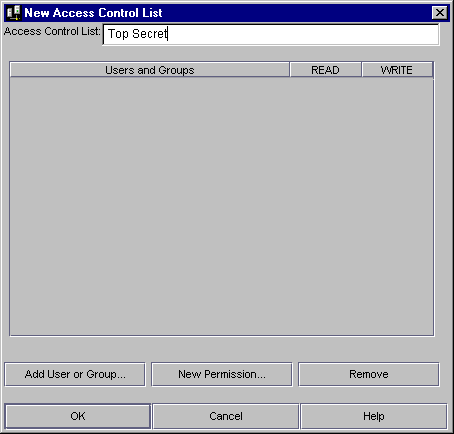
In the Access Control List field, enter a name for the ACL.
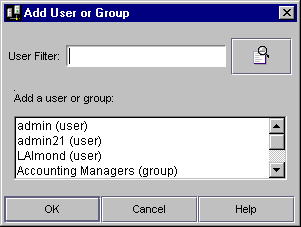
To add a user or group to the ACL, click the Add User or Group button at the bottom of the dialog box.
- The name can be any word or words you choose to distinguish one ACL from another.
Select the users and/or groups you want to add to the ACL.
Click OK.
- You can filter the list of users that appears in the result set by entering a string in the User Filter text box. For instance, to show only user IDs that begin with "F," enter F* in the User Filter text box, then click the User Filter button. The user IDs matching your filter criteria appear in the list box below. The User Filter applies only to users, not to groups.
To add a new permission to the ACL, click New Permission.
Enter the new permission action word.
Click OK.
- A permission defines the level of access a user or group has to a particular application or part of an application.
To set the appropriate permissions for the groups in the ACL, check each permission for that group.
Modifying an Access Control List
You can modify the following ACL properties:You can also remove groups from the system.
To modify an access control list, perform the following steps:
On the iPlanet Application Server Administration Tool toolbar, click the Security button to open the Security window.
Highlight the Access Control List that you want to modify.
Click the Modify button located at the bottom of the window.
To add a new user or group, click Add User or Group.
Select the group or groups you want to add to the ACL.
Click OK.
- You can filter the list of users that appear in the list by entering a string in the User Filter text box. For instance, to show only user IDs that begin with "F," enter F* in the User Filter text box, then click the User Filter button. The user IDs matching your filter criteria appear in the list box below. The User Filter applies only to users, not to groups.
To create a new permission, click New Permission.
To edit the permissions of a group, select or deselect the appropriate permissions for that group.
Previous Contents Index DocHome Next
Copyright © 2000 Sun Microsystems, Inc. Some preexisting portions Copyright © 2000 Netscape Communications Corp. All rights reserved.
Last Updated February 06, 2001
