| Previous Contents Index Next |
| iPlanet Application Server Administrator's Guide |
Chapter 9 Administering Transactions
This chapter describes the tasks and conceptual information necessary for administering transactions using the iPlanet Application Server Administration Tool (iASAT)The following topics are included in this chapter:
About the Transaction Manager
Storing Distributed Transactions Log Data
Administering Distributed Transactions in the Transaction Window
Administering Distributed Transactions from the Command Line
Setting Up Resource Managers for Distributed Transactions
About the Transaction Manager
The transaction manager is installed with each instance of iPlanet Application Server to coordinate global transactions within a Java Server (KJS) process. Global transactions are a set of related operations that must be executed as a unit, though each operation may run in a different process.You can use global transactions to update a database that uses one or more Enterprise Java Beans (EJBs) running concurrently for the same global transaction, from within one or more KJS processes. This occurs when an EJB triggers another EJB to run and they both participate in the same transaction. You can also update multiple databases that are distributed over different geographic locations or update multiple databases of different types (such as Oracle and Sybase).
The transaction manager runs within a KJS process and creates two files: a restart file and a restart.bak file. In addition, you need to provide a log file for each KJS process. You can administer these files from the command line or by using the Transaction window of iASAT.
Storing Distributed Transactions Log Data
An installation of iPlanet Application Server consists of one Administration Server (KAS) process, one Executive Server (KXS) process, and at least one Java Server (KJS) process. A transaction manager exists for each KJS.As an iPlanet Application Server administrator, you must maintain one logical volume and its restart data for each KJS in an iPlanet Application Server installation. A logical volume is made up of one or more physical volumes. A physical volume stores the state of all ongoing transactions. If you have more than one physical volume, additional physical volumes are backups, or mirrors, of the first physical volume.
When you initially start iPlanet Application Server, it looks in the registry for the location of the directory root. In this location is an empty log file for each KJS where iPlanet Application Server will write information about the state of all ongoing distributed transactions for that process. iPlanet Application Server then creates additional files called restart and restart.bak (a backup of restart) for each KJS, which record the location of the log file and the state of the logical and physical volumes. Thereafter, whenever you start the server, iPlanet Application Server refers to the restart file for the location and state of the log file and does not refer to the registry. Restart and restart.bak are stored in the following directories:
You should store restart.bak on a different device if possible. If restart becomes corrupted, iPlanet Application Server uses restart.bak to determine the location of the log file and state of ongoing distributed transactions. If both restart and restart.bak are corrupted, the transaction manager will become inoperable and you must "cold-start" the server. When you cold-start a server, iPlanet Application Server must look to the registry for the location of the log file as it did in its initial startup; all restart data is lost. The log file and all data will then be overwritten.
- iASInstallDir/ias/bin/KJS #/restart
- iASInstallDir/ias/bin/KJS #/restart.bak
The following table lists the registry entries to which iPlanet Application Server refers along with their default values:
Administering Distributed Transactions in the Transaction Window
You can administer transactions using the Transaction window of iASAT.This section describes the following topics:
About the Transaction Window
Configuring Transactions Per Server
About the Transaction Window
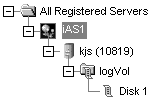
The left pane of the Transaction window displays a tree of nodes as shown in the following illustration:
The top level of the tree lists which servers are registered with iASAT. The second level, below each registered server name, displays one or more process nodes. These nodes indicate which processes are running on each registered server. Only Java Server (KJS) processes appear in the tree because only KJS processes support transactions. The third level of the tree displays the physical volumes for each process. Finally, the fourth level of the tree displays the disks in each physical volume. See Storing Distributed Transactions Log Data for more information about physical volumes.
When you click a physical volume node, the right pane of the transactions window displays the name, status and the total size of the physical volume. You cannot edit these values.
A disk can be thought of as a partition of the physical volume. You can create an unlimited number of disks, but you cannot delete a disk once it's created. When you click a disk node, the right pane of the Transactions window displays the location and size of the selected disk.
Configuring Transactions Per Server
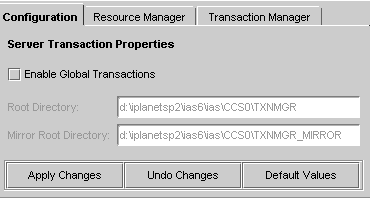
To change transaction settings for an application server, click a registered server in the left pane of the Transaction window. The Configuration tab appears in the right pane as shown here:
You can set the transaction mode. When global transactions are enabled, transactions can span across multiple heterogeneous databases and processes. When you clear the Enable Global Transactions checkbox, local transactions are enabled. Local transactions are limited to a single database/process but offer overall improved server performance over global transactions.
The selected server's current root and mirror directories are listed on the Configuration tab. Since no error checking is provided, it is not recommended that you edit these directories.
Viewing Transactions on a Selected Server
You can view transactions running on the selected server by clicking the Transaction Manager tab.The Transactions tab displays details about all the transactions running on the selected server. For each transaction, the tab displays the following information:
process: the Java Server process (KJS) where the transaction is running
Click Update periodically to remove expired transactions from view and display currently running transactions in the window.transaction ID: an arbitrary number used to identify the transaction
Viewing Transaction Details
To view details about a transaction, click Details.The Transactions Detail dialog box appears.
In the text box, Originator indicates where the selected transaction originates. The Participants box indicates where the transaction is currently running.
You can force the transaction into a state by clicking the appropriate button (Abort, Force Abort, Force Commit, Force Finish).
Configuring Transactions Per Process
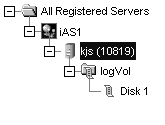
Click the process in the left pane of the Transaction window to change transaction settings for a process on an application server.
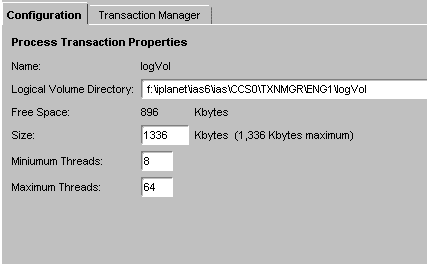
The Configuration tab appears in the right pane as shown in the following illustration:
The logical volume size for the process is displayed. You can set the size of the logical volume by entering a number in the Logical Volume Size field. A logical volume must be between 8 MB and 10 MB.
Viewing Transactions on a Selected Process
Click the Transaction Manager tab to view the details of all transactions running on the selected process. The following window appears:The transaction ID and state appear. See Configuring Transactions Per Server for more information.
Configuring Resource Managers
A resource manager enables you connect to a database back end for global transactions. If you enable a resource manager, the transaction manager within a KJS process attempts a connection to the database when the KJS process is started.There is one resource manager for each database the application server can access. Click the Resource Manager tab in the Transaction window to configure resource managers. The following window appears:
The name of each resource manager (for instance, Microsoft SQL) as well as its status (enabled or disabled) is displayed. Click the Enabled checkbox to toggle the status of each resource manager.
Note You must restart the server before changes to your resource manager configuration take effect.
To Add and Editing Resource Managers
To add or edit Resource Managers, perform the following steps:
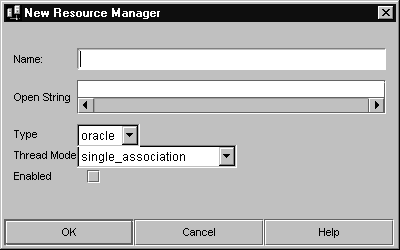
Click Add or Modify to add or edit a resource manager. The following dialog box appears:
In the Name field, enter a value to distinguish the selected resource manager from other resource managers.
In the OpenString field, enter the parameters for accessing a particular database (user name, password, permissions).
Select the type of database from the Type drop-down box (for instance, Microsoft SQL).
Choose the thread mode from the drop-down box:
multiple_associations: the transaction manager XA (TM-XA) service performs no serialization of XA operations between threads.
Finally, to enable or disable the resource manager, click the Enabled checkbox.serialize_all_operation: the TM-XA service permits a maximum of one thread to make an XA call to the resource manager client library at a time.
serialize_start_end: the TM-XA service ensures that only one association with the resource manager client library is attempted at a time.
single_association: the TM-XA service does not prevent multiple threads from attempting different associations at the same time.
- Only one resource manager may be enabled for each database type.
- You must restart the server before changes take effect.
Administering Distributed Transactions from the Command Line
You can also administer transactions from the command line. Invoke the command-line tool with the following script:The following table lists iasadmin commands you can execute from the command line. Once you invoke the command-line tool, each command in the following table is preceded by iasadmin command prompt as shown in the following example:
Setting Up Resource Managers for Distributed Transactions
Before you can connect to resource managers to use in distributed transactions, you must perform setup tasks that are not required for local transactions.This section contains information about the following types of resource managers:
Oracle
To set up an Oracle resource manager, perform the following steps:
Enter the open string in the following format:
Oracle_XA+DB=<Server_Instance>+Acc=P/<user
name>/<password>+Sqlnet=<Server Instance>+SesTm=<Session time
out>+Threads=<Thread safe mode>
Make sure the three required catalog tables for recovery exist. If they don't, create them using the following script:
- If you are trying to connect to the bb734 instance using the user name system and the password manager, the open string appears as shown the following example:
Oracle_XA+DB=bb734+Acc=P/system/
manager+Sqlnet=bb734+SesTm=90+Threads=True
- Use the setting Threads=True only in the multiple_associations thread mode, which is the recommended mode for use with Oracle resource managers. Other thread modes reject this setting. Omit this parameter or use the setting Threads=False with other thread modes.
- It is strongly recommended that you use only one thread mode for all Oracle resource managers; do not mix and match thread modes for multiple resource managers.
$ORACLE_HOME/rdbms80/admin/xaviews.sql (see below)
rem $Header: xaview.sql 7020200.1 95/04/05 13:07:30 rdhoopar
Generic<base> $ xaview2.sql Copyr (c) 1989 Oracle
Rem
------------------------------------------------------------Rem Create the view necessary to do XA recovery scan of prepared
Rem and heuristically completed transactions.
Rem The view 'XATRAN' basically combines information from two
Rem different types of tables:
Rem pending_trans$ & pending_sessions$
Rem The view v$pending_xatrans$ combines and then filters
Rem from the table pending_trans$ and pending_sessions$ into
formatRem Then the view v$xatrans$ combines information from x$k2gte2
andRem cchew 07-15-92 - added fmt column
Rem cchew 05-22-92 - No more fmt=0 condition
Rem ----------------------------------------------------------------
CREATE VIEW v$pending_xatrans$ AS
(SELECT global_tran_fmt, global_foreign_id, branch_id
FROM sys.pending_trans$ tran, sys.pending_sessions$ sess
WHERE tran.local_tran_id = sess.local_tran_id
AND tran.state != 'collecting'
AND BITAND(TO_NUMBER(tran.session_vector),
POWER(2, (sess.session_id - 1))) = sess.session_id)
(((SELECT k2gtifmt, k2gtitid_ext, k2gtibid
SELECT global_tran_fmt, global_foreign_id, branch_id
SELECT global_tran_fmt, global_foreign_id, branch_id
/
Sybase
Sybase is only available on Solaris platforms. To set up a Sybase resource manager, perform the following steps:
Name the resource manager by adding entries to xa_config. The entries should be in the following format:
Enter the open string in the following format:
-U<User name> -P<Password> -N<RM name> -Txa
Make sure that libxa.so exists in the $SYBASE/lib directory.
- For example, if you are trying to connect to ksample_rm, which is set up to connect to a ksample server instance, the open string is in the following format:
-Uuser -Ppswd -N ksample_rm -Tevent
- If you want do not want to suppress logging user names and passwords to a trace file, use -Txa instead of -Tevent in the open string.
Run the following scripts available in the $SYBASE/scripts/ directory:
- XA libraries do not come by default with Sybase client libraries.
DB2 Unix
To set up a DB2 resource manager, perform the following steps:
Enter the open string in the following format:
<DataSourceName,UserName,Password>
Enter the following in the DB2 configuration:
- For example, if you are connecting to ksample and using inst1/inst1 as user name and password, the open string is in the following format:
db2 update dbm cfg using TP_MON_NAME libEncServer_nodce
Make sure $DB2DIR/lib/libdb2.so has 755 permissions.
- DB2 uses dynamic registration to participate in distributed transactions. On NT, DB2 needs to know which shared library implements the dynamic registration functions like ax_reg() and ax_unreg().
Make sure that $DB2LIB/sqllib/lib/libdb2.so has r-x permissions
- If it does not, the Java Server (KJS) process will crash when calling xa_open.
Set the CURSORHOLD parameter to zero in the db2cli.ini file.
- If it does not, the KJS process will crash upon startup.
In the db2cli.ini file, set DISABLEMULTITHREAD to 1.
- The cursor hold feature does not work in the XA environment.
Microsoft SQL Server
To set up a Microsoft SQL resource manager, perform the following steps:
Enter the open string in the following format:
Tm=transaction manager's name RmRecoveryGuid=GUID
Install and set up the Distributed Transaction Coordinator (DTC). You can get DTC from Microsoft's web site or from MSDN Windows NT option pack 4.0.
- In the iPlanet Application Server environment, tm is Encina.
- Find and copy the value for RmRecoveryGuid in the following registry entry:
HKEY_LOCAL_MACHINE\SOFTWARE\Microsoft\MSSQLServer\ResourceMgrID
- If this registry entry is missing, generate a GUID using the kguidgen tool.
Make sure the ODBC driver on your server machine is version 3.5 or higher.
- When the DTC is installed, the Microsoft DTC (MS DTC) section exists in the SOFTWARE\MICROSOFT\hive.
- It is not necessary to install the Microsoft Transaction Server (MTS).
Make sure the following XA-related stored procedures are installed on the MS SQL Server machine where the application server connects:
- sp_start_xact, sp_scan_xact, sp_commit_xact or their deprecated names such as start_xact, scan_xact and commit_xact.
Enabling XA Error Logging
To log XA error messages, follow the directions for the type of resource manager you are using:
Oracle
Oracle
In the open string, add a log directory as shown in the following example:Oracle_XA+DB=<bb734>+Acc=P/system/
manager+Sqlnet=bb734+SesTm=90+Threads=True+LogDir=/export/logs
Make sure that the log file generated by LogDir allows administrator access only as it contains the user names and passwords for the database.
- where /export/logs is the log directory.
Sybase
In the open string, add a log directory as shown in the following example:-Uuser -Ppswd -N ksample_rm -Tevent -L/export/logs/syb_xa_log
Make sure that the log file generated by LogDir allows administrator access only as it contains the user names and passwords for the database.
- where /export/logs is the log directory.
DB2
Enter the following commands to enable the logging of XA calls and/or interfaces:db2 update dbm cfg using DIAGLEVEL 4
db2 update dbm cfg using DIAGPATH $GX_ROOTDIR/logs
The log will be created under file name called db2diag.log.
XA failures appear in the following format:
String Title: XA Interface SQLCA PID:28084 Node:000
SQLCODE = -998 REASON CODE: 4 SUBCODE: 4
Using the REASON CODE and SUB CODE, you can find the cause of an error by looking up the code in the following table:
Microsoft SQL Server
The log file for the XA interface, dtcxa.log, is created under the current KJS directory.
Resolving In-Doubt Transactions
Occasionally, particularly when a Java Server (KJS) process quits suddenly, you may find "hanging" or in-doubt transactions. For Microsoft SQL Server, in order to manually commit or rollback in-doubt transactions, use DTC administrator control. This is also known as DAC. dac.exe is found in the WINNT\SYSTEM32\ directory and is installed with DTC.After starting DAC, perform the following steps to manually commit or rollback in-doubt transactions:
From the iASAT toolbar, click Transactions to open the Transactions window.
For Oracle resource managers, if you encounter a "lock held by distributed transaction" error, you must connect to the database and rollback the global transaction explicitly. To do so, perform the following steps:Click the Transaction Manager tab.
Select the transaction that you want to force and click Details.
Find out the local transaction ID that corresponds to the transaction by looking at dba_2pc_pending, which has all the details about pending global transactions.
For Sybase resource managers, if you encounter a "lock held by distributed transaction" error, you must connect to the database and rollback the global transaction explicitly. To do so, perform the following steps:Rollback the transaction by typing
- at the command line.
Find out the local transaction ID that corresponds to the transaction by running sp_xa_scan_xact, which supplies a list of transaction identifiers.
Use sp_finish_xact with a transaction identifier and a stat (either commit or rollback) to force the branch to complete.
Recovering from Log Failure
This section describes common iPlanet Application Server log failure scenarios and explains how iPlanet Application Server can recover from these scenarios.Logs record the state of each transaction processed by iPlanet Application Server. If this data is completely lost, some transactions - those in the prepared state before the failure - can be left in an undesirable state. You may have to resolve such transactions manually by either aborting or committing them at the resource manager. The server can then be cold-started with new volume information and the system can be brought back online. However, the transaction manager provides means for recovering from some failures without resorting to a cold-start.
These means are described in the following sections:
Recovering from Log Disk Failure: Running Server
Recovering from Log Disk Failure: Running Server
Log volumes in the transaction manager are backed up by physical volumes. Physical volumes are backed up by disks.A disk failure can disable a log volume which can, in turn, disable the application server. Creating a mirror of the log volume helps increase the availability of the iPlanet Application Server machine. Without a mirror, disk failure disables the iPlanet Application Server machine. If a volume is mirrored, the iPlanet Application Server machine can continue normal operation even if the log volume fails.
If one of the disks backing up the log volume fails, you can perform the following steps to restart the application server and continue normal operation:
Query the logical volume to obtain a list of the mirrors backing it.
Query the failed physical volume to obtain the size of the volume.
Recovering from Log Disk Failure
If a log disk fails when the server is stopped, or when the server has crashed after a disk failure, you must restart the server in administration mode.If you know which disk has failed, perform the following steps to recover from the failure:
Restart the server in administration mode. You can set the administration mode, as follows:
If you do not know which disk has crashed, restart the server in normal operations mode. The server will not start properly, but it will print the name of the failed disk.
Remove the bad mirror.
- Open iPlanet Registry and navigate to the following key:
- SOFTWARE\iPlanet\Application Server\6.0\CCS0\TXNMGR\EngX\AdminMode
- You need to set AdminMode=1, to carry out recovery operations in case of media, log failures, etc. The KJS engine can't come up when AdminMode is set to 1. AdminMode should be reset to 0 before starting the server.
Recovering from Loss
You can obtain information about log volume configuration from the transaction manager's restart file. If the restart file is lost, you must cold-start the server, a process that can be undesirable; when a server is cold-started, existing volume information is lost. To avoid cold-starting the server, use the backup file (restart.bak) that the transaction manager creates by default. Place the restart and restart.bak files on separate disks. The transaction manager can recover from the loss of one of these files, but if both files are lost, the server must be cold-started.
Recovering Transaction History
Previous Contents Index Next
Copyright © 2001 Sun Microsystems, Inc. Some preexisting portions Copyright © 2001 Netscape Communications Corp. All rights reserved.
Last Updated April 29, 2002
