| Previous Contents Index Next |
| iPlanet Application Server Administrator's Guide |
Chapter 11 Administering Message Driven Beans
To deploy and run message-driven beans on iPlanet Application Server, you must first setup the Java Message Service (JMS) provider to enable clients to connect to a message-driven bean.The message-driven bean acts as a JMS message listener, and therefore a messaging middleware needs to be configured to enable deployment of message-driven beans. Currently, only the Java Message Queue is supported in this version of iPlanet Application Server.
This chapter contains the following topic:
Configuring a JMS Provider
For more information on deploying message-drivem beans, see iPlanet Application Server Developer's Guide and the Deployment Tool online help.Administering Message Driven Beans
Note The message-driven bean functionality in iPlanet Application Server is meant for developer use only. It has not been tested or certified for production environments.
Configuring a JMS Provider
To configure a JMS provider, you must first install the messaging middleware. By default, iPlanet Application Server uses the iPlanet Message Queue (iMQ) for Java, 2.0 SP1. iMQ for Java, 2.0 SP1 is bundled on the iPlanet Application Server installation CD. If you don't have the installation CD, you can download it from http://www.iplanet.com/products/iplanet_message_queue/home_message_queue.html.You can use iMQ for Java, 2.0 SP1, which is supplied with iPlanet Application Server, or use a third party product.
To Configure iMQ for Java
To Configure iMQ for Java
Before starting the configuration of iMQ for Java 2.0 SP1, ensure that iPlanet Message Queue for Java, 2.0 SP1 is installed on your machine.Follow these steps to setup a JMS provider and a message queue to enable support for message-driven beans:
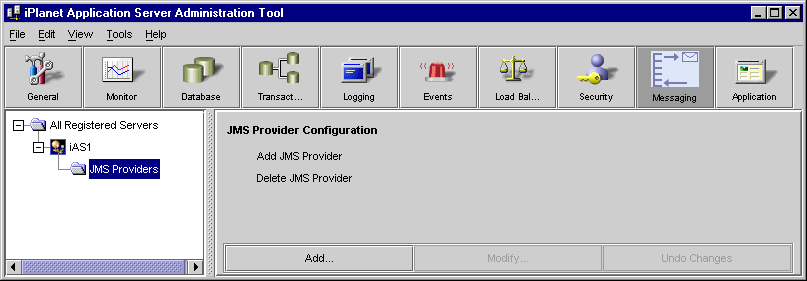
Start iASAT.
Click the Messaging icon on the menu bar.
Click JMS Providers in the left pane.
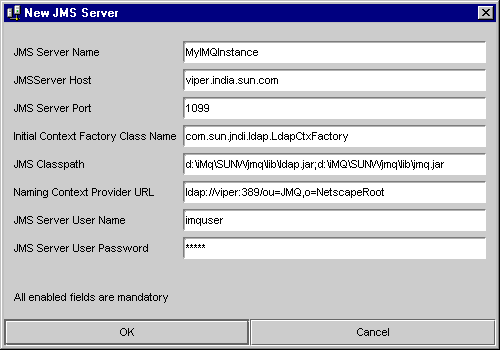
Enter the particulars for your environment.
- All fields are mandatory. You need to specify the following:
JMS Server Name
Click OK to commit the changes.Initial Context Factory Class Name
JMS ClassPath
- This can be specified in terms of LDAP URL, filesystem path, etc.
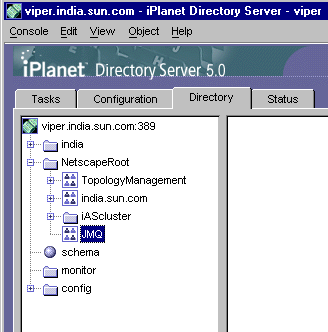
Create an entry for the Queue in the directory server.
Use the tools availablle with iMQ for Java 2.0 to create the Queue Connection Factory object, QCF. in the directory server under ou=JMQ.
- If you are using a filesystem context factory name, then specify the path to the file.
- For information on creation an organizational Unit, see iPlanet Directory Server 5.0 docuemntation.
Use iPlanet Console to ensure that the cn=QCF object in the directory has read, compare and Search permissions.
- A sample file is shown below:
- cmdtype=add
- obj.type=qf
- obj.lookupName=cn=QCF
- objstore.attrs.java.naming.factory.initial=\com.sun.jndi.ldap.LdapCtxFactory
- objstore.attrs.java.naming.provider.url=\ldap://border.india.sun.com:389/ou=JMQ,o=NetscapeRoot
- objstore.attrs.java.naming.security.principal=cn=Directory Manager
- objstore.attrs.java.naming.security.credentials=netscape
- objstore.attrs.java.naming.security.authentication=simple
- Now that your JMS provider is configured you can start using message-driven beans in your applications.
To Configure Third Party JMQ
Follow these steps to configure a third party Java messaging middleware. Ensure that the message queue you plan to use, conforms to Chapter eight, "JMS Application Server Facilities", of the JMS specification.Follow these steps to configure a third party JMS provider:
Manually create the Factory Context and configuration parameters in the iPlanet Directory Server, under ou=JMQ,o=NetscapeRoot.
If you have already configured iPlanet Message Queue for Java 2.0, SP1, delete the following iMQ specific entries from the iPlanet Registry:
- These values are only valid for iPlanet Message Queue. Use the Factory settings sepecified for your JMQ.
Administering Message Driven Beans
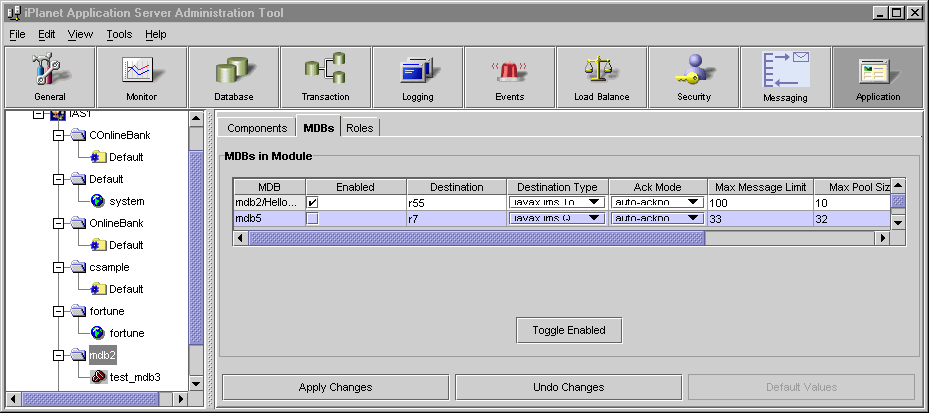
Message-driven beans can now be administered through the iPlanet Application Server Administration Tool. You can change the properties of each individual message-driven bean in a module.
To Administer Message Driven Beans
Follow these steps to modify the properties of a deployed message-driven bean:
Start iASAT.
Click Application on the menu bar.
Select the message-driven bean you want to modify.
- In the left pane all the deployed applications are displayed.
In the right pane, select MDBs tab.
The following fields can be modified:
MDB Name
Destination Name
- If the flag is disabled, KJS will not load the message-driven bean at startup.
Acknowledgement Mode
- Can be Queue or Topic.
Click Apply Changes to commit the changes you have made.
- This property can be set for Topic Subscription only.
Previous Contents Index Next
Copyright © 2002 Sun Microsystems, Inc. All rights reserved.
Last Updated March 06, 2002