| Previous Contents Index Next |
| iPlanet Application Server Installation Guide |
Chapter 6 Advanced Installations for Windows
This chapter describes how to install and configure the iPlanetTM Application Server for the Windows platform. It contains the following information:
What You're Installing
For any late breaking updates to these instructions, check the Release Notes at:http://docs.iplanet.com/docs/manuals/ias.html
For more information about configuring your application server after installation, refer to the iPlanet Application Server Administrator's Guide.
What You're Installing
The software you're installing for iPlanet Application Server, actually consists of a group or stack of components, including:
iPlanet Directory Server, Enterprise Edition 5.0, SP1
See Chapter 1 "Getting Started," for an overview of the iPlanet Application Server features and components.iPlanet Console, which has its own Administration Server
iPlanet Application Server and its subcomponents:
Note In addition to these components, Custom Installation allows you to install database clients, proprietary Type 2 iPlanet Application Server Database Drivers, and third party JDBC drivers.
Running the Custom Installer
Installing iPlanet Application Server using the custom installation wizard is divided into the following topics:
"To Start Custom Installation"
"To Configure the Directory Server"
"To Configure iPlanet Application Servers"
"To Configure Database Connectivity"
"To Configure iPlanet Application Server Clusters"
"To Use the Sample Applications"
Note Meet the Minimum System Requirements and Prerequisites for Installation, as given in "Chapter 2 "Preparing to Install".
If you are installing from a CD-ROM, the installation wizard should start automatically. If it does not, browse the CD-ROM drive to locate and launch setup.exe.
Within iPlanet Application Server installation, there are several panels pertaining to installing and configuring iPlanet Directory Server 5.0, SP1. The Directory Server stores the application server's configuration and directory data.Click Next after the Welcome screen appears.
Click Yes to accept the license agreement.
Click Next to install the iPlanet Server and core components.
- You must accept the License agreement to continue.
Select Custom as the type of installation and Click Next.
- Select the iPlanet Administration Console to install it as a standalone application. Selecting the iPlanet Server and core components will install the Administration Console by default on the same machine on which you are installing the application server.
- The Type of Installation panel appears.
Click Next on the Location of Installation panel to accept the default pathway, or click the ellipsis (...) to browse through your computers' folders and select another directory.
- The Location of Installation panel appears.
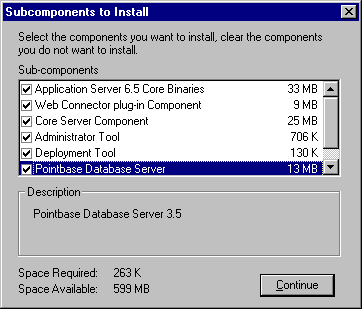
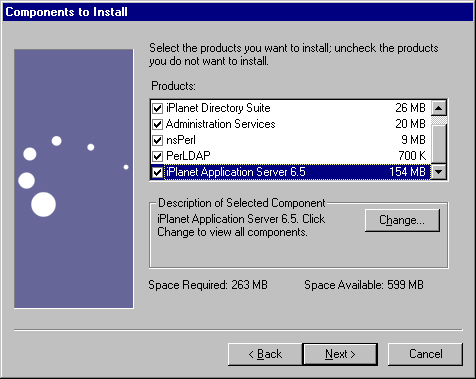
Click Next to accept the default choices on the Components to Install panel. The default choices indicate those installed during a full installation.
- Click the Change button to further refine your choices. This displays the subcomponents associated with each component selected.
- The Components to Install panel enables you to:
Deselect the Directory Suite component if you already have a directory service available.
Deselect Administration Services if you don't want the iPlanet Administration Console.
Note The nsPerl and PerLDAP components are required by the directory server component.To deselect them, you must first deselect the iPlanet Directory Suite component.
- iPlanet Application Server bundles the PointBase database server, which is installed by default. If you do not want to install PointBase, select iPlanet Application Server 6.5 > Change, and uncheck the box next to PointBase Database Server.
To Configure the Directory Server
The Custom Installation Wizard panels set up the following:
Directory Server
Next, you will configure the port numbers and the number of Java and C++ servers.Registers the Directory Server's data tree by indicating what the Directory Server stores:
Sets up following administrators:
Records general settings for the Directory server's
Sets Administrative Domain boundaries for the Directory Server
Select the directory server that will hold the configuration directory.
- For an overview of the various functions of the Directory Server, see the iPlanet Directory Server Installation Guide.
Note For information about the Directory Server's Synchronous Service for Windows, see the iPlanet Directory Server Installation Guide at: http://docs.iplanet.com/.
- These panels and their function are described in the following steps.
- The configuration directory contains the data tree used by the iPlanet Application Server. The Directory Server stores these configuration settings in the data tree: o=NetscapeRoot, and under the suffix that you set up to identify your organization. Multiple server installations can store their configuration settings in this configuration directory.
- Choose one of the following options:
Specify a new Directory Server (the one you are installing) as the configuration directory by keeping the default setting, or
Select the Directory Server that will store iPlanet Application Server data.Use an existing Directory Server by selecting "Use existing configuration Directory Server," and then fill in the information used to identify that server:
- The Directory Server gives you the option to distribute data amongst multiple Directory Server databases. It does this by using a plug-in that chains together distributed data. For more information, see iPlanet Directory Server Deployment Guide, which is available on the Web at http://docs.iplanet.com.
- Choose one of the following options:
To store directory data in the newly installed Directory Server, select the default option.
To use an existing Directory Server for data storage, select that option and enter its general settings:
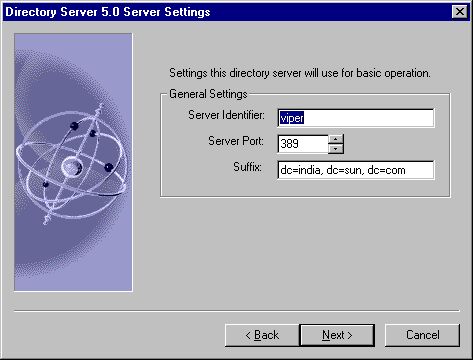
Specify the Directory Server's General Settings
- Click Next to continue with the Directory Server Settings.
- These settings consist of an identifier for the Directory Server's host machine, the port number of the LDAP communication port, and the data information tree suffix that is used to identify the root of the database tree for this iPlanet Application Server installation or the Directory Server.
- The suffix is the entry at the top of the Directory Server data tree, below which iPlanet Application Server data is stored. For more information on standard directory suffixes, see the iPlanet Directory Server Administrator's Guide.
The Server Identifier is set to the local host (the computer on which you are installing the directory server.)
Enter the Administrator ID and password for this configuration server instance.The default Server Port number is 389 (the standard LDAP port number); if the port is in use, a randomly generated number will be used.
The default domain name is set to the computer you're installing the Application Server on.
Note This Administrator ID and password will be required if you ever want to uninstall iPlanet Application Server and Directory Server.
Set up the directory server's Administration Domain.
Enter a Directory Administrator (Manager) user name and password.
- The default is set to the installation computer's domain. If you need to change this value, you should use a name that corresponds to the organizations that control the servers in each domain.
- Since a Directory Server may store Configuration information for multiple domains, the Administration Domain is used to keep these separate. The Directory Server administration domain allows you to logically group servers together so that you can more easily distribute server administrative tasks.
- A common scenario is for two divisions in a company is to have each want control of their individual servers. However, you may still want some centralized control of all the servers in your enterprise. Administration domains allow you to meet these conflicting goals.
- For more advanced configurations and information about using the Directory Server to store information about multiple domains, see the iPlanet Directory Server Administrator's Guide.
Enter the Directory Manager DN or keep the default.
Enter the Directory Manager's password; it must be at least 8 characters long.
- The Directory Manager's Distinguished Name is the special directory entry to which access control does not apply. You can think of the Directory Manager as your directory's super user.
- In most cases, it is best to keep the default value, which is set to the common name of Directory Manager, cn=Directory Manager
Specify the Supplier and Consumers for Directory Manager.
Accept the default to populate the directory server with commonly used entries.
- Accept the default supplier and consumer replication settings, unless you have another Replication Configuration design to implement.
- Replication is the process by which directory data is automatically copied from one Directory Server to another.
- A server that holds a replica that is copied to a replica on a different server is called a supplier. A server that holds a replica that is copied from a different server is called a consumer. For more information on replication concepts, see iPlanet Directory Server Deployment Guide.
- http://docs.iplanet.com/docs/manuals/directory.html#dirserver
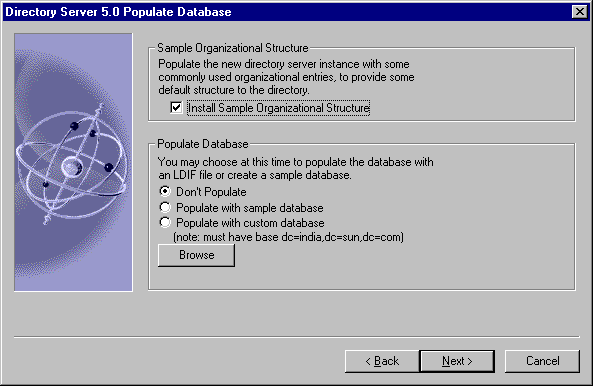
Choose to populate the database by selecting the appropriate radio button.
- These sample entries are provided to help you to start running iPlanet Application Server.
Click Next to enable schema checking. We recommended that you keep the default.
- If you have a custom database, select the Populate with custom database option > click Browse. Enter the full path and filename of a file in LDIF format to populate the directory with the custom database.
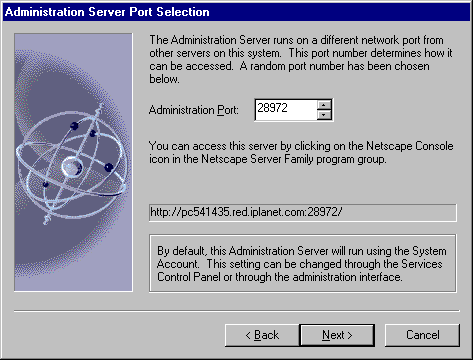
Click Next to accept the default or enter a specific IP address to bind to your Administration Server.
Note Enter the correct IP address as no verification is performed.
Click Next to accept the default port number for the Administration Server.
Accept the default, or enter a unique global configuration name for this installation of iPlanet Application Server.
- The iPlanet Administration Console requires this port number to administer the Directory Server.
Enter the product key for iPlanet Application Server.
- The name you assign is stored in the configuration directory, under o=NetscapeRoot tree, along with the global configuration names of any other iPlanet Application Server installations.
Select the Web Server type and instance that you have installed and running.
- The product key is in the Welcome letter you received with the product and is required before installation can continue.
- In case of multiple instances of iPlanet Web Server, select one to associate with iPlanet Application Server.
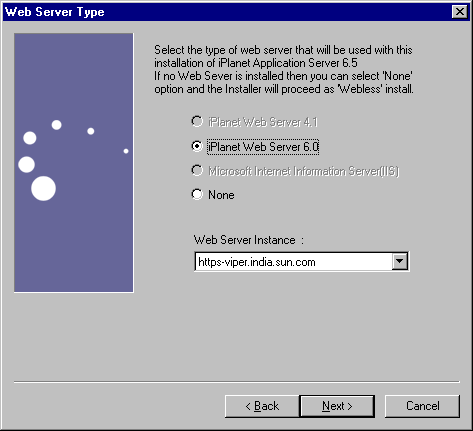
Note If you are using a Web Server other than IIS or iPlanet Web Server, you must enter the doc and cgi-bin directories.
To use the Apache Web Server, you must configure iPlanet Application Server to work with either the iPlanet Web Server or Microsoft Internet Information Server during installation. After installing the iPlanet Application Server, install and configure the Apache Web Server.
Make sure to set the registry key permissions for the \SOFTWARE\iPlanet key to Full Control for all options.
- For more information on how to install and configure the Apache Web Server, see "Installing the Web Connector Plug-in"
To Configure iPlanet Application Servers
Enter the port numbers for the Administrative Server (KAS), the Executive Server (KXS), the Java Servers (KJS), and C++ Servers (KCS).
Next up are panels that enable you to configure database clients.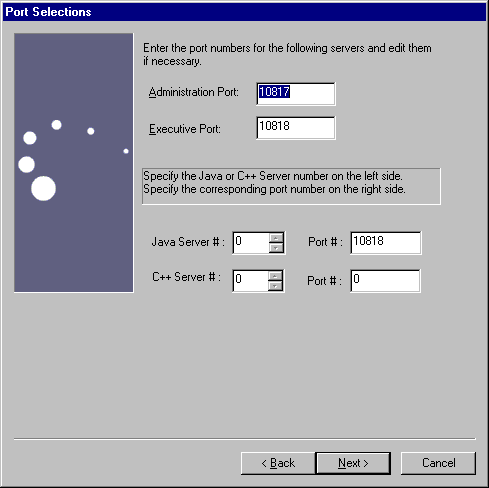
Enter the iPlanet Application Server administrator's username and password.
- All port numbers you specify for listener ports must be within the acceptable range (1 to 65535), and must be unique (not used by any other applications on your system).
Note If the port number is already in use, the service does not start up when you run iPlanet Application Server.
- Enter the number of Java Servers (KJS) and C++ Servers (KCS) to use to process applications.
- The default values are 1; increase these values to handle high processing loads. You can also adjust the values after installation using the Administration Tool. See the iPlanet Application Server Administrator's Guide for more information.
- These are used to authenticate to the Administration Server, which is used by the Administration Tool and the Deployment Tool.
To Configure Database Connectivity
This section includes procedures on setting up the database clients, native and third party JDBC drivers.
"To configure Native Database Client Priority"
"To Configure Third Party JDBC Drivers"
"To Configure Third Party JDBC Drivers"
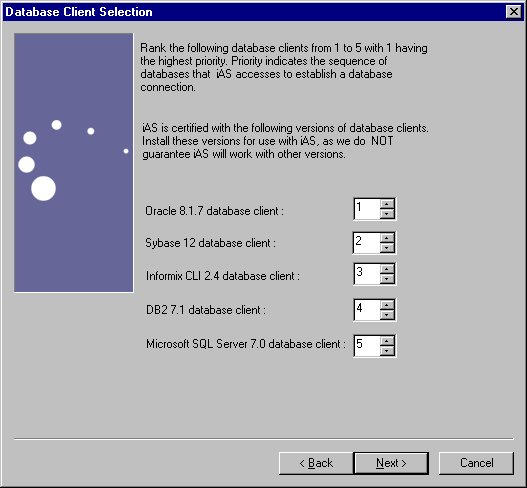
To configure Native Database Client Priority
- Rank the installed database clients in order of connection priority.
- The installation program lists all supported database clients. The clients allow your applications to connect to your database back ends. Rank the clients according to connection priority, whether you've installed them yet or not. Client software can be added after installation. Sample applications are configured for the highest priority database.
- Registration of iPlanet Type 2 JDBC drivers for the supported database platforms is automatic since iPlanet Application Server automatically recognizes the presence of the supported native client libraries.
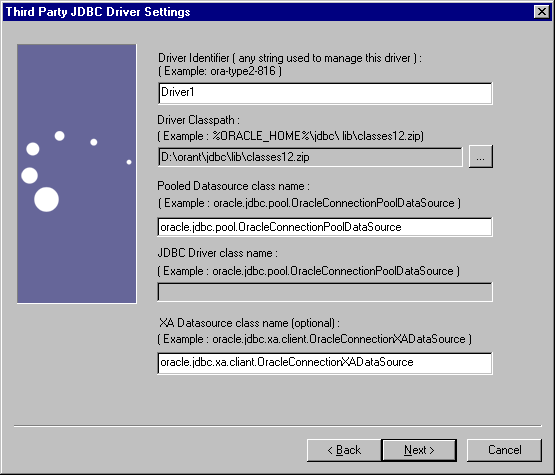
To Configure Third Party JDBC Drivers
Select Yes if you want to configure third party JDBC drivers.
Enter a Driver Identifier for the driver, for example drive2.
- You can also configure third party JDBC drivers after installation using the iPlanet Application Server Administration Tool.
- If you answer yes, enter the number of drivers you want to configure before clicking Next. The following dialog box appears:
Enter the Driver class path, for example Oracle_Home/jdbc/lib/classes12.zip
- The Driver Name is a logical name by which you identify the driver to iPlanet Application Server. This name is used to link datasource definitions back to a physical driver type. The name can be of any string value you choose. Examples include: driver2, ora-type4, ora-type2, and jconnect.
Enter the Pooled Datasource class name, for example oracle.jdbc.pool.OracleConnectionPoolDataSource.
- The Driver class path is the fully qualified path to the driver classes, JAR, or ZIP file. This zip file holds the library classes for the driver. Specify the complete path as shown in the following example:
- d:\oracle\jdbc\lib\classes12.zip.
Enter the XA Datasource classname, for example Database.Jdbc.xa.client.DatabaseXADatasource. If your database is Oracle, type oracle.xa.jdbc.client.OracleConnectionXADataSource.
Click Add to register the driver.
Click OK to commit the changes.
- You can choose to configure more drivers or click Cancel to abort the process.
To Configure Internationalization
Select Yes on the Internationalization panel to enable support for standard Java internationalization. Click Next.
Next up are configuration options for setting up iPlanet Application Server clusters.
- Enabling I18N support allows multi-lingual applications to be deployed to iPlanet Application Server.
To Configure iPlanet Application Server Clusters
Note Follow instructions for installing and verifying the simple cluster on the Windows platform at: http://developer.iplanet.com/appserver/samples/cluster/docs/nt-cluster.html
Select "Yes" if you intend to synchronize session and state information across multiple servers for failover and fault tolerance.
Enter the name of the cluster that this instance of iPlanet Application Server participates in.
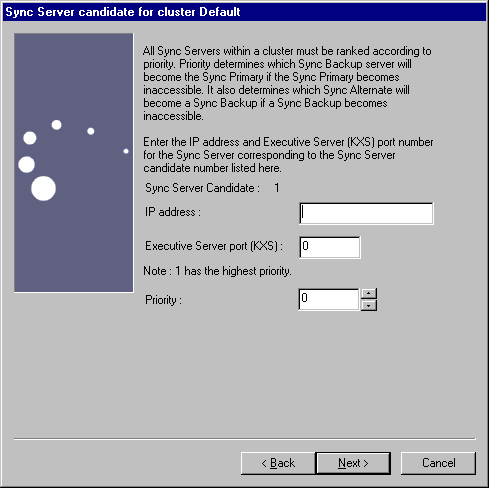
Click on Sync Server or Synch Local to indicate whether this iPlanet Application Server is a synchronization server (Sync. Server) or a local server (Sync Local.)

Enter the total number of synchronization servers that you plan to have in this cluster.
If this server is a synchronization server (you selected Sync Server in the previous step) enter its IP address, Executive Server (KXS) port number, and its priority number for taking over as the primary synchronization server.
- A Sync Local server uses data synchronization services, but is not eligible to become a Sync Primary or the Sync Backup Server.
Click Install to complete the installation process.
- For more information on setting up sync servers, backups etc., see "Configuring iPlanet Application Server Clusters".
- Additional instructions for installing and verifying a simple cluster on the Windows platform are available at: http://developer.iplanet.com/appserver/samples/cluster/docs/nt-cluster.html
- The installation program notifies you when all the iPlanet Application Server files are in place. Select OK on the final dialog to reboot your computer, so that the new settings can take effect.
Verifying Installation
You can use a pre-installed application to verify that iPlanet Application Server is running. Since this basic application, which uses servlets and JSPs, does not rely on a backend database, it runs without any post-installation setup.
Open your browser and enter the following URL:
Press Enter.
- http://<yourwebserver>:<portnumber>/ias-samples/index.html
Click on the Quick Test link, under Sample Applications.
Press the shift key and click on the browser's Reload button to ensure the application repeatedly returns a new HTML stream.
Using the Sample Applications
To better understand specific technology features provided by iPlanet Application Server, run the iPlanet Application Server Technology Samples.
To Use the Sample Applications
Start running iPlanet Application Server.
After you become familiar with the iPlanet Application Server sample applications, run the Sun Samples, which are applications based on those found at www.java.sun.com. The Java Pet Store example in particular demonstrates how a popular J2EE application is deployed to iPlanet Application Server.Open your browser, enter the following URL, and press Enter:
Select the iPlanet Application Server J2EE Application Samples link and select a specific sample application. Follow the application-specific setup instructions to establish the necessary database settings and to run the application.
- http://yourwebserver:portnumber/ias-samples/index.html
You can review the source code of the sample applications and associated J2EE XML Deployment Descriptors by browsing in the following location:
You can also find compile scripts at this site for experimenting with the sample code.
Installing on Multiple Windows Machines
The Silent Installation feature allows you to install the Application Server on multiple Windows machines without running the installation program more than once.To execute a Silent installation, perform the following procedure:
Install on the first machine by running the setup -k command.
Copy the install.inf to the machine on which you want to install iPlanet Application Server.
- Choose one of the installation types and proceed with the installation program. An install.inf file is generated in the installDir/setup directory.
You may have to change some or all of the following values in install.inf, depending on your configuration requirements, such as, port numbers, domain name, etc. Default values are set for several of the entries.
Change the following passwords, if required:
Run the following command on the second system to begin silent installation: setup -s -f <fullpath_install.inf>
- ConfigDirectoryAdminPwd
- UserDirectoryAdminPwd
- RootDNPwd
- LDAPUserPassword(Same as RootDNPwd)
Restart the system when the process entry for Setup.exe disappears from Windows Task Manager.
- Check the status of Setup.exe in Windows Task Manager.
Note The command setup -help lists the syntax usage for Silent installation.
Previous Contents Index Next
Copyright © 2002 Sun Microsystems, Inc. All rights reserved.
Last Updated March 12, 2002