| iPlanet Instant Messenger Release 3.0 Quick Reference |
iPlanet Instant Messenger Release 3.0 Quick Reference
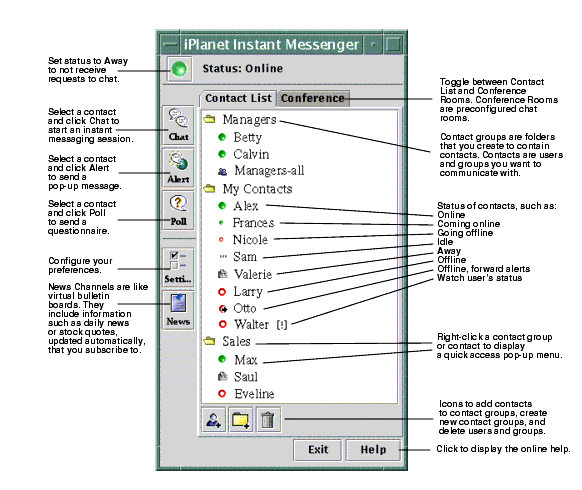
iPlanet Instant Messenger Main Window Overview
iPlanet Instant Messenger Procedures
To configure your computer with the appropriate Java software, see:
Windows: iPlanet Instant Messenger for Windows Requirements
If you are using Java Web Start, on Windows you can create a Desktop shortcut, so you never really enter a URL. On Solaris, you can invoke the javaws launcher to start iPlanet Instant Messenger.Solaris: iPlanet Instant Messenger for Solaris Requirements
If your browser is configured for the Java plug-in, do not close the browser window in which you started iPlanet Instant Messenger, nor change the URL as long as you are using the client. You can minimize this browser. If you do close this browser window by mistake, close all browser windows and restart before trying to rerun iPlanet Instant Messenger.
To Get Started Using iPlanet Instant Messenger
When you run iPlanet Instant Messenger for the first time, the Main window's Contact List tab shows one contact group named "My Contacts." To get started, do the following:
Search for and add contacts to this contact group.
Add other contact groups to your Contact List.
- In iPlanet Instant Messenger, contacts are LDAP userIDs or groups that you send and receive instant messages with. You add contacts to your personalized contact groups so that you can monitor their online status. Other instant message environments refer to contacts as "buddies" and contact groups as "buddy lists."
(Optional) Rename the "My Contacts" group to some other name of your choice.
- Create contact groups for different categories of users you want to communicate with.
- To rename a contact group, right-click the group and select Rename contact group from the pop-up menu.
To Search for and Add Contacts to a Contact Group
Use these steps to search for and add contacts to a contact group:
In the Main window, with the Contact List tab selected, click the Search and Add Contacts icon:
Search for contacts you want to add to your contact groups.

- The Add New Contact to Contact Group window appears.
- Tip: Right-click on a contact group to display a pop-up menu. From here you can add and delete contacts, and work with contact groups.
After entering your search criteria, click Search. The result is displayed in the List of contacts to Add, or if your search finds more than one match, the Select Contact window is displayed.
- Use the Search by drop-down menu to choose the type of search, either User ID or Name, then type the user ID or name in the text box. When you search by Name, use the Search Options drop-down menu to choose Contains, Starts With, or Ends With. For example, if you know the contact's last name, choose "Ends With" and type the last name in the text box.
To remove a contact from the list, select the contact and click Remove.
- If the Select Contact window is displayed, select the contact(s) that you want to add to a contact group and press OK. You can use multiple selection in this window.
- The Add New Contact to Contact Group window is updated with the contact(s) and the Select Contact window is closed.
Use the Add contact(s) to group drop-down menu to select a contact group and click Add Contact(s).
- iPlanet Instant Messenger updates your contact group with the contact(s).
In the Main window, with the Contact List tab selected, click the Create a New Group icon:
Type the contact group name and click OK.
- The new contact group is displayed in the Contact List tab.
To Send an Instant Message (Chat)
With the Contact List tab highlighted, select the contact(s) you want to chat with.
Click the Chat icon:
- You can start an instant message session with one or multiple contacts. Use the Shift or Control keys for multiple selection.
Type your message in the input area. When done, click Send.

- The Chat window appears.
- Tip: You can double-click a contact (or contacts) to launch the Chat Room window.
To invite other users to participate, click the Invite Others button.
- The message will be sent to the users displayed and will appear in your upper display area. As users respond, their messages also appear here.
- Tip: Use the toolbar to change text size or color, or to emphasize with bold, italic, or underlining.
To Send an Alert
Use alerts, rather than chat, to send time-critical pop-up messages.Note: You need Alert privileges to be able to send alerts. Contact your administrator for more information.
With the Contact List tab highlighted, select the contact(s) you want send the alert to.
Click the Alert icon:
- You can send an alert to one or multiple contacts. Use the Shift or Control keys for multiple selection.
To add or delete recipients, click the Add Recipients button to display the Add Recipients window.

- The Send alert message window appears. Recipients of the alert appear in a scrollable list box. If you do not need to add or delete recipients, skip to Step 4.
In the Send alert message window, type the alert message subject in the Subject text box. Type the text of the message. Add text formatting for effect.
- The Add Recipients window enables you to build a recipient list from your personal contact list, or to search the LDAP directory for contacts. When done adding or deleting recipients, click the OK button.
Select the Show message status check box if you want to display a pop-up Status window on your desktop showing the status of each recipient.
- The alert appears on the recipients' desktops, and in the Alerts tab in their News Channels window if the recipients have subscribed to that channel. If you selected the Show message status check box, a Status pop-up appears on you desktop.
- Tip: You can chat with the sender of an alert. Right-click in the alert message to display a pop-up menu and select Chat with sender.
Commonly Used Abbreviations for Chat
Use of iPlanet Instant Messaging is subject to the terms described in the license agreement accompanying it.
Copyright © 2001 Sun Microsystems, Inc. All rights reserved.
Sun, Sun Microsystems, the Sun logo, Java, Java Web Start, iPlanet, and all Sun, Java, and iPlanet based trademarks and logos are trademarks or registered trademarks of Sun Microsystems, Inc. in the United States and other countries.

Last Updated October 26, 2001