| Previous Contents Index DocHome Next |
| iPlanet Process Manager Installation Guide Version 6.0 Service Pack 2 |
Chapter 2 Installing on NT
This chapter describes the procedure for installing Process Manager on Windows NT systems. Process Manager can be installed on Windows NT 4.0 (Service Pack 5) systems.On Windows NT systems, you can install all Process Manager components or you can choose to install just the Process Builder component. Regardless of whether you install all components or just Process Builder, you use an onscreen installer to perform the installation.
This chapter has the following sections:
Getting Ready
Before installing Process Manager on Windows NT 4.0 (Service Pack 5), make sure:
your system meets all the hardware, operating system and memory requirements discussed in the section "Platform Requirements" in Chapter 1 "Preparing for Installation."
you have access to a database.
you know all the information discussed in the section "Getting Ready to Install" in Chapter 1 "Preparing for Installation."
Installing All Components
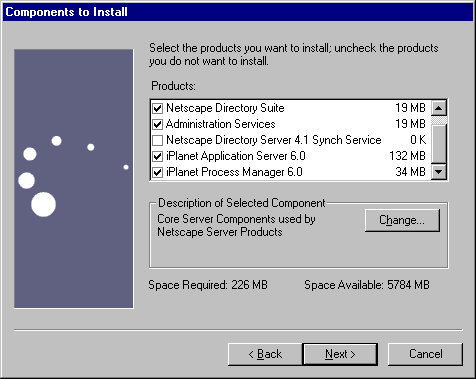
On Windows NT, you use an onscreen Process Manager installer that allows you to click through a set of install options.When installing Process Manager on a Windows NT system, you can select which components to install by checking the corresponding boxes as shown in the following figure:
Before you install Process Manager 6.0, see the section "Getting Ready to Install" in Chapter 1 "Preparing for Installation" which explains important concepts and information required to properly install and configure iPlanet Application Server.
To install the Process Manager components using the installation wizard, follow these steps:
Log on
Select Which Components To Install
Enter Information for the Directory Server
Enter Information for the Application Server and Web Server
Log on to Windows NT as a user with administrator privileges.
The installation wizard launches.Insert the Process Manager disc into your CD ROM drive or download the compressed product file from the ftp site and unzip it into a temporary location.
The following section describes the steps for performing a Typical installation. If you plan on using the iPlanet Application Server Clusters, you must perform a Custom installation. See the iPlanet Application Server Installation Guide for Custom installation instructions.
Select Which Components To Install
Click Next in the Welcome dialog box.
Click Yes to accept the Software License Agreement.
When prompted for the installation, click Netscape Servers. This gives you the choice to install iPlanet Application Server, Netscape Directory Server, Netscape Console, iPlanet Application Server Administrator, the Web connector plug-in, and Process Manager.
When prompted for the installation type, click Typical.
Select the installation directory and click Next.
Select which components to install:
- The default directory is C:\iPlanet\iPM6.
- You cannot use a directory name that includes spaces.
- To install Process Manager along with iPlanet Application Server and Directory Server, select all the following components (these are the default selections):
- The first three components (Netscape Server Family Core Components, Netscape Directory Suite, Administration Services) install Directory Server software.
- To install Process Manager along with Netscape Application Server without Directory Server, select
- To install only Process Manager Server 6.0 and Process Builder 6.0 select only
iPlanet Process Manager 6.0
- To install Process Manager Server without the Web Connector, for a webless install, select
iPlanet Application Server 6.0 and click Change
Deselect the Web Connector Plug-in component and click Continue.
- Once your webless installation is complete, you must install the Web Connector Plugin on your Web Server machine. See the section "Webless Installation" to update the webserver instance you plan on using with the Application Server.
- To install only Process Manager Server 6.0 or Process Builder 6.0, select
iPlanet Process Manager 6.0 and click Change.
- Deselect the component you do not want to install and click Continue. If you are installing only Process Builder, click Next to complete the installation process. If you are installing only Process Manager server, click next to Enter Information for Process Manager.
Enter Information for the Directory Server
If you specified that you want to install a new instance of Directory Server, select "This instance will be the configuration directory server."
If you do not want to install Directory Server, enter the following information for the configuration Directory Server:
Host name and port number of the machine where the existing installation of Directory Server resides
If you are installing a new Directory Server click "Store data in this directory server."Login ID for the machine where Directory Server is installed in "Bind As" (the default value is cn=Directory Manager).
Password to the machine where Directory Server is installed.
If you are not installing a new Directory Server, enter the following information for the storage Directory Server that you want this installation to be configured with:
Host name and port number of the machine where Directory Server is installed
Login ID to the machine where Directory Server is installed in "Bind As"
If you are not installing a new Directory Server, skip this step. Otherwise, enter the settings to be used by the Directory Server you are installing or accept the default settings:
- Go to the section "Enter Information for the Application Server and Web Server" to proceed to the application server portion of the installation process.
If you are not installing a new Directory Server, skip this step. Otherwise, enter the Administrator ID and password to the configuration directory.
Enter the name of the Administration Domain where Netscape software information is stored on Directory Server or accept the default name.
- Important: This is the Administrator ID and password required to uninstall iPlanet Application Server and Directory Server. Make a note of this information, as you will need it if you uninstall either of these products.
Enter the Directory Manager distinguished name (DN) and password. The default value for the distinguished name is cn=Directory Manager.
Enter the port number for the Directory Server Administration Server. This is required for using the Console to administer the Directory Server.
Confirm the configuration Directory Server information by entering the server's host name (defaults to the host you have used so far in the installation), port number (defaults to 389), Directory Manager user, and the Directory Manager password.
- Note: Take note of this port number. Either use a number meaningful to you or store the port number in a safe place.
Enter Information for the Application Server and Web Server
Enter the product key of iPlanet Application Server. See the Welcome letter you received with the product for the correct key.
If you have already installed a web server, when prompted for the type of web server to be used, accept the default of iPlanet Web Server 4.1 (Process Manager 6.0 requires this web server). The web server instance will be displayed. For a webless installation, select `None'.
When prompted for the Administration Server user ID and password, enter the user ID and password that will be required to log on to the Administration Server through the Administrator tool (iPlanet Application Server Administrator).
Select whether or not want to enable i18N support for the application server.
Enter Information for Process Manager
Enter the administrator user for Process Manager. This user should exist in the corporate directory.
Review the summary provided by the installation program of the configuration you have selected. If necessary, go back and make changes. When you are ready to install, click Install.
When the installation is complete, reboot the computer so that the new settings take effect.
During the installation process, when prompted if you want to overwrite an existing .dll file, press OK.
Installing Process Builder Only
You can install the Process Builder as a stand-alone tool on your system. Note that if you install Process Manager 6.0, Process Builder is installed by default; you do not need to install Process Builder separately. However, if you want to install only Process Builder, perform the following steps:
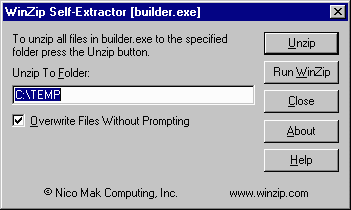
Locate the builder.exe file on the CD or download it from the Process Manager ftp site.
Double-click the builder.exe file.
Enter the directory where the self-extractor will extract the files.
Click OK in the dialog box that appears indicating that the files were extracted successfully.
- The Process Builder files are extracted into the directory you specified in Step 3.
Click Close in the self-extractor window.
Navigate to the directory you specified in Step 3 and open the builder folder.
Double-click the Builder.exe file.
- Process Builder appears.
- Alternatively, you can double-click the Builder.bat file to launch a separate DOS window in addition to Process Builder that displays diagnostic messages. Note that if you close this DOS window, Process Builder closes as well.
Upgrading from Process Manager 6.0 to SP 1
It is not necessary to uninstall Process Manager 6.0 in order to upgrade to the Service Pack 1 release. Follow the installation steps described earlier and select the components you wish to upgrade.You must upgrade the Application Server components to Service Pack 1 before you upgrade the Process Manager.
Webless Installation
For a production purposes,you may have elected to install the Process Manager and the Application Server on a separate machine from the Web server. Once you have completed the webless installation, you must:
Copy a directory from the machine where you installed the Process Manager to the Web Server machine.
To copy the directory:
Go to the machine where the Web Server is installed.
To update the obj.conf file:Create a directory with the name iPlanet\iPM6.
Assuming you installed Process Manager in an iPlanet\iPM6 directory, copy the following directories from the machine where you have installed the Process Manager to the Web Server machine directory you just created.
- iPlanet\iPM6\bpm\html
iPlanet\iPM6\bpm\resources
- In addition, if your Process Manager application uses any resources such as images or HTML files, copy the directory, for example:
- iPlanet\iPM6\bpm\applications\MyApp\images
- You must copy the directory for each application that relies on any resources.
Go to the machine where the Web Server is installed.
Open the obj.conf file located in:
Copy the following lines under the <object name=default> section:
- webserverlocation/https instance name/conf/obj.conf
Additionally, if the following isn't already in your obj.conf file, add it:
- Change the pathname following the dir directive to match the pathname where you copied the files.
NameTrans fn="pfx2dir" from="/Administrator.apm" dir="d:/iPlanet/iPM6/bpm/html/Administrator.apm/en"
NameTrans fn="pfx2dir" from="/Business.apm" dir="d:/iPlanet/iPM6/bpm/html/Business.apm/en"
NameTrans fn="pfx2dir" from="/Express.npm" dir="d:/iPlanet/iPM6/bpm/html/Express.npm/en"
NameTrans fn="pfx2dir" from="/PMResources" dir="d:/iPlanet/iPM6/bpm/resources"
NameTrans fn="pfx2dir" from="/BPM" dir="d:/iPlanet/iPM6/bpm/Applications"
Restart the Web Server.
- Service method=(GET|HEAD|POST) type=*~magnus-internal/* fn=send-file
Previous Contents Index DocHome Next
Copyright © 2000 Sun Microsystems, Inc. Some preexisting portions Copyright © 2000 Netscape Communications Corp. All rights reserved.
Last Updated March 12, 2001