Figure 13: Add Broker
Disabling the autocreate Feature
One of the features of the broker is the auto-creation of queues and topics. When a JMS client application tries to publish messages to a destination that does not exist on the broker, the behavior of the client application is determined by the value of the autocreate property.
If autocreate is set to true, the client application will run successfully. The broker will temporarily auto-create the destination accessed by the client application and it will be available to the client application. Once the client application exits and if the destination is empty, the auto-created destination will be destroyed on the broker.
If autocreate is set to false, the client application will receive a JMS security exception and it will not run successfully. The error message that the client application will receive will look something like the following:
javax.jms.JMSSecurityException: [C4035]: Forbidden.
at com.sun.messaging.jmq.jmsclient.ProtocolHandler.createDestination(ProtocolHandler.java:752)
at com.sun.messaging.jmq.jmsclient.ProtocolHandler.createMessageProducer(ProtocolHandler.java:700)
at com.sun.messaging.jmq.jmsclient.MessageProducerImpl.<init>(MessageProducerImpl.java:100)
at com.sun.messaging.jmq.jmsclient.QueueSenderImpl.<init>(QueueSenderImpl.java:37)
at com.sun.messaging.jmq.jmsclient.QueueSessionImpl.createSender(QueueSessionImpl.java:122)
It is important that you turn off the autocreate in a deployment environment so that all the destinations on the broker are centrally managed by an administrator. The default value for autocreate for queues and topics is true.
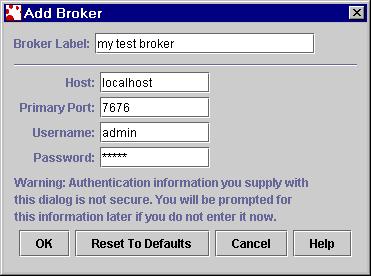
You can use jmqadmin to disable the autocreate feature. In order
to do this, you need to first create and add a broker in jmqadmin.
It is very similar to the way you created and added an object store.
Figure 13: Add Broker

Figure 14: Query/Update Broker
Tips using jmqcmd:
If you want to use jmqcmd to turn off the autocreate for queues and
topics, execute the following commands.
jmqcmd update bkr -o "jmq.autocreate.queue=false" -u admin -p admin
jmqcmd update bkr -o "jmq.autocreate.topic=false" -u admin -p admin
<<Back << >> Next>> <<Return to TOC>>