| Previous Contents Next |
| iPlanet Market Maker Installation Guide |
iPlanet Market Maker
Installation Guide
Foreword
This iPlanet Market Maker Installation Guide has been produced by iPlanet, a Sun/Netscape Alliance company, to provide you with instructions for how to install iPlanet Market Maker and the required third party software on your Solaris system.
Introduction
This installation manual describes how to install iPlanet Market Maker, Ver. 1.0 SP1, on Sun's Solaris operating system.
Purpose of This Guide
This document, organized into the following major sections, provides detailed instructions on how to install iPlanet Market Maker.
Installing iPlanet Market Maker.
Tips for installing Oracle 8i on Solaris.
- See Appendix A "Tips for Installing Oracle Software".
- Note: this appendix does not provide complete instructions for installing Oracle software. For more information, see the Oracle 8i Installation Guide, Release 2 (8.1.6) for SunSPARC Solaris.
Who Should Read This Guide
This document was produced for the following users:Developers and installers at a user's site.
Developers and installers within iPlanet's Professional Services Group.
Also, refer to the following documents for more information:
Release Notes for the latest product information.
iPlanet Market Maker Customization Guide for information about customizing the product.
Presumptions Prior to Installation
This section describes certain presumptions or prerequisites that you should know about prior to the installation of iPlanet Market Maker.
You will read Release Notes prior to starting your installation. This file, which is contained within the delivered product, provides the very latest updates and information that are vital to your installation effort.
You, as the installer, are familiar with the Solaris operating system, the applications and web server applications being installed.
You are aware that iPlanet Market Maker, the iPlanet Web Server and the iPlanet Directory Server are products provided by iPlanet, a Sun/Netscape Alliance company.
You have obtained access to all required application and server software, either through the network or from CD-ROMs.
Oracle 8i, Ver. 8.1.6 has already been installed on your database server.
All patches for the Solaris operating system will be installed prior to the installation of the JDK 1.2.2.06.
This version of iPlanet Market Maker, Version 1.0 SP1, only runs on versions 2.6 and 2.8 of the Solaris operating system.
This installation guide does not include any description of hardware nor does it provide hardware requirements.
Required Applications
The following applications must be installed prior to the installation of iPlanet Market Maker:
Solaris, Versions 2.6 and 2.8 only.
JDK patches for Solaris first, then JDK 1.2.2.06
- IMPORTANT: To ensure that iPlanet Market Maker works properly, make sure that your Solaris Versions 2.6 and 2.8 have the latest patches. For Solaris 2.6, type uname -a on the command line. Make sure that the line returned contains the text Generic_105181-23. For Solaris 2.8, type uname -a on the command line. Make sure that the line returned contains the text Generic_108528-03.
- For more information about patches, go to http://sunsolve.Sun.COM/pub-cgi/show.pl?target=patches/patch-access
Oracle, Version 8.1.6 (requires installation of interMedia and JServer options).
Before You Start Installing iPlanet Market Maker
Before you start the installation process, check the following:
Login as Oracle user and run sqlplus system/<password>@<service name>
Note: Service Name=whatever you chose during Oracle database creation. You must specify the <service name>. See the "Using the Oracle Universal Installer" section in Appendix A.If you are not able to connect with the above parameters, see the "Troubleshooting" section of this Installation Guide as the installation will not succeed.
Check Java version, e.g. java -version should report 1.2.2
Installing iPlanet Market Maker
The order in which you install the iPlanet Market Maker components depends on which components are to be installed on which servers. The following section explains the component installation sequence to follow.
Component Installation Sequence
Your server configuration affects the order in which you install the iPlanet Market Maker components. You need to install these components in the following order.
Install the iPlanet Market Maker Directory Server Database (LDAP) component on the iPlanet Directory Server machine.
The following tables show two examples.Install the iPlanet Market Maker Oracle Database component from a machine that has an Oracle client installed pointing to the Oracle server.
Install the iPlanet Market Maker Core component on the iPlanet Web Server machine.
Server Architecture with Oracle Database Installed on Server B
Server A
Server B
Install the iPlanet Market Maker Directory Server Database (LDAP) component on Server A.
Install the iPlanet Market Maker Oracle Database component from a machine that has an Oracle client installed pointing to the Oracle server on Server B.
Install the iPlanet Market Maker Core component on Server A.
Server Architecture with Oracle Database Installed on Server A
Server A
Server B
Install the iPlanet Market Maker Directory Server Database (LDAP) component on Server A.
Note: If your Oracle client is installed on Server A, you can install both the iPlanet Market Maker Directory Server Database (LDAP) component and iPlanet Market Maker Oracle Database component at the same time from Server A.Install the iPlanet Market Maker Oracle Database component from a machine that has an Oracle client installed pointing to the Oracle server on Server A.
Install the iPlanet Market Maker Core component on Server B.
Extracting Installation Files
To extract iPlanet Market Maker installation files, do the following.
Log in as the root user.
This places the setup files and release notes in your current working directory.Choose the temporary directory location to extract iPlanet Market Maker installation files.
Copy iMM_1.0_SP1.tar to your temporary directory.
Type in the following command to extract iMM_1.0_SP1.tar to your temporary directory:
- % tar xvfpo iMM_1.0_SP1.tar
Starting the Installation Process
To continue installing iPlanet Market Maker, follow these steps.
Run setup:
If running in command line mode, initial screen will contain instructions for entering data and running installer.
- % ./setup
- Note: This command starts the iPlanet Market Maker installation wizard in graphical mode that will further guide you through the installation procedure. Each wizard page has a Help button that provides information about that page. To exit the wizard at any time, press the Exit button on any page.
- Also, make sure that your DISPLAY environment variable is set correctly.
- If you wish to run setup in command line mode (for example, if you do not have X-server available and you are trying to install from a remote location), run the following command:
- % ./setup -nodisplay
Note: Because of the Java API constraints, in command line mode, passwords are visible as you enter them. If you are concerned about security while you are installing iPlanet Market Maker in this mode, take necessary precautions.
Note: This section lists the installation pages in the order in which they appear if you choose to install all of the iPlanet Market Maker components at once. If you choose to install only some of the components, the order in which the pages appear will be different.
Note: If running in command line mode, press ENTER key to go to next page.
Following page contains Software License Agreement. If necessary, increase the window size to make the entire agreement visible.
Note: If running in command line mode, press ENTER key to go to next page. Then enter yes (full word) at command prompt to continue with installation.
On the Select the components to install page:
Note: If running in command line mode, press ENTER key to go to next page.
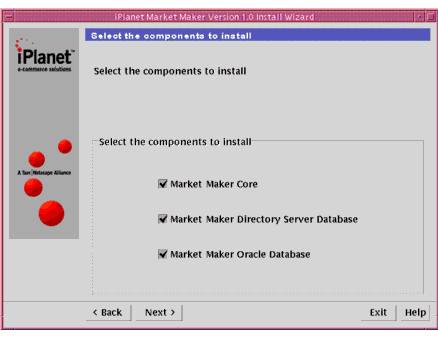
- The iPlanet Market Maker components showing a checked box will be installed:
- Note: Before you select which components to install, see the "Component Installation Sequence" section.
On the Select install directory page:
Note: If running in command line mode, accept default, or enter directory name. Then press ENTER key to go to next page.
Note: Installer will create an iPlanet Market Maker directory in the specified location and will place iPlanet Market Maker underneath it.
Note: If you are installing iPlanet Market Maker 1.0 SP1 as an upgrade to a 1.0 release, see the "Upgrading from iPlanet Market Maker Version 1.0 to Version 1.0 SP1" section.
If a previous iPlanet Market Maker 1.0 SP1 installation exists in the selected directory, a warning screen appears. If your previous 1.0 SP1 installation was not successful, you can continue the installation process. If your previous 1.0 SP1 installation was successful, you can exit now.
On the Market Maker User Configuration page:
Note: If running in command line mode, press ENTER key after each entry to continue.
On the Encryption Password page:
Note: If running in command line mode, enter and confirm password at command prompt. Then press ENTER key after each entry to continue.
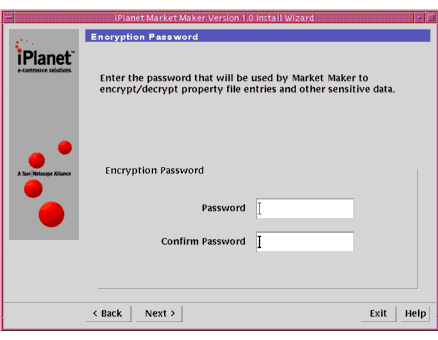
- Note: If you are reinstalling iPlanet Market Maker, you must use the same password you specified for your previous installation. You risk losing important data if you do not specify your original password. This password is used for encrypting sensitive data stored in properties files and in the Oracle database.
Select and enter a password that will be used by iPlanet Market Maker to encrypt/decrypt property file entries and other sensitive data (for example, order details stored in the Oracle database).
Enter the same password again in the Confirm Password text box.
Select NEXT button to continue installation.
On the SMTP Server Configuration:
Note: If running in command line mode, accept default, or enter directory name. Then press ENTER key to continue.
Enter the SMTP server name used for email notification.
On the Enter JDK 1.2.2 directory page:Enter the SMTP server port number.
Enter the Default notification initiator. Specify a valid email address that will be used to send and receive iPlanet Market Maker messages. Note that this email address is not checked for validity in the installation process. After installation, you can change this email address in the VortexConfiguration.properties file.
On the iPlanet Web Server content directory page:
Note: If running in command line mode, enter directory name.
Accept the default, or select Browse... button to search for a new location. iPlanet Market Maker will use this directory to publish its Java Server Pages (JSPs). The default is docs directory under the iPlanet Web Server directory, such as /usr/netscape/server4/docs.
Select NEXT button to continue installation.
Then press ENTER key to continue.
On the Enter iPlanet Web Server instance directory page:
Note: If running in command line mode, enter directory name. Press the ENTER key to continue.
Note: During installation, installer deploys precompiled JSPs under the <web_server_instance>/ClassCache directory.
On the iPlanet Web Server User Configuration page:
Note: If running in command line mode, enter directory name at command prompt. Then press ENTER key to continue.
Enter the UNIX User ID that iPlanet Web Server runs as. Typically, it is nobody.
On the Enter iPlanet Directory Server instance directory page:Enter the UNIX Group ID that iPlanet Web Server belongs to. Typically, it is nobody.
Enter iPlanet Directory Server Instance Directory name. This directory usually has a path such as <server-root>/slapd-<hostname>, for example:
Select NEXT button to continue installation.
- /usr/netscape/server4/slapd-<hostname>
On the LDAP Connection Configuration page:
Note: If running in command line mode, press ENTER to accept each default and continue, Or enter a value specific to your configuration at each prompt and press ENTER key after each entry to continue.
- This page specifies the parameters used by iPlanet Market Maker to establish connections to the iPlanet Directory Server database.
Accept default of localhost in LDAP Host Name text box, or enter value specific to your configuration.
Accept default of 389 in LDAP Port Number textbook, or enter value specific to your configuration.
Accept default of cn=Directory Manager in LDAP Username text box, or enter value specific to your configuration.
Enter in LDAP Password text box the password used when installing Directory Server.
Repeat LDAP password entry in Confirm Password text box.
Select NEXT button to continue installation.
On the Oracle connection configuration page:
Note: If running in command line mode, press ENTER key to accept each default and continue. Or, enter a value specific to your configuration at each prompt and press ENTER key after each entry to continue.
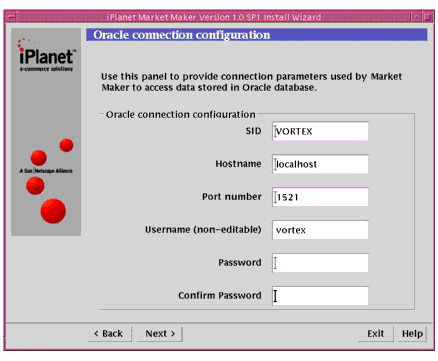
- This page specifies the parameters used by iPlanet Market Maker to establish the JDBC connection to the Oracle database.
In SID text box, enter an SID you selected during database creation.
Enter Oracle server machine name in Hostname text box.
Enter Oracle Port Number on which Oracle is running.
An Oracle user vortex will be created as part of the installation of iPlanet Market Maker.
Choose a password for user vortex and enter it in the Password text box.
Type your password again in the Confirm Password text box.
Select NEXT button to continue installation.
On the Create LDAP Schema page:
Note: LDAP Schema is required to run iPlanet Market Maker.
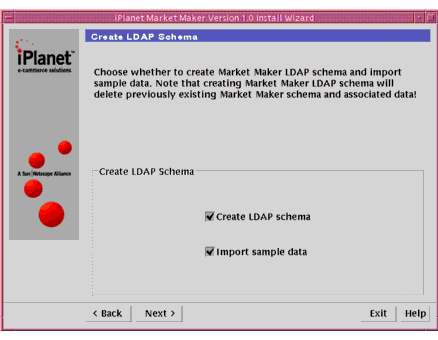
- Note: This step recreates the iPlanet Market Maker LDAP schema and import sample data. If you want to preserve your existing LDAP schema and import data, turn off both of the options on this page. Otherwise all of your previous iPlanet Market Maker LDAP schema data will be deleted.
Accept Create LDAP Schema to use iPlanet Market Maker.
Note: Warning notice will appear stating: Schema creation will delete any existing iPlanet Market Maker LDAP Schema and data. Select CANCEL or CONTINUE.
(Optional): Accept Import sample data default.
Note: If running in command line mode, enter yes or no at each command prompt. If you selected to create schema, confirm your choice by entering value 2 to continue, or enter value 1 to cancel.
Select NEXT button on LDAP Schema page to continue installation.
On the Create Oracle Schema page:
Note: Warning notice will appear stating: Schema creation will delete any existing iPlanet Market Maker Oracle Schema and data. Select CANCEL or CONTINUE.
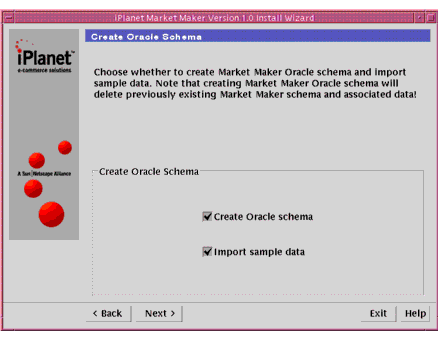
- Note: This step recreates the iPlanet Market Maker Oracle schema and import sample data. If you want to preserve your existing Oracle schema and import data, turn off both of the options on this page. Otherwise all of your previous iPlanet Market Maker Oracle schema data will be deleted.
Note: If running in command line mode, enter yes or no at each command prompt. If you selected to create schema, confirm your choice by entering value 2 to continue, or enter value 1 to cancel.
Select CONTINUE button to continue installation.
On the Oracle Installation Configuration 1 page:
Note: If running in command line mode, press ENTER key to accept each default and continue. Or enter a value specific to your configuration at each command prompt.
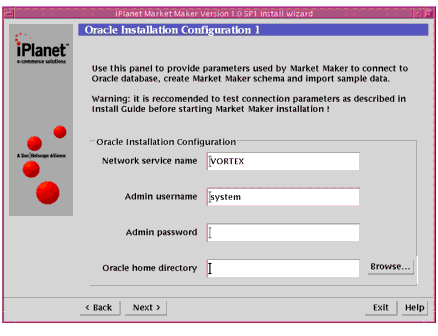
- Note: This page defines the parameters used by iPlanet Market Maker installer to establish a connection to your Oracle database. The password is used for creating the Oracle schema for iPlanet Market Maker. Consult your Oracle DBA if you have questions about what information to enter in this page.
Enter the same Network Service Name as specified during Oracle database creation. Note that this is not necessarily the same as SID name. See the "Procedures for the Root User" section in Appendix A.
Accept default (Oracle System Username). Contact your Oracle database administrator for further information.
Enter Oracle password for above user.
Enter Oracle Home Directory pathname that will be used to start the Oracle client. Contact your Oracle database administrator for further information.
Select NEXT button to continue installation.
On Oracle Installation Configuration 2 page, provide parameters used by iPlanet Market Maker to connect to Oracle database, create the iPlanet Market Maker schema, and import sample data:
Note: See your database administrator who will specify location and size for the entry needed in the Oracle Datafile and Indexfile text box. If installing iPlanet Market Maker against Oracle on a separate server, then datafile and index file locations are for the server system. The default location is $ORACLE_BASE/oradata/$ORACLE_SID directory on the Oracle Server. Do not provide a forward slash ( / ) at the end. Each module will create a data tablespace and index tablespace size specified here. Make sure you have at least six (6) times the space mentioned above for six (6) modules. See Appendix A "Tips for Installing Oracle Software" for details regarding iPlanet Market Maker database setup.
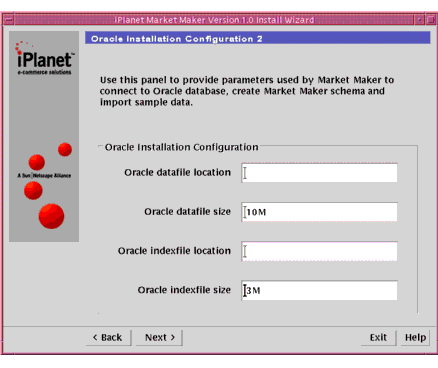
- Note: The data you specify on this page must already exist on your Oracle server. Consult your Oracle DBA if you have questions about how to enter information in this page.
Note: Go to Oracle server to verify locations. Entries are case sensitive and should include the full path to the index and data file locations.
Note: If running in command line mode, press ENTER key to accept each default and continue. Or enter a value specific to your configuration at each command prompt.
Select NEXT button to continue installation.
On the Oracle Common Objects Configuration page:
Note: If running in command line mode, press ENTER key to accept each default and continue. Or enter a value specific to your configuration at each command prompt.
- Note: This page defines a set of Oracle database objects required for installing the iPlanet Market Maker modules.
Select NEXT button to continue installation.On Oracle Community Objects Configuration page, provide parameters used by iPlanet Market Maker to create catalog module objects in Oracle database:
Note: If running in command line mode, press ENTER key to accept each default and continue. Or enter a value specific to your configuration at each command prompt.
- Note: This page defines a set of Oracle database objects required for installing the iPlanet Market Maker Community module. It is recommended to use the default values.
On Oracle Catalog Objects Configuration page:
Note: If running in command line mode, press ENTER key to accept each default and continue. Or enter a value specific to your configuration at each command prompt.
- Note: This page defines a set of Oracle database objects required for installing the iPlanet Market Maker Catalog module. It is recommended to use the default values.
On Oracle Pricing Objects Configuration page, provide parameters used by iPlanet Market Maker to create pricing module objects in Oracle database:
Note: If running in command line mode, press ENTER key to accept each default and continue. Or enter a value specific to your configuration at each command prompt.
- Note: This page defines a set of Oracle database objects required for installing the iPlanet Market Maker Pricing module. It is recommended to use the default values.
On Oracle OMS Objects Configuration page, provide parameters used to create OMS module objects in Oracle database:
Note: If running in command line mode, press ENTER key to accept each default and continue. Or enter a value specific to your configuration at each command prompt.
- Note: This page defines a set of Oracle database objects required for installing the iPlanet Market Maker OMS module. It is recommended to use the default values.
On Oracle Auction Objects Configuration page, provide parameters used to create Auction module objects in Oracle database:
Note: If running in command line mode, press ENTER key to accept each default and continue. Or enter a value specific to your configuration at each command prompt.
- Note: This page defines a set of Oracle database objects required for installing the iPlanet Market Maker Auction module. It is recommended to use the default values.
On Oracle RFx Objects Configuration page, provide parameters used to create RFx module objects in Oracle database:
Note If running in command line mode, press ENTER key to accept each default and continue. Or enter a value specific to your configuration at each command prompt.
- Note: This page defines a set of Oracle database objects required for installing the iPlanet Market Maker RFx module. It is recommended to use the default values.
On the User Display Profiles Import page:
Note: If running in command line mode, enter value 1 to Install Now. Or, enter value 2 to start over. Or enter value 3 to exit installation process.
Next appears Ready to Install screen.
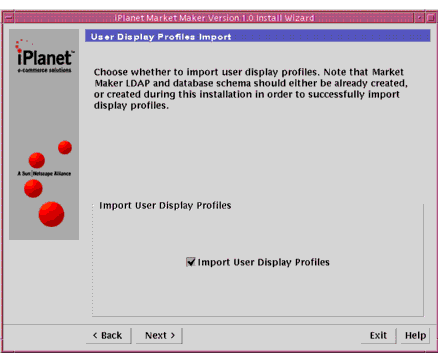
- Note: Choose Import Display Profiles the first time you install iPlanet Market Maker and when you want to recreate either database or the directory schema for iPlanet Market Maker. If you are reinstalling iPlanet Market Maker and want to preserve both database directory schema for iPlanet Market Maker, turn this option off.
Select INSTALL NOW button to initiate installation.
The Installing... page will appear and will indicate installation progress. Post installation process will run after iPlanet Market Maker files have been installed.
Note: If running in command line mode, Installation Summary page will appear, and Installing... page will also appear and will indicate installation progress. Post installation process will run after you exit installation itself. (See next screen to exit.) This will not necessarily be evident from the Progress Bar display.Next page will display Installation Summary:
Select EXIT button on next screen to complete installation process.
Note: If running in command line mode, enter value 1 to see installation details, or enter value 2 to exit installation and initiate post-installation script. When command prompt appears, post-installation has been completed.Note: In both graphical and command line modes, more details from post installation script are available in postinstall.log file.
Check postinstall.log and master_install_db.log files after installation is complete for any possible warnings or errors. The postinstall.log file is in the directory in which you started your installation. The master_install_db.log file is in <imm_install_dir>/db/install. For errors, consult Troubleshooting section that follows these instructions.
Source the environment file $IMM_HOME/iMM/mm.[c|k]shrc
Start the Job scheduler using js_start.sh.
- If you have trouble with your mm.[c|k]shrc file, see the "Troubleshooting" section.
Start your Web Server now. (Note that when you start the web server from iPlanet Web Server Administration Server, you must select 'Save and Apply' when prompted to save and apply changes. iPlanet Web Server configuration files were modified during installation.)
Start the Netscape or Internet Explorer browser and specify the URL to start iPlanet Market Maker, such as http://localhost/imm.
Upgrading from iPlanet Market Maker Version 1.0 to Version 1.0 SP1
Before you install iPlanet Market Maker 1.0 SP1, make sure you have backed up your Oracle and Directory server data. To install iPlanet Market Maker 1.0 SP1, do the following steps.
Do steps 1 through 4 in the "Starting the Installation Process" section, if you have not done them already.
After you complete step 4, click Next.
Do steps 5 through 14 in the "Starting the Installation Process" section.
- The next screen displayed contains instructions about what to do before you proceed with the 1.0 SP1 installation. Read these instructions carefully before you go on with your installation.
- Note that the installation process backs up files in the following 1.0 directories:
- <server_root_dir>/docs/imm
- <imm10_install_dir>/iMM/properties
- to the following directories:
- <server_root_dir>/docs/imm.<timestamp>
- <imm10_install_dir>/iMM/properties.<timestamp>
- where <timestamp> is the time and date of your 1.0 SP1 release installation.
After you complete step 14, click Next.
- The following screen is displayed.
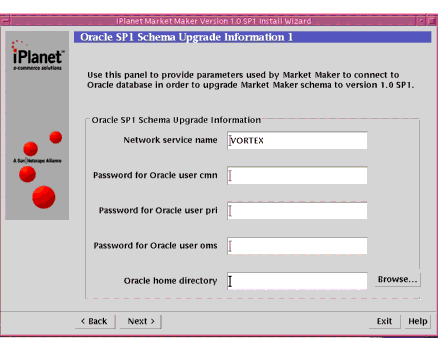
- Note: This page defines the parameters used by iPlanet Market Maker installer to establish a connection to your Oracle database. The password is used for updating the Oracle schema for iPlanet Market Maker. If you specified a password to create a previous Oracle schema, you must specify that same password for your current installation. Consult your Oracle DBA if you have questions about what information to enter in this page.
Enter the same Network Service Name as specified during Oracle database creation. Note that this is not necessarily the same as SID name. See the "Procedures for the Root User" section in Appendix A.
Type the password you used in your 1.0 installation in Oracle Common Objects User Password text box (Oracle user cmn).
Type the password you used in your 1.0 installation in Oracle Pricing User Password text box (Oracle user pri).
Type the password you used in your 1.0 installation in Oracle OMS User Password text box (Oracle user oms).
Enter Oracle Home Directory pathname that will be used to start the Oracle client. Contact your Oracle database administrator for further information.
Click Next.
- The following screen is displayed.
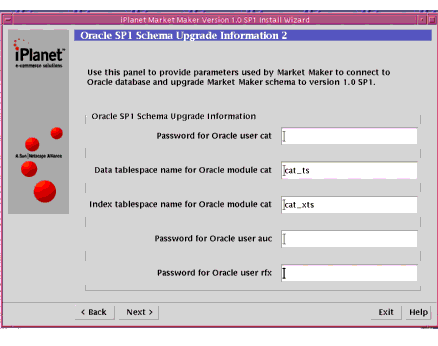
Type the password you used in your 1.0 installation in Oracle Catalog User Password text box (Oracle user cat).
Accept default or enter Data Tablespace Name.
Accept default or enter Index Tablespace Name.
Type the password you used in your 1.0 installation in Oracle Auction User Password text box (Oracle user auc).
Type the password you used in your 1.0 installation in Oracle RFx User Password text box (Oracle usr rfx).
Troubleshooting
Error:
word too long when sourcing the mm.cshrc file in the C-shell
Fix:
You need to create a symbolic link from your root directory to the iPlanet Market Maker installation directory. The command to create this link is ln -s <install_dir> <link_name>. After you create this link, replace all instances of the iPlanet Market Maker installation directory name in your mm.cshrc file with the directory name defined by the symbolic link.
Oracle Error:
Error during creation of interMedia index.create index CAT_ATR_VALUE_TXT1 on CAT_ATTR
*
ERROR at line 1:
ORA-29855: error occurred in the execution of ODCIINDEXCREATE routine
ORA-20000: interMedia Text error:
DRG-50704: Net8 listener is not running or cannot start external
procedures
ORA-28575: unable to open RPC connection to external procedure agent
ORA-06512: at "CTXSYS.DRUE", line 126
ORA-06512: at "CTXSYS.TEXTINDEXMETHODS", line 54
ORA-06512: at line 1
Possible cause:
Oracle Service Name is not configured correctly. Make sure that tnsnames.ora is configured properly. Reconfiguring Net8 using "$ORACLE_HOME/bin/netasst" and "$ORACLE_HOME/bin/netca" may solve the problem. Refer to Oracle Net8 Administrator's Guide or contact your database administrator.
Fix:
Make sure that listener.ora and tnsnames.ora files are configured properly for use with interMedia. There must be an SID entry of "PLSExtProc" in tnsnames.ora and it's corresponding entry in listener.ora. Reconfiguring Net8 using "$ORACLE_HOME/bin/netasst" and "$ORACLE_HOME/bin/netca" may solve the Net 8 configuration problem. Refer to Oracle Net8 Administrator's Guide.
Installer hangs indefinitely:
Installer cannot connect to Oracle via SQL plus.
Fix:
Check the connection parameters.
Web Server Error:
500 Internal Server Error
Possible cause:
iMM specific entries are missing in iWS CLASSPATH.
Fix:
Add the following line at the beginning of the jvm.classpath variable in <webserver_instance>/config/jvm12.conf file:<server_root>/iMM/properties:<server_root>/iMM/lib/vtxcimp.jar:
<server_root>/iMM/lib/vtxarc.jar:<server_root>/iMM/lib/vtxauc.jar:<server_root>
/iMM/lib/vtxpri.jar:<server_root>/iMM/lib/vtxmem.jar:<server_root>/iMM/lib/
vtxcat.jar:<server_root>/iMM/lib/vtxoms.jar:<server_root>/iMM/lib/vtxrfx.jar:
<server_root>/iMM/lib/userx.jar:<server_root>/iMM/lib/classes12.jar:
<server_root>/iMM/lib/jce1_2_1.jar:<server_root>/iMM/lib/sunjce_provider.jar:
<server_root>/iMM/lib/ldapjdk.jar:<server_root>/iMM/lib/activation.jar:
<server_root>/iMM/lib/mail.jar:<server_root>/iMM/lib/vtxdsp.jar:<server_root>
/iMM/lib/vtxgui.jar:<server_root>/iMM/lib/jcert.jar:<server_root>/iMM/lib/
jnet.jar:<server_root>/iMM/lib/jsse.jar
Web Server not responding:
Possible cause: not enough RAMCheck your memory usage (via "top" or "wsinfo"). The following exercise is a good indication that insufficient memory is the cause of the problem:
If the web server starts responding it is likely that there is not enough RAM on the machine to run both Oracle and the web server at the same time. You might want to dedicate a separate machine to Oracle or decrease its memory use. Please refer to Oracle documentation or contact your database administrator if you choose to decrease Oracle's memory usage.
Running installer using Microsoft Windows X-server utilities
It is recommended to run iPlanet Market Maker installer in GUI mode on Solaris system (either locally or remotely).If running iPlanet Market Maker installer using Windows X-server display utilities you might experience problems such as incorrectly displayed text and labels or installer freezing while displaying some of input panels. If these problems occur, try restarting installer. If problems persist, please run installer in command line mode by running setup -nodisplay command (as described in Installation Guide).
Uninstallation Notes
To uninstall iPlanet Market Maker version 1.0 or 1.0 SP1, do the following:
Run the <iMM_installation_directory>/bin/js_stop.sh script to stop the Job Scheduler process.
Remove iMM related Directory Server data.
Remove iMM related Directory Server schema.
Remove lines containing the following entries from <LDAP_instance_directory>/config/ns-schema.conf file:
Restart iPlanet Directory Server.
- iplanet-marketmaker-schema.conf
- iplanet-userx-schema.conf
- iplanet-ecommerce-schema.conf
- In most cases these will be the last lines in the file.
Remove iPlanet Market Maker objects from Oracle database. All iPlanet Market Maker users and tablespaces should be dropped. To get list of iPlanet Market Maker users and tablespaces see $IMM_HOME/db/sql/cr_vortex_db.sql file.
Remove $IMM_HOME directory and its contents.
Remove iMM content from web server's contents directory.
Remove the imm directory and its content from iPlanet Web Server documents directory (by default /usr/netscape/server4/docs).
Remove the contents of the <web_server_instance_directory>/ClassCache directory.
Remove iPlanet Market Maker related classpath entries from <web_server_instance_directory>/config/jvm12.conf file.
iPlanet Web Server Configuration Files
For optimal iPlanet Market Maker performance, it is recommended to change following defaults in iPlanet Web Server configuration files:
jvm.maxHeapSize entry in <web_server_instance_directory>/config/jvm12.conf file should be uncommented and set to at least 128 Mb. New entry should be:
For improved security, the context.global.sessionExpireOnClose entry in <web_server_instance_directory>/config/contexts.properties file should be uncommented and set to true. New entry should be:
iPlanet Market Maker Database Setup
Note: This section is informational only. No user installation steps are performed in this section.Each of the modules (Catalog/Pricing, Community, Architecture, Auction, Negotiations, and Order Management System) has its own module owned by separate database schema owners. The schema owners are CAT, COM, CMN, PRI, OMS, AUC, and RFX. They have default passwords which are the same as the schema name (for example, CAT/CAT). All the objects (that is, table, sequences, and so on) owned by these schema owners are granted to the transactional user "VORTEX". The default password for Vortex is VORTEX. The iPlanet Market Maker User Interface connects to the database using the Vortex user.
The current release has fixed names for schema names, storage parameters, etc., for database objects. The create table scripts of respective modules (e.g., <install directory/iMM/db/modulename/db/sql/...) should be examined, and modified depending on the expected size of the iPlanet Market Maker database, especially for table and index storage. The following table shows the default schema setup for the iPlanet Market Maker database:
MODULE NAME
SCHEMA NAME/PASSWORD
DEFAULT DATA TABLESPACE
DEFAULT INDEX TABLESPACE
DEFAULT TEMPORARY TABLESPACE
Installing The JDK Patches
You must install any patches to the Java Development Kit (JDK) before installing the SJDK 1.2.2. Download these patches from the web site: http://java.sun.com/products/jdk/1.2/.Download the 1.2.2_06_patches_ sparc_5.6 or 5.8 patch. Confirm the Solaris version number (must be 5.6 or 5.8).
Expand and decompress this patch, which can be identified by its gz extension, by entering:
Change your directory to this newly created one and decompress these files in that directory by entering:
- % tar xvf <filename>
- This should create a directory which contains four .tar.z files.
Expand these files by entering:
- % compress -d *.Z
Install these patches by entering:
- %find . name "*.tar" exec tar xvf {} \ ;
- Each of these files, in turn, creates a directory with a readme.txt file and the actual patch. You may want to copy these patch files to your var/spool/patch directory for future reference. If you do this, remember to do a cp -r because it is a directory.
- % patchadd <filename> with path (for each patch)
Installing JDK
Download J2SE: Java 2 Standard Edition (1.2.2_06 Localized) Production Release for Solaris (English) from web site:
http://www.sun.com/software/solaris/java/download.html
Follow Steps 1-3 in the previous section to expand and decompress these files. The 1.2.2_06_jdk_sparc.tar file that you just downloaded from the Java web site will give you six sets of files and four packages after extraction.
Delete the tar files and extracted directories because they are not needed.
To install the JDK, run the following command:
- pkgadd -d . SUNWj2rt SUNWj2dev SUNWj2man SUNWj2dem
Installing iPlanet Directory Server
To install iPlanet Directory Server, Version 4.1.2:Note: For more information, go to http://home.netscape.com/eng/server/directory/4.1/install/contents.htm, or consult your iPlanet Directory Server Installation Manual.
Installing iPlanet Web Server
To install iPlanet Web Server Enterprise Edition, Version 4.1 SP3:
Run setup.
Note: For more information, go to http://docs.iplanet.com/docs/manuals/enterprise/41/ig/contents.htm, or consult your iPlanet Web Server Installation Manual.Choose all defaults during installation except on Custom JDK screen. Select option to use the Custom Java Development Kit and enter the JDK path (the directory where you installed JDK1.2.2. When prompted for the JDK library path and JDK classpath, leave it empty.
Previous Contents Next
Copyright © 2000 Sun Microsystems, Inc. Some preexisting portions Copyright © 2000 Netscape Communications Corp. All rights reserved.
Last Updated February 01, 2001