| Previous Contents Index Next |
| iPlanet Meta-Directory Configuration and Administration Guide |
Chapter 6 Views in Meta-Directory
In joining data, Meta-Directory lets you view information in two ways, in connector views and in meta views. A connector view displays data from an external data source. A meta view displays integrated data from a number of connector views. This chapter contains the following sections:
Connector Views
Connector Views
A connector view is an LDAP representation of data that resides in an external source. Connector views provide LDAP-ready information to the join engine, which uses this information to build the meta view. In order for data from the connector view to become part of the meta view, the connector view must be enabled as a participating view, in effect, allowing connector view data to flow. Only connector views added to the participating views list will synchronize entries to and from the meta view. (Data can flow in both directions between the meta view and the participating connector view.) The following sections explain how to add and remove connector view instances.
Note To prevent duplicate user IDs from occurring, one connector view should not be nested as a subtree of another connector view. Each connector view should be a flat tree with no subentries.
To Add a Connector View Instance
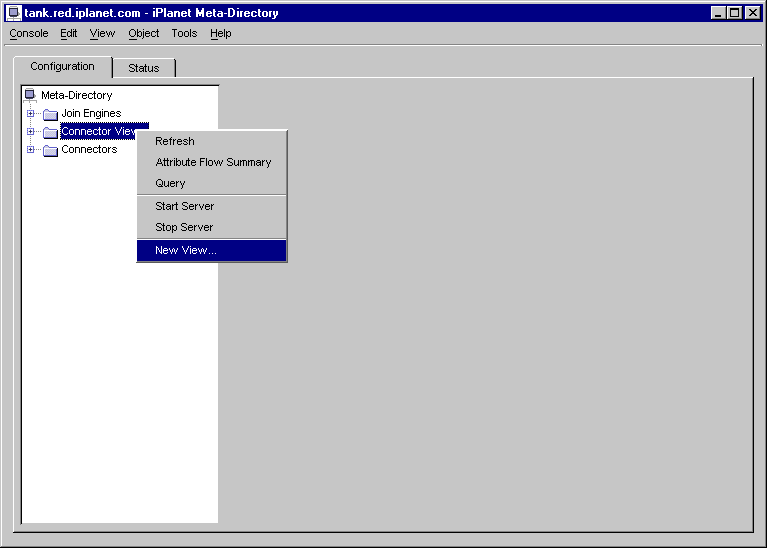
Select Connector Views from the Meta-Directory console navigation tree, and right-click.
Select New View.
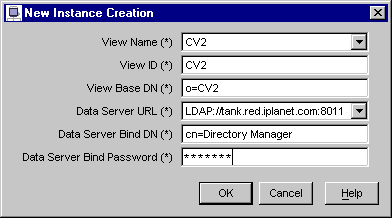
Provide information for the following fields:
Click Yes to load the schema.
The system will create the new instance, which may require several minutes.
- If the base entry of your schema does not exist, the Subschema Subentry dialog box appears:
- This dialog box appears because Meta-Directory has proprietary attributes that are not contained within the Directory Server. Accept the default location of cn=schema, or provide another subentry, to store these attributes and click OK.
Note While loading the schema to a Directory Server instance which does not contain the Meta-Directory configuration information, "cannot delete" error messages might result from the ldapmodify utility trying to delete an entry that does not exist. These messages are not serious. For more information, see Appendix C "Troubleshooting Meta-Directory."
- The message "Instance Creation Succeeded" appears after the instance has been created.
To Remove a Connector View Instance
In the Meta-Directory console, highlight the instance in the navigation tree that you want to remove, and right-click.
Choose Delete View.
- A context menu appears.
- The instance is deleted.
Providing a Connector View Description
Descriptive information can be added to an existing connector view instance using the following procedure.
In the navigation tree of Meta-Directory console, select the connector view for which you want to add a description.
Enter descriptive text in the Description field.
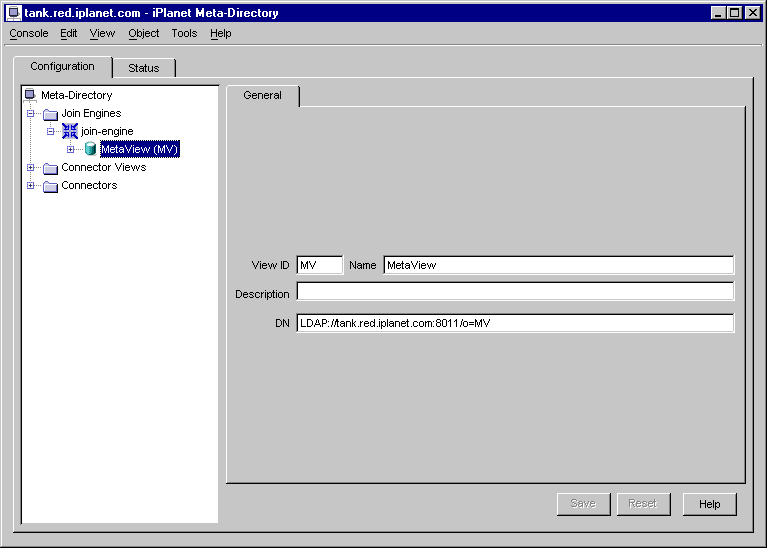
- The General tab displays the values for the View ID, Name, and DN fields that were provided in the New Instance Creation dialog box. These values cannot be changed.
Meta View
The meta view is a unified view of entries from one or more connector views; it represents the result of the join process. After the join engine processes the information received from a connector view, it transfers the information to the meta view. (Like the connector view, the meta view is a sub-tree on a Directory Server.) From the meta view, you can view linked entries as well as modify them and send the changes back to the original entries via the connector views. When you create an instance of the join engine, the meta view is created at the same time. You can see the meta view icon in the Meta-Directory console navigation tree under the join engine instance you created. It is an empty meta view until it is joined with at least one connector view. Meta-Directory supports only one meta view per join engine instance.For information on creating instances of the join engine and creating a meta view, see "Creating the Join Engine Instance" of Chapter 5 "Configuring The Join Engine."
Providing a Meta View Description
Descriptive information can be added to a meta view that has already been created by following the procedure below.
To Provide Descriptive Information for a Meta View
Select Meta View from the Meta-Directory console navigation tree.
Enter descriptive text in the Description field.
- The General tab displays the values for the View ID, Name, and DN fields that were provided in the New Instance Creation dialog. These values cannot be changed.
Creating New Data in the Meta View
New data can be added to the database through the meta view. Once the join engine is installed and a meta view is created, new entries, groups and organizations can be integrated with existing data.
To Create an Entry in the Meta View
Select the Contents of the meta view.
From the menu bar, select Object > New > User.
Provide information for the following fields:
- The Create New User dialog box appears.
Optional: Select a language and provide language-specific user information.
Optional: If using the NT Domain connector, enable NT User Attributes and provide the necessary information.
Optional: If using the Posix operating system, enable Posix User Attributes and provide the necessary information.
- The user name appears in the Contents of the meta view within the right pane of the Meta-Directory console.
To Create a Group in the Meta View
Select the Contents of the meta view.
From the menu bar, select Object > New > Group.
Provide information for the following fields:
- The Create New Group dialog box appears.
Group Name
Description
Choose the entries that will become members of the group.
Optional: Select a language and provide language-specific user information.
- The group's name appears in the Contents of the meta view within the right pane of the Meta-Directory console.
To Create an Organization in the Meta View
Select the Contents of the meta view.
From the menu bar, select Object > New > Organization.
Provide information for the following fields:
- The Create New Organization dialog box appears.
Name
Description
Phone
Fax
Alias
Address
Optional: Select a language and provide language-specific user information.
- The organization's name appears in the Contents of the meta view within the right pane of the Meta-Directory console.
To Modify an Entry in the Meta View
Click on the Contents of the Active Directory meta view.
Double-click on the Active Directory user you want to modify.
Alter the fields as needed, then click OK.
- The Edit Entry dialog box appears.
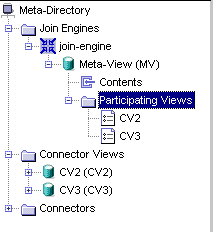
Participating Views
In order for a connector view to be accessed by the meta view it must be added as a participating view and configured to participate in the join process. Once a connector view becomes a participating view and is enabled, data can flow bi-directionally between that view and the meta view.Once a participating view is added, it is configured by applying join process rules to it. Each participating connector view is configured separately. Enabling the participating view is the final step in allowing the connector view to participate in the join process.
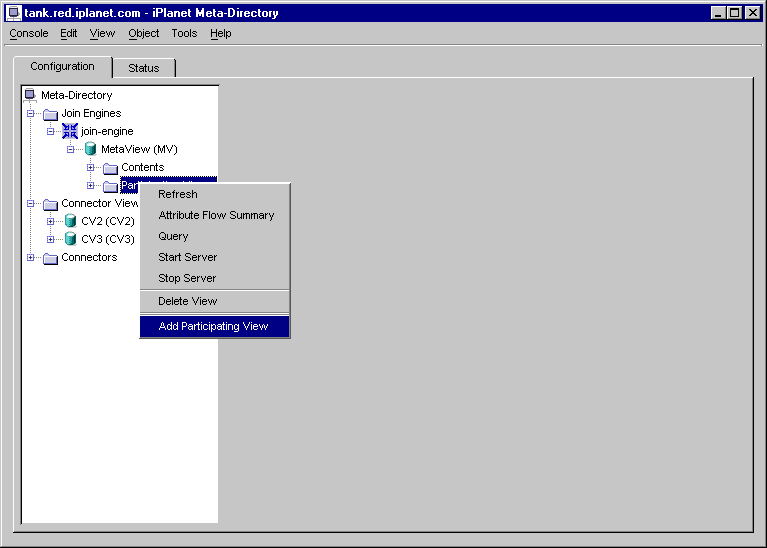
In the navigation tree of the Meta-Directory console, right-click the Participating Views object.
Choose Add Participating View.
Select the connector view or views you want to participate in a synchronization to the meta view.
To Remove a Participating View
Highlight the view you want to remove, and right-click.
Select Delete View.
- A context menu appears.
- The view is deleted.
Configuring a Participating View
Before enabling a participating view, you need to configure it so that data flow between the connector view and the meta view can be managed. Join process rules are applied to the participating view which the join engine will then apply to the connector view entries. In addition, you can specify capability settings, refresh schedules and group filters for each participating view.
To Configure a Participating View
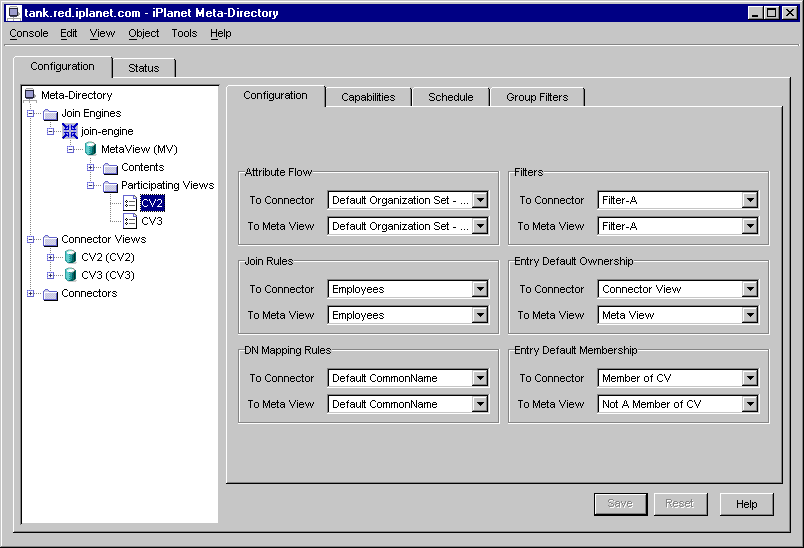
Select the participating connector view you want to configure and choose the Configuration tab from the right panel.
Select the appropriate combinations of rules from the drop-down list boxes, and click Save.
- The Configuration tab for a participating connector view contains a set of drop-down lists that allow you to apply the rules for the join process.
Select rule sets for Attribute Flow, Join Rules, DN Mapping Rules, and Filters. The choices are derived from the rules that you set up in "Creating the Join Engine Instance" of Chapter 5 "Configuring The Join Engine."
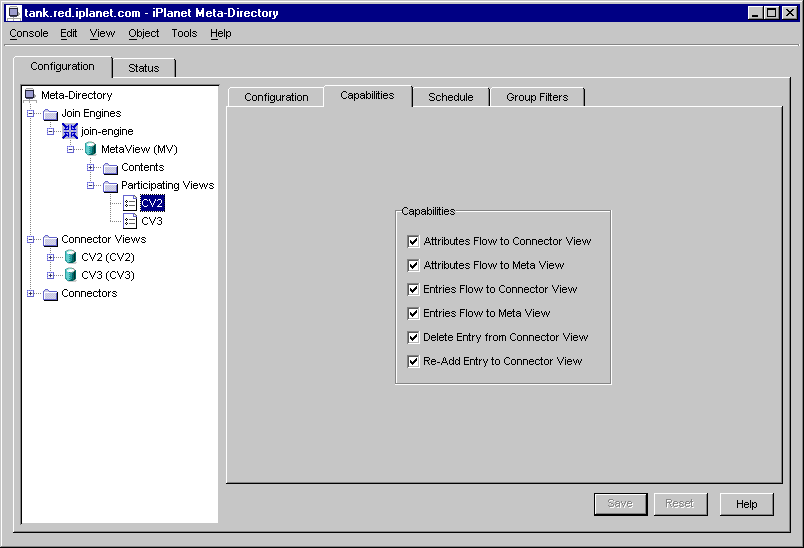
Select the Capabilities tab.
For Entry Default Ownership, select Connector or Meta View for each of these two drop-down lists:
- When choosing join process rules for a participating view, Attribute Flow rules and DN Mapping rules contain a selection called Atomic. Atomic refers to Meta-Directory default rules that flow, map, and join LDAP attributes that are clearly the same. For example, when the join engine applies an atomic attribute flow rule, attributes in the source entry that have no match in the destination entry will not be flowed. When the join engine applies an atomic DN mapping rule, the RDN of the source entry is added to the base DN of the destination view to form a full DN. For instance, an RDN of user1 in a connector view located in cn=user1,ou=cv1,o=iplanet.com would remain the same when applied atomically to the meta view as cn=user1,o=mv.
The selection made in To Connector specifies the view that owns the entries replicated from the meta view to the connector view.
The selection made in To Meta View specifies the view that owns the entries replicated from the connector view to the meta view.
For Entry Default Membership, select Member of CV or Not A Member of CV for each of these two drop-down lists:
- When an entry is owned by either the meta view or the connector view, it can only be deleted through that view. By default, an entry is owned by the view from which it originates; the default ownership can be changed with this option.
Note Ownership here is not the same as granularity and ownership discussed in Chapter 7 "Connectors and Connector Rules." The values discussed here refer to ownership of entries shared between the connector view and the meta view. Chapter 7 refers to ownership of entries shared between the data source and a connector view.
The selection made in To Connector specifies whether new entries will or will not be members of the connector view as the data flows from the meta view to the connector view.
The selection made in To Meta View specifies whether new entries will or will not be members of the connector view as the data flows from the connector view to the meta view.
- Membership identifies an entry within a connector view that is native to the data source represented by the connector view. Rules can then be configured and applied based on the attributes that are already present in the data source.
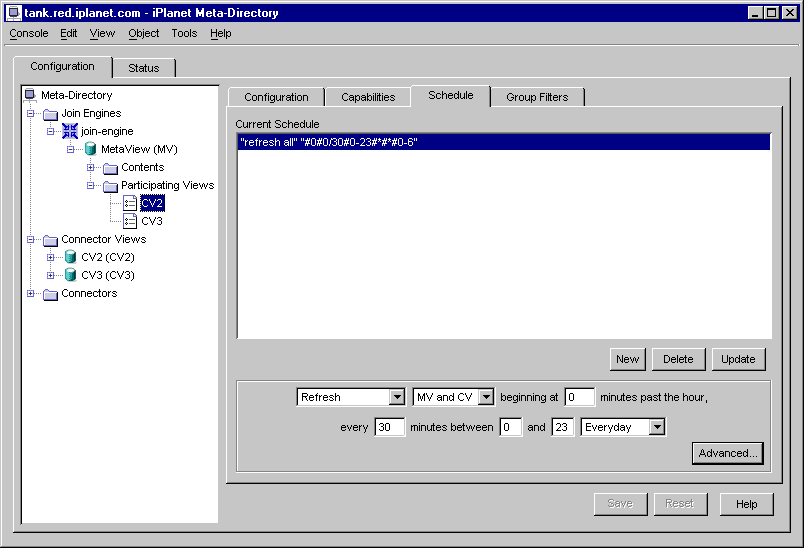
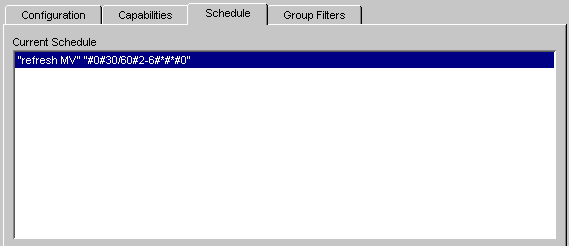
Select the Schedule tab.
- The Capabilities tab contains a set of options that control the behavior of data flow back and forth between the meta view and connector view. Select the Capabilities you want:
- In the Schedule tab, you can configure a refresh schedule for the participating connector view. (If no schedule is configured, the view will only be refreshed manually.)
Click New to add a new schedule entry.
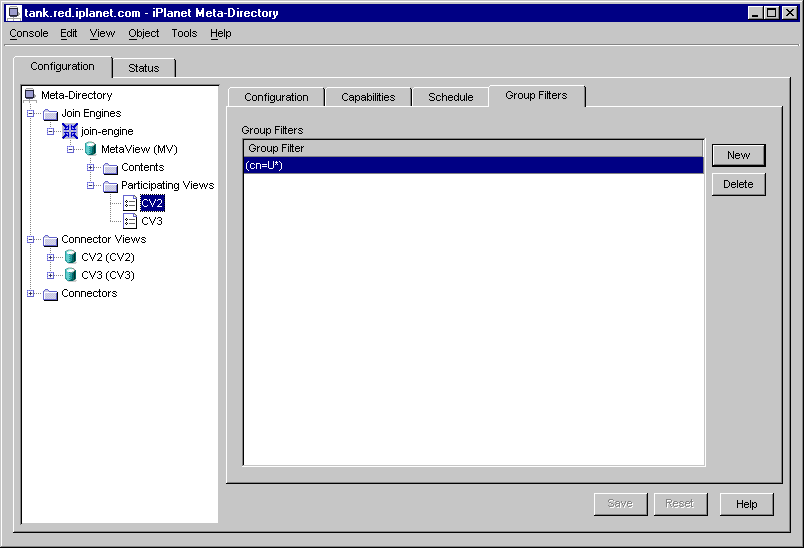
Select the Group Filters tab.
Change the default values in the list boxes and field entries at the bottom of the window to schedule the desired task.
- The scheduler can operate as many times as once every second; therefore, the finest granularity occurs every second.
Click Update.
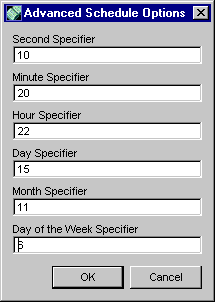
- Alternatively, you can provide settings in a tabular format by clicking Advanced... The Advanced Schedule Options dialog box appears.
- Numerals can be used in the Advanced Schedule Options fields:
Field Name
Value
Enter a value from 0 to 6, where 0 is Sunday and 6 is Saturday.
- When configuring a schedule with numerals, both single values and ranges (such as 1,2,5-7,10/5) can be used.
- Expressions can also be used in the Advanced Schedule Options fields:
Click Save when you finished configuring the participating connector view.
- The Group Filters tab enables you to create one or more filters for LDAP data sources. You can use the group filters to refresh entries of a connector view only. The format of the filter is (attribute=value). Note that the parentheses are part of the syntax.
- When you refresh groups, the join engine refreshes only the entries that match the group filter or filters you have specified. For information about refreshing groups, see "Join Engine Operations".
- The connector instance must be restarted to activate it's configuration. For procedures on how to stop and re-start the connector, see Chapter 13 "Starting and Stopping Components."
Enabling a Participating View
In order to flow data, a participating view must be enabled. Enabling is what allows data to flow. Before enabling it, a connector view must be added and configured as a participating view.
To Enable a Participating View
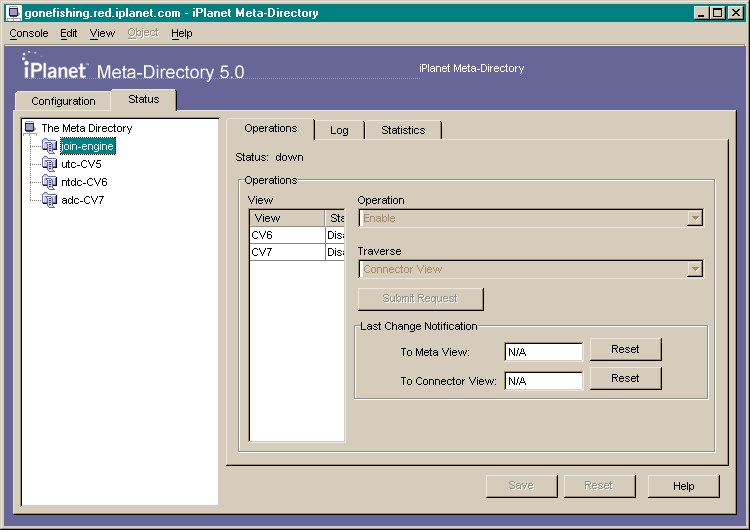
Click the Status tab from above the navigation tree window in Meta-Directory console.
Select the join engine from the navigation tree and click the Operations tab.
Select a participating view listed in the View list box that is disabled.
- For more information on join engine and connector view operations, see "Operations" of Chapter 14 "Monitoring Meta-Directory Components".
Choose Enable from the Operation drop-down list.
- The View list box has two columns: View and Status. (The size of the View column can be reduced by dragging the column divider to the left; this should make the Status column visible. Both columns can be increased in size by enlarging the console window.) All added participating views are listed in these columns along with their status: Enabled or Disabled.
Click Start.
- This option disables the Traverse drop-down menu.
Select Refresh from the Operation List Window, then select either Meta View or Connector View from the Traverse menu list.
- The status of the view changes from Disabled to Enabled allowing data to flow to the meta view. Any error in the connector view's configuration will automatically disable the participating view.
Click Start.
- Once the participating view is enabled, you should refresh it in order to update the data.
Checking Entry Links
There are several reasons why an entry in a connector view might not link up to an entry in the meta view. One reason is that the join engine found more than one entry to link to. Another possible reason is that the external data contains errors. Because of these possibilities, you should check, as a standard procedure, for errors and omissions by doing one or both of the following:
Review the Directory Server error log for reports of failures. This can be done by using a Perl script or using the command grep -i fail *.log in the log directory.
If you find errors, you can use join commands in the Fix-It Tool to fix the problems as described in Chapter 15 "Administration Tools."As discussed in Chapter 15 "Administration Tools", use the Query Tool to check for entries which were not linked.
Refreshing the Views
To incorporate new or modified data or to bypass regularly scheduled refresh synchronizations for immediate updates, you use the Refresh option of the specific Meta-Directory component. In addition, to flow entries that preexist in a connector view, you must refresh the connector view's enabled participating view.
Refreshing Meta Views
When meta views are refreshed, the join rules are re-applied (or traversed) to each entry in the targeted view and the data is reconstructed. The other rules are then applied accordingly:
If the entry is found, the attribute flow rule is applied.
If the entry is not found, the DN mapping rule is applied.
If the entry exists, the attribute flow rule is applied.
If the entry doesn't exist, an entry is created.
Note If you change any of your rules, you need to refresh the join engine to get the data to flow according to the new rules.
Select the Status tab and the join engine in the Meta-Directory console's navigation tree.
Select the participating view whose data needs to be refreshed.
- All participating views are listed in the View field.
Choose Refresh, Refresh Unlinked or Refresh Groups from the Operation drop-down menu.
If you choose Refresh, the entire view will be scanned for new entries and changes to existing entries.
Choose Meta View or Connector View from the Traverse menu.If you choose Refresh Unlinked, the view will be scanned for only entries that are not currently linked.
If you choose Refresh Groups, the entire view will be scanned after the application of the Group Filter. (The group filter is an LDAP filter used to select certain entries prior to refresh. Information on configuring group filters can be found on page 119 of this chapter.)
Press Submit Request to begin the process.
- Choosing Meta View will re-apply join rules to all entries in the meta view and, similarly, choosing Connector View will re-apply join rules to all entries in the connector view.
Refreshing the External Data or Connector View
New or modified data flowing to the external directory or the connector view of a particular connector can also be refreshed.
To Refresh External Data or the Connector View
Select the Status tab and the specific connector in the Meta-Directory console's navigation tree.
Select the participating view.
- The connector's participating view is listed in the View field.
Choose Refresh from the Operation drop-down menu.
Choose External Directory or Connector View from the Updates to the drop-down menu.
Press Start to begin the process.
- Choosing External Directory will refresh the external data source with new data or data modifications made in the meta view and transferred to the connector view. Choosing Connector View will refresh the connector view with new data or data modifications made in the external data source.
Choose the type of refresh operation and press OK.
- The Modify Task Status dialog box appears.
- If you are updating the external directory, you will be asked to choose the from the following options:
Re-propagate all existing entries in the Connector View to the External Directory immediately.
Propogate all existing entries in the Connector View that meet the filter criteria to the External Directory immediately.
Select the filter desired. Only those configured for the "NoSubtreesExcept" option are displayed when Select Filter... is chosen, not filters configured for the "AllSubtreesExcept" option.
Perform the above two operations in sequence.
- If you are updating the connector view, the only option is to delete from the connector view all existing entries that originate in the external data source.
- If you are refreshing the external directory, the following version of the box appears:
- You must select a filter for the second and third options. Only filters configured for the "NoSubtreesExcept" option are displayed when you click Select Filter, not filters configured for the "AllSubtreesExcept" option.


Previous Contents Index Next
Copyright © 2002 Sun Microsystems, Inc. All rights reserved.
Last Updated April 08, 2002