|
|
| iPlanet Process Manager, Version 6.5 Process Builder's Guide |
Chapter 17 The Insurance Claim Processing Application
This chapter describes the Insurance Claim Processing sample application that is shipped with this product. It includes a general walk through of the sample application and describes its functions. You can use the applications as a learning tool to see how applications are designed.
This chapter contains the following sections:
- "Application Overview"
- "Process Map"
- "Application Walkthrough"
- "Groups and Roles"
- "Data Dictionary"
- "Forms"
- "Script Dictionary"
- "Required Files"
- "Configuring the Insurance Claim Processing Application"
- "Custom Activity Code"
Application Overview
This application automates an insurance claims process from the time a customer enters a claim for automobile damage to the time when the claim is either approved or denied. The application demonstrates how you can implement a number of advanced Process Manager features including the following:
- Expiration for customer forms
The Application uses expiration setter and handler scripts in order to discard forms that are not accessed for a certain time.
- Accessing a flat file
The application takes the policy number from the customer and reads a flat file (an XML file with customer records) and parses it to get the policy details record for the customer. If the record is not found the application prompts the user to re-enter the policy number.
Note The application contains all the necessary forms, user roles, and database fields to complete the process.
You must use Netscape Communicator to run this application.
Process Map
Figure 17-1 shows the application's steps:
Figure 17-1 The Insurance Claim Process Map
The process map shows the following steps.
Entry Point
The process map contains one entry point where the user enters their policy number. Immediately following the entry point, a custom activity uses the policy number to retrieve the customer's record from the flat file database.xml.
Activities
This process has eight manual activities:
- Policy Details. Displays the customer's personal information and policy details
- Re-Enter Policy No. Prompts the user to re-enter the policy number if it was not found in the flat file.
- Enter Claim Details. Prompts the user to enter the claim details.
- Confirmation. Displays the customer's personal information, policy details and details of the claim. The customer can confirm the details or go back to the previous form to correct the details.
- Approver. Allows an insurance adjuster to approve the insurance claim if everything is correct or to request clarification of the claim
- Clarification. Allows an insurance clerk to enter changes to the claim if applicable after talking to the customer to clarify the claim.
- Inform Customer. Informs the customer that the claim was approved.
- Send Check. Informs the customer that the check was sent.
Custom Activities
There are three custom activities, which perform different functions.
Look Up Details
This custom activity is the most important of the three custom activities. It takes the policy number, entered by the customer at the entry point, as the INPUT. It then opens the flat file (database.xml) and parses the file to get the matching policy number as entered by the customer.
If it finds a matching policy number, it fetches the records and sends all the details to the OUTPUT of the custom activity. All this is done in the perform() function of the custom activity Java file. The record is mapped to the variables in Process Builder and hence when we view the next form we can see all the details.
If it does not find a matching policy number, it prompts the customer to re-enter the policy number until it finds the matching policy number in the flat file.
It maintains a log file (Policy.log) which is created if not present. This log file has the information about all the access to the policy and the results.
Note The flat file (database.xml) must be in the current user directory in order to make the application work.
Update Log
This custom activity updates the Policy.log file when the claim is approved. It is a parallel activity.
Log Denial
This custom activity updates the Policy.log whenever the claim is denied.
Decision Point
After the Clarify activity, there is a decision point. If no changes have been made to the claim details, the process returns to the Approver activity so that the insurance adjuster can re-examine the claim. If no changes have been made, however, the process moves down the denial path. This is because if there are no changes then the claim is not correct and hence denied.
Exit Points
The process has four exit points:
- Claim Approved. A claim is approved.
- Claim Denied. A claim is denied.
- Expiration Exit. Whenever an Expiration handler gets activated it destroys the process instance.
- No Transactions. When there is no access to the policy details such as when the user enters the wrong policy number and then presses the exit button in the form that asks them to re-enter the number.
Application Walkthrough
This walkthrough takes you through the process described by the application, describing the portions of the application involved in each step.
The Entry Point (Enter Policy No.)
Users (customers) initiate an insurance claim at the Enter Policy No. entry point. When they initiate the application in Process Express, they see the Entry.html form. On this form customer enters the policy number for which they are claiming the insurance.
Custom Activity (Look Up Details)
When users have filled out the form, they click Next to perform the function of the class file associated in the custom activity - Look Up Details. The function of this custom activity is to open database.xml (which is the flat file), parse it, and look for a matching policy number.
A main function of this application is to log all the activities carried out whenever a new process is initiated. This helps the insurance company personnel check all insurance claims entered through this application. At this custom activity, the application adds the customer name and a randomly generated claim ID to a file called Policy.log.
Activity (Policy Details)
If the custom activity finds a matching Policy number, it displays the policy details on the form Details.html. This activity has two scripts associated with it:
Activity (Re-enter Policy No.)
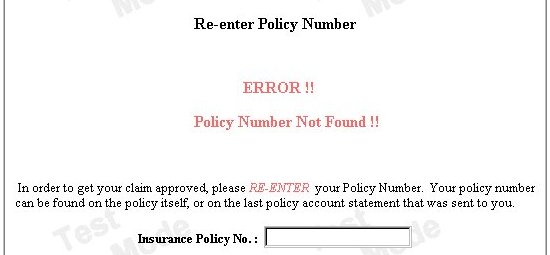
If the custom activity does not find the policy number in the flat file, it will prompt the customer to re-enter the policy number until it finds a policy record. It prompts the customer by displaying a form, called Resubmit.html.
Activity (Enter Claim Details)
The form at this activity, EnterClaim.html, allows the customer to enter the claim. It has predefined claim such as vehicle damage, window damage etc. The customer clicks the appropriate check box to select the type of claim and describes the claim in detail in the text area provided.
This activity also has two scripts associated with it: "Script at Enter Claim Details Activity" and "Completion Script at Enter Claim Details Activity".
Activity (Confirmation)
After entering all the details in the EnterClaim.html form, the form at this activity Confirmation.html shows all the details associated with the customer and the policy, including the claim details which the customer had entered in the previous form. This form prompts the customer to check all the details displayed and then continue if correct.
If the customer feels that there is a error in the claim details a 'BACK' button takes the customer back to the Enter Claim Details activity, where the customer can enter the corrects claim details and continue.
This activity also has an Script at Confirmation associated with it.
Activity (Approver)
After the confirmation from the customer, the process continues to the next step, approving the claim. This activity is carried out by the insurance company employee who has the rights to approve the claim. The form Approver.html displays all the information shown previously in the Confirmation.html, the customer personal information, the policy details, and the claim. In addition to this information, the form contains a text area for comments from the approver.
The approver can approve the claim at this point or, if there are some comments or doubts about the claim or the customer, the approver can send it on for clarification.
Activity (Clarification)
If the approver in the previous activity has some doubts about the claim or the customer, the approver can send it for clarification. The form, Clarify.html, has the same contents as Approver.html, and an additional field for the clarification comments. The clarifier talks with the customer and looks for any changes in the policy. If there are any changes he writes them in the Clarification Comments text area and submits it to the approver.
If there are no changes in the policy, then the approver's comments hold good and there is something wrong with the claim. In this case, the claim is denied.
Activity (Inform Customer)
If the approver approves the claim, this activity displays a confirmation form (InfCustomer.html) that the claim with Customer Name, Policy No. and Address to which the claim check will be sent is approved.
Parallel Activities
After the Inform Customer activity, two different tasks are carried out in parallel: Sent Check and Update Log.
Activity (Send Check)
The first part of the parallel activity informs the insurance claim personnel that the check for the approved claim was sent. This is displayed in the SendCheck.html form.
Custom Activity (Update Log)
The other part of the parallel activity is a custom activity - Update log. This custom activity updates the log file, which was appended to when the process was initiated. This custom activity writes the claim ID, which was randomly generated during the process initiation, and the claim, which was approved, in the log file.
Groups and Roles
The following groups and roles are defined for this application:
- all
- creator
- admin
- trusted users
These are the default groups and roles that are created for every application. For demonstration purposes, all activities in this application are assigned to the creator of the process instance. In order for a group to be able to search, the Allow Search option must be checked in the Inspector window for that group.
Group and Role Priorities
The group and role priorities determine the order in which the application processes groups and roles to determine what forms the users see. Because a user can belong to more than one group or role in the same application, the application needs the builder to specify which group or role to evaluate first. The evaluation order you set in the Groups and Roles properties window is the order used in the Form Access window.
The assignee role is always at the top of the list and the "all" group is always at the bottom. You cannot reprioritize these two.
To see the group and role priorities
- In the application tree view, double-click the Groups & Roles folder, or highlight the folder and click Inspect.
- In the Inspector Window, click "evaluation order" if it's not already selected. The groups and roles are listed in the following order:
The application first checks to see if a user is the assignee of a particular activity. If so, it finds the appropriate form to display to the assignee. If the user is not the assignee, the application checks down the list, and when it finds a role or group the user belongs to, it displays the appropriate form as configured in the Form Access window. Figure 17-2 shows a portion of this window:
Figure 17-2 Form Access Window
Data Dictionary
The data dictionary contains all the data fields that are used by the application and stored in the database. To see the properties for these fields, in the application tree view, inside the Data Dictionary folder, double-click the name of the field.
Fields are defined to have a class ID, which in turn determine the properties the field has. When you add fields, you can either add them with predefined class IDs, or you can create your own class IDs.
Table 17-1 shows the Data Dictionary for the Insurance Claim Processing application:
Forms
The following sections describe the forms included in the Insurance Claim application.
Entry.html
Customers enter the Policy Number to begin the Insurance Claim process in this form, as shown in Figure 17-3.
Figure 17-3 Entry.html

Resubmit.html
This form, shown in Figure 17-4, is displayed whenever the Policy Number, which the customer entered in Entry.htm, is not found in the flat file.
Figure 17-4 Resubmit.html
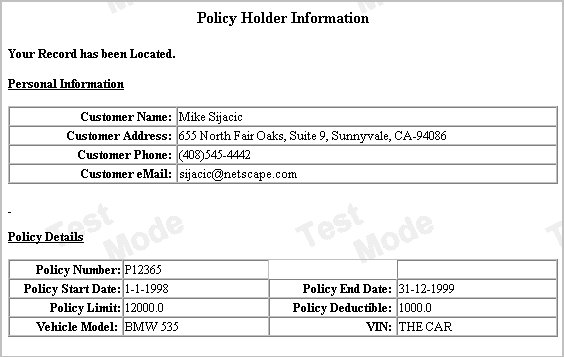
Details.html
This form, shown in Figure 17-5, displays the customer's personal information and the policy information that was found in the flat file.
Figure 17-5 Details.html
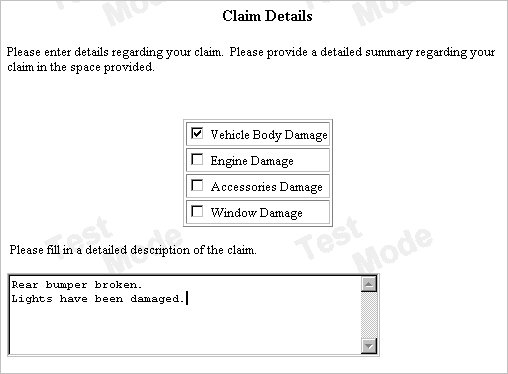
EnterClaim.html
Customers enter the claim in this form, shown in Figure 17-6. It has a predefined claim check boxes and a text area where the customer can enter a small description of the claim.
Figure 17-6 EnterClaim.html
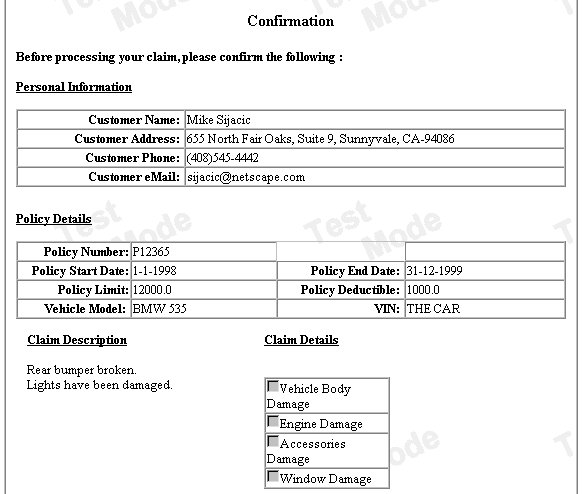
Confirmation.html
This form, shown in Figure 17-7, displays customer details from Details.html and claim details from EnterClaim.html.
Figure 17-7 Confirmation.html
Approver.html
This form, shown in Figure 17-8, is same as Confirmation.html with an additional text area for the approver's comments.
Figure 17-8 Approver.html

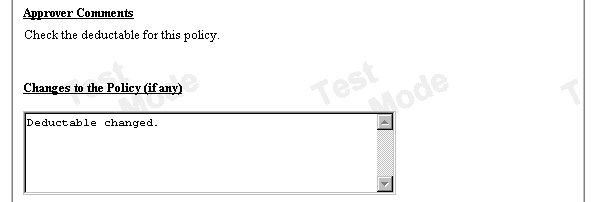
Clarify.html
This form, shown in Figure 17-9, is similar to Approve.html but has an additional text area for the clarifier's comments.
Figure 17-9 Clarify.html
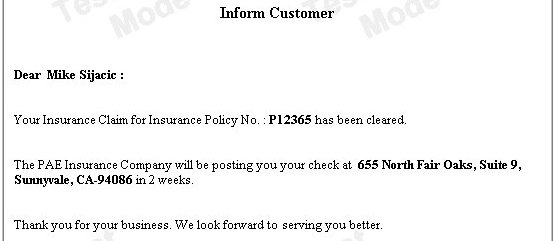
InfCustomer.html
This form, shown in Figure 17-10, is displayed whenever a claim is approved. It shows the customer's name, customer's address, and the policy number.
Figure 17-10 InfCustomer.html
SendCheck.html
This form (see Figure 17-11) tells the customer that the claim check was sent.
Figure 17-11 SendCheck.html
ClaimApproved.html
This exit form is displayed whenever a claim is approved and the process is successfully completed.
ClaimDenied.html
This exit form is displayed whenever a claim is denied and the process is successfully completed.
ExpirationExit.html
This exit form is displayed whenever a form has expired and it goes to the exit point.
Script Dictionary
The script dictionary contains the scripts used by the application. They are divided into categories based on the purpose they serve in the application.
Expiration Scripts
The expiration scripts run whenever a form has not been used or accessed for a period of time set by an expiration handler. When the period of time has elapsed without the form being accessed, the expiration handler script is executed.
The activities with expiration scripts in this application are set to expire in five minutes if the form is not accessed. In each activity's property window, the expiration setter is set to five minutes. Each activity has an expiration handler script that is called when the five minutes has passed. The script advances the process to the Expiration exit point.
The following sections show the expiration scripts at the activities where they occur:
Script at Policy Details Activity
function exppolicydetails ( )
{
var pi = getProcessInstance ( );
var wi = getWorkItem ( );
// handle expiration
// move process instance to Expiration Exit point.
wi.setNodeName ( "Expiration Exit" ) ;
return true;
}
Script at Enter Claim Details Activity
function expenterclaim ( )
{
var pi = getProcessInstance ( );
var wi = getWorkItem ( );
// handle expiration
// move process instance to Expiration Exit point.
wi.setNodeName ( "Expiration Exit" ) ;
return true;
}
Script at Confirmation
function expconfirmation ( )
var pi = getProcessInstance ( );
var wi = getWorkItem ( );
// handle expiration
// move process instance to Expiration Exit point.
wi.setNodeName ( "Expiration Exit" ) ;
return true;
}
Script at Resubmit Policy No.
function expresubmit ( )
{
var pi = getProcessInstance ( );
var wi = getWorkItem ( );
// handle expiration
// move process instance to Expiration Exit point.
wi.setNodeName ( "Expiration Exit" ) ;
return true;
}
Completion Scripts
Completion scripts are executed whenever an activity goes on to the next step. This is particularly helpful whenever you want to do a particular task such as displaying the form or setting some value in a data field as soon as the activity is completed.
In this application, after displaying at the policy details in Details.html, the application displays the EnterClaim.html form directly, without returning the user to their work item list. The completion script displays the form automatically to the user by using a function to redirect the URL.
The following sections show the completion scripts at the activities where they occur.
Completion Script at Policy Details Activity
function Enterclaim ( )
{
var pi = getProcessInstance( );
var process_id = pi.getInstanceId( );
url = "http://onguard/cgi-bin/gx.cgi/AppLogic+wfmySampleApp.npm?eventI d=OnDisplayWorkItem&__instanceId="
+ process_id +
"&__forkId=0&__nodeName=Enter%20Claim%20Details";
setRedirectionURL(url);
return true;
}
Completion Script at Enter Claim Details Activity
function Confirmation ( )
{
var pi = getProcessInstance( );
var process_id = pi.getInstanceId( );
setRedirectionURL(
"http://onguard/cgi-bin/gx.cgi/AppLogic+wfmySampleApp.npm?eventI d=OnDisplayWorkItem&__instanceId="
+ process_id +
"&__forkId=0&__nodeName=Confirmation");
return true; }
Required Files
The following sections show the additional required files for the Insurance Claim application.
The database.xml File
The following is an example of the database.xml file you need in order to run the application. The policy numbers listed in the file are the ones you need to enter in order to process an application.
<xml version="1.0" encoding="us-ascii">
<POLICYSET>
<POLICY>
<CUSTOMER_NAME>Mike Sijacic</CUSTOMER_NAME>
<CUSTOMER_ADDRESS>
876 North Fair Oaks, Suite 9, Sunnyvale, CA-94086
</CUSTOMER_ADDRESS>
<CUSTOMER_PHONE_NUMBER>(408)123-4442</CUSTOMER_PHONE_NUMBER>
<EMAIL> sijacic@netscape.com </EMAIL>
<POLICY_NUMBER>P12365</POLICY_NUMBER>
<START_DATE>1-1-1998</START_DATE>
<END_DATE>31-12-1999</END_DATE>
<POLICY_AMOUNT>12000</POLICY_AMOUNT>
<POLICY_DEDUCTIBLE>1000</POLICY_DEDUCTIBLE>
<VEHICLE_MODEL>BMW 535</VEHICLE_MODEL>
<VEHICLE_NUMBER>THE CAR</VEHICLE_NUMBER>
</POLICY>
<POLICY>
<CUSTOMER_NAME>MICHAL CHMIELEWSKI</CUSTOMER_NAME>
<CUSTOMER_ADDRESS>
3248 LAKEVIEW APTS,San Jose, CA-94086
</CUSTOMER_ADDRESS>
<CUSTOMER_PHONE_NUMBER>(408)123-4372</CUSTOMER_PHONE_NUMBER>
<EMAIL> michal@netscape.com </EMAIL>
<POLICY_NUMBER>P32345</POLICY_NUMBER>
<START_DATE>1-1-1998</START_DATE>
<END_DATE>31-12-1999</END_DATE>
<POLICY_AMOUNT>12000</POLICY_AMOUNT>
<POLICY_DEDUCTIBLE>1000</POLICY_DEDUCTIBLE>
<VEHICLE_MODEL>BMW 747</VEHICLE_MODEL>
<VEHICLE_NUMBER>seeCAR23</VEHICLE_NUMBER>
</POLICY>
<POLICY>
<CUSTOMER_NAME>Souvik Das</CUSTOMER_NAME>
<CUSTOMER_ADDRESS>
844 Salt Lake, Moutain View, CA-94043
</CUSTOMER_ADDRESS>
<CUSTOMER_PHONE_NUMBER>(650)123-2343</CUSTOMER_PHONE_NUMBER>
<EMAIL> souvik@netscape.com </EMAIL>
<POLICY_NUMBER>P12346</POLICY_NUMBER>
<START_DATE>1-1-1998</START_DATE>
<END_DATE>31-12-1999</END_DATE>
<POLICY_AMOUNT>12300</POLICY_AMOUNT>
<POLICY_DEDUCTIBLE>400</POLICY_DEDUCTIBLE>
<VEHICLE_MODEL>HONDA Accord V6 LE</VEHICLE_MODEL>
<VEHICLE_NUMBER>PF12335</VEHICLE_NUMBER>
</POLICY>
<POLICY>
<CUSTOMER_NAME>Albert TAM</CUSTOMER_NAME>
<CUSTOMER_ADDRESS>884 Mary Blvd., Mountain View, CA-94043
</CUSTOMER_ADDRESS>
<CUSTOMER_PHONE_NUMBER>(650)123-4578</CUSTOMER_PHONE_NUMBER>
<EMAIL> atam@netscape.com </EMAIL>
<POLICY_NUMBER>P12347</POLICY_NUMBER>
<START_DATE>1-1-1998</START_DATE>
<END_DATE>31-12-1999</END_DATE>
<POLICY_AMOUNT>12000</POLICY_AMOUNT>
<POLICY_DEDUCTIBLE>1000</POLICY_DEDUCTIBLE>
<VEHICLE_MODEL>BMW 535 v6</VEHICLE_MODEL>
<VEHICLE_NUMBER>BPM GROUPIE3</VEHICLE_NUMBER>
</POLICY>
</POLICYSET>
The Policy.log File
The following is an example of the log file that is created when you run the application. It contains the ID numbers and claim information of process instances.
[Tue Aug 17 16:32:30 PDT 1999]
The Insurance Claim with Claim id : 1715745114 for Policy No. : P12346 was initialized by : Souvik Das
[Tue Aug 17 16:33:27 PDT 1999]
Claim ID : 1715745114 With Claim : ' Broken fuel tank ' was submitted
[Tue Aug 17 16:33:27 PDT 1999]
Claim ID : 1715745114 was APPROVED.
[Tue Aug 17 16:34:04 PDT 1999]
The Insurance Claim with Claim id : 618655790 for Policy No. : P12365 was initialized by : Mike Sijacic
[Tue Aug 17 16:34:52 PDT 1999]
Claim ID : 618655790 With Claim : ' All windows broken ' was denied
REASON : ' null '
The Banner Image
The application uses a banner image, shown in Figure 17-12, on all displayed forms.
Figure 17-12 The banner.gif file

The Background Image
The application uses a background image, shown in Figure 17-13, on all displayed forms.
Figure 17-13 The background image is called Gray_Textured1040.gif

Configuring the Insurance Claim Processing Application
Before running the Insurance Claim Processing application, make sure the database.xml file resides in the correct location in your environment. This file contains sample policy data. The application retrieves this data for a policy that the user enters.
On Solaris, database.xml must reside in the home directory of the user who is running the application server. On Windows NT, you must place database.xml in the root of the drive of where Windows NT is installed. For example, if Windows NT is installed on the E: drive, then database.xml file must reside at E:\database.xml.
Note that the policy.log file will be created in the same location as database.xml.
Custom Activity Code
This section summarizes the three custom activities in the Claim Processing sample application:
For information on writing and packaging a custom activity, see the Process Manager Programmer's Guide.
The LogPerformer Activity
The LogPerformer custom activity writes specific information to a log file. This custom activity is represented by the LogPerformer.jar archive, which contains the following files:
/LogPerformer.xml
/com/model/sampleapp/logperformer/Logger.class
/com/model/sampleapp/logperformer/LogPerformer.class
The LogdenialPerformer Activity
The LogdenialPerformer custom activity writes a claim process denial to a log file. This custom activity is represented by the LogdenialPerformer.jar archive, which contains the following files:
/LogdenialPerformer.xml
/com/model/sampleapp/logdenialperformer/Logger.class
/com/model/sampleapp/logdenialperformer/LogdenialPerformer.class
The LookupPerformer Activity
The LookupPerformer custom activity takes the policy number as input, searches a database of policies, and returns the policy details back to the process. This custom activity is represented by the LookupPerformer.jar archive, which contains the following files:
/LookupPerformer.xml
/com/model/sampleapp/lookupperformer/Logger.class
/com/model/sampleapp/lookupperformer/LookupPerformer.class
/com/model/sampleapp/lookupperformer/MyParser.class
/com/model/sampleapp/lookupperformer/Policy.class
/com/model/sampleapp/lookupperformer/PolicySet.class
Code Walkthrough for LookupPerformer.java
This section describes the steps for creating the LookupPerformer.java file. This file contains three main parts:
Definitions and Packages
The first part of LookupPerformer.java is written as follows:
- Define a package for your class:
package com.model.sampleapp.lookupperformer;
- Import the required Java packages:
import java.lang.*;
import java.util.*;
import com.model.sampleapp.lookupperformer.*;
import com.netscape.pm.model.*;
import java.io.*;
- A custom activity must implement the ISimpleWorkPerformer interface:
public class LookupPerformer implements
com.netscape.pm.model.ISimpleWorkPerformer
{
- Next, define the variables to use within the custom activity:
private String CustomerName ;
private String CustomerAddress ;
private String CustomerPhoneNo ;
private String CustomerEmail ;
private double PolicyAmt;
private String PolicyNo ;
private String StartDate ;
private String EndDate ;
private double Deductible ;
private String VehicleModel ;
private String VIN ;
private String mFileName ;
The init, perform, and destroy Methods
- The init method is used to set up anything you'll need globally within the custom activity. In this example, the method initializes the name and location of the file to use to search for policies.
public void init( Hashtable env ) throws Exception {
mFileName = "database.xml";
}
- The perform method does the main work of the custom activity.
public void perform( Hashtable input, Hashtable output )
throws Exception {
This method takes data from an input hashtable (which is passed in from the process), does the necessary work, and then puts the data back into an output hashtable (which is passed back to the process).
- The data hashtable from the process is in the input variable. Similarly, the hashtable in which to pass data back to the process is in the output variable.
// Read the Policy_No attribute from the input hashtable
Object value = input.get ( "Policy_No" ) ;
- Next, you check to see whether the value from the hashtable is in the proper format, a string.
if ( value instanceof com.netscape.javascript.NativeJavaObject )
{
input.put ("Policy_No",
((com.netscape.javascript.NativeJavaObject)
value).unwrap().toString()) ;
}
String mPolicyNo = (String) input.get( "Policy_No" );
- A call to GetPolicy will parse the database.xml file and return the details of the policy.
Policy ourPolicy = GetPolicy (mPolicyNo);
- Check whether the policy number received by the custom activity is blank. If so, return an empty policy number in the output hashtable. You'll check whether the policy number returned within the process is empty and show an error screen there.
if ( ourPolicy == null ){
// throw new Exception("Policy No not found");
PolicyNo = " ";
output.put ( "PolicyNo", PolicyNo ) ;
return;
}
- Next, generate a random number to assign as the claim number.
String RanNum = null ;
Random rgen = new Random ();
RanNum = Integer.toString (rgen.nextInt());
if ( RanNum.startsWith ("-") ) {
RanNum = RanNum.substring ( 1 ) ;
}
- Now construct a message line for logging. The message contains the claim number and some of the policy details.
String PNo = (String) input.get( "Policy_No" );
StringBuffer temp1 = new StringBuffer
( "The Insurance Claim with Claim id : " );
temp1.append ( RanNum )
temp1.append ( " for Policy No. : " + PNo);
CustomerName = ourPolicy.getCustomerName ( ) ;
temp1.append ( " was initialized by : " + CustomerName );
- Open a Logger object that writes the information to a log file.
Logger logger = new Logger ();
logger.open();
logger.log ( temp1.toString() ) ;
logger.close();
- Define variables based on the ourPolicy object, which contains the details of the customer and policy.
CustomerName = ourPolicy.getCustomerName ( ) ;
CustomerAddress = ourPolicy.getCustomerAddress ( ) ;
CustomerPhoneNo = ourPolicy.getCustomerPhoneNo ( ) ;
CustomerEmail = ourPolicy.getCustomerEmail ( ) ;
PolicyNo = ourPolicy.getPolicyNo( ) ;
PolicyAmt = ourPolicy.getPolicyAmt( ) ;
StartDate = ourPolicy.getStartDate( ) ;
EndDate = ourPolicy.getEndDate( ) ;
Deductible = ourPolicy.getDeductible( ) ;
VehicleModel = ourPolicy.getVehicleModel( );
VIN = ourPolicy.getVIN( );
- Next, populate the output hashtable with the information from the policy.
// Set the output hashtable
output.put ( "CustomerName", CustomerName ) ;
output.put ( "CustomerAddress", CustomerAddress ) ;
output.put ( "CustomerPhoneNo", CustomerPhoneNo ) ;
output.put ( "CustomerEmail", CustomerEmail ) ;
output.put ( "PolicyNo", PolicyNo ) ;
output.put ( "PolicyAmt", Double.toString(PolicyAmt) ) ;
output.put ( "StartDate", StartDate ) ;
output.put ( "EndDate", EndDate ) ;
output.put ( "Deductible", Double.toString(Deductible) ) ;
output.put ( "VehicleModel", VehicleModel ) ;
output.put ( "VIN", VIN ) ;
output.put ( "ClaimId", RanNum );
// End of perform method
}
- The destroy method is invoked when the application is unloaded from the application server. It is the opportunity to clean up resources that are used by the server. In this case, there is nothing to do.
public void destroy( ){
}
The GetPolicy Method
The GetPolicy method returns a policy object that contains the information on a given policy. The method itself opens up the database.xml file and parses through it to find the appropriate policy. Here is the code for this method:
private Policy GetPolicy (String PNO)
{
try
{
String fileName = "database.xml";
int Pfound = 0;
int MAX_LENGTH = 50000 ;
char [] xml = new char [ MAX_LENGTH ] ;
java.io.File f = new java.io.File ( fileName ) ;
FileReader fr = new FileReader ( f ) ;
BufferedReader in = new BufferedReader( fr );
int count = 0 ;
while ((count = in.read (xml, count, MAX_LENGTH )) != -1 )
{}
String xmlStr = new String ( xml ) ;
MyParser parser = new MyParser ( xmlStr ) ;
PolicySet tempPolicySet = parser.parse ( ) ;
int j;
Policy policy = null ;
for ( j=0 ; j < tempPolicySet.GetSize(); j++ )
{
policy = (Policy) tempPolicySet.elementAt(j) ;
if ( policy.getPolicyNo().equals (PNO ) )
{
Pfound = 1 ;
System.out.println("PNO in GET POLICY IS : " PNO );
System.out.println( "Policy Not Found!!");
return policy;
}
}
return null; // If Policy not found ...
} catch ( Exception ignore )
{
return null;
}
}
// end class
}
Contents