|
|
| Sun ONE Application Server 7 Developer's Guide to Enterprise Java Beans Technology |
CMP Mapping with the Sun ONE Studio 4 InterfaceThis section provides guidelines on mapping between a set of Java programming language classes and a relational database using the Sun ONE Studio 4 interface.
This section addresses the following topics:
You should already be familiar with the "Using Container-Managed Persistence for Entity Beans"," and chapter 10 of the Enterprise JavaBeans Specification, v2.0 before using these procedures.
Mapping CMP Beans
To map container-managed persistence beans, you must first capture the schema, then map the beans to the schema.
This section contains the following sections:
Capturing a Schema
Before mapping any enterprise beans to a database schema, you need to capture the schema to create a working copy in your file system. This allows you to do your work without affecting the database itself.
Note It is best to store the captured schema in a package. If you do not have a package to contain the schema, create one by right-clicking on the file system and selecting New Package.
- You have three ways to display the Mapping Tool:
Right-click on the file system and select New > Databases > Database Schema.
Choose New from the File menu and then, in the Template Chooser, double-click Databases and select Database Schema.
Select Capture Database Schema from the Tools menu.
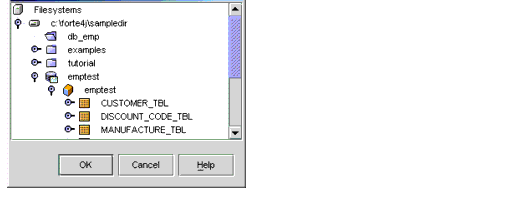
- In the Target Location pane, type a file name for the working copy of your schema, then select a package for the captured schema.
- In the Database Connection pane, if you have a connection established, you can select it from the Existing Connection menu. Otherwise, under New Connection, enter the following information:
The name of the database you are connecting to. (If your database is not listed in the dropdown menu, you might need to quit the Mapping Tool and install the driver in the IDE before continuing.)
The JDBC URL for the database, including the driver identifier, server, port, and database name. For example, jdbc:pointbase://localhost:9092/sample.
The format of a JDBC URL varies depending on which kind of database management system (DBMS) you use—Oracle, Microsoft SQL Server, or PointBase—and the version of that DBMS. Ask your system administrator for the correct URL format for your DBMS.
A user name for your database.
The password for that user.
- In the Tables and Views pane, choose the tables and views you want to capture, then click Finish.
Note If you choose one table and exclude another that is referenced to the included table by a foreign key, both tables will be captured even though you specified only one.
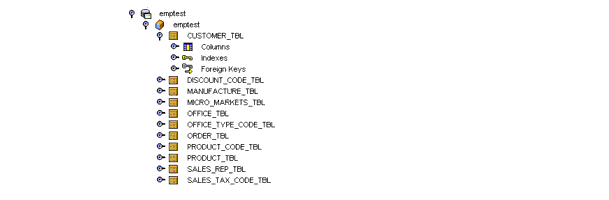
The database and its schema will be represented as shown in following figure.
Mapping Existing Enterprise Beans to a Schema
This section discusses how to use container-managed persistence to customize mappings or to create a mapping for an existing object model.
Before you can map an enterprise bean to a database schema, you must make sure that the database schema is captured and mounted in your Explorer file system. See "Capturing a Schema" for instructions on how to do this.
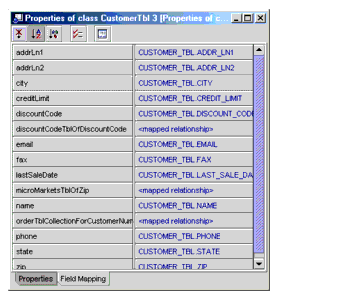
You can set up or edit a mapping piecemeal by editing the individual properties in the Properties window. All the mapping and persistence information can be accessed through the Properties window. The mapping fields property editor provides a way to view and edit groups of classes and fields at one time, providing a useful overview of your mapping model.
- Under Filesystem, open the EJB Module.
The enterprise beans in that module are listed.
- Select the enterprise bean from its containing EJB module.
The properties table for the enterprise bean is displayed.
- If you have completed the preliminary tasks, click Next to bring up the Select Tables pane of the Mapping Tool.
Otherwise, click Cancel, complete the tasks, and restart the Mapping Tool.
- Select a primary table from the Primary Table combo box, or click Browse to open the Select Primary Table dialog.
- If you open the Select Primary Table dialog, find a schema and expand it to find its tables.
- Select a table and click OK.
The table you select as the primary table should be the one that most closely matches your class.
- Once the primary table is set up, you can map one or more secondary tables by clicking Add.
This opens the Secondary Table Settings dialog box.
A secondary table enables you to map fields in your enterprise bean to columns that are not part of your primary table. For example, you might add a DEPARTMENT table as a secondary table in order to include a department name in your Employee class. A secondary table differs from a relationship, in which one class is related to another by way of a relationship field. In a secondary table mapping, fields in the same class are mapped to two different tables. A secondary table enables you to map your field directly to columns that are not part of your primary table. You can use this pane to select secondary tables, and to show how they are linked to the primary table.
A secondary table must be related to the primary table by one or more columns whose associated rows have the same values in both tables. Normally, this is defined as a foreign key between the tables. When you select a secondary table from the drop-down menu, the Mapping Tool checks for a foreign key between the two tables. If a foreign key exists, it is displayed as the reference key by default.
Select a secondary table from the combo box.
Once you select a secondary table, the container-managed persistence implementation checks to see if there is a foreign key between the primary and secondary tables. If so, the foreign key is displayed as the default reference key. If there is no foreign key, the editor displays Choose Column, and you must set up a reference key.
To set up a reference key, click Choose Column and select a column from the dropdown menu.
Once you pick a primary column, the choices in the secondary column are limited to columns of compatible types. If no column is compatible, the field displays No Compatible Columns. If you select a primary column that is incompatible with your secondary column, the value of the secondary column reverts to Choose Column.
Note If no pair of columns seems to relate in a logical manner, preventing a logical reference key, you may want to reconsider your choice of a secondary table.
You can select the Add Pair key to set up a complex key using more than one pair of columns.
- Click OK to save your selections.
- Click Next in the Mapping Tool to bring up the Field Mappings panel of the Mapping Tool.
The Field Mappings panel displays all the persistent fields of the enterprise bean and their mapping status. You can map a field to a column by selecting the column in the drop-down menu for that field, or try to map all unmapped fields by selecting Automap. Automap will make the most logical selections, ignoring any relationship fields and any fields that have already been mapped. It will not change any existing mappings.
If you want to map a field to a column from another table that is not available, click Previous to return to the previous Mapping Tool page and add a secondary table that contains the column you want.
Unmap works on whatever field or fields are selected. You can unmap a group of fields at once by holding down the Shift key or Control key while selecting the fields you want. If you want to unmap one item, choose Unmapped in the drop-down menu for that field.
To map a field to multiple columns, click the ellipsis button (...) for the appropriate field in the Field Mappings pane to display the Map Field to Multiple Columns dialog box.
In this dialog box, you add columns to the list of mapped columns. Columns are from the tables you have mapped to this class.You can change the order of the columns by using Move Up/Move Down.
If you do not see the column you want to map, you might need to add a secondary table to your mapping, or change the primary table you have selected. If no columns are listed, you have not yet mapped a primary table, or you have mapped a table that has no columns.
If you map a field to more than one column, all columns will be updated with the value of the first column listed. Therefore, if the value of one of the columns is changed outside of a container-managed persistence application, the value will only be read if the change was made to that first column. Writing a value to the database overwrites any conflicting changes made to any other columns.
You must also make sure that if you map more than one field to any of these columns, the mappings cannot partially overlap. Consider the following three scenarios:
Field A mapped to Columns A and B, Field B mapped to Column B. Since the mappings only partially overlap, this example will get a validation error at compilation.
Field A mapped to Column A, and Field B mapped to Column B. Since there is no overlap, this mapping is allowed.
Field A mapped to Columns A and B, Field B mapped to Columns A and B. Since the mappings completely overlap, this mapping is allowed.
Click OK to save the mapping.
Mapping Relationship Fields
When you have foreign keys between database tables, you usually want to preserve those relationships in Java class references. Mapping CMR fields lets you specify the relationships that correspond to the class reference fields.
- To Map a Relationship Field, click the ellipsis button (...) in the Field Mappings panel next to the drop-down menu of a relationship field to bring up the Relationship Mapping editor.
To use the Relationship Mapping editor outside of the Mapping Tool, click the relationship field in Explorer and edit its Mapping property.
In this pane, verify that the Related Class is set. If the related class is not set, then set it. If the class you want to select is not persistence-capable, you might need to cancel out of the editor, convert the class to persistence-capable, then return.
Verify that the Related Field (if any) is also correct, and that the Primary Table is set for the related class.
Note If you have a logical related field, you should choose a Primary Table. That will create a managed relationship.
Select between linking the tables directly, or through a join table.
- If your relationships are one-to-one or one-to-many, choose to link the tables directly. Clicking Next opens the Map to Key pane of the Relationship Mapping editor.
This pane shows:
An existing mapping if there is one and there were no changes on the initial setup page.
The default mapping if there is no existing mapping or the mapping is no longer valid.
The editor attempts to determine the most logical key column pairs between the two related classes, based on existing foreign keys. If there are no foreign keys, you need to create the key column pairs by selecting local and foreign columns. The columns in each pair are expected to have the same value.
To create a complex key, use the Add Pair button to add additional Key Column Pairs.
If the Finish button is disabled, you need to choose a key column pair.
- If your relationship is many-to-many, link tables through a join table. Click Next to open the Map to Key: Local to Join pane.
This pane shows:
The first class and field in the relationship
The join table to be used to create the relationship between the fields
Key column pairs between the field join table and the table to which the related class is mapped
In this pane, you choose a join table, then map the relationship field to a key. This is only the relationship between the table This Class is mapped to and the join table. If you don't have a join table, go back to the previous panel and select Link the Mapped Tables Directly.
Choose a join table that sits between the two tables that your classes are mapped to. The Editor will attempt to determine the most logical key column pairs between the join table and the table that This Class is mapped to.
If the tables have a foreign key between them, the editor will use the foreign key as the default key column pair. If there is no foreign key, then you must create a key by choosing a pair of columns that will allow navigation from the join table to the table to which This Class is mapped. The columns in each pair are expected to have the same value.
To create a compound key, use Add pair to add additional Key Column Pairs.
If the Next button is disabled, you need to pick a join table or make sure that at least one key column pair exists that has columns on both sides.
- Click Next to open the Map to Key: Join to Foreign pane.
In this pane, you relate a second table to the join table you chose in the previous pane.
The editor will attempt to determine the most logical key column pairs between the join table and the table that the Related Class is mapped to.
If the tables have a foreign key between them, the editor will use the foreign key as the default key column pair. If there is no foreign key, then you must create a key by choosing a pair of columns that will allow navigation from the join table to the table to which the Related Class is mapped. The columns in each pair are expected to have the same value.
To create a compound key, use Add Pair to add additional key column pairs.
If the Finish button is disabled, you need to choose a valid key column pair.
- Click Finish to return to the Field Mappings pane of the Mapping Tool.
- Click Finish to close the Field Mappings pane and map the Java classes to the database schema.
EJB Persistence Properties
Enterprise beans that use container-managed persistence have several unique properties that can be specified outside the Mapping Tool.
The following table describes these unique properties.
Properties for CMP Enterprise Beans
Property
Description
Mapped primary table
The primary table you select for a persistence-capable class should be the table in the schema that most closely matches the class. You must specify a primary table in order to map a persistence-capable class. See "Mapping Existing Enterprise Beans to a Schema" for information on how to do this.
Mapped schema
The schema containing the tables to which you are mapping the persistence-capable class. The primary table, secondary tables, and related classes must be from this schema. This setting cannot be made until you capture the schema as described in "Capturing a Schema".
Mapped secondary table(s)
Secondary tables let you map columns that are not part of your primary table to your class fields. For example, you might add a DEPARTMENT table as a secondary table in order to include a department name in your Employee class. You can add multiple secondary tables, but no secondary table is required. This property is only enabled when Mapped Primary Table is set. See page 98 and page 221 for more information on adding a secondary table.
Consistency levels
Specifies container behavior in guaranteeing transactional consistency of the data in the bean. If the consistency checking flag element is not present, none is assumed. For further information on consistency levels, see "consistency".
Fetch groups
The fetched-with property specifies the fetch group configuration for fields and relationships. A field may participate in a hierarchical or independent fetch group. If the fetched-with element is not present, the following value is assumed: <fetched-with><none/></fetched-with>. Refer to "fetched-with" for further information.
You can unmap a class by choosing <unmapped> from the drop-down menu for the Mapped Primary Table property. When you unmap a currently mapped class, a warning appears if there are field mappings or secondary tables. Click OK if you are sure that you want to unmap the class. Otherwise, click Cancel to cancel the mapping status change and leave the class mapped.
Click the Field Mapping tab at the bottom of the Properties window to see the field mapping properties for a persistence-capable class.