| Sun ONE Application Server 7 Getting Started Guide |
Chapter 6
Setting Up Database ConnectivityThe sample application uses the Java™ Database Connectivity (JDBC™) API to record greetings to a database. In this section you will define the necessary JDBC-related settings in the application server environment prior to deploying and exercising the sample.
JDBC configuration involves setting up a JDBC driver, defining a JDBC connection pool and registering the JDBC resources used by your application. By default, the sample application used in this guide is configured to work with the PointBase Server database product. All distributions of Sun ONE Application Server 7 except for the application server that is installed as part of Solaris™ 9 include the PointBase Server database product. If the directory appserver_install_dir/pointbase/ exists in your application server installation, then PointBase has already been installed and you can proceed with the following instructions to define the JDBC connection pool and resource objects.
If the PointBase Server product has not been installed as part of your application server installation, you can follow the steps in the section "Installing and Configuring PointBase Server" to set up a PointBase environment before proceeding with the JDBC connection pool and resource set up steps.
The following topics are included in this chapter:
Configure the JDBC DriverA JDBC driver must be configured in the classpath of the application server before you can exercise applications that use JDBC.
Since the PointBase Type 4 JDBC driver should already be configured in your application server instance’s environment (based on either the combined installation of the application server with PointBase or through your installation and configuration of PointBase), there is no need for you to perform any additional JDBC driver set up steps.
Tip
Preconfigured PointBase Database: To learn more about how the sample applications use PointBase, see the Sample Applications documentation.
Define the JDBC Connection PoolBefore running the sample application, you need to define a suitable JDBC connection pool that maps to the PointBase database server and a JDBC resource that associates the JDBC references made in the sample application to the JDBC connection pool definition.
- Through a web browser, access the administrative console. (You might have to start the application server if it is not running).
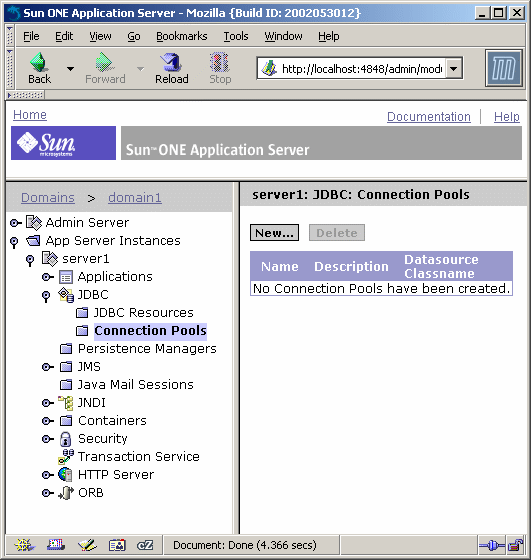
- Expand the JDBC node under the application server instance named server1. Then click the Connection Pools node and click New to define a new connection pool.
Figure 6-1 Data sources node
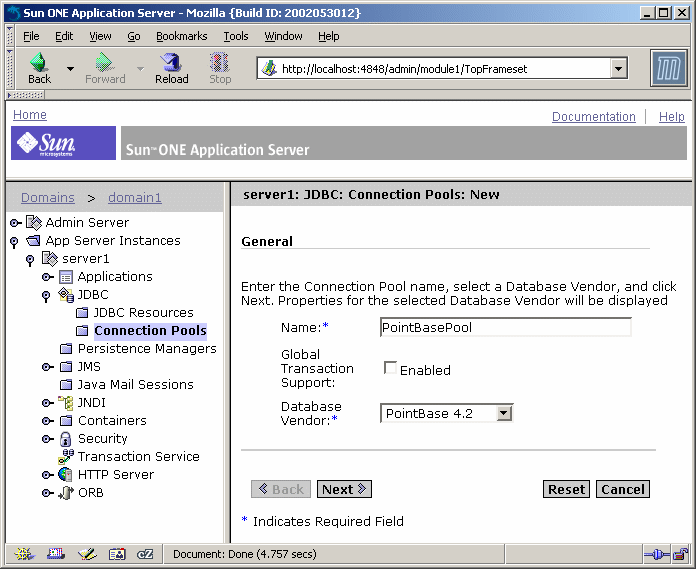
- Enter the database property settings shown in the following table in the first screen of the create new connection pool wizard and then click the Next button.
Table 6-1 Database property settings
Field
Value
Name
PointBasePool
Database vendor
select: PointBase 4.2
Figure 6-2 Database connection pool settings
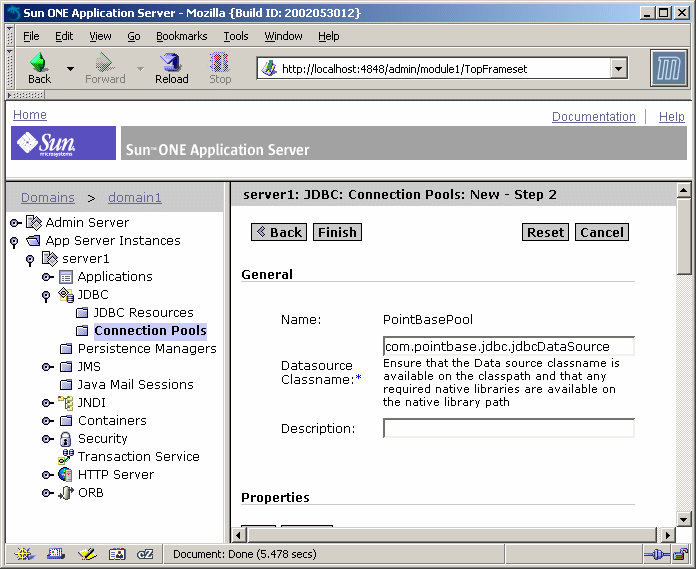
The following screen appears:
Figure 6-3 Connection pool settings
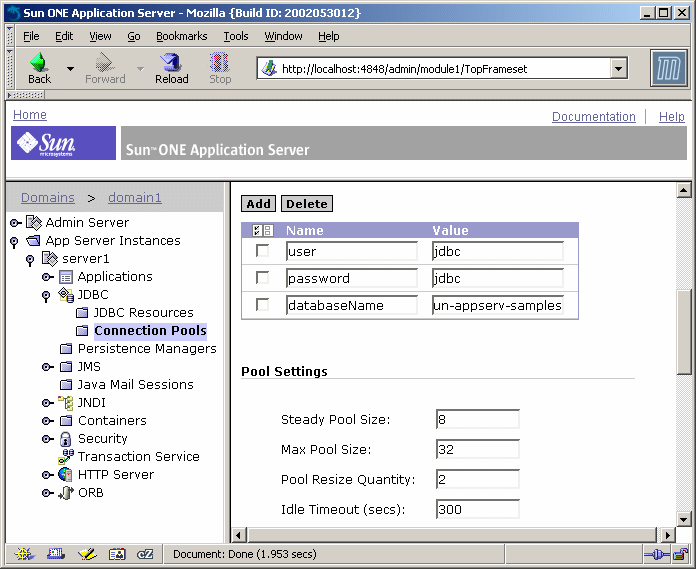
- Scroll down to the Properties section and specify the database property settings shown in the following table:
Table 6-2 Database property settings
Property
Value
user
jdbc
password
jdbc
databaseName
jdbc:pointbase:server://localhost/sun-appserv-samples
Note
Connection Pool Properties and Using Other Databases: Although the databaseName property is supported by PointBase Server, it is not supported by all other databases. For example, for an Oracle RDBMS, use the URL property name to specify the URL to be used by the JDBC driver to connect to the Oracle RDBMS. Consult your JDBC driver’s documentation for details on exactly which properties are supported. For an example of using an Oracle JDBC driver with the sample, see the note on “Using an Oracle Type 4 JDBC Driver” in "Define JDBC Resource" for details.
If you see any additional properties in this list, select the checkbox to the left of each of these properties and click the Delete button to remove these unused properties.
Figure 6-4 Connection pool properties
- Click the Finish button to complete the wizard.
As a result of completing the JDBC connection pool wizard, the administrative server recognizes that although changes have been made to the server's configuration, the changes have not yet been applied to the active configuration. Consequently, several warning icons are displayed in the administrative console to inform you that pending changes need to be applied before they take effect.
Before you apply these changes, proceed to the next step to define the JDBC resource for the sample. After defining the JDBC resource, you will apply both the outstanding connection pool and JDBC resource changes at the same time.
Figure 6-5 Apply changes
Define JDBC ResourceNow that the JDBC connection pool definition has been created, you are ready to define a JDBC resource and associate it with the connection pool entry.
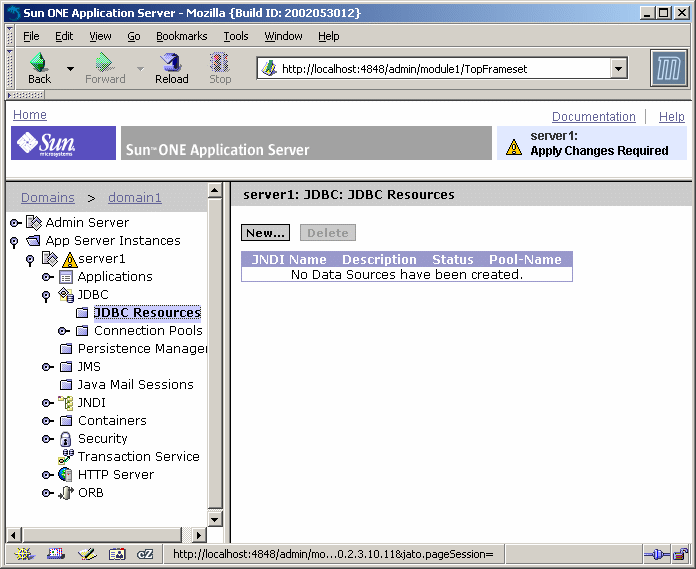
- Under the JDBC node, click the JDBC Resources node and click New... to define a new resource entry.
Figure 6-6 Data sources node
Since the sun-web.xml file of the sample web application refers to the jdbc/jdbc-simple JNDI name and a JDBC resource of that name does not yet exist in the server configuration, you need to define a new JDBC resource.
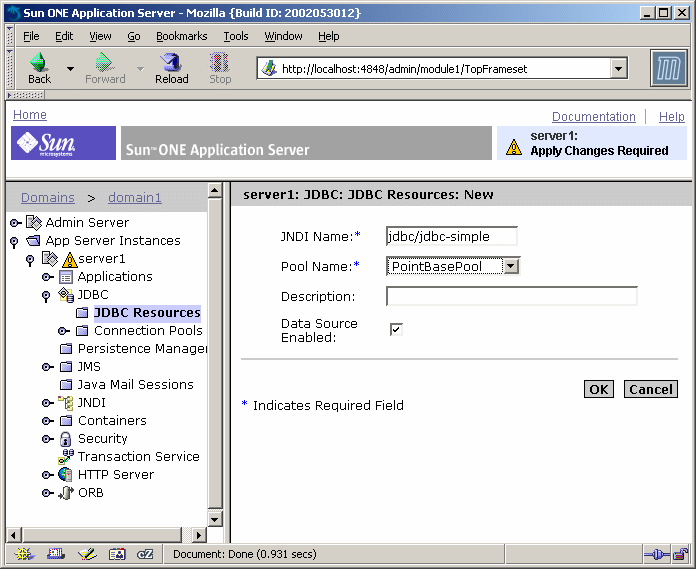
- Set the fields to the database property settings shown in the following table and click OK to define the resource.
Table 6-3 Database property settings
Field
Value
JNDI Name
jdbc/jdbc-simple
Pool Name
select: PointBasePool
Figure 6-7 Create data source
- Now that you have defined both the JDBC connection pool and resource for the sample application, you are ready to apply the changes so to make the application server instance aware of the changes:
- Select the server1 node.
- Click Apply Changes to apply the outstanding JDBC connection pool and resource changes.
Figure 6-8 Apply changes
A message is displayed stating that the changes have been applied. Note that a server instance restart is not required in this case.
Start the PointBase Server DatabaseBefore exercising the sample application, you must start the PointBase Server database.
If you are either sharing your application server installation with other users or your system user ID does not have write permissions to the area in which PointBase is installed (which is typically the case when the application server is installed by the root user on UNIX systems and you are using a non-root user ID), you should make a copy of the pre-built PointBase databases and the PointBase Server startup script.
If you are not sharing the PointBase installation with other users, proceed to "Start the PointBase Server Database".
This section contains the following topics:
Making Your Own Copy of the Database
You can create your own copy of the PointBase Server environment by following these steps:
- Create a directory named pointbase/ under a directory in which you have write permissions.
- Copy the prepopulated PointBase database files from the samples installation area to your own PointBase area.
To copy the prepopulated database files to your own PointBase installation, copy the files contained in the following directory:
appserver_install_dir/samples/pointbase/databases/*
to:
personal_pointbase_dir/pointbase/databases/
This operation will copy the files named sun-appserv-samples$1.wal and sun-appserv-samples.dbn to the your own PointBase area.
- Copy the following files from the PointBase installation area to personal_pointbase_dir/pointbase/ directory:
File
Comments
StartServer.sh or StartServer.bat
Start up script containing port number on which the PointBase server listens.
pointbase.ini
Initialization file specifying location of database files.
If PointBase was installed as part of the application server installation, these files are located at:
appserver_install_dir/pointbase/server/
If you downloaded an installed the evaluation distribution of PointBase, these files are located at:
pointbase_install_dir/tools/server/
- Edit the StartServer.sh or StartServer.bat script to specify a port number that does not conflict with other running instances of the PointBase server.
Now you are ready to start the PointBase Server from your own directory area.
Starting the PointBase Server
The database server can be easily started by performing one of the following actions:
Once you execute this script, you will see the following text in either a command window or at the UNIX terminal prompt:
Server started, listening on port 9092, display level: 0 ...
>
To stop the server, enter quit at the prompt.
Proceed to Chapter 7, "Deploying and Running the Sample Application" to exercise the application.
Installing and Configuring PointBase ServerPointBase is not installed when either the application server is installed as part of a Solaris 9 installation or, during installation of the application server, the PointBase component was deselected as a component to be installed.
To determine if PointBase is installed and configured to work with sample applications, check your application server installation for the following directory:
appserver_install_dir/pointbase/
If this directory exists, then PointBase has already been installed as part of the application server installation. Continue with the database set up steps at the beginning of this document, starting with "Configure the JDBC Driver".
To install and configure PointBase for use with the sample applications, follow these steps:
1. Download and Install PointBase Server and Client Products
2. Copy Samples PointBase Database Files
3. Add PointBase Type 4 JDBC Driver to Server Application Server’s Classpath
1. Download and Install PointBase Server and Client Products
- Download the PointBase evaluation software from http://www.pointbase.com.
- Install at least the PointBase Server and Client products on your system.
The PointBase Client product includes the PointBase Type 4 JDBC driver.
2. Copy Samples PointBase Database Files
The samples component of Sun ONE Application Server 7 contains a prepopulated PointBase database file for the sample applications. If you do not intend to share your PointBase installation with other users, you must copy the prepopulated database files from the samples area to the PointBase product installation area.
If you intend to share the PointBase installation with other users, then you will learn how to create your own PointBase runtime environment in a subsequent section.
If this is the case, then proceed to the next step, "3. Add PointBase Type 4 JDBC Driver to Server Application Server’s Classpath".
To copy the prepopulated database files to your PointBase installation, copy the files contained in the following directory:
appserver_install_dir/samples/pointbase/databases/*
to:
pointbase_install_dir/databases/
This operation will copy the files named sun-appserv-samples$1.wal and sun-appserv-samples.dbn to the PointBase installation area.
3. Add PointBase Type 4 JDBC Driver to Server Application Server’s Classpath
- Copy the PointBase Type 4 JDBC driver library from the PointBase installation directory to the lib/ directory of your application server instance. For example:
.../domains/domain1/server1/lib/
You can find the JDBC driver under pointbase_install_dir/lib/. The driver is named pbclientnn.jar where nn represents the version of PointBase.
- Restart the application server to make the server aware of the driver.
Alternatively, you can specify the location of the PointBase driver in the Classpath Suffix field in the application server’s configuration:
- Start the administrative console and access the application server instance's JVM Settings -> Path Settings area to make this change.
If a PointBase JDBC driver is already configured in the Classpath Suffix field, replace it with the path to the newly installed driver.
- Once you’ve changed the Classpath Suffix field, apply the changes and restart the application server instance.
Now that you’ve installed and configured PointBase, continue with the database set up steps at the beginning of this document, starting with "Configure the JDBC Driver".