Create a project SampleEJBProject and assign Sun ONE Server as the target server for the project. If you need help on this, refer to Create a Project and Attach Sun ONE Server to the Current Project.
From the JBuilder menu bar, click File -> New -> Enterprise tab of Object Gallery -> EJB Module. Click OK.
In the EJB Module Wizard, enter the module name as HelloUser and select the EJB version. Click OK.
Note: You can select
EJB 1.0 or EJB 2.0 specification for your EJB development. For this exercise,
the module name is HelloUser and the version is EJB 2.0 compliant.
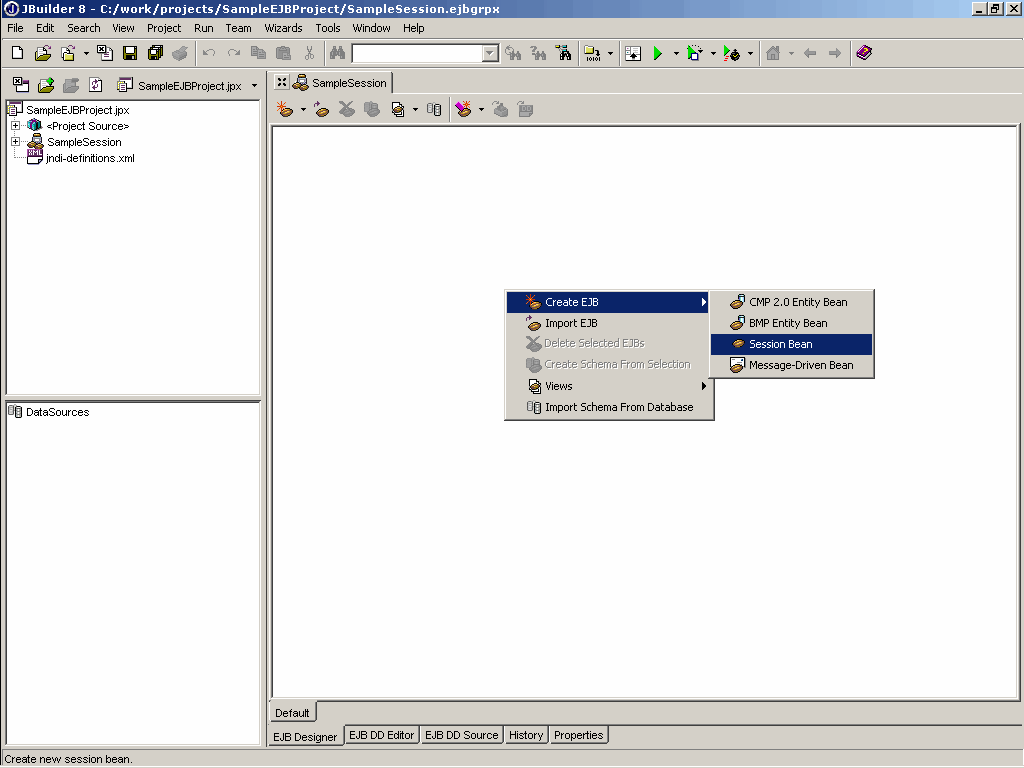
Create a session bean
Right-click on the Editor pane to create EJBs. Click Create EJB. Click Session Bean.
See Figure 11 for details.
Figure 11: JBuilder creating a session bean visually
Note: A session bean
is created and is displayed. You can change the name of the session bean
in the Bean Properties window. Click and the session bean with the specified
name is created. For this exercise, the name of the session bean is HelloBean.
To add a method in the session bean, right-click on HelloBean. Click Add. Click Method. See Figure 12 for details.
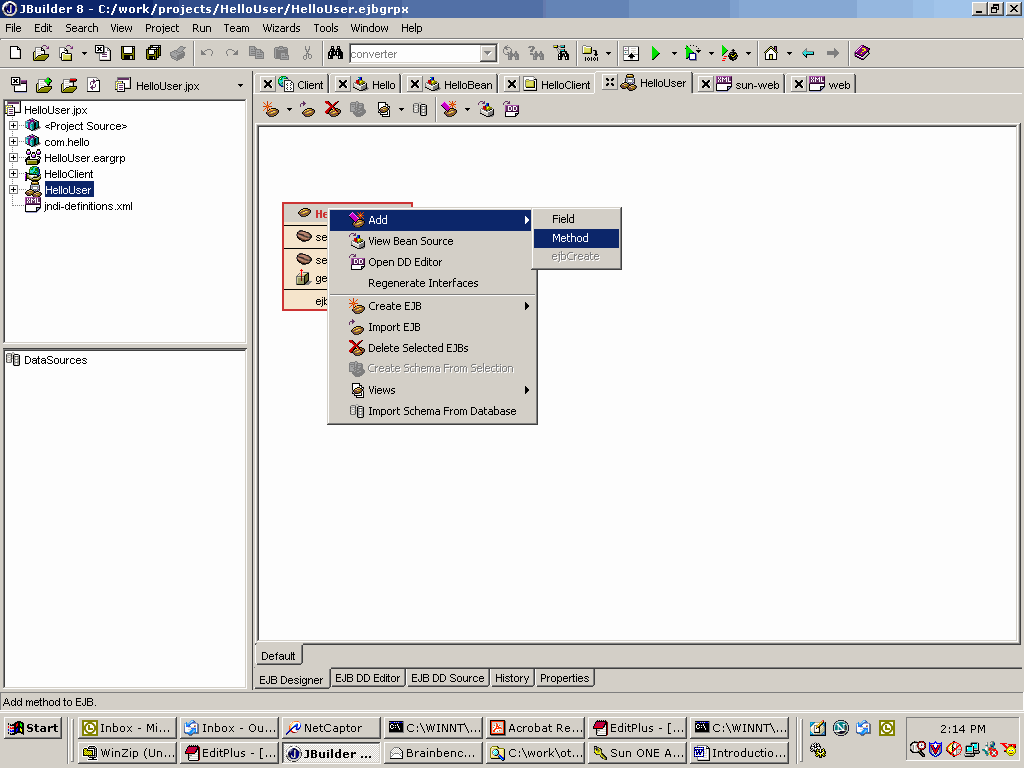
Figure 12: JBuilder adding a business method to an EJB.
The method name is getMessage(java.lang.String name), return type as string and interfaces as remote.
Now double-click on HelloBean.java,
which automatically brings source code for HelloBean.java in editor
pane. Change getMessage(java.lang.String name) method as follows.
public java.lang.String getMessage(java.lang.String name) {
	return "Hello "+name;
}
To run the session bean, first make project. To get help on how to make the project, refer to Make the Project.
Note: After make,
Sun ONE Application Server 7 container specific files and deployment descriptors
are created in JBuilder. Expand HelloBean.java to view container-generated
files and double-click HelloUser.jar to view deployment descriptors
in the structure pane. See Figure 13 for details.
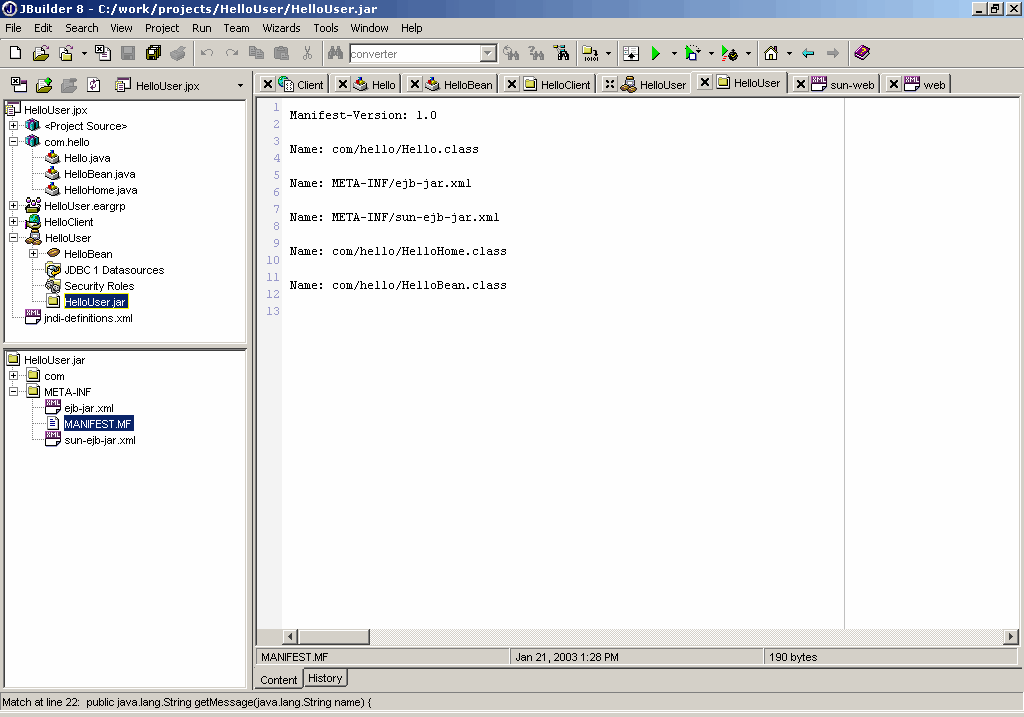
Figure 13: JBuilder has created a ready-to-deploy JAR file for Sun One Application Server 7 with required container generated files
JBuilder includes the Deployment Descriptor Editor that the user can use to change deployment information (such as transaction policies and security roles in an EJB deployment Descriptor files).
Viewing deployment descriptor of an enterprise bean
To view information about an enterprise bean in the Deployment Descriptor editor,
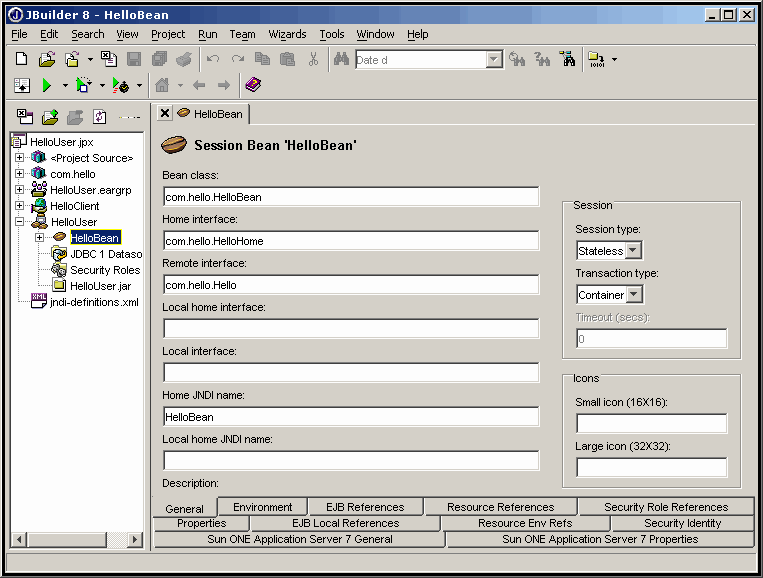
Figure 14: The Deployment Descriptor editor with General tab selected.
The Deployment Descriptor editor has many tabs. The user can click on any of these tabs at the bottom of the Deployment Descriptor editor to view information. Use the editor to make any changes to the deployment information for the bean. The user can view additional information about a deployment descriptor by opening a bean node in the project pane. By double-clicking these nodes, the user can see additional panels. For example, double-clicking the Container Transactions node for a bean displays a Container Transactions panel in the Deployment Descriptor editor. The JDBC DataSources and Security Roles nodes can also be expanded and opened, if they contain data. The subnodes that appear can be used to display more information. To view the source code of each descriptor, double-click the EJB module node in the project pane, and then click EJB DD Source tab at the bottom of Deployment Descriptor editor. For each deployment descriptor in an EJB module, a tab appears with the name of the file on the tab. Select the tab of the file you want to view. While viewing the source code of a deployment descriptor, you can click on elements in the structure panel to move a highlight bar to the corresponding element in the source code. You can edit the source code directly.
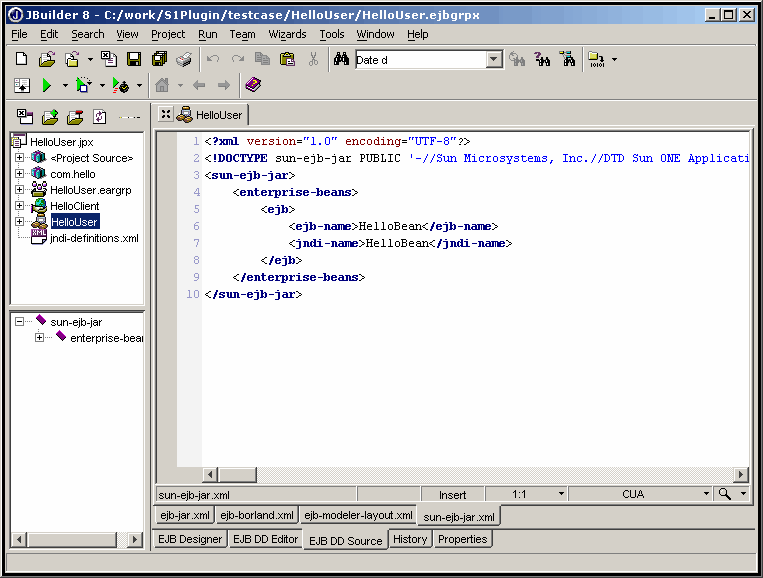
Figure 15: The Deployment Descriptor source for HelloUser EJB Module.
For adding parameters specific only to Sun ONE Server, the user can see two tabs as Sun ONE Application Server 7 General and Sun ONE Application Server 7 Properties. To edit the Pool and Cache properties for the Sun ONE Application Server, click on the Sun ONE Application Server 7 General tab. You will see a screen where you can modify the deployment descriptor specific details. See Figure 16 for details.
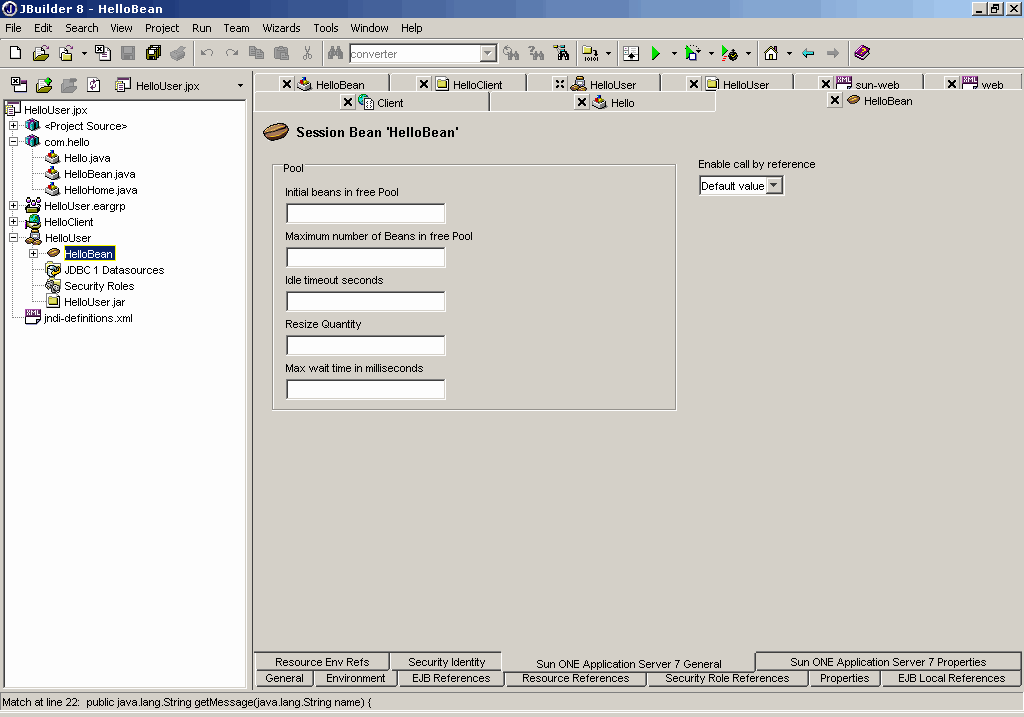
Figure 16: The screen where values of Sun ONE Application Server 7 General deployment descriptor tags can be modified.
For editing the ior-security-config properties or properties specific for a particular type of bean click on the Sun ONE Application Server 7 Properties tab. You will see a screen where you can modify the deployment descriptor specific details. See Fig 17 for details.
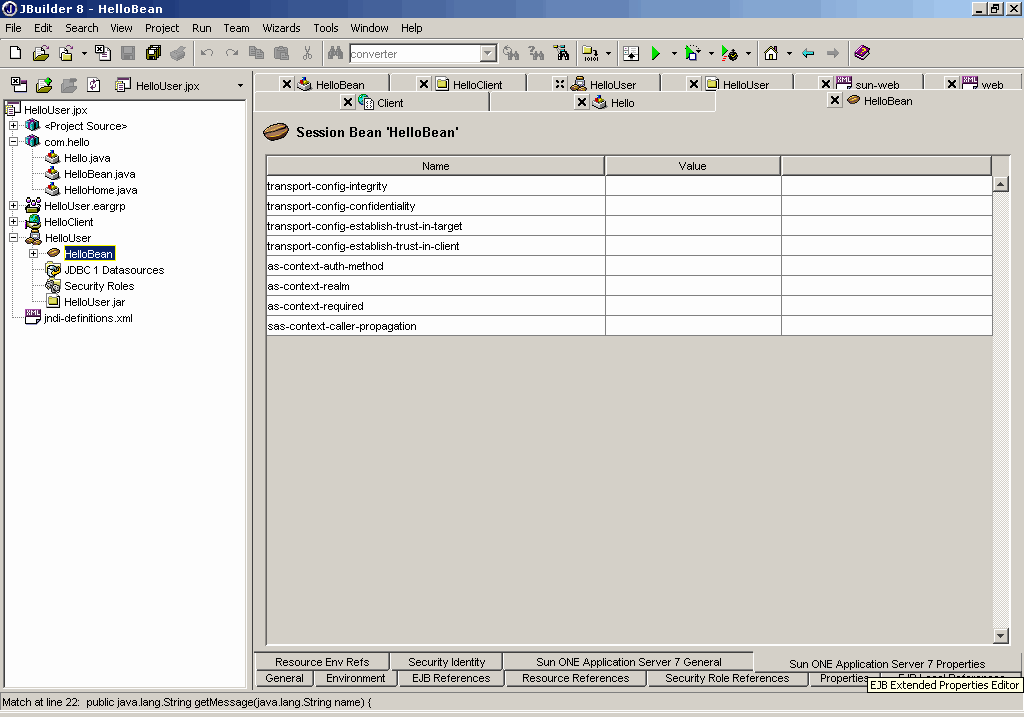
Figure 17: The screen where values of the Sun ONE Application Server 7 properties for deployment descriptor tags can be modified.
To test the session bean, you can create a web test client using JBuilder.
From the JBuilder menu bar, click File -> New -> Web ->Web Application. Click OK. For more on how create a web application refer to Create a Web Application.
Note: For this exercise,
enter the name of the web application as HelloClient and the name
of JSP as Client.jsp.
Add the logic in the JSP to lookup the bean
<%@ page import="com.hello.*"%>
<%@ page import="javax.ejb.*"%>
<%@ page import="java.math.*"%>
<%@ page import="javax.naming.*"%>
<%@ page import="javax.rmi.PortableRemoteObject"%>
<%@ page import="java.rmi.RemoteException"%>

<%!
	private Hello hello = null;

	public void jspInit() {
		try {
		InitialContext ic = new InitialContext();
		Object objRef = ic.lookup("java:comp/env/ejb/HelloBean");
		HelloHome home = (HelloHome)PortableRemoteObject.narrow(objRef, HelloHome.class);
		hello = home.create();
	} catch (RemoteException ex) {
		System.out.println("Couldn't create hello bean."+ ex.getMessage());
	} catch (CreateException ex) {
		System.out.println("Couldn't create hello bean."+ ex.getMessage());
	} catch (NamingException ex) {
		System.out.println("Unable to lookup home: "+ "HelloBean "+ ex.getMessage());
		}
	}

	public void jspDestroy() {
		hello = null;
	}
%>
<html>
<head>
<title>hello</title>
</head>

<body bgcolor="white">
<h1><b><center>Hello Client</center></b></h1>
<hr>
<p>Enter your Name:</p>
<form method="get">
<input type="text" name="name" size="25">
<br>
<p>
<input type="submit" value="Submit">
</form>

<%
	String name = request.getParameter("name");
	if(name !=null && name.equals(""))
{
%>
	<p>
	<%= hello.getMessage(name) %>
<%
}
%>
</body>
</html>
Specify EJB References through
the web editor. Go to the Deployment Descriptors node in the web application
and select the web.xml. An editor is displayed where in the user can specify
various parameters for web application. Select the EJB references panel in
the lower left pane of JBuilder and do an Add to specify the EJB
References used in web application. See Figure 18 for details.
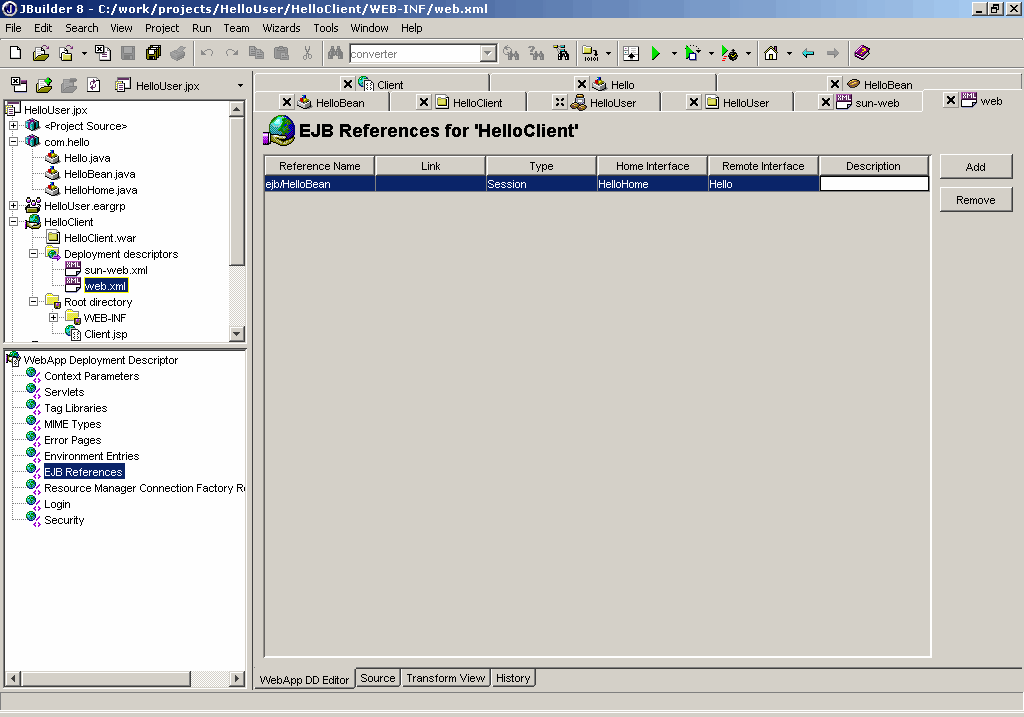
Figure 18: Web App DD Editor showing the EJBs referred in the web application.
Go to the sun-web.xml tab.
the user can see the default sun-web.xml source. He needs to add the
following code manually in the sun-web.xml.
<sun-web-app>
<ejb-ref>
<ejb-ref-name>ejb/HelloBean</ejb-ref-name>
<jndi-name>HelloBean</jndi-name>
</ejb-ref>
</sun-web-app>
Finally the sun-web.xml would look as shown in the Figure 19.
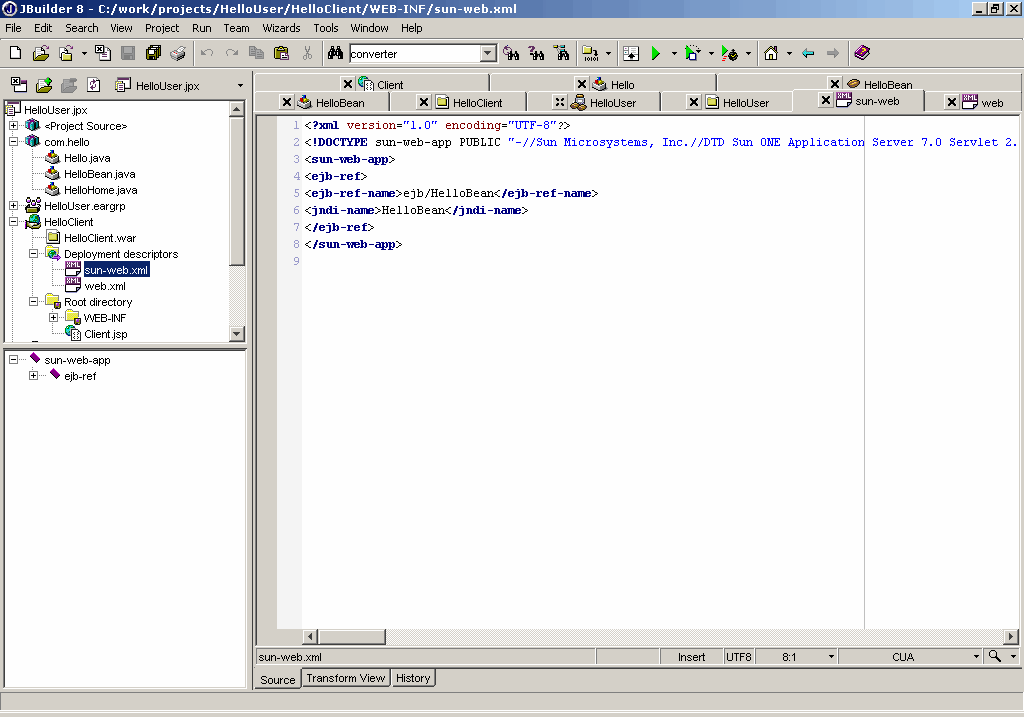
Figure 19: sun-web.xml DD Source showing the EJBs referred in the Web application.
Before doing a make on Web application click on HelloClient, right-click and select Properties.
To make the web application, press Ctrl+Shift+F9 or click the Make icon from the JBuilder toolbar. JBuilder may show some warnings because of the use of deprecated methods. To hide the deprecation, click Project -> Project Properties -> Build. Uncheck Show warnings and Show deprecation.
As a result of make, JBuilder automatically
creates the WAR file for the Web archive. The WAR file for this exercise
is HelloClient.war.
From the JBuilder menu bar, click File -> New -> Enterprise tab of Object Gallery -> EAR. Click OK.
It shows all the EJB modules in the current project, check the EJB Module that you want to include in the Ear and click Next. See Figure 20.
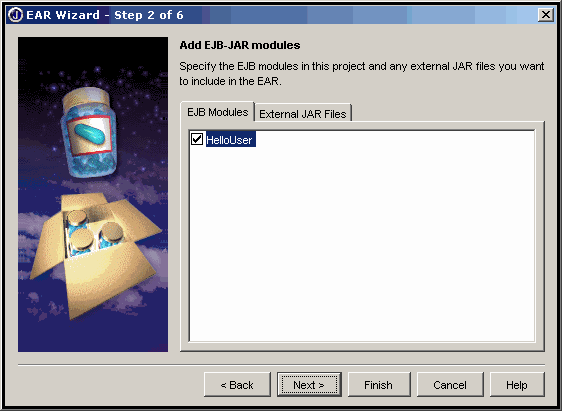
Figure 20: Check the EJB Module to be included in the Ear.
The next screen shows all the web application modules
in the current project. Check the web application module that you want to include
in the EAR and specify the context Name (the URI with which you want to invoke
this web application). You can also include any external .war file in the EAR, if you wish to do so. See Figure 21.
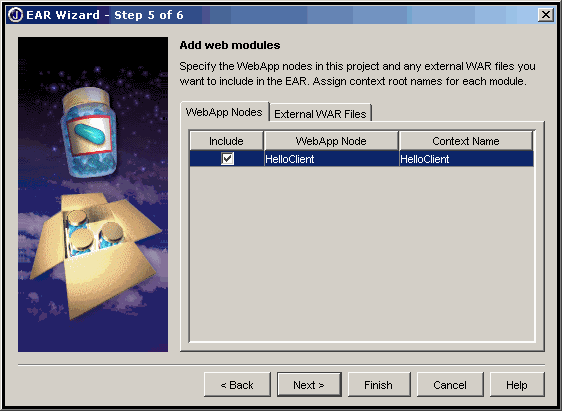
Figure 21: The Web Application Module to be included in the Ear and the context Name (the URI with which the user can invoke this web application)
Click on the Finish button and you will see following screen.
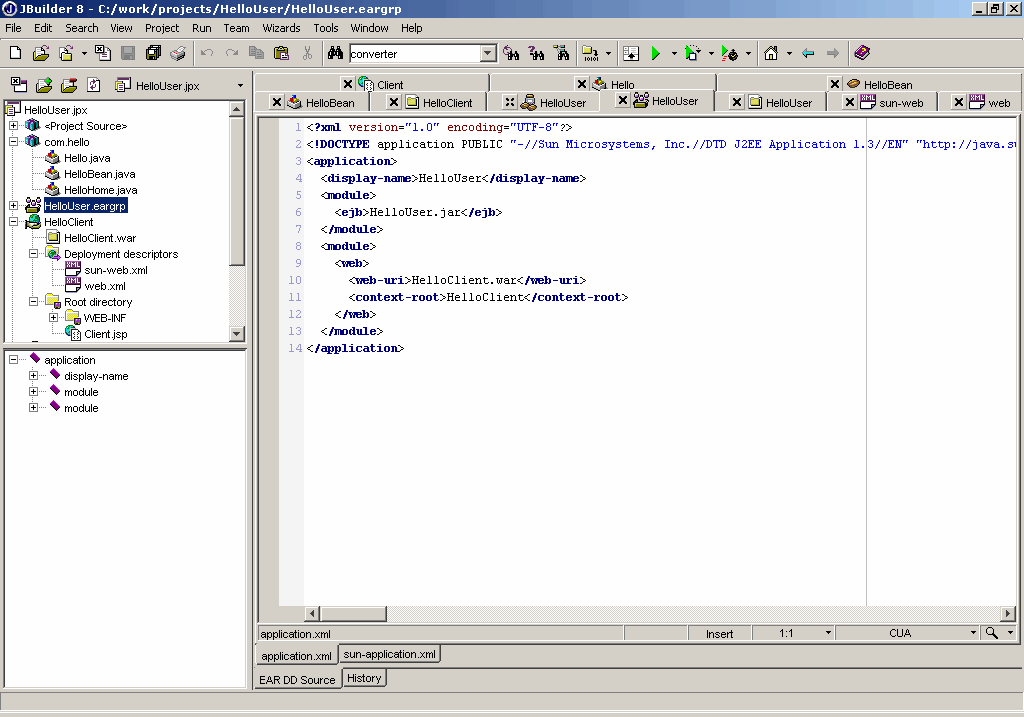
Figure 22: Screen after the user clicks Finish while making an EAR
Note: If the user wants to include a sun-application.xml
in the EAR there is a sun-application.xml tab next to application.xml in the
right hand pane. The user needs to manually edit it, as it contains the default
values.
The EAR thus created is a deployable EAR file. To run an enterprise application we need to make an EAR first.
Run the test client
To run the test client, right click on the EAR File Node and select the Run Using "Client"
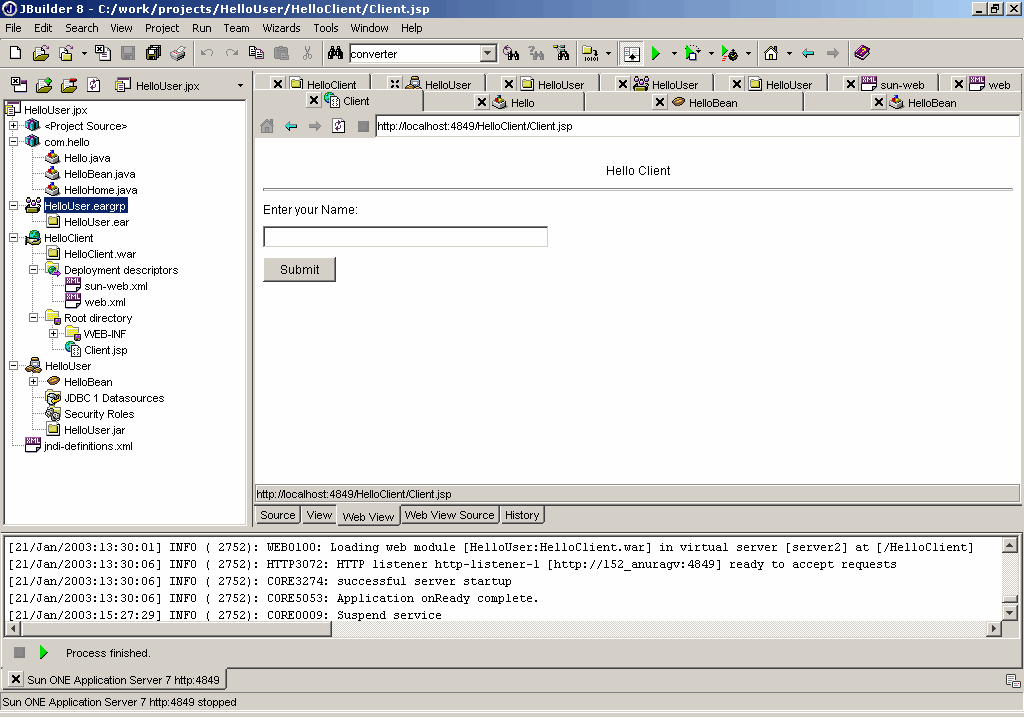
Figure 23: Running the EAR application using the Client.jsp
Enter any name, say John, in the text box and Submit. The application returns "Hello John".
Create a project, assign Sun ONE Application Server 7 as the target application server for the project, and create an EJB module. To get help on how to create a project, refer to Create a Project. To get help on how to assign Sun ONE Server to current project, refer to Attach Sun ONE Server to the Current Project. To get help on how to create an EJB module, refer to Create an EJB Module.
Note: For this exercise,
the name of the project is EmpCMPBean and name of the EJB module isSampleEJB and the package is empcmpbean.>
Right-click on the Editor pane. Click Import Schema from Database. This brings up the Database Schema Provider window. Enter the Database Driver, URL, Username, Password, and JNDI name.
Note: For this exercise,
Oracle will be used as database and scott (the default user that comes
with Oracle) will be used as the user and tiger as the password. Enter the following values in the Database Schema Provider window.
oracle.jdbc.driver.OracleDriver
jdbc:oracle:thin:@<hostname>:1521:ORAWIN
scott
tiger
DemoDataSource
See Figure 24 for details.
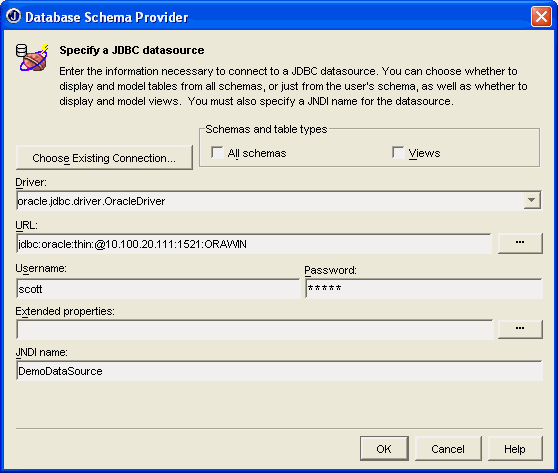
Figure 24: JBuilder Database Schema Provider
Expand DemoDataSource
from the JBuilder structure pane to see the list of tables available in
the database. You can create entity beans by right-clicking a table name
and then click Create CMP 2.0 Entity Bean (or Create BMP Entity
Bean in case you want to create a Bean Managed Persistent bean).
Note: For this exercise, we will create a CMP 2.0 Entity Bean for Emp Table.
Right-click on EMP from
the structure pane and click Create CMP 2.0 Entity Bean. This creates
a Emp Entity Bean in the editor pane; you can also check the corresponding
source code in the editor pane by expanding the package called SampleEJB in project pane.
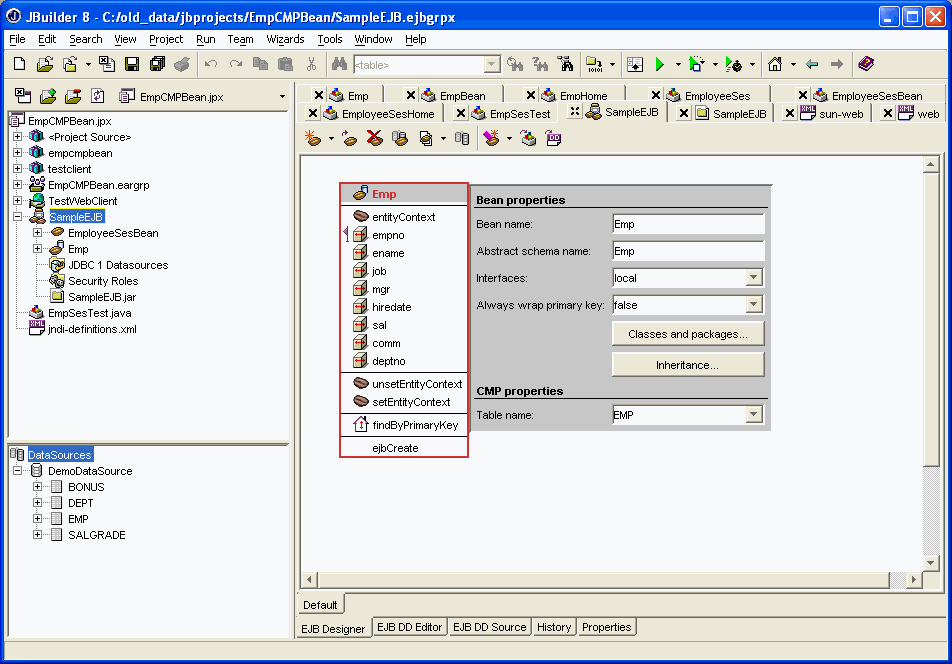
Figure 25: EJBs thus created in JBuilder displaying the fields and methods
The user can change the properties of the fields
individually in case he wants to change the type or persistence of the
field. JBuilder8 creates the CMP Interfaces internally so to check the
source code of the CMP right-click on the Emp EJB and select "View
Bean Source" which takes the user to the EmpBean class.
In order to specify the JNDI Name or other properties click the Emp node under the SampleEJB node.
In addition, specify the Sun ONE Application Server 7 specific CMP Properties in the Sun ONE Application Server 7 properties tab.
Specify the name of the Schema file that is creates. If nothing is specified, it is created as mySchema.dbschema.
Note: In a situation where there are multiple JAR files within an EAR file (for example, jar1 and jar2), any corresponding database schema files for jar1 and jar2 must have unique fully qualified names. In other words, the database schema file names must be unique in a given EAR file.

Figure 26: Sun ONE 7CMP-JDBC tab showing the Sun ONE Application Server 7 specific properties for the Emp CMP
Go back to Designer tab by double clicking
on the SampleEJB node and do a make or Rebuild. SampleEJB.jar is created.
Just click on the SampleEJB.jar and
check its contents. It includes the class files of the CMP and the Deployment
Descriptors for Sun ONE Application Server 7 (i.e., sun-ejb-jar.xml and
sun-cmp-mappings.xml) along with the schema file that is mySchema.dbschema
(which needs to be included in the jar file while deploying the CMP Bean
to the Sun ONE Application Server 7).
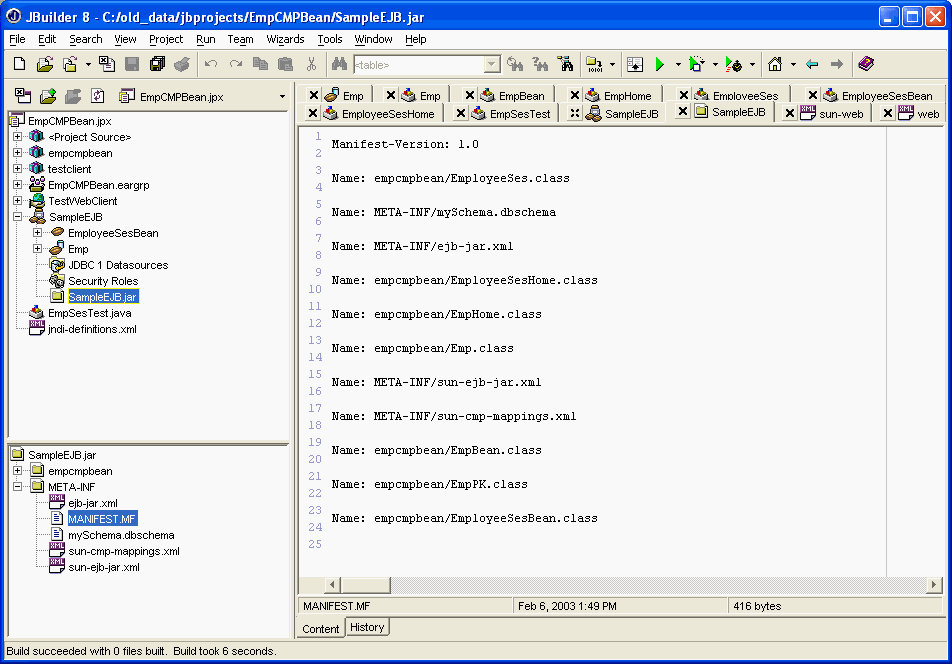
Figure 27: Figure shows the contents of a jar file created for a CMP Bean created for Sun ONE Application Server 7
Please refer to "Create a session bean" in Create an EJB Module for details on how to create a session bean.
Note: For this exercise, the name of the
session bean is EmployeeSesBean, which is created under the
same package name empcmpbean.
Add a method to EmployeeSesBean and provide the following parameters.
getEmpName
String
Short empNo
remote
See Figure 28 for details.

Figure 28: Visual EJBs in JBuilder displaying fields and methods
Double-click EmployeeSesBean.java from the JBuilder project pane and
change the getEmpName(int empNo) method as follows.
public String getEmpName(int empNo) {
String empName = "name not found";
	try{
		javax.naming.Context context = new javax.naming.InitialContext();
		Object object = context.lookup("java:comp/env/ejb/Emp");
		EmpHome empHome = (EmpHome) javax.rmi.PortableRemoteObject.narrow(object, EmpHome.class);
		Emp emp = empHome.findByPrimaryKey(new EmpPK(empNo));
			empName = emp.getEname() ;
		}catch (NamingException ex) {
			ex.printStackTrace();
		}catch (ClassCastException ex) {
			ex.printStackTrace();
		}catch (Exception ex){
			ex.printStackTrace();
		}
		return empName;
	}
Also add the entry of the method
in the EmployeeSes that is
public String getEmpName(int empNo) throws RemoteException;
Since the session bean EmployeeSesBean is
calling the entity bean Employee, you have to store the Emp entity bean
reference in the deployment descriptor. The deployment descriptor tool
of JBuilder can be used to create a reference visually.
Double-click EmployeeSesBean under SampleEJB from JBuilder project pane and click EJB Local references tab at the bottom of the editor pane.
Click Add and enter the name as ejb/Emp in
EJB Local Reference window. Click OK.
Click the checkbox Islink. The other columns Link, Local Home and Local should be populated automatically. To make sure, check the values of the following columns.
Emp
Entity
empcmpbean.EmpHome
empcmpbean.Emp
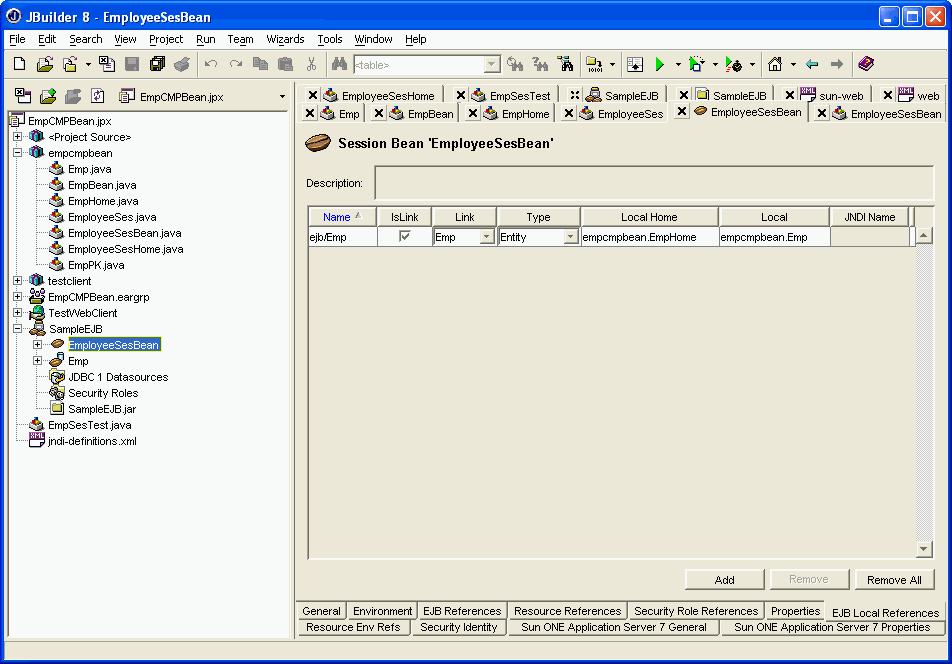
Figure 29: Creating an EJB reference visually using JBuilder DDEditor Tool.
Create a web application that has a servlet as a Test Client as described in the Create a Web Application.
The source code of the client index.jsp is:
<%@ page import="empcmpbean.*" %>
<%@ page import="javax.ejb.*" %>
<%@ page import="javax.naming.*" %>
<%@ page import="javax.rmi.PortableRemoteObject" %>
<%@ page import="java.rmi.RemoteException" %>
<%!
	private EmployeeSes emp = null;

	public void jspInit() {
		try {
			javax.naming.Context context = new javax.naming.InitialContext();
			Object object = context.lookup("java:comp/env/ejb/EmployeeSesBean");
			EmployeeSesHome empHome = (EmployeeSesHome) javax.rmi.PortableRemoteObject.narrow(object, EmployeeSesHome.class);
			emp = empHome.create();
		} catch (RemoteException ex) {
			System.out.println("Couldn't create employee session bean."+ ex.getMessage());
		} catch (CreateException ex) {
			System.out.println("Couldn't create employee session bean."+ ex.getMessage());
		} catch (NamingException ex) {
			System.out.println("Unable to lookup home: "+ "EmployeeSesBean "+ ex.getMessage());
		}
	}

	public void jspDestroy() {
		emp = null;
	}
%>
<html>
<h1>
Sample Entity Bean
</h1>
Enter the empno of the employer<br>
<form method="get">
<INPUT TYPE="text" NAME="empno"><br>
<p>
<INPUT TYPE="submit">
<input type="reset" value="Reset">
</form>
<%
	String inputEmpno = request.getParameter("empno");
	if ( inputEmpno != null && inputEmpno.length() > 0 ) {
	int empno=Integer.parseInt(request.getParameter("empno"));
%>
	<p>
	Empname of the <%=empno %> is: <%= emp.getEmpName(empno) %> .
<%
	}
%>
</body>
</html>
Add the entries for the ejb references
in the web.xml using DD Editor and manually edit the sun-web.xml to include
<sun-web-app>
<ejb-ref>
<ejb-ref-name>ejb/EmployeeSesBean</ejb-ref-name>
<jndi-name>employee</jndi-name>
</ejb-ref>
</sun-web-app>
Note: The JNDI Name specified in
the sun-web.xml should be same as the JNDI Name specified in the General tab of the EmployeeSesBean.
Create a .war file by selecting
the web application node, right click and selecting make or Rebuild.
Create an EAR file that includes the SampleEJB Module and the Web Application that includes the Test Client Servlet. Make the ear and right click the ear and Select the "Run using index"
Note: Before running the application the user needs to create the Connection pool, JDBC Resources and Persistence Manager on the server instance on which the user needs to run the application by using the asadmin utility or the Browser based admin UI of the Sun ONE Application Server 7.
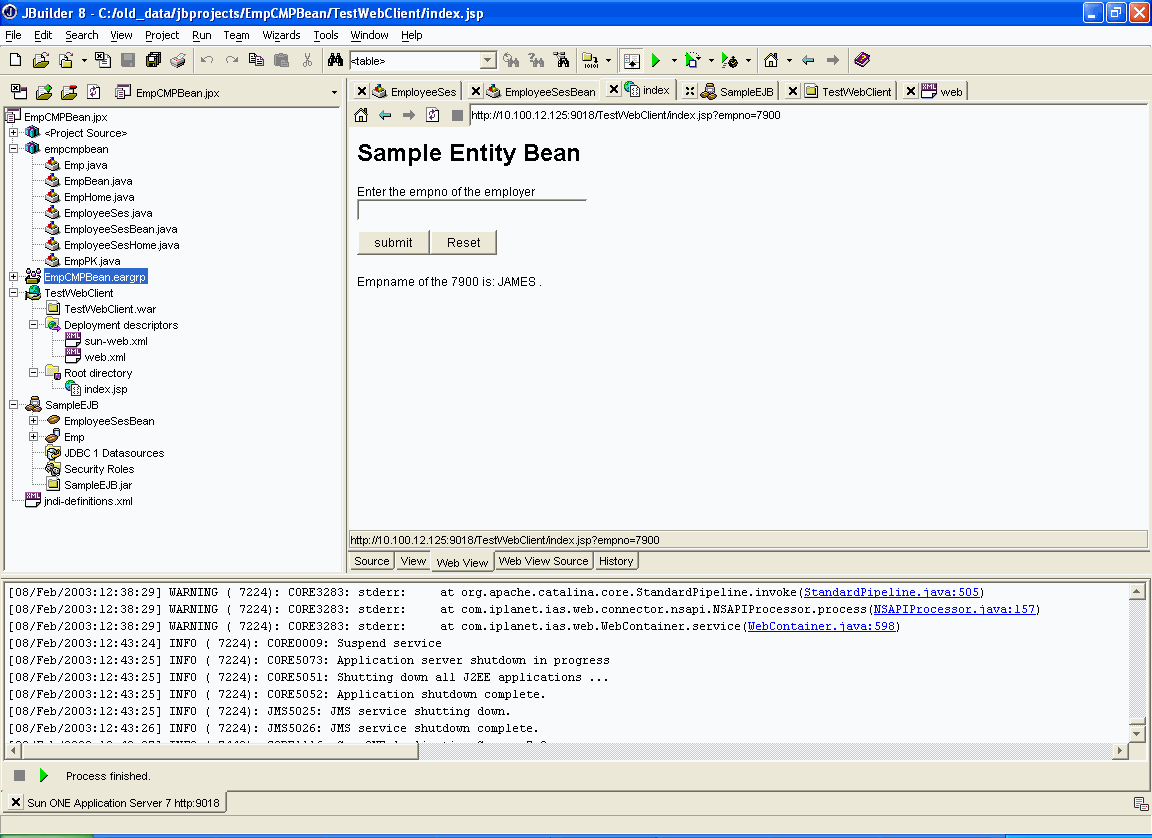
Figure 30: The screen takes as an input the empno and displays the name of Employee if the empno specified exists in the database when the user runs the Sample CMP application.
Create a project, assign Sun ONE Application Server 7 as the target application server for the project, and create an EJB module. To get help on how to create a project, refer to Create a Project. To get help on how to assign Sun ONE Server to current project, refer to Attach Sun ONE Server to the Current Project. To get help on how to create an EJB module, refer to Create an EJB Module.
Note: For this exercise,
the name of the project is SampleMDBean and name of the EJB module is
SampleMDBand Bean Name is SimpleMeassageBean.
Right-click on the Editor pane to create EJBs. Click Create EJB. Click Message-Driven Bean.
A message driven bean is created and is displayed. You can change the name of the session bean in the Bean Properties window. Click and the session bean with the specified name is created.
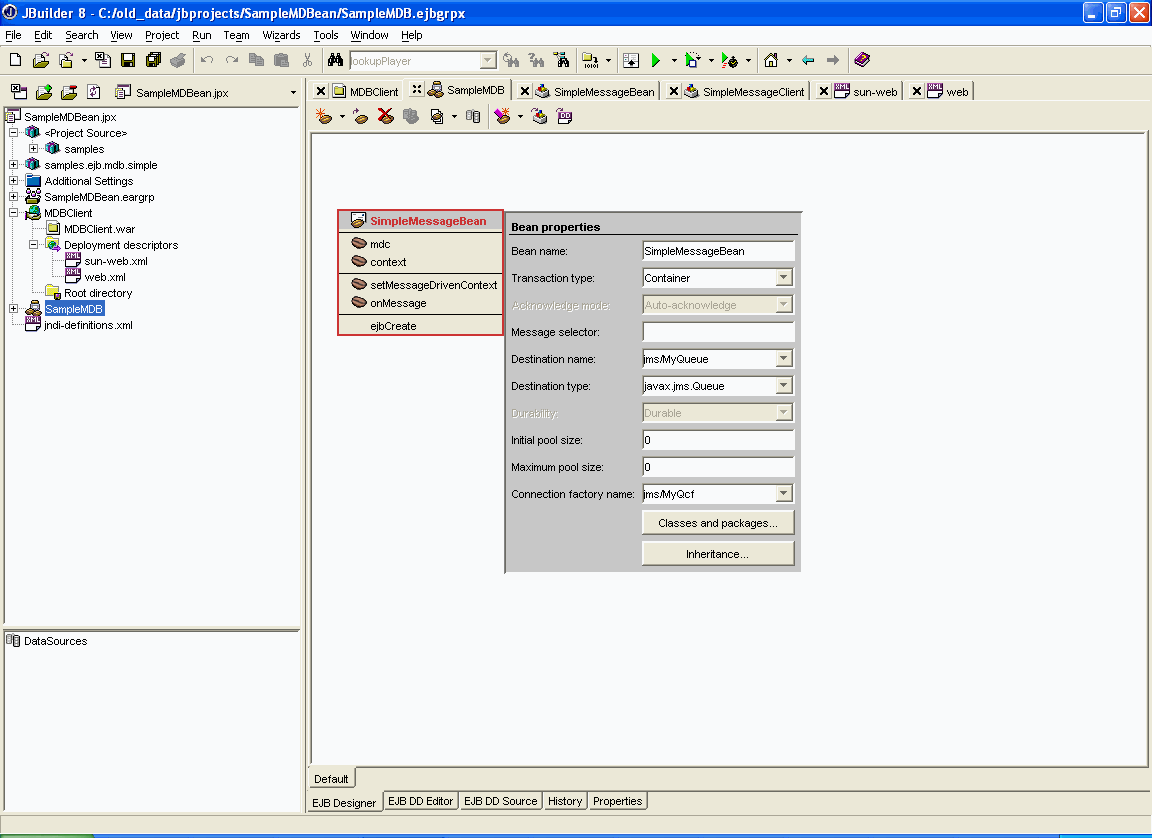
Figure 31: MDB created in JBuilder displaying the various properties that can be specified for MDB
The user can specify the properties like Destination Name (JNDI Name of the Message Driven Bean), Connection Factory Name in the Bean properties Screen. For the other properties the user can click on the SimpleMeassageBean node and specify properties like EJB References, Resource References and Sun ONE specific properties in the various Tabs.
To specify the Business logic click on
"View Bean Source" and edit the SimpleMessageBean file
and write the code in the onMessage() method.
/**
 * When the queue receives a message, the EJB container invokes the <code>onMessage</code>
 * method of the message-driven bean. In the <code>SimpleMessageBean</code> class, the
 * <code>onMessage</code> method casts the incoming message to a TextMessage and displays the text.
 * @param inMessage incoming message.
 */
 public void onMessage(Message inMessage) {
	 TextMessage msg = null;

	 try {
		if (inMessage instanceof TextMessage) {
			msg = (TextMessage) inMessage;
			System.out.println("MESSAGE BEAN: Message received: "
			+ msg.getText());
		} else {
			System.out.println("Message of wrong type: "
			+ inMessage.getClass().getName());
		}
	 } catch (JMSException e) {
		e.printStackTrace();
	 } catch (Throwable te) {
		te.printStackTrace();
	 }
 } // onMessage
Click on the SampleMDB node
and do a make or Rebuild on the EJB to build the Bean. This creates the SampleMDB.jar.

Figure 32: Figure displays the contents of the SampleMDB.jar
Create a web application that has a servlet as a Test Client in the way as described in Create a Web Application.
The source code of the client servlet for the sample is:
package samples.ejb.mdb.simple.client;
import javax.servlet.*;
import javax.servlet.http.*;
import java.io.*;
import java.util.*;
import javax.jms.*;
import javax.naming.*;

public class SimpleMessageClient extends HttpServlet {
	private static final String CONTENT_TYPE = "text/html";
	//Initialize global variables
	public void init() throws ServletException {
	}
	//Process the HTTP Get request
	public void doGet(HttpServletRequest request, HttpServletResponse response)
throws ServletException, IOException {
	response.setContentType(CONTENT_TYPE);
	PrintWriter out = response.getWriter();
	out.println("<html>");
	out.println("<head><title>SimpleMessageClient</title></head>");
	out.println("<body bgcolor=\"#ffffff\">");

	Context jndiContext = null;
		QueueConnectionFactory queueConnectionFactory = null;
		QueueConnection queueConnection = null;
		QueueSession queueSession = null;
		Queue queue = null;
		QueueSender queueSender = null;
		TextMessage message = null;
		final int NUM_MSGS = 3;

		try {
			jndiContext = new InitialContext();
		} catch (NamingException e) {
			System.out.println("Could not create JNDI " + "context: " + e.toString());
		}

		try {
			queueConnectionFactory = (QueueConnectionFactory)
				jndiContext.lookup
				("java:comp/env/jms/MyQcf");
			queue = (Queue) jndiContext.lookup("java:comp/env/jms/MyQueue");
		} catch (NamingException e) {
			out.println("JNDI lookup failed: " + e.toString());
		}

		try {
			queueConnection = queueConnectionFactory.createQueueConnection();
			queueSession = queueConnection.createQueueSession(false, Session.AUTO_ACKNOWLEDGE);
			queueSender = queueSession.createSender(queue);
			message = queueSession.createTextMessage();

			for (int i = 0; i < NUM_MSGS; i++) {
				message.setText("This is message " + (i + 1));
				out.println("Sending message: " + message.getText());
				queueSender.send(message);
			}

		} catch (Throwable e) {
			out.println("Exception occurred: " + e.toString());
		} finally {
			if (queueConnection != null) {
				try {
					queueConnection.close();
				} catch (JMSException e) {}
			} // if
		} // finally

		out.println("<p>The servlet has received GET. This is the reply.</p>");
		out.println("</body></html>");
	}
	//Clean up resources
	public void destroy() {
	}
}
Add the entries for the references
in the web.xml using DD Editor and manually edit the sun-web.xml to include the following
Changing web.xml manually and adding the content in the sun-web.xml
Specify the Resource Environment References through the web editor. Go the the Deployment Descriptors node in the web application and select the web.xml. Select Resource Environment References in the lower left pane of JBuilder and do an Add to specify the Resource Environment References used the web application. See Figure 33 for details.
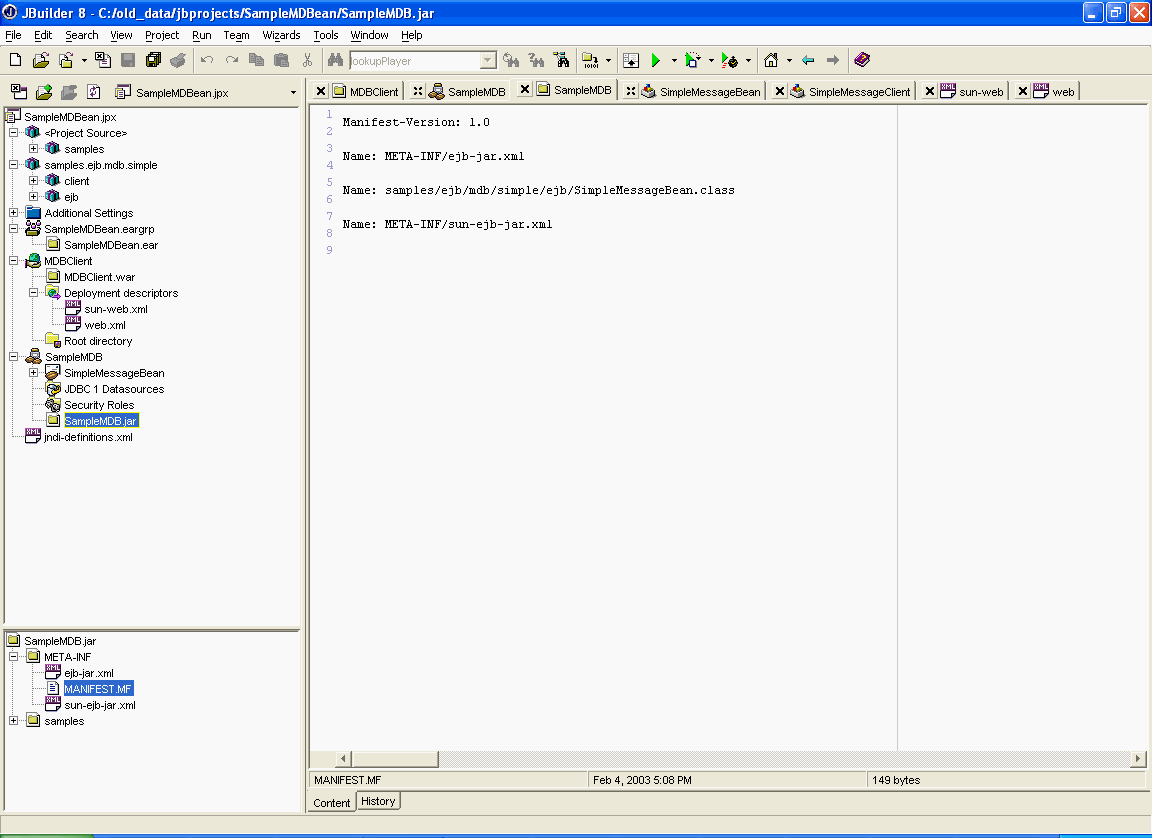
Figure 33: Adding the Resource Environment References in the web.xml
Add the following in the sun-web.xml
<sun-web-app>
	<resource-ref>
		<res-ref-name>jms/MyQcf</res-ref-name>
		<jndi-name>jms/MyQcf</jndi-name>
		<default-resource-principal>
			<name>guest</name>
			 <password>guest</password>
		</default-resource-principal>
	</resource-ref>
	<resource-env-ref>
		<resource-env-ref-name>jms/MyQueue</resource-env-ref-name>
		<jndi-name>jms/MyQueue</jndi-name>
	</resource-env-ref>
</sun-web-app>
Create a .war file by selecting
the Web Application node, right click and selecting make or Rebuild.
Create an EAR file that includes the SampleMDB Module and the Web Application that contains the Client Servlet in the EAR refer to Make an Ear for more details. Make the ear and right click the ear to select the "Run using SimpleMessageClient.
Note: Before running the application the user needs to create the Connection Factories and the Destination Resources in the Sun ONE Application Server.
The user can see the following output on the servlet screen:
Sending message: This is message 1
Sending message: This is message 2
Sending message: This is message 3
The message bean receives the messages and are
printed in the log file (server.log) of the server instance on which the application is run is as follows:
MESSAGE BEAN: Message received: This is message 1
MESSAGE BEAN: Message received: This is message 2
MESSAGE BEAN: Message received: This is message 3