Chapter 4 Monitoring and Controlling Jobs and Queues
After you submit jobs, you need to monitor and control them. This chapter provides background information about monitoring, and controlling jobs and queues, as well as instructions for how to do these tasks. The chapter also includes information about job checkpointing.
This chapter includes instructions for the following tasks:
Monitoring and Controlling Jobs
You can monitor and control submitted jobs in three ways:
-
With QMON
-
From the command line with the qstat, qdel, and qmod commands
-
By email
The following sections describe each of these methods.
Monitoring and Controlling Jobs With QMON
You use the QMON Job Control dialog box to control jobs.
To monitor and control your submitted jobs, in the QMON Main Control window click the Job Control button. The Job Control dialog box appears.
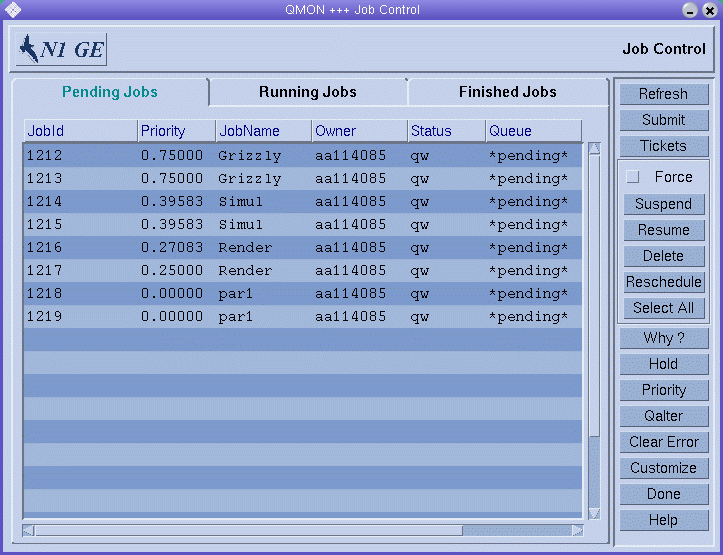
The Job Control dialog box has three tabs, a tab for Running Jobs, a tab for Pending Jobs that are waiting to be dispatched to an appropriate resource, and a tab for recently Finished Jobs.
The Submit button provides a link to the Submit Job dialog box.
The Job Control dialog box enables you to monitor all running, pending, and finished jobs that are known to the system. You can also use this dialog box to manage jobs. You can change a job's priority. You can also suspend, resume, and cancel jobs.
In its default format, the Job Control dialog box displays the following columns for each running and pending job:
-
JobId
-
Priority
-
JobName
-
Owner
-
Status
-
Queue
You can change the default display by customizing the format. See Customizing the Job Control Display for details.
Refreshing the Job Control Display
To keep the displayed information up-to-date, QMON uses a polling scheme to retrieve the status of the jobs from sge_qmaster. Click Refresh to force an update of the Job Control display.
Selecting Jobs
You can select jobs with the following mouse and key combinations:
-
To select multiple noncontiguous jobs, hold down the Control key and click two or more jobs.
-
To select a contiguous range of jobs, hold down the Shift key, click the first job in the range, and then click the last job in the range.
-
To toggle between selecting a job and clearing the selection, click the job while holding down the Control key.
You can also use a filter to select the jobs that you want to display. See Filtering the Job List for details.
Managing Jobs
You can use the buttons at the right of the dialog box to manage selected jobs in the following ways:
-
Suspend
-
Resume (unsuspend)
-
Delete
-
Hold back
-
Release
-
Reprioritize
-
Reschedule
-
Modify with qalter
Only the job owner or grid engine managers and operators can suspend and resume jobs, delete jobs, hold back jobs, modify job priority, and modify jobs. See Managers, Operators, and Owners. Only running jobs can be suspended or resumed. Only pending jobs can be rescheduled, held back and modified, in priority as well as in other attributes.
Suspension of a job sends the signal SIGSTOP to the process group of the job with the UNIX kill command. SIGSTOP halts the job and no longer consumes CPU time. Resumption of the job sends the signal SIGCONT, thereby unsuspending the job. See the kill(1) man page for your system for more information on signalling processes.
Note –
You can force suspending, resuming, and deleting jobs. In other words, you can register these actions with sge_qmaster without notifying the sge_execd that controls the jobs. Forcing is useful when the corresponding sge_execd is unreachable, for example, due to network problems. Select the Force option for this purpose.
Click Reschedule to reschedule a currently running job.
Putting Jobs on Hold
To put a job on hold, select a pending job and click Hold. The Set Hold dialog box appears.
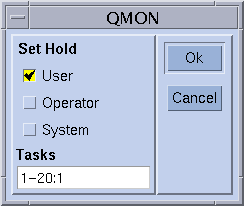
The Set Hold dialog box enables setting and resetting user, operator, and system holds. User holds can be set or reset by the job owner as well as by grid engine managers and operators. Operator holds can be set or reset by managers and operators. System holds can be set or reset by managers only. As long as any hold is assigned to a job, the job is not eligible for running. You can also set or reset holds by using the qalter, qhold, and qrls commands.
Putting Array Job Tasks on Hold
The Tasks field on the Set Hold dialog box applies to Array jobs. Use this button to put a hold on particular subtasks of an array job. Note the format of the text in the Tasks field. The task ID range specified in this field can be a single number, a simple range of the form n-m, or a range with a step size. The task ID range specified by, for example, 2-10:2 results in the task ID indexes 2, 4, 6, 8, and 10. This range represents a total of five identical tasks, with the environment variable SGE_TASK_ID containing one of the five index numbers. For detailed information about job holds, see the qsub(1) man page.
Changing Job Priority
When you click Priority on the Job Control dialog box, the following dialog box appears.
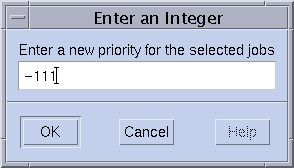
This dialog box enables you to provide the new priority of selected pending or running jobs. The priority ranks a single user's jobs among themselves. Priority tells the scheduler how to choose among a single user's jobs when several jobs are in the system simultaneously.
When you select a pending job and click Qalter, the Submit Job window appears. All the entries of the dialog box are set corresponding to the attributes of the job that were defined when the job was submitted. Entries that cannot be changed are grayed out. The other entries can be edited. The changes are registered with the grid engine system when you click Qalter on the Submit Job dialog box. The Qalter button is a substitute for the Submit button.
Verifying Job Consistency
The Verify flag on the Submit Job dialog box has a special meaning when the flag is used in the Qalter mode. You can check pending jobs for their consistency, and you can investigate why jobs are not yet scheduled. Select the desired consistency-checking mode for the Verify flag, and then click Qalter. The system displays warnings on inconsistencies, depending on the checking mode you select. See Submitting Advanced Jobs With QMON and the -w option on the qalter(1) man page for more information.
Using the Why? Button to Get Information About Pending Jobs
Another method for checking why jobs are still pending is to select a job and click Why? on the Job Control dialog box. Doing so opens the Object Browser dialog box. This dialog box displays a list of reasons that prevented the scheduler from dispatching the job in its most recent pass. An example of a Browser window that displays such a message is shown in the following figure.
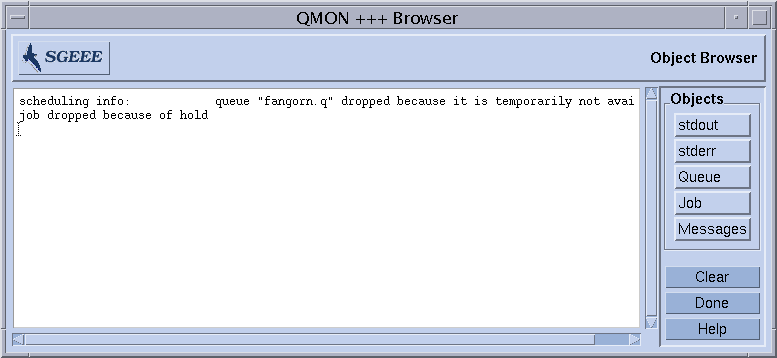
The Why? button delivers meaningful output only if the scheduler configuration parameter schedd_job_info is set to true. See the sched_conf(5) man page. The displayed scheduler information relates to the last scheduling interval. The information might not be accurate by the time you investigate why your job was not scheduled.
Clearing Error States
Click Clear Error to remove an error state from a pending job that failed due to a job-dependent problem. For example, the job might have insufficient permissions to write to the specified job output file.
Error states appear in red text in the pending jobs list. You should remove jobs only after you correct the error condition, for example, using qalter. Such error conditions are automatically reported through email if the job requests to send email when the job is aborted. For example, the job might have been aborted with the qsub -m a command.
Customizing the Job Control Display
To customize the default Job Control display, click Customize. The Job Customize dialog box appears. Click the Select Job Fields tab. A sample Select Job Fields tab is shown in the following figure.
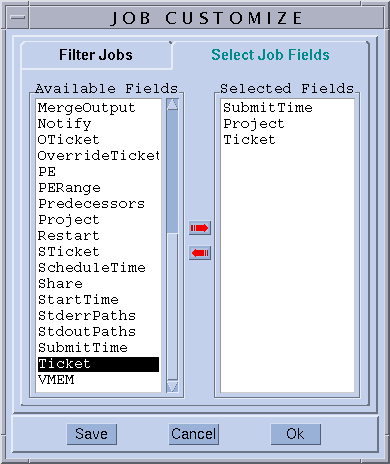
Use the Job Customize dialog box to configure the set of information to display.
With the Job Customize dialog box, you can select more entries of the job object to be displayed. You can also filter the jobs that you are interested in. The example in the preceding figure selects the additional fields Projects, Tickets, and Submit Time.
The following figure shows the enhanced look after customization is applied to the Finished Jobs list.
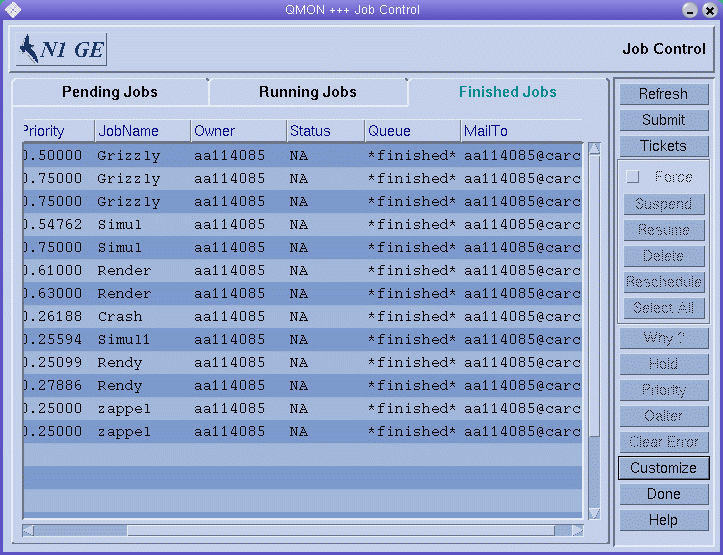
Use the Save button on the Customize Job dialog box to store the customizations in the file .qmon_preferences. This file is located in the user's home directory. By saving your customizations, you redefine the appearance of the Job Control dialog box.
Filtering the Job List
The following example of the filtering facility selects only those jobs owned by aa114085 that are suitable to be run on the architecture solaris64.
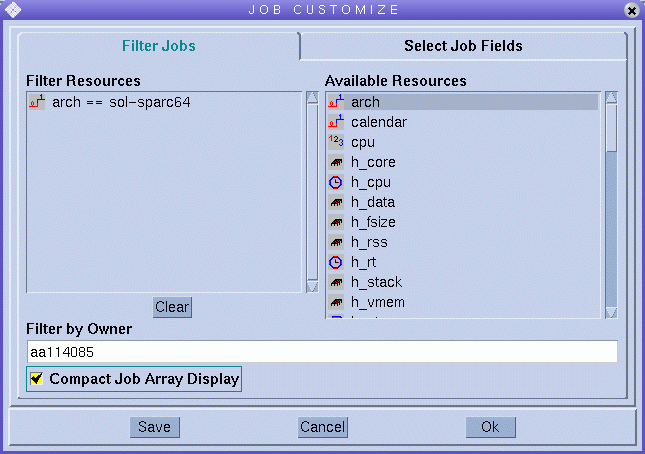
The following figure shows the resulting Running Jobs tab of the Job Control dialog box.
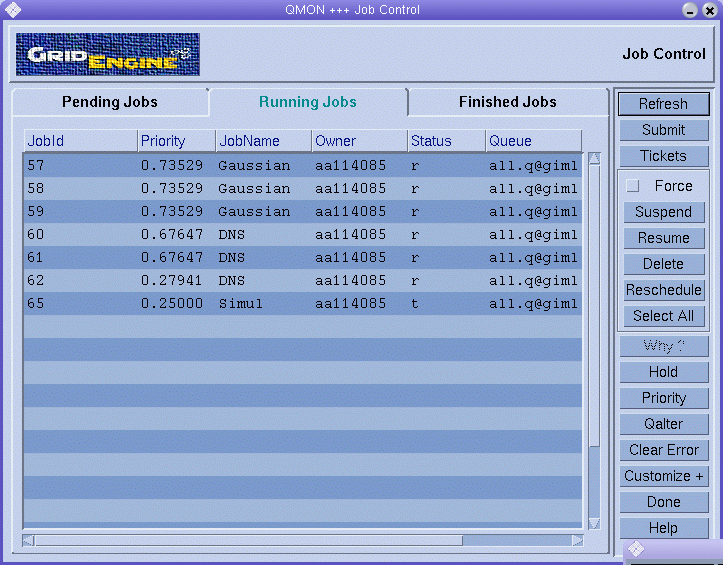
The Job Control dialog box that is shown in the previous figure is also an example of how QMON displays array jobs.
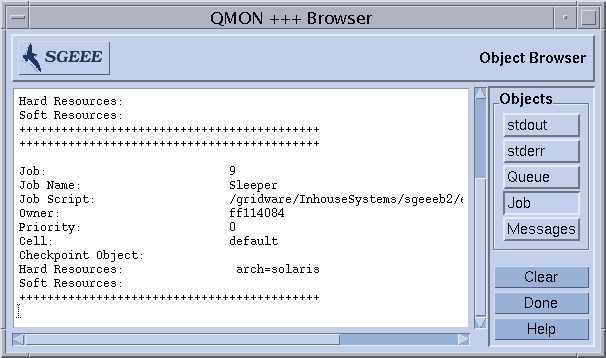
Getting Additional Information About Jobs With the QMON Object Browser
You can use the QMON Object Browser to quickly retrieve additional information about jobs without having to customize the Job Control dialog box, as explained in Monitoring and Controlling Jobs With QMON.
You can open the Object Browser to display information about jobs in two ways:
-
Click the Browser button in the QMON Main Control window, and then click Job in the Browser dialog box.
-
Move the pointer over a job in the Job Control dialog box.
The following Browser window shows an example of the job information that is displayed:
Monitoring and Controlling Jobs From the Command Line
This section describes how to use the commands qstat, qdel, and qmod to monitor, delete, and modify jobs from the command line.
Monitoring Jobs With qstat
To monitor jobs, type one of the following commands, guided by information that is detailed in the following sections:
qstat qstat -f qstat -ext |
qstat with no options provides an overview of submitted jobs only. qstat -f includes information about the currently configured queues in addition. qstat -ext contains details such as up-to-date job usage and tickets assigned to a job.
In the first form, a header line indicates the meaning of the columns. The purpose of most of the columns should be self-explanatory. The state column, however, contains single character codes with the following meaning: r for running, s for suspended, q for queued, and w for waiting. See the qstat(1) man page for a detailed explanation of the qstat output format.
The second form is divided into two sections. The first section displays the status of all available queues. The second section, titled PENDING JOBS, shows the status of the sge_qmaster job spool area. The first line of the queue section defines the meaning of the columns with respect to the queues that are listed. The queues are separated by horizontal lines. If jobs run in a queue, the job names appear below the associated queue in the same format as in the qstat command in its first form. The pending jobs in the second output section are also listed as in qstat`s first form.
The columns of the queue description provide the following information:
-
qtype – Queue type. Queue type is either B (batch) or I (interactive).
-
used/free – Count of used and free job slots in the queue.
-
states – State of the queue. See the qstat(1) man page for detailed information about queue states.
The qstat(1) man page contains a more detailed description of the qstat output format.
In the third form, the usage and ticket values assigned to a job are shown in the following columns:
-
cpu/mem/io – Currently accumulated CPU, memory, and I/O usage.
-
tckts/ovrts/otckt/ftckt/stckt – These values are as follows:
tckts – Total number of tickets assigned to the job
ovrts – Override tickets assigned through qalter -ot
otckt – Tickets assigned through the override policy
ftckt – Tickets assigned through the functional policy
stckt – Tickets assigned through the share-based policy
In addition, the deadline initiation time is displayed in the column deadline, if applicable. The share column shows the current resource share that each job has with respect to the usage generated by all jobs in the cluster. See the qstat(1) man page for further details.
Various additional options to the qstat command enhance the functionality. Use the -r option to display the resource requirements of submitted jobs. Furthermore, the output can be restricted to a certain user or to a specific queue. You can use the -l option to specify resource requirements, as described in Defining Resource Requirements, for the qsub command. If resource requirements are used, only those queues, and the jobs that are running in those queues, are displayed that match the resource requirement specified by qstat.
Note –
The qstat command has been enhanced so that the administrator and the user may define files that can contain useful options. See the sge_qstat(5) man page. A cluster-wide sge_qstat file may be placed under $xxQS_NAME_Sxx_ROOT/$xxQS_NAME_Sxx_CELL/common/sge_qstat. The user private file is processed under the location $HOME/.sge_qstat. The home directory request file has the highest precedence, then the cluster global file. You can use the command line to override the flags contained in a file.
Example 4–1 and Example 4–2 show examples of output from the qstat and qstat -f commands.
Example 4–1 Example of qstat -f Output
queuename qtype used/free load_avg arch states dq BIP 0/1 99.99 sun4 au durin.q BIP 2/2 0.36 sun4 231 0 hydra craig r 07/13/96 20:27:15 MASTER 232 0 compile penny r 07/13/96 20:30:40 MASTER dwain.q BIP 3/3 0.36 sun4 230 0 blackhole don r 07/13/96 20:26:10 MASTER 233 0 mac elaine r 07/13/96 20:30:40 MASTER 234 0 golf shannon r 07/13/96 20:31:44 MASTER fq BIP 0/3 0.36 sun4 ################################################################################ - PENDING JOBS - PENDING JOBS - PENDING JOBS - PENDING JOBS - PENDING JOBS - ################################################################################ 236 5 word elaine qw 07/13/96 20:32:07 235 0 andrun penny qw 07/13/96 20:31:43 |
Example 4–2 Example of qstat Output
job-ID   prior   name         user      state   submit/start at     queue      function
231      0       hydra        craig     r       07/13/96            durin.q    MASTER
                                                20:27:15
232      0       compile      penny     r       07/13/96            durin.q    MASTER
                                                20:30:40
230      0       blackhole    don       r       07/13/96            dwain.q    MASTER
                                                20:26:10
233      0       mac          elaine    r       07/13/96            dwain.q    MASTER
                                                20:30:40
234      0       golf         shannon   r       07/13/96            dwain.q    MASTER
                                                20:31:44
236      5       word         elaine    qw      07/13/96
                                                20:32:07
235      0       andrun       penny     qw      07/13/96 20:31:43
|
Controlling Jobs With qdel and qmod
To control jobs from the command line, type one of the following commands with the appropriate arguments.
% qdel arguments % qmod arguments |
Use the qdel command to cancel jobs, regardless of whether the jobs are running or are spooled. Use the qmod command to suspend and resume (unsuspend) jobs already running.
For both commands, you need to know the job identification number, which is displayed in response to a successful qsub command. If you forget the number, you can retrieve it with qstat. See Monitoring Jobs With qstat.
The following list provides several examples of the qdel and qmod commands:
% qdel job-id % qdel -f job-id1, job-id2 % qmod -s job-id % qmod -us -f job-id1, job-id2 % qmod -s job-id.task-id-range |
In order to delete, suspend, or resume a job, you must be the owner of the job or a grid engine manager or operator. See Managers, Operators, and Owners.
You can use the -f (force) option with both commands to register a job status change at sge_qmaster without contacting sge_execd. You might want to use the force option in cases where sge_execd is unreachable, for example, due to network problems. The -f option is intended for use only by the administrator. In the case of qdel, however, users can force deletion of their own jobs if the flag ENABLE_FORCED_QDEL in the cluster configuration qmaster_params entry is set. See the sge_conf(5) man page for more information.
Monitoring Jobs by Email
From the command line, type the following command with appropriate arguments.
% qsub arguments |
The qsub -m command requests email to be sent to the user who submitted a job or to the email addresses specified by the -M flag if certain events occur. See the qsub(1) man page for a description of the flags. An argument to the -m option specifies the events. The following arguments are available:
-
a – Send email when the job is rescheduled or aborted (for example, by using the qdel command).
-
n – Do not send email. n is the default.
Use a string made up of one or more of the letter arguments to specify several of these options with a single -m option. For example, -m be sends email at the beginning and at the end of a job.
You can also use the Submit Job dialog box to configure these mail events. See Submitting Advanced Jobs With QMON.
Monitoring and Controlling Queues
As described in Displaying Queues and Queue Properties, the owners of queues have permission to suspend and resume queues, and to disable and enable queues. Owners might want to suspend or disable queues if certain machines are needed for important work, and those machines are strongly affected by jobs running in the background.
You can control queues in two ways:
-
Using the QMON Queue Control dialog box
-
Using the qmod command
Monitoring and Controlling Queues With QMON
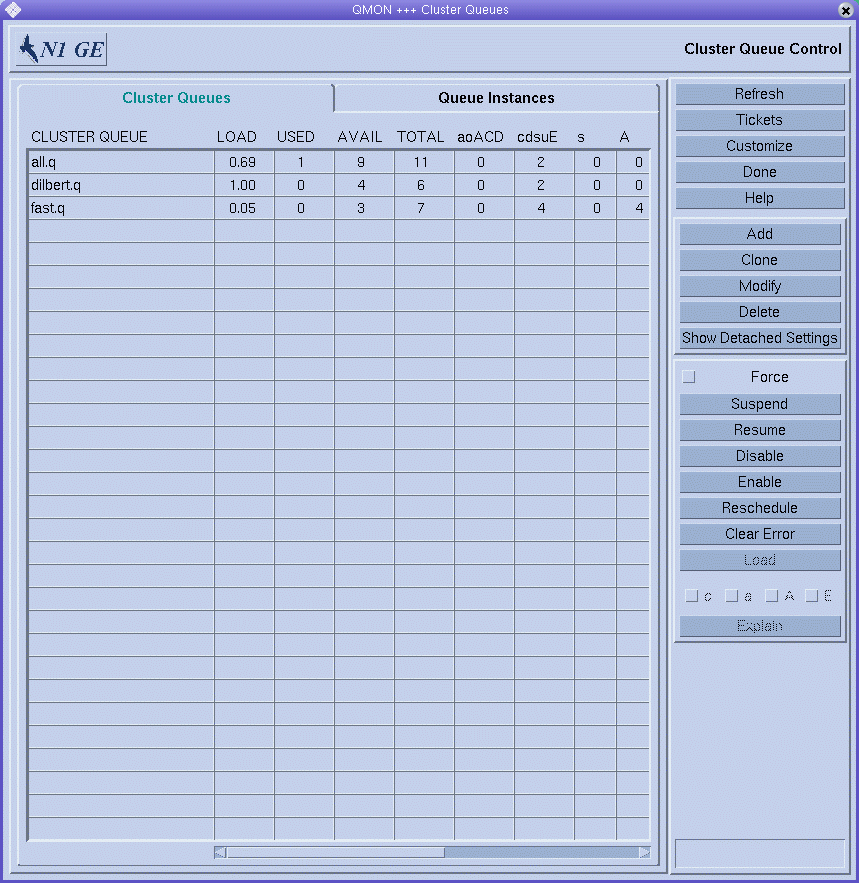
In the QMON Main Control window, click the Queue Control button. The Cluster Queues dialog box appears.
Monitoring and Controlling Cluster Queues
The Cluster Queue tab provides a quick overview of all cluster queues that are defined for the cluster. The Cluster Queue tab also provides the means to suspend and resume cluster queues, to disable and enable cluster queues, as well as to configure them.
Information displayed in the Cluster Queue dialog box is updated periodically. Click Refresh to force an update. Click a cluster queue name to select the queue.
Click Delete, Suspend, Resume, Disable, or Enable to execute the corresponding operation on cluster queues that you select. The suspend/resume and disable/enable operations require notification of the corresponding sge_execd. If notification is not possible, you can force an sge_qmaster internal status change by clicking Force. For example, notification might not be possible because a host is down.
The suspend/resume and disable/enable operations require cluster queue owner permission, grid engine manager permission, or operator permission. See Managers, Operators, and Owners for details.
Suspended cluster queues are closed for further jobs. The jobs already running in suspended queues are also suspended, as described in Monitoring and Controlling Jobs With QMON. The cluster queue and its jobs are unsuspended as soon as the queue is resumed.
Note –
If a job in a suspended cluster queue was suspended explicitly, the job is not resumed when the queue is resumed. The job must be resumed explicitly.
Disabled cluster queues are closed. However, the jobs that are running in those queues are allowed to continue. The disabling of a cluster queue is commonly used to clear a queue. After the cluster queue is enabled, it is eligible to run jobs again. No action on currently running jobs is performed.
Error states are displayed using a red font in the queue list. Click Clear Error to remove an error state from a queue.
Click Reschedule to reschedule all jobs currently running in the selected cluster queues.
To configure cluster queues and queue instances, click Add or Modify on the Cluster Queue dialog box. See Configuring Queues With QMON in Sun N1 Grid Engine 6.1 Administration Guide for details.
Click Done to close the dialog box.
Cluster Queue Status
Each row in the cluster queue table represents one cluster queue. For each cluster queue, the table lists the following information:
-
Cluster Queue – Name of the cluster queue.
-
Load – Average of the normalized load average of all cluster queue hosts. Only hosts with a load value are considered.
-
Used – Number of currently used job slots.
-
Avail – Number of currently available job slots.
-
Total – Total number of job slots.
-
aoACD – Number of queue instances that are in at least one of the following states:
-
a – Load threshold alarm
-
o – Orphaned
-
A – Suspend threshold alarm
-
C – Suspended by calendar
-
D – Disabled by calendar
-
-
cdsuE – Number of queue instances that are in at least one of the following states:
-
c – Configuration ambiguous
-
d – Disabled
-
s – Suspended
-
u – Unknown
-
E – Error
-
-
s – Number of queue instances that are in the suspended state.
-
A – Number of queue instances where one or more suspend thresholds are currently exceeded. No more jobs
-
S – Number of queue instances that are suspended through subordination to another queue.
-
C – Number of queue instances that are automatically suspended by the grid engine system calendar.
-
u – Number of queue instances that are in an unknown state.
-
a – Number of queue instances where one or more load thresholds are currently exceeded.
-
d – Number of queue instances that are in the disabled state.
-
D – Number of queue instances that are automatically disabled by the grid engine system calendar.
-
c – Number of queue instances whose configuration is ambiguous.
-
o – Number of queue instances that are in the orphaned state.
-
E – Number of queue instances that are in the error state.
See the qstat(1) man page for complete information about cluster queues and their states.
Monitoring and Controlling Queue Instances
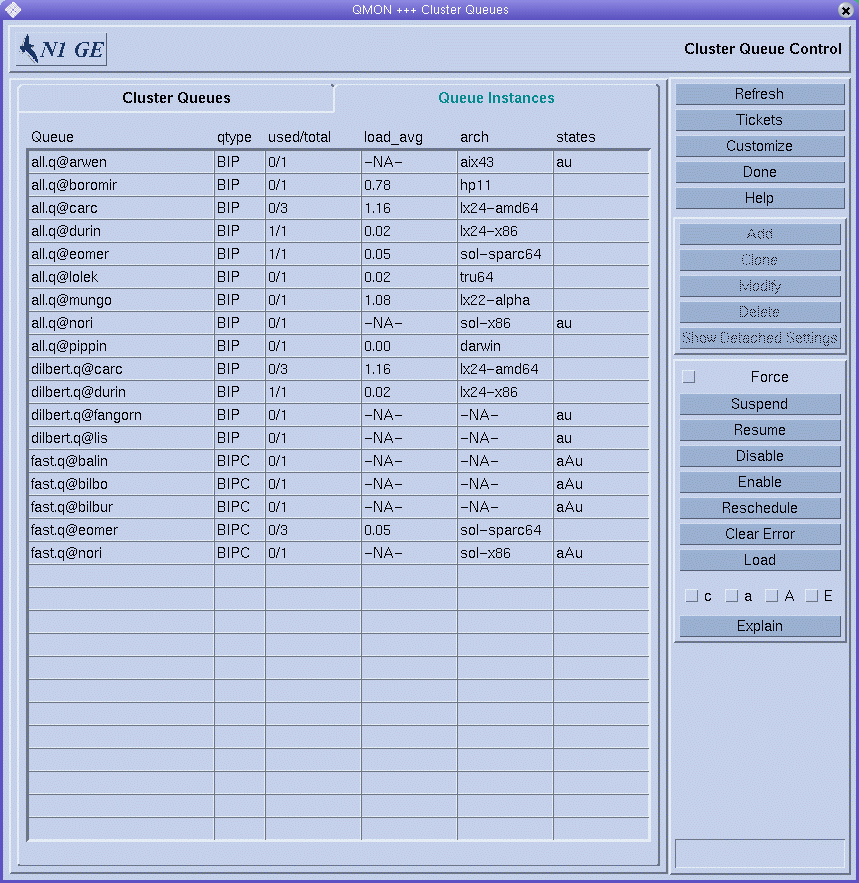
The Queue Instances tab provides a quick overview of all queue instances that are associated with the selected cluster queue. The Queue Instance tab also provides the means to suspend, resume, disable, and enable queue instances.
Click a cluster queue name to select the queue instance.
Click Suspend, Resume, Disable, or Enable to execute the corresponding operation on queue instances that you select. The suspend/resume and disable/enable operations require notification of the corresponding sge_execd. If notification is not possible, for example, because the host is not reachable, you can force an sge_qmaster internal status change by clicking Force.
The suspend/resume and disable/enable operations require queue owner permission, manager permission, or operator permission. See Managers, Operators, and Owners.
Suspended queue instances are closed for further jobs. The jobs already running in suspended queue instances are also suspended, as described in Monitoring and Controlling Jobs With QMON. The queue instance and its jobs are unsuspended as soon as the queue instance is resumed.
Note –
If a job in a suspended queue instance was suspended explicitly, the job is not resumed when the queue instance is resumed. The job must be resumed explicitly.
Disabled queue instances are closed. However, the jobs executing in those queue instances are allowed to continue. The disabling of a queue instance is commonly used to clear a queue instance. After the queue instance is enabled, it is eligible to run jobs again. No action on currently running jobs is performed.
Queue Instance Status
Each row in the queue instances table represents one queue instance. For each queue instance, the table lists the following information:
-
Queue – Name of the queue instance
-
qtype – Type of queue instance, which can be B (batch), I (interactive), or P (parallel)
-
used/total – Number of used job slots and the total number of job slots
-
load_avg – Load average of the queue instance host
-
arch – Architecture of the queue instance host
-
states – States of the queue instance
See Cluster Queue Status for a list of queue states. See the qstat(1) man page for complete information about queue instances and their states.
Displaying Queue Instance Attributes
To retrieve a queue instance's current attribute information, load information, and resource consumption information, select the queue instance, and then click Load. This information also implicitly includes information about the machine that is hosting the queue instance. The window shown in the following figure appears:
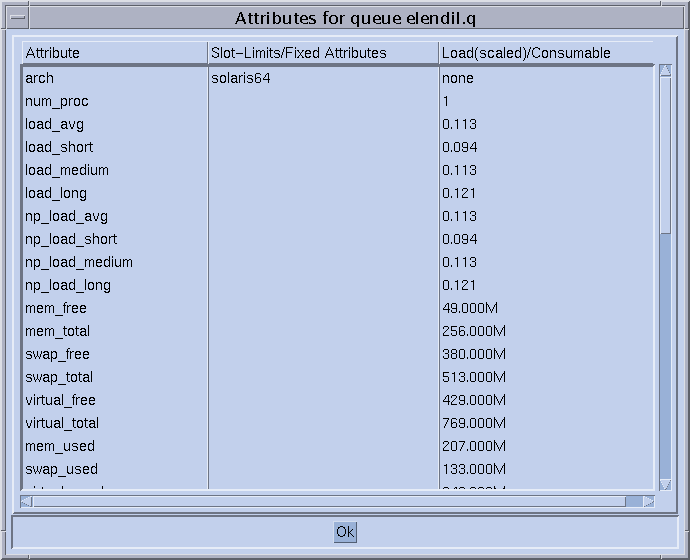
The Attribute column lists all attributes attached to the queue instance, including those attributes that are inherited from the host or the global cluster.
The Slot-Limits/Fixed Attributes column shows values for those attributes that are defined as per queue instance slot limits or as fixed resource attributes.
The Load(scaled)/Consumable column shows information about the reported and scaled load parameters. The column also shows information about the available resource capacities based on the consumable resources facility. See Load Parameters in Sun N1 Grid Engine 6.1 Administration Guide and Consumable Resources in Sun N1 Grid Engine 6.1 Administration Guide.
Load reports and consumable capacities can override each other if a load attribute is configured as a consumable resource. The minimum value of both, which is used in the job-dispatching algorithm, is displayed.
Note –
The displayed load and consumable values currently do not take into account load adjustment corrections, as described in Execution Hosts.
Filtering Cluster Queues and Queue Instances
The Customize button enables you to filter the cluster queues and queue instances you want to display.
The following figure shows a filtered selection of only those queue instances whose current configuration is ambiguous.
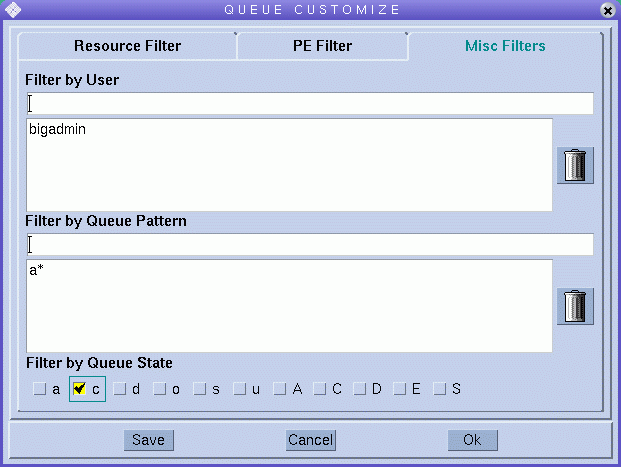
Click Save in the Queue Customize dialog box to store your settings in the file .qmon_preferences in your home directory for standard reactivation on later invocations of QMON.
Controlling Queues With qmod
You can use the qmod command to suspend and resume queues. You can also use qmod to disable and enable queues.
The following commands illustrate how to use qmod:
% qmod -s q-name % qmod -us -f q-name1, q-name2 % qmod -d q-name % qmod -e q-name1, q-name2, q-name3 |
qmod –s suspends a queue. qmod –us –f resumes (unsuspends) two queues. qmod –d disables a queue. qmod –e enables three queues.
The -f option forces registration of the status change in sge_qmaster when the corresponding sge_execd is not reachable, for example, due to network problems.
Suspending and resuming queues as well as disabling and enabling queues requires queue owner permission, manager permission, or operator permission. See Managers, Operators, and Owners.
Note –
You can use qmod commands with crontab or at jobs.
Using Job Checkpointing
This section explores two different kinds of job checkpointing: user-level and kernel-level.
User-Level Checkpointing
Many application programs, especially programs that consume considerable CPU time, use checkpointing and restart mechanisms to increase fault tolerance. Status information and important parts of the processed data are repeatedly written to one or more files at certain stages of the algorithm. If the application is aborted, these restart files can be processed and restarted at a later time. The files reach a consistent state that is comparable to the situation just before the checkpoint. Because the user mostly has to move the restart files to a proper location, this kind of checkpointing is called user-level checkpointing.
Application programs that do not have integrated user-level checkpointing can use a checkpointing library. A checkpointing library can be provided by some hardware vendors or by the public domain. The Condor project of the University of Wisconsin is an example. By relinking an application with such a library, a checkpointing mechanism is installed in the application without requiring source code changes.
Kernel-Level Checkpointing
Some operating systems provide checkpointing support inside the operating system kernel. No preparations in the application programs and no relinking of the application is necessary in this case. Kernel-level checkpointing usually applies to single processes as well as to complete process hierarchies. A hierarchy of interdependent processes can be checkpointed and restarted at any time. Usually both a user command and a C library interface are available to initiate a checkpoint.
The grid engine system supports operating system checkpointing if available. See the release notes for the N1 Grid Engine 6.1 software for information about the currently supported kernel-level checkpointing facilities.
Migrating Checkpointing Jobs
Checkpointing jobs are interruptible at any time because their restart capability ensures that very little work that is already done must be repeated. This ability is used to build migration and dynamic load balancing mechanism in the grid engine system. If requested, checkpointing jobs are stopped on demand. The jobs are migrated to other machines in the grid engine system, thus averaging the load in the cluster dynamically. Checkpointing jobs are stopped and migrated for the following reasons:
-
The executing queue or the job is suspended explicitly by a qmod or a QMON command.
-
The job or the queue where the job runs is suspended automatically because a suspend threshold for the queue is exceeded. The checkpoint occasion specification for the job includes the suspension case. For more information, see Configuring Load and Suspend Thresholds in Sun N1 Grid Engine 6.1 Administration Guide and Submitting, Monitoring, or Deleting a Checkpointing Job From the Command Line.
A migrating job moves back to sge_qmaster. The job is subsequently dispatched to another suitable queue if such a queue is available. In such a case, the qstat output shows R as the status.
Composing a Checkpointing Job Script
Shell scripts for kernel-level checkpointing are the same as regular shell scripts.
Shell scripts for user-level checkpointing jobs differ from regular batch scripts only in their ability to properly handle the restart process. The environment variable RESTARTED is set for checkpointing jobs that are restarted. Use this variable to skip sections of the job script that need to be executed only during the initial invocation.
Example 4–3 shows a sample transparently checkpointing job script.
Example 4–3 Example of a Checkpointing Job Script
#!/bin/sh
#Force /bin/sh in Grid Engine
#$ -S /bin/sh

# Test if restarted/migrated
if [ $RESTARTED = 0 ]; then
     # 0 = not restarted
     # Parts to be executed only during the first
     # start go in here
     set_up_grid
fi

# Start the checkpointing executable
fem
#End of scriptfile
|
The job script restarts from the beginning if a user-level checkpointing job is migrated. The user is responsible for directing the program flow of the shell script to the location where the job was interrupted. Doing so skips those lines in the script that must be executed more than once.
Note –
Kernel-level checkpointing jobs are interruptible at any time. The embracing shell script is restarted exactly from the point where the last checkpoint occurred. Therefore, the RESTARTED environment variable is not relevant for kernel-level checkpointing jobs.
Submitting, Monitoring, or Deleting a Checkpointing Job From the Command Line
Type the following command with the appropriate options:
# qsub options arguments |
The submission of a checkpointing job works in the same way as for regular batch scripts, except for the qsub -ckpt and qsub -c commands. These commands request a checkpointing mechanism. The commands also define the occasions at which checkpoints must be generated for the job.
The -ckpt option takes one argument, which is the name of the checkpointing environment to use. See Configuring Checkpointing Environments in Sun N1 Grid Engine 6.1 Administration Guide.
The -c option is not required. -c also takes one argument. Use the -c option to override the definitions of the when parameter in the checkpointing environment configuration. See the checkpoint(5) man page for details.
The argument to the -c option can be one of the following one-letter selections, or any combination. The argument can also be a time value.
-
n – No checkpoint is performed. n has the highest precedence.
-
s – A checkpoint is generated only if the sge_execd on the jobs host is shut down.
-
m – Generate the checkpoint at the minimum CPU interval defined in the corresponding queue configuration. See the min_cpu_interval parameter in the queue_conf(5) man page.
-
x – A checkpoint is generated if the job is suspended.
-
interval – Generate the checkpoint in the given interval but not more frequently than defined by min_cpu_interval. The time value must be specified as hh:mm:ss. This format specifies two digit hours, minutes, and seconds, separated by colons.
The monitoring of checkpointing jobs differs from monitoring regular jobs. Checkpointing jobs can migrate from time to time. Checkpointing jobs are therefore not bound to a single queue. However, the unique job identification number and the job name stay the same.
The deletion of checkpointing jobs works in the same way as described in Monitoring and Controlling Jobs From the Command Line.
Submitting a Checkpointing Job With QMON
The submission of checkpointing jobs with QMON is identical to submitting regular batch jobs, with the addition of specifying an appropriate checkpointing environment. As explained in Submitting Advanced Jobs With QMON, the Submit Job dialog box provides a field for the checkpointing environment that is associated with a job. Click the button next to that field to opens the following Selection dialog box.
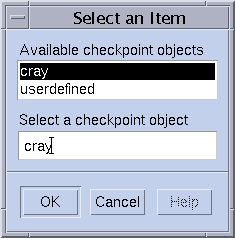
You can select a suitable checkpoint environment from the list of available checkpoint objects. Ask your system administrator for information about the properties of the checkpointing environments that are installed at your site. For more information, refer to Configuring Checkpointing Environments in Sun N1 Grid Engine 6.1 Administration Guide.
File System Requirements for Checkpointing
When a user-level checkpoint or a kernel-level checkpoint that is based on a checkpointing library is written, a complete image of the virtual memory covered by the process or job to be checkpointed must be saved. Sufficient disk space must be available for this purpose. If the checkpointing environment configuration parameter ckpt_dir is set, the checkpoint information is saved to a job private location under ckpt_dir. If ckpt_dir is set to NONE, the directory where the checkpointing job started is used. See the checkpoint(5) man page for detailed information about the checkpointing environment configuration.
Note –
You should start a checkpointing job with the qsub -cwd script if ckpt_dir is set to NONE.
Checkpointing files and restart files must be visible on all machines in order to successfully migrate and restart jobs. Because file visibility is necessary for the way file systems must be organized, NFS or a similar file system is required. Ask your cluster administration if your site meets this requirement.
If your site does not run NFS, you can transfer the restart files explicitly at the beginning of your shell script. For example, you can use rcp or ftp in the case of user-level checkpointing jobs.
- © 2010, Oracle Corporation and/or its affiliates
