 To Create the OS Profile
-
Open a Web browser and log in to the OTP master server system management service.
Go to URL https://OTP master server:6789 where OTP master server is either the IP address or the fully qualified name of the OTP master server.
The Java Web console log in page is appears. Type your OTP account name and password to log in.
The system management page appears.
-
Click Sun N1 System manager.
The System Manager page appears.
-
Click New... beneath OS Profiles in the Task Shortcuts panel on the right side of the page.
The Create Operating System Profile wizard appears. Step 1, Specify Initial OS Profile Information is displayed.
Tip –Click Help on this panel and subsequent panels for a description of each panel.
-
Specify the initial OS profile information.
-
Type a name for the OS profile in the Name field.
-
(Optional) Type a description of the OS profile in the Description field.
-
Choose the OS distribution from the drop-down list in the Distribution field.
-
Type the root password to be used for the new OS distribution in the Root Password field.
-
Type the root password again in the Confirm Password field.
Click Next. Step 2, Specify Preferences is displayed.
-
-
Specify the language and time zone preferences.
-
Choose the language locale from the Language drop down list.
-
Choose the time zone from the Time Zone drop down list.
Click Next. Step 2.1, Specify Solaris Flash archive is displayed.
-
-
(Optional) Type the full path to the Solaris flash archive.
-
If you have not created a Solaris flash archive, click Next.
-
If you have created a Solaris flash archive, type the full path to the location of the flash archive, and then click Next.
Step 3, Add Distribution Groups is displayed.
-
-
Choose Entire Distribution plus OEM.
Click Entire Distribution plus OEM in the Available column and then click Add to add it to the Selected column.
Note –If your browser displays only a portion of the distributions, choose the second Entire Distribution in the list.
Click Next. Step 4, Define Partitions is displayed.
-
Define the partitions.
Refer to Table 3–1 for disk drive partitioning requirements when allocating the root /, swap, and /globaldevices partitions.
For each partition:
-
Type the partition name in the Mount Point field.
-
Type the file system type in the File System field.
-
Type the partition size in Mbytes in the Size (MB) field.
-
Click add.
The partition is added beneath the entry fields.
 Caution –
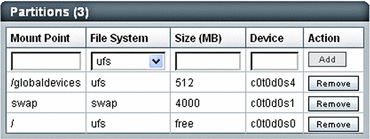
 When specifying the disk partitions, ensure that you allocate the /globaldevices directory with at least 512 Mbytes of free space.
The Partitions panel should be similar to the following:

When you have completed defining the partitions, click Next. Step 4, Specify NIS and LDAP Preferences is displayed.
-
-
(Optional) Specify NIS and LDAP Preferences.
-
If you do not want to specify NIS and LDAP preferences, click Next.
Step 6, Review Selections is displayed.
-
To specify NIS and LDAP preferences, check the items you want to specify and then click Next.
Additional sub-steps labeled 5.1 up to 5.4 are displayed for each item you have checked. Click the Help tab within each step to display information about that step.
When you have completed specifying the information for all of your selections, click Next. Step 6, Review Selections is displayed.
Check the items that you want to specify and then click next. Depending on your choices
-
-
Review your selections.
 Caution –
 Make certain that Entire Distribution plus OEM has been selected.
If the selections are correct, click Finish. Otherwise, click the appropriate Step to correct the selections.
When you click Finish, a job ID is displayed in the Command Pane. To view the job status, click the Jobs tab or type show job job ID in the Command Pane. When the job completes, the OS profile name is listed beneath OS Profiles in the Task Shortcuts panel.
Next Steps
Discover the new OTP hosts as described in the next procedure.
- © 2010, Oracle Corporation and/or its affiliates
