 To Install the Solaris OS on a New OTP Host
-
Open a Web browser and go to URL http://external OTP installation server:9090 where external OTP installation server is either the IP address or the fully qualified name of the external OTP installation server.
The OTP provisioning service log in screen appears. Log in to the service provisioning system.
-
Click OS Provisioning.
The OS Provisioning screen appears.
-
Click the Solaris Images Provision OS** link.
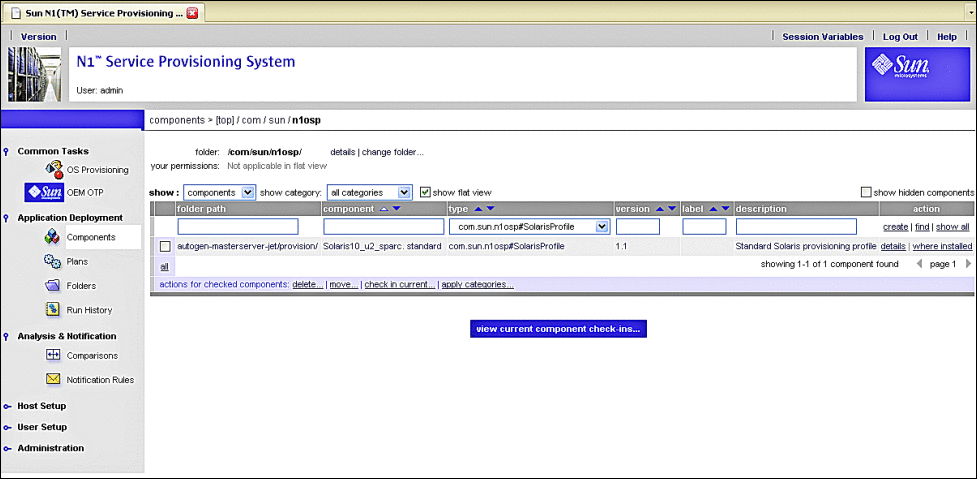
The components screen appears.
Figure 3–27 OS Provisioning Components Screen

-
Click Solaris10_u2_sparc. standard or Standard Solaris provisioning profile.
The Components Details screen appears.
Figure 3–28 OS Provisioning Component Details Screen

-
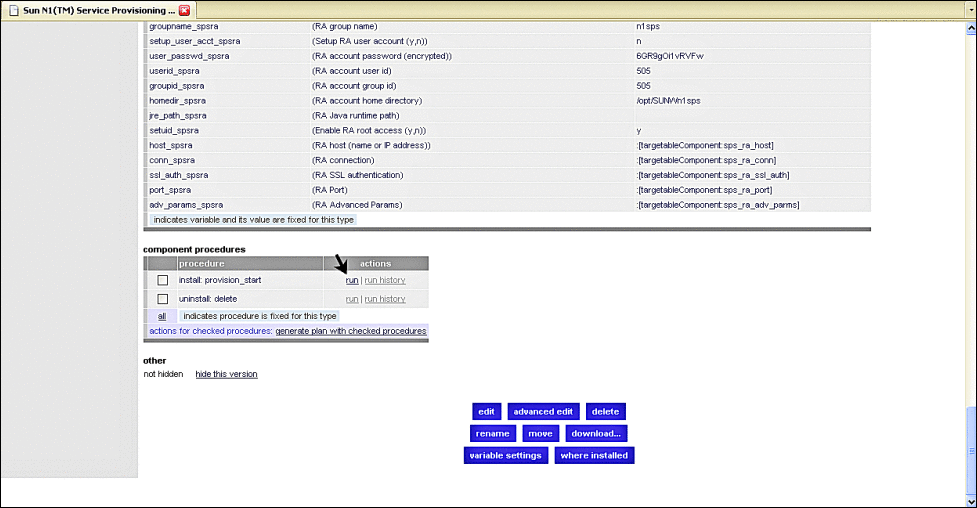
Scroll to the bottom and click run as shown by the following figure.
Figure 3–29 OS Provisioning Component Details Screen, Selecting Run

The Plans Details Run screen appears.
Figure 3–30 OS Provisioning Plans Details Run Screen

-
Click select from list... beneath variable settings.
The select variable setting from list... screen appears.
-
Scroll to the bottom of the select variable setting from list screen and click create set.
The create set variables screen appears.
Figure 3–31 OS Provisioning Create Set Variables Screen

-
Enter the values on the Create OS Provisioning Set Variables Screen as follows:
The following list describes only the required fields. All other fields are optional.
-
Type a name for the OS Provisioning variables set in the Set Name field.
For example, otpclient35–set. The name must start with an alphabetic character.
-
Click the profile_cluster_base_config check box.
Type SUNWCXall in the field to install Entire Distribution plus OEM.
-
Make certain that the profile_del_cluster_base_config check box is unchecked.
-
Click the profile_swap_base_config check box.
Type 4096 in the field.
-
Click the profile_s3_mtpt_base_config check box.
Type /globaldevices in the field.
-
Click the profile_s3_size_base_config check box.
Type 512 in the field.
-
Click the profile_s5_mtpt_base_config check box.
Clear the field.
-
Click the profile_s6_mtpt_base_config check box.
Clear the field.
-
Click the profile_s7_mtpt_base_config check box.
Clear the field.
-
Click the profile_s7_size_base_config check box.
Type 128 in the field.
-
Click the sysidcfg_root_password_base_config check box.
Copy and paste the encrypted root password from the file /etc/shadow in to the field.
For further information about generating and entering encrypted passwords, see Password Encryption in Sun N1 Service Provisioning System User’s Guide for OS Provisioning Plug-In 3.1.
-
Click the install_spsra and setuid_spsra check boxes.
Type n in both fields to prevent installation of the service provisioning remote agent. The remote agent is installed at a later point.
-
Click the packages_m_custom check box.
Note –This key is displayed only if the JET server custom modules were included in the OS Profile.
Type SUNWotpra SUNWotpcli SUNWotputil to install the required OTP packages.
The SUNWotpra package is required in order to install the remote agent after the Solaris OS installation completes.
-
-
Click save.
-
Click the right-most select button.
The create set screen closes, and the variable set name you created is displayed in the OS Provisioning Plans Details Run screen variable settings field.
-
Click on the target host field select from list... link on the Settings Plan Run screen.
The select hosts from list screen appears.
-
Click the names of the hosts you want to jumpstart.
-
Click add hosts to main window.
The select hosts from list screen closes, and the hosts you selected are added to the Plans Details Run screen.
-
Click run plan (includes preflight).
The OS provisioning plan will take a few minutes to complete. OS provisioning takes about a hour to complete.
To check the OS provisioning status:
-
In the Common Tasks section of the N1 SPS browser interface, select OS Provisioning.
-
On the OS Provisioning Common Tasks page, click Status in the OS Provisioning Administration Tasks section.
-
On the Plans Details page, click Run.
-
On the Plan Details Run page, select the OTP host on which you provisioned the OS.
-
Click run plan (includes preflight).
-
Follow the Details links to view the status.
When the plan completes, the results screen appears. Click Done.
Note –The OSP plug-in also installs the SUNWotpra, SUNWotpcli, and SUNWotputil packages. You do not need to add the SUNWotpcli package or setup the remote agent on the target host as these steps are done as part of the post OS installation processing by the OSP plug-in.
-
Next Steps
-
Configure the Solaris OS on the OTP host as described in Configuring Solaris 10 Update 2.
-
If you did not create the /globaldevices file system on the OTP host, create the file system as described in Creating the /globaldevices File System on the OTP Hosts.
-
If the OTP host is a Sun Fire T2000, install the OTP patches on the OTP host as described in Installing the Open Telecommunications Platform Patches On Sun Fire T2000 Servers.
When you have completed configuring Solaris 10 Update 2 on each new OTP host, install the Open Telecommunications Platform on the OTP host.
-
To install OTP on one or more OTP hosts using the command line, see Chapter 4, Installing the Open Telecommunications Platform For the First Time Using the Command Line
-
To install OTP on one or more OTP hosts using the graphical user interface, see Chapter 5, Installing the Open Telecommunications Platform For the First Time Using the Graphical User Interface
-
To install OTP on one or more OTP hosts using a production standalone or clustered OTP system, see Chapter 6, Installing the Open Telecommunications Platform Using the Provisioning Service On an Existing OTP System
- © 2010, Oracle Corporation and/or its affiliates
