| Skip Navigation Links | |
| Exit Print View | |

|
Sun Storage 6 Gb SAS PCIe HBA, External Installation Guide For HBA Models SGX-SAS6-EXT-Z and SG-SAS6-EXT-Z |
| Skip Navigation Links | |
| Exit Print View | |

|
Sun Storage 6 Gb SAS PCIe HBA, External Installation Guide For HBA Models SGX-SAS6-EXT-Z and SG-SAS6-EXT-Z |
Chapter 2 Hardware Installation and Removal
Chapter 3 Creating a Bootable Drive in a Preboot Environment
Overview of Creating a Bootable Drive in a Preboot Environment
Creating a Bootable Drive (SPARC)
To Create a Bootable Drive (SPARC)
Using the OBP Environment to Set Up a Bootable Drive (SPARC)
To Prepare to Create a Bootable Drive (SPARC)
Creating an Alias for a Bootable Drive (SPARC)
To Create an Alias for a Bootable Drive (SPARC)
Creating a Bootable Drive (x86)
To Create a Bootable Drive (x86)
Selecting a Bootable Drive (x86)
To Select a Bootable Drive (x86)
Validating the Oracle Solaris Labels of the HBA Drives
To Verify That the Oracle Solaris Label of a Drive is Valid
Installing the Oracle Solaris OS
To Prepare to Install the Oracle Solaris OS
To Install the Oracle Solaris OS
This section describes how to use the BIOS Configuration utility to set up a drive on an x86 system prior to installing an OS. You can then use the drive as your boot drive upon which to install the OS. This section contains the following topics:
During the boot process, the BIOS initialization banner lists information about the discovered SAS adapters and devices that are attached to the discovered HBAs in the system.
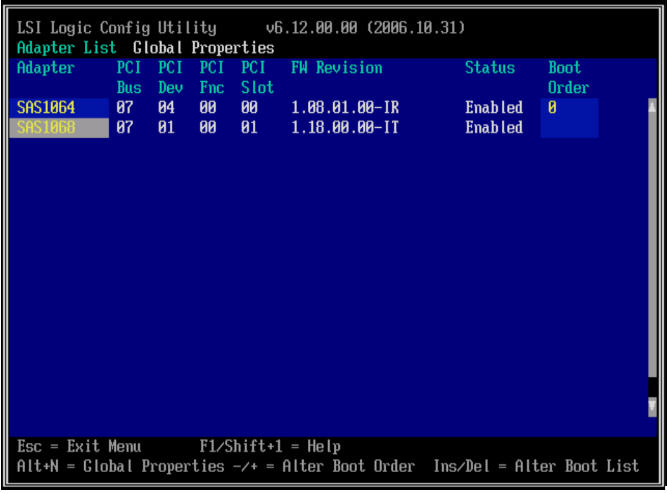
The LSI Corp Config Utility menu is displayed (see LSI Corp Config Utility Menu).
Figure 3-1 LSI Corp Config Utility Menu

|
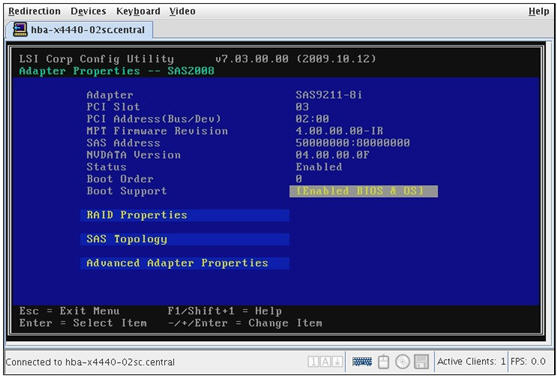
The Adapter Properties screen is displayed for the selected HBA (see Adapter Properties Screen).
Figure 3-2 Adapter Properties Screen

The Advanced Adapter Properties screen is displayed.
This field specifies the number of devices that the HBA will export to the system BIOS for boot. Changing the value to a low number (such as a value of 1 or 2) simplifies boot maintenance.
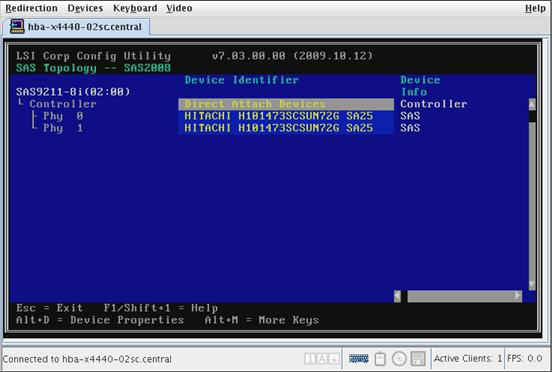
The SAS Topology screen is displayed (see SAS Topology Screen).
Figure 3-3 SAS Topology Screen

You can now use the BIOS Configuration utility to set up a bootable drive.