 Understanding Retroactive Processing
This chapter provides an overview of retroactive processing, and discusses how to:
Set up retroactive processing.
Review additional pages affecting retroactive processing.
Understand complex retroactive processing.
Review tips for retroactive processing.
Understanding Retroactive Processing
Retroactive (retro) processing refers to the recalculation of prior periods due to changes in payee data that could result in adjustments to entitlement or compensation.
Absence Management uses a form of retroactive processing referred to as corrective retro. With corrective retro, the system:
Recalculates the elements of the absence run that are defined to be recalculated during retroactive processing.
Replaces the previous calculations with the recalculated values for the elements of the run.
Updates balance and segment accumulators in the recalculated period.
Executes a full reversal of the prior calculation results.
The recalculated run replaces the previously calculated run. However, the original run calculations remain available for auditing and reporting purposes.
 Common Elements Used in This Chapter
This section defines some of the key terms used to describe retroactivity in this chapter.
Prior Results and Recalculated Results
When retroactive processing occurs for a previously calculated period, new results are created for that period. The new results are called the recalculated results. The results from the previously calculated period are called the prior results.
Recalc Period
A period that has been previously calculated and is being recalculated due to retroactivity.
When retroactive processing occurs for a given payee, the system recalculates each element generated for the payee. The system compares the recalculated results to the prior results. The difference between these results is typically called the retro delta. A retro delta represents an increase or a decrease that results in an adjustment to the payee's calculations.
Note. Retro Deltas are not applicable to Absence Management.
When a period that has already been processed for retroactivity is processed again due to additional retroactive data changes, the recalculation is called retro on retro.
Version and Revision Numbers
In the following sections you will see numerous references to version and revision numbers. Absence Management tags each Payee Process Stat record with a version and revision number. The version number is the vehicle for tracking recalculation of a calendar period due to retroactivity.
The system defines the original set of output results for a calendar calculation as Version 1, Revision 1 (V1R1). Each subsequent recalculation of the calendar increases the version number while the revision number stays at one. For example, the first retro would be Version 2, Revision 1 (V2R1). The second retro would be Version 3, Revision 1 (V3R1), and so forth. Version numbers are updated during corrective retro processing, for example, in absence calendars. Revision numbers are updated during forwarding retro processing. (This does not occur in Absence Management.)
See Also
Tracking Recalculated Calendars
Understanding General Rules of Retro Processing
This section provides an example of a retroactive calculation and discusses how Absence Management:
Tracks recalculated calendars.
Loads balance accumulators.
Stores recalculated results.
Set backward and forward limits.
Example: Corrective Retro—No ExceptionsIn this example, Earning 1 rate changes from 100 to 120; effective date is in period 1; notified in period 2:
|
Recalc Option |
Calendar Period 1 |
Prior Results (Old Value) |
Re-Calculation (New Value) |
Deltas |
Corrective Replace Old Value with New Value |
Forward Y/N |
|
Always |
Earning 1 |
100 |
120 |
20 |
Y |
N |
|
Always |
Deduction 1 (flat amount) |
30 |
30 |
0 |
Y |
N |
This table shows the processing results for the example above:
|
Calendar Period 2 |
Current Results |
Retro Adjustment |
|
Earning 1 |
120 |
None |
|
Deduction 1 (flat amount) |
30 |
None |
In this example, only Earning 1 generates a retro delta. The new value of Earning 1 replaces its old value.
Tracking Recalculated Calendars
Absence Management tags each Payee Process Stat Record with a version number to track the recalculation of a calendar period due to retroactivity.
The system defines the original set of output results for a calendar calculation as Version 1, Revision 1 (V1R1). Each subsequent recalculation increments the version number by 1. The revision number stays the same. For example, the first corrective retro is Version 2, Revision 1 (V2R1). The second corrective retro (retro on retro) is Version 3, Revision 1 (V3R1), and so forth.
The system uses these numbers to determine which calculations to use as the old and new values when processing retro deltas.
Version and Revision Numbers in Retro Adds
A retro add is a situation in which a previous calculation does not exist for a payee, and retroactivity calls for a payee process status record to be created for the first time. For example, suppose that a payee initially thought to have been hired in February was actually hired in January. There are no calculations for January, so when January is processed for retro, the system must create a payee process status record for the period and assign version and revision numbers to it. In this case, the first calculation is labeled V1R1. The reason is that corrective retro replaces the results of the prior calculation (it does not use them only to create retro deltas), so when a period is added, it treats this period as if it were the original one.
The following tables illustrate how the system numbers payee process status records in retro add situations:
Scenario:
In the following retro add situation, it is discovered that a payee who was calculated as part of period 1 should not have been processed in that period. The calculations for the payee are therefore reversed in Recalc No. 2. When it is later discovered that the payee belongs in that period after all, the system produces a new calculation using the version and revision numbers that are indicated in Recalc No. 3.
|
Period/Recalculation |
Numbering |
|
Period 1 (original calculation) |
V1R1 |
|
Recalc No. 1 |
V2R1 |
|
Recalc No. 2 (reversal) |
V3R1 |
|
Recalc No. 3 (add) |
V4R1 |
In each example, all calculations for the payee are reversed in Recalc No. 2 when the payee is eliminated from the calendar. When the payee is later restored (when it is discovered that he or she belongs in the original calendar), new calculations are created. The new calculation uses the numbering that is indicated in Recalc No. 3.
See Also
Loading Balance Accumulators
Before the system recalculates elements during retro, it loads balances to produce the correct value for the balance accumulators.
The system loads the balance for the element from the calculation with the highest version number in the previous period.
Storing Recalculated Results
When a trigger starts retroactive processing for a payee, the system recalculates each calculation that is generated for the payee from the date of retroactivity forward. The system compares the recalculated results to the original results. If there is a difference between them, the system:
Stores prior results for auditing purposes.
Replaces the prior results with new ones in the recalculated period and stores the new calculation results for each payee.
These results represent the true results for that period.
Setting Backward and Forward Retro Limits
In Absence Management, you use the Pay Entity Retro Limits page to establish default backward and forward limits for retro processing. These defaults tell the system how far back in time to go to recalculate closed calendars that are associated with a pay entity, and how long after a payee becomes inactive he/she is eligible for retro processing.
To determine how far back in time to go to process retroactivity, the system compares the backward limit defined on the Pay Entity Retro Limits page to the following system dates:
Trigger Effective Date.
This date—the effective date of the change that triggers retroactive processing—establishes a theoretical goal for how far back in time to go to recalculate data. When the system determines which periods to process, the backward limit date takes precedence over the trigger effective date. For example, if the trigger effective date is January 1, 1990, and the backward limit date is January 1, 1995, the backward limit date stops all calculations prior to (and including) that date. By contrast, if the backward limit date is January 1, 1990, and the trigger effective date is January 1, 1995, then the trigger effective date establishes the number of periods to recalculate.
No Retro Processing Before Date.
This is the date that a payee enters the Absence Management system. This date takes precedence over the trigger effective date and the backward limit date because no matter what these dates are, there is no historical data to recalculate before the No Retro Processing Before Date.
This diagram illustrates the interaction of the dates used to determine the number of past periods to recalculate.
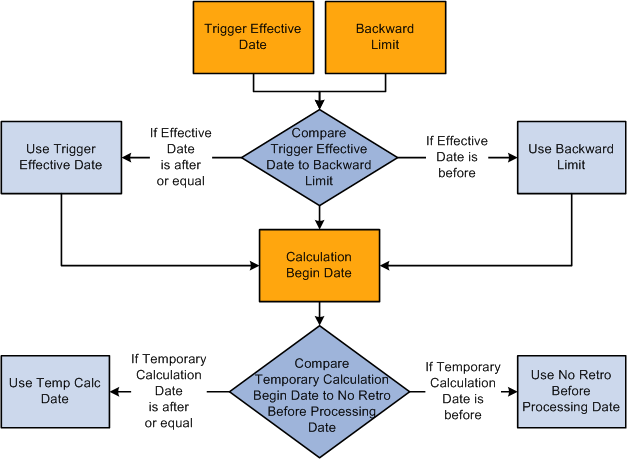
First recalculation period
The Absence Management system determines the first recalculation period by comparing the trigger effective date to the backward limit date and comparing both dates to the calculation begin date.
The process for determining forward limits is less complex than for backward limits, because the system does not compare trigger effective dates to either the forward limit or the No Retro Processing Before Date. It only needs to determine whether payees are within the forward limits defined on the Pay Entity Retro Limits page. If a payee is within these limits, the system applies the backward limits to determine the number of past periods to recalculate.
For forward limits to apply, a payee must be inactive in all jobs (EMPL_STATUS on the Job record is used to validate the payee's status). A payee is considered inactive if the EMPL_STATUS value is D (deceased), R (retired), T (terminated), V (terminated pension payout), or X (retired-pension administration). If a payee has multiple jobs, the highest effective date of all rows that are returned is used as the inactive date.
Setting Up Retroactive Processing
To set up retroactive processing, use the Countries (GP_COUNTRY) and the Retro Process Definitions (GP_RTO_PRC_DEFN) components.
This section provides an overview of retroactive processing setup and discusses how to:
Define the retroactivity defaults at the country level.
Define a retro process.
Define trigger event IDs.
Define backward and forward limits for retro processing at the pay entity level.
Define retro processing limits at the payee level.
See Also
Additional Pages Affecting Retroactive Processing
Understanding Retroactive Processing Setup
Follow these steps to set up retroactive processing:
Specify the retroactivity defaults.
Using the Countries page, select the corrective method for processing retroactivity. (Forwarding retro applies only to Global Payroll.)
Define a retro process.
Once you have selected a default method for the country, define a retro process on the Retro Process Definition page.
Map retro processes to trigger event IDs.
Use the Retro Event Definition page to associate the retro process you defined in step 2 with a trigger event ID. This event ID tells the system how to process data changes to the records or fields you make sensitive to retroactive data changes in step 4 (see below).
Define trigger records and fields.
After mapping retro processes to event IDs, you must decide which database records and fields will trigger retroactive processing in response to data changes. You identify these fields and records on the Trigger Definitions component (GP_TRGR_SETUP) and link them to one of the trigger event IDs that you defined in Step 3. Because trigger event IDs identify retro process definitions, any field or record that is linked to this ID triggers the correct process in response to a data change.
Determine which pay entities allow retroactive processing.
Use the Pay Entity Retro Limits page to enable retroactive processing of calendars in a pay entity.
Specify backward and forward limits.
There are two pages on which you can set backward and forward limits:
Use the Pay Entity Retro Limits page to establish default backward and forward limits for retro processing (optional). This tells the system how far back in time to go to recalculate closed calendars that are associated with a pay entity, and how long after a payee becomes inactive he/she is eligible for retro processing.
If necessary, override the default backward and forward limits for specific payees using the Retro Limits Assignment page.
View, add, and cancel retro triggers.
After the online system generates retro triggers, use the Payee Triggers - Retro page to manage retro events so that retroactive processing takes place only response to the appropriate changes in system data. This page enables you to view retro triggers for each payee; you can also add and cancel triggers on this page.
Note. Retro trigger data is generated by the online system based on conditions that you specify during setup. You can also manually enter retro trigger rows that were not created automatically.
Warning! Canceling a trigger does not undo the database change that created the trigger in the first place. If there is retro for some other reason, this change may be picked up when prior periods are recalculated.
Pages Used to Set Up Retroactive Processing|
Page Name |
Definition Name |
Navigation |
Usage |
|
GP_COUNTRY |
Set Up HRMS, Product Related, Global Payroll & Absence Mgmt, System Settings, Countries, Countries |
Define the retro method at the country level. |
|
|
GP_RTO_PRC_DEFN |
Set Up HRMS, Product Related, Global Payroll & Absence Mgmt, Triggers, Retro Process Definitions, Retro Process Definition |
Define a retro process. |
|
|
GP_RTO_EVT |
Set Up HRMS, Product Related, Global Payroll & Absence Mgmt, Triggers, Retro Event Definitions, Retro Event Definition |
Associate a triggering event (a change in critical data) with one of the processes that you defined on the Retro Process Definition page. |
|
|
GP_PYENT_RETRO |
Set Up HRMS, Product Related, Global Payroll & Absence Mgmt, Framework, Organizational, Pay Entities, Retro Limits |
Define the backward and forward limits for retro processing at the pay entity level. |
|
|
GP_PYE_RTO_LIM |
Global Payroll & Absence Mgmt, Payee Data, Create Overrides, Assign Retro Limits, Retro Limits Assignment |
Override, at the payee level, the backward and forward limits for retro processing that you established at the pay entity level on the Retro Limits page. |
Defining Retroactivity Defaults
Access the Countries page (Set Up HRMS, Product Related, Global Payroll & Absence Mgmt, System Settings, Countries, Countries).
Note. We discuss the Countries page in detail elsewhere in this PeopleBook.
See Defining Country-Level Setup.
Defining a Retro Process
Access the Retro Process Definition page (Set Up HRMS, Product Related, Global Payroll & Absence Mgmt, Triggers, Retro Process Definitions, Retro Process Definition).
|
Retro Process Definition ID (retroactive process definition ID) |
Identifies the retro process you are defining. |
|
Retro Method |
For Absence Management, this value should always be set to Corrective. |
|
Retro Method Varies |
Leave this check box empty. It applies only to Global Payroll. |
Retro Method Decided By
The fields in this group box apply only to Global Payroll.
Defining Trigger Event IDs
Access the Retro Event Definition page (Set Up HRMS, Product Related, Global Payroll & Absence Mgmt, Triggers, Retro Event Definitions, Retro Event Definition).
The mechanism that is used to track online data changes that should trigger retroactive processing is called a trigger. In Absence Management, you set up triggers by identifying the records and fields that should trigger retroactive processing in response to data changes, and by defining the retro process definition to use to process these changes:
On the Retro Event Definition page, associate each of the retro processes defined on the Retro Process Definition page with a trigger event ID.
On the Trigger Definitions page, identify the records and fields that should trigger retroactive processing when data is modified or updated retroactively.
On the Trigger Definitions and Trigger Definitions - Field Values pages, associate the records and fields identified in step 2 with one of the trigger event IDs you defined in step 1. Because each ID is linked to a process definition, the system can automatically apply the correct retro process when one of these records of fields is modified or updated.
Note. Because the Trigger Definitions and Trigger Definitions - Field Values pages are documented in the chapter "Setting Up Triggers," this section describes only the use of the Retro Event Definition page.
See Setting Up Retro Triggers.
|
Country |
This display-only field is populated based on the country that you selected on the search page. |
|
Trigger Event ID |
This display-only field is populated based on the trigger event ID that you selected on the search page. Link each trigger event ID to one of the processes you defined on the Retro Process Definition page. |
|
Retro Process Definition ID |
Select a process that you defined on the Retro Process Definition page to link to the trigger event ID. Note. Different countries can process the same event differently. |
|
Absence Event |
Select if the trigger event ID is for an absence event only. |
The Absence Event indicator determines the first calendar for recalculation, which avoids processing calendars unnecessarily. Selection of the indicator depends on such things as the processing order of the calendars for a particular period, as well as what absence related trigger definitions have been defined and to which retro events they point. When the indicator is set to yes, processing can start at the first absence calendar instead of the first calendar that qualifies after checking retro limits.
Note. Absence balance accumulators are always defined as corrective—they must be updated (replaced) at the end of each calculation period.
See Also
Defining Backward and Forward Limits for Retroactive Processing at
the Pay Entity Level
Access the Retro Limits page (Set Up HRMS, Product Related, Global Payroll & Absence Mgmt, Framework, Organizational, Pay Entities, Retro Limits).
After you have defined a retro method and the events that trigger retro processing, you must specify the backward and forward limits for retro processing at the pay entity level. This tells the system how far back in time to go to recalculate closed calendars, and how long a payee is eligible for retroactive processing after being inactivated or terminated.
Note. You can override backward and forward limits you define at the pay entity level using the Retro Limits Assignment page at the payee level.
Use the fields in this group box to limit the number of calendar periods that Absence Management can reprocess going into the past.
To determine how far back to go, the system compares the backward limit defined on the Retro Limits page to the retro trigger effective date. If the trigger effective date comes before the backward limit date, the system uses the backward limit date to determine the first retro period. If the backward limit date comes before the trigger effective date, the system uses the trigger date to determine the first retro period to process.
|
Process Retro |
Select to enable retroactive processing at the pay entity level. You can override your selection at the payee level. |
|
Acm Adjustments Persist (accumulator adjustments persist) |
Select to retain adjustments to accumulator balances when retroactive processing causes an accumulator to be recalculated in a prior period. This option may be needed because Absence Management does not automatically include adjustment amounts when recalculating accumulator balances. For example, if you select this check box and reprocess a prior period in which an accumulator with a value of 100 received an adjustment of 10, the system computes the incoming balance as the sum of the original accumulator and the user-entered adjustment, and returns a value of 110. Otherwise, the system ignores the adjustment and returns a balance of 100. Note. The preferred approach to managing accumulator balances is to correct the elements (entitlements or takes) that contribute to the accumulator, rather than to adjust the accumulator directly. This is because other accumulators that store period-to-date amounts or other values based on the calculation of the same elements will not be automatically updated, possibly resulting in calculation or reporting errors. Note. To adjust accumulator balances, use the Adjust Accumulator Balance page. |
|
Deltas Cross Pay Groups |
Leave this check box empty. It applies only to Global Payroll. |
|
No Limit - Backward |
If you select this option, then retro processing begins with the first period that includes the trigger effective date and goes forward. Selecting this option does not mean that there are no limits to how far back you can go. The No Retro Processing Before date limits how far back in time you can go to process retroactivity. |
|
Limit by Months - Backward and Number of Months - Backward |
To define a limit in terms of months, select this option and enter the number of months that the system can calculate into the past. The system determines the maximum number of months to go back starting from the begin date of the first calendar in the current calendar group for the payee. |
|
Limit by Years - Backward and Number of Years - Backward |
To define a limit in years, select this option and enter the number of years that the system is to calculate into the past. This limit year, in conjunction with the Retro Back Limit Start Month and Retro Back Limit Start Day fields, determines how far back the system can go when processing retroactivity. For example, if Number of Years - Backward is 2, Retro Back Limit Start Month is 06 (June), Retro Back Limit Start Day is 01, and the current period begin date is April 1, 2005, then the backward limit is June 1, 2003. The system allows retroactivity 2 years from the current period begin date, but not prior to June 1 of that year. |
|
Retro Back Limit Start Month |
Select the calendar month to use as the backward limit. |
|
Retro Back Limit Start Day |
Select the day to use as the backward limit. |
Example 1: Using months criterion to determine the first retro period to recalculate.
|
Trigger Effective Date |
Current Calendar Period |
Backward Limit |
First Retro Period |
|
February 15, 2005 |
June 1, 2005−June 30, 2005 |
2 months = April 1, 2005 |
April 1, 2005 – April 30, 2005 |
Absence Management determines the backward limit by going back two months from the current calendar period begin date of June 1, 2005, providing a limit date of April 1, 2005. The system compares the backward limit date to the trigger effective date. The trigger effective date precedes the backward limit date, so the system uses the backward limit date to determine the first retro period. Two periods are recalculated. April (April 1, 2005−April 30, 2005) and May (May 1, 2005−May 31, 2005).
Example 2: Using years, months, and days criteria to determine the first retro period to recalculate (trigger effective date does not exceed backward limit date).
|
Trigger Effective Date |
Current Calendar Period |
Backward Limit |
First Retro Period |
|
June 30, 2004 |
June 1, 2005−June 30, 2005 |
Year =1, Month = 3, Day = 15 (March 15, 2004) |
June 1, 2004−June 30, 2004 |
Absence Management determines the backward limit by going back one year (the start year is determined by the year of the begin date of the first calendar) and applying the month and day that are defined: The result is a backward limit date of March 15, 2004. The system compares the limit to the trigger effective date, which (in this example) establishes the first retro period because it does not exceed the backward limit date. Twelve periods will be recalculated.
Example 3: Using years, months, and days criteria to determine the first retro period to recalculate (trigger effective date exceeds backward limit date).
|
Trigger Effective Date |
Current Calendar Period |
Backward Limit |
First Retro Period |
|
February 28, 2004 |
June 1, 2005−June 30, 2005 |
Year = 1, Month = 3, Day =15 (March 15, 2004) |
March 1, 2004−March 31, 2004 |
Absence Management determines the backward limit by going back one year (the start year is determined by the year of the begin date of the first calendar) and applying the month and day that are defined: The result is a backward limit date of March 15, 2004. The system compares that date to the trigger effective date, which (in this example) exceeds the backward limit date, so that the backward limit date determines the first retro period. Fifteen periods will be recalculated.
Use the fields in this group box to specify the amount of time that retroactive data can continue to be processed after a payee is terminated or becomes inactive.
|
No Limit - Forward |
If you select this option, retroactive data can be processed indefinitely for inactive payees belonging to this pay entity. Although eligible for retro processing, the inactive payee is still restricted by the backward limits. |
|
Limit by Months - Forward and Number of Months - Forward |
To define the forward limit in months, select this option and enter the number of months to continue calculating retroactivity after a payee becomes inactive. The system determines the maximum number of months using the Inactive date of the last active job. |
|
Limit by Years - Forward and Number of Years - Forward |
To define the forward limit in years, select this option and enter the number of years beyond the inactive date to process retro. The year, in conjunction with the Retro Fwd Limit Start Month and Retro Fwd Limit Start Day, determines how long after the inactive date the system allows retroactivity processing. |
|
Retro Fwd Limit Start Month (retro forward limit start month) |
Enter the calendar month to use as the forward limit in conjunction with the year in the Number of Years - Forward field. |
|
Retro Fwd Limit Start Day (retro forward limit start day) |
The day to use as the forward limit in conjunction with the year and month entered in the Number of Years - Forward and Retro Fwd Limit Start Month fields. For example, if the Number of Years is 2, the Retro Fwd Limit Start Month is 06 (June), the Retro Fwd Limit Start Day is 01, and the termination date is January 1, 2005, the limit for processing retroactivity would be June 1, 2007. In this example, the system knows to allow retroactivity for 2 years from the Inactive date, but not after June 1 of that year. |
Example 1: Using months criterion to determine the first retro period to recalculate (calendar period does not exceed forward limit).
|
Inactive Date |
Current Calendar Period |
Forward Limit |
Eligible for Retro Processing? |
|
January 1, 2005 |
June 1, 2005−June 30, 2005 |
12 months (January 31, 2006) |
Yes |
Absence Management determines the forward limit by going forward 12 months from the inactive date. The current calendar period does not exceed the forward limit, so retro processing can occur. The retro triggers are compared to the backward limits to continue the process.
Example 2: Using months criterion to determine the first retro period to recalculate (calendar period exceeds forward limit).
|
Inactive Date |
Current Calendar Period |
Forward Limit |
Eligible for Retro Processing? |
|
January 31, 2005 |
June 1, 2005−June 30, 2005 |
3 months (April 30, 2005) |
No |
Absence Management determines the forward limit by going forward 3 months from the inactive date. The current calendar period (in this example) exceeds the forward limit, so retro processing cannot occur. The retro triggers are ignored and marked as used.
Defining Retro Processing Limits at the Payee Level
Access the Assign Retro Limits page (Global Payroll & Absence Mgmt, Payee Data, Create Overrides, Assign Retro Limits, Retro Limits Assignment).
Note. The fields on this page are almost identical to those on the Retro Limits page. To view definitions of the shared fields, return to the section on the Retro Limits page. In this section we discuss only the fields that are unique to the Retro Limits Assignment page.
|
No Retro Processing Before |
This date is the date when Absence Management begins processing a payee. It is set by the system, but you can override it. The system cannot process retroactivity for a payee prior to this date. If a payee has multiple jobs, be sure that this date is correct, to support all jobs. |
|
Use Pay Entity Retro Limits |
Select to use the retro limits that are defined for the pay entity to which the payee belongs. When this check box is selected, the system uses the values from the pay entity definition, and all other fields on this page, other than No Retro Processing Before, are unavailable for entry. When this check box is cleared, the Process Retro check box becomes available for entry, and the system uses the values that were entered at the payee level, rather than those that were entered at the pay entity level. |
|
Process Retro |
Select if you want retroactivity to be processed. If you select this check box, the fields in the Backward Limit and Forward Limit group boxes become available for data entry. |
See Also
Setting Backward and Forward Retro Limits
Additional Pages Affecting Retroactive Processing
In addition to the pages described earlier in this chapter, several other pages affect retro processing. These pages are of two types—general setup pages and calendar setup. The following table describes these pages:
|
Page Type |
Page Name |
Description |
|
General Setup |
Pay Entity - Processing Details |
Define payment keys. Retro adjustments respect payment key values when they are applied to a segment. |
|
Calendar Setup |
Run Types |
Identify the run types that can process retro triggers. The run type is linked to a calendar, which is linked to a calendar group. If at least one calendar in the group is defined to process retro triggers, the calendar group uses the instructions defined for the run type as the default instructions for processing retro triggers. |
|
Calendar Setup |
Calendars - Definition |
Specify the payees to process in a calendar run. You can select payees with retro triggers (active or inactive) for processing. |
|
Calendar Setup |
Calendar Group |
Indicate whether to process retro triggers defaults from Run Type. If at least one calendar allows retro triggers to be processed, the Process Retro Triggers check box will be selected. Otherwise it will be cleared. It can be cleared so that retro triggers are not processed. However, you cannot select it in order to process retro triggers if the default setting is cleared. |
Understanding Complex Retro Processing
This section discusses:
Segmentation and retro
Retroactive deletes
Retroactive adds
Segmentation and Retro
Segmentation can affect retro processing when a segmented period is being recalculated for retro, and the segmentation dates of the original calculation don't coincide with those of the recalculation.
This is called a segment mismatch, and it affects how retro deltas are calculated.
Note. Segmentation also affects how the system manages the Retro Recalculation Option of Do Not Recalculate.
Calculating Deltas in Matched and Mismatched Segments
The way that Absence Management calculates deltas varies depending on whether the segmentation dates and payment keys of the prior period match those of the recalc period.
When Segments Match
When segment dates match and payment keys are the same, the system recalculates the original segments (to determine the new values for each segment), subtracts the old value from the new value for each element of pay, and writes new results to the output tables.
When Segments Don't Match
When segments don't match, the system treats the old and new values as if they belong to separate segments.
The system creates reversal segments for each segment that existed in the prior calculation and then creates new recalc segments.
A reversal segment does not have any results.
The new recalc segments generate the new values. The new values are written to the output result tables.
Note. When the value of a payment key (for example, company ID) changes between a prior calculation and the recalculation, the system handles the situation as a segment mismatch. That is, it treats the old and new calculations as belonging to separate segments—just as if the segment dates no longer matched.
Retroactive Deletes
A retroactive delete occurs when there is a retroactive termination, a retroactive pay group transfer, or a retroactive change in pay system. In all cases the information is received after the actual effective dates for these changes. The result is that calculations where made when they should not have been and these results must be completely reversed.
Retroactive Adds
A retroactive add occurs when there is a retroactive hire or a retroactive pay group transfer. With a retroactive hire, there is no previous calculation. In the case of a retroactive pay group transfer, the retro add refers to the pay group to which the payee is transferred.
Reviewing Tips for Retroactive Processing
The following table provides hints on using retroactive processing.
|
Question |
Answer |
|
Can Absence Management calculate retro across countries? |
The default retro method, retro process definitions, and trigger event IDs are defined by country. The system does not calculate retro across countries. However, if a payee transfers to another country, and it's later discovered that the payee should have received additional entitlement while employed in the first country, it might be possible to process retro for that payee even though he or she is inactive in the original country. This depends on the forward limits that apply at the pay entity level and other processing rules that determine how long after a payee is inactive he or she remains eligible for retroactive processing. |
|
What happens when multiple triggers are generated and each points to a different retro process definition? |
Suppose that multiple retro events occur, causing multiple retro triggers to be written to the trigger tables. If these triggers call for that calendar run to be processed (recalculated) using different process definitions, a conflict will occur. In such a situation, where the events that cause retroactive processing activate the application of more than one process definition for the same payee in the same calendar, the system writes an error message and does not process retro. Only the current period is calculated. Retro triggers are not marked as processed. Note. The retro conflict method that is specified on the Countries page does not apply to the conflict situation described here. In this situation, the retro conflict method will not resolve the conflict. However, you can change the event ID that is associated with the retro trigger, using the Payee Trigger Retro Expanded page. For a payee, you cannot have more than one process definition resulting from the retro events that cause retroactivity for that calendar run. The same process must apply for all calendars in the calendar group. |
See Also
Setting Up Retroactive Processing