 Understanding the Administering PAR System
This chapter provides an overview of administering personnel action requests (PAR) and discusses how to:
Track and route a personnel action request (PAR) through reviews and completion.
Initiate and request personnel actions.
Authorize and approve personnel actions.
Process human resources personnel actions.
Cancel or correct a personnel action request.
Print Request for Personnel Action (SF-52) and Notice of Personnel Action (SF-50) reports.
View summary pages.
Generate a Personnel Actions History report.
Generate a Wage and Separation report.
Understanding the Administering PAR System
The administering PAR system provides you with the power to process action requests quickly and easily. The system automatically routes a wide variety of requests directly to reviewing officials, and on to human resources, in the path your agency designates.
If anyone needs further information, the system automatically routes that inquiry back to the originator. All involved are included in the communication loop and always know that their requests are moving through a well-mapped review, authorization, and approval cycle.
Note. Keep in mind that the description and samples described throughout this book are illustrative, flexible models that you can adapt for your agency's personnel administration system. Your agency can set up the Administer Workforce system routing, security, accessing, processing, and many other features to meet your individual agency needs and requirements.
Using a streamlined menu structure, you can navigate quickly and easily through the whole process. Using PeopleSoft workflow, you indicate the level of authorization and the system routes the request through the process for you.
Significant features of the PAR system include:
Flexible work-in-progress processing.
Cancellation and correction functionality.
Reviewed flag processing for retroactive personnel actions.
Enhanced navigation with pages.
Issuing awards and bonuses.
Detail assignment processing.
Support for the personnel office identifier (POI) signature requirement.
 Common Elements Used in This Chapter
|
PAR Status |
The PAR status code automatically defaults to Requested for new actions. Leave this as a work-in-progress request with that status until you have complete data. After you have completed all the necessary information, keep the PAR status as Requested to send it on to human resources officials for approval and processing. If you aren't ready to submit the request, change the status to Initiated, and keep working on it until you're done. Change the status to Requested to submit it. After completing the HR Request pages and reviewing the data, assign a status of Processed by HR to approve and finalize this request. Once you assign the status of Processed by HR, the request becomes an actual event and is posted in the system to interface with PeopleSoft Enterprise Payroll, Manage Base Benefits, or other related areas. If the request is invalid or needs further information, assign a status of Disapproved or Return to Sender. |
PrerequisitesBegin every personnel action request on the Data Control page. The first time you open the page, the most recent personnel action request appears automatically. Before creating a new request, you must insert a new row for all actions or changes.
In order to save time, the system assumes you want to continue viewing and updating information on the same employee, so when you move to a new page in the component, information for that same employee appears automatically.
See Also
(USF) Setting Up Human Resources Management Tables
(USF) Setting Up the Work-in-Progress Management System
Entering Information for the Employment Instance
Understanding Workflow
Many of the tasks you perform throughout the day are part of larger tasks that involve multiple steps and several people in your organization working together. PeopleSoft workflow tools help you build the larger process into your PeopleSoft Enterprise Human Resources system, automating vital business tasks. You can tie together the individual steps so that PeopleSoft can help coordinate the activities. Because the system has the big picture and knows what you are trying to accomplish, it can automatically start the next step in the workflow, following your organization's business rules.
Using workflow capabilities for administering personnel actions, the PAR status indicates the steps in routing and provides employees, supervisors, and human resources professionals easy access, surveillance, and security in the request management process. Workflow routes requests by sending personnel actions through a cycle to initiate, request, authorize, and approve requests, and provides options along the way for more time, further information, or returning to sender. Workflow then sends requests on to human resources for final processing. The automated workflow process ensures that the action request goes through all the reviews your agency needs until it becomes an actual event.
See Also
Delivered Workflows for PeopleSoft HRMS
Tracking and Routing a PAR Through Reviews and Completion
The Employee Request, Supervisor Request, and HR Request components are identical. The only difference is in the type of data that is accessible to each group, according to security options and allowable actions.
Note. The information you need to track and route a PAR is the same type of information you enter to hire employees. Use the same pages for both.
Your agency determines the actions and data available to employees, supervisors, and human resources officials. Actions may include creating requests, issuing approvals and authorizations, and finalizing actions. Actions also include returning an action to the originator; asking for more information; or withdrawing, canceling, or correcting an action. Decisions on these issues are implemented using the Approval Flow component (GVT_WIP_ACTIVITY).
Employees may request only their allowable actions; therefore, a user sees only certain options, such as Family/Benefits Change or Retirement. Supervisors may request, approve, and authorize those and other specific actions. When a supervisor opens the pages, their list reflects whatever your agency designates, such as promotion, demotion, detail assignment, reassignment, bonuses and awards, and others. They may also return an action to the originator for more information, or disapprove a request and render it inactive.
Human resources officials have the authority to initiate, approve, and finalize all possible actions. Therefore, human resources officials, along with hiring, tenure changes, and other actions that an employee or supervisor wouldn't usually initiate, can access all of the personnel actions in any phase of the cycle. For finalized actions that have already completed the processing cycle, human resources has the exclusive right to cancel and correct.
The PAR processes provide both flexibility and modification capacity. You can process new personnel actions that are effective-dated prior to existing personnel actions and define the codes for requests in a truly user-defined environment.
See Also
Adding and Updating Data
For U.S. Federal Government customers, to add, update, or change any employee data, you create a PAR. To submit and route and track a PAR automatically through the approval process, assign a PAR work-in-progress status code that indicates its position in the request cycle and determines where to send it.
By changing the request status and saving the page, reviewers acknowledge receipt and approval, and send a PAR forward through workflow. Each review level serves as verification that the information is complete and that the necessary documents are attached. The reviewers may also enter their own comments. Your agency can set up and route request cycles for each type of request from creation through various reviews, including as many or few reviews as desired, and on to final Human Resources completion.
If you want to open a request, fill in partial data and then complete it later, open a request and assign a PAR status of Initiated. While you gather additional information, the request stays within your own domain and control. You can revisit it as often as needed until you are ready to submit it for review.
When your request data is complete and you want to proceed with the automatic routing review cycle, submit the request by assigning a PAR status of Requested. By doing so, you make the request official. Once the originator submits a Requested action, workflow retrieves it and automatically routes it to others who are involved in the processing, and the authorizing and approving officials review its merits. It may go through a review cycle that includes 1st Authorized and 2nd Authorized by specific supervisors and managers, Approved/Signed by second-level managers, and finally to the status of Processed (processed by HR), according to your agency's requirements.
If clarification or additional information is needed, a reviewer can choose the status of Returned for More Information. Returning it to the originator restarts the process. A reviewer can also disapprove a request by assigning the Disapproved status, which stops the process altogether. During the review cycle, the originator can also withdraw a request while it is still in a work-in-progress state.
Only the originator can cancel or change and resubmit a request that is in progress. Because other supervisors, managers, and human resources officials don't have the ability to change request data, if a request needs to be Canceled, you must return it to the originator.
When a user chooses a work-in-progress status and assigns a PAR status code, this code indicates the request's status and position and enables workflow to route and monitor it through the approval cycle.
We provide a general example of the review cycle, though your agency can set it up differently if necessary.
This illustration shows an overview of a sample process. In this example, an employee, supervisor, or HR official initiates the PAR and submits it for approval. The PAR then goes through multiple levels of authorization before it is either approved or denied:
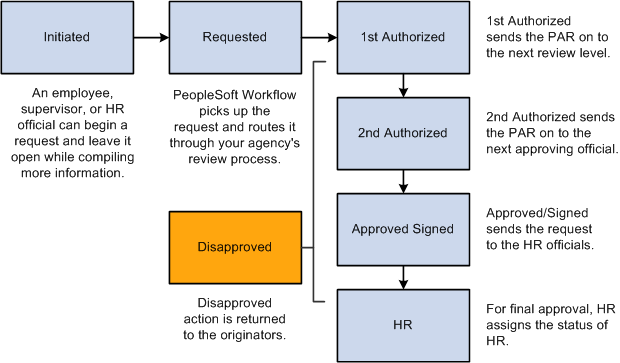
An example of the process of initiating, requesting, and approving a PAR
Disapproving or Returning a Request
This illustration provides an example of a business process when a request is disapproved. In this example, the request is put back in the Initiated state so that the originator can modify it as necessary and resubmit it. The resubmitted request then goes through the standard approval cycle again:
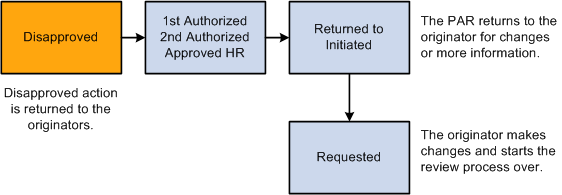
Example of return or disapproval of a PAR before completion
Note. Although a status of Returned/Disapproved is delivered, workflow isn't part of this feature.
Cancellation, Correction, or Withdrawal of a Request
Requests can be cancelled, withdrawn, or corrected only in specific situations:
Any time before final approval, the initiator can withdraw the request.
Once the request is approved, either the initiator or HR can cancel the requests, but only HR can correct the completed request.
The following diagram shows who can cancel, correct, or withdraw a request:
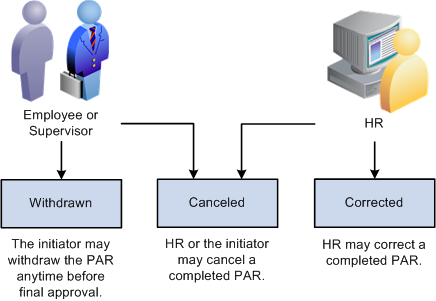
Example of cancellation, correction, or withdrawal of a PAR
Following are definitions for each work-in-progress status and PAR status code that are set up in the sample data delivered with your system:
|
Work-In- Progress Status |
PAR Status Code |
Definition |
|
Initiated |
INI |
Indicates an action is open, but not yet submitted as a request. For various reasons, originators may begin a request and then find they need additional time or data before completing their work on that action. By assigning a status of Initiated, originators can leave the request open until it is ready to submit. Supervisors may need extra time to develop supporting documentation, such as job codes, and can assign a status of Initiated to designate that their work is in progress. |
|
Requested |
REQ |
To submit a request, assign a status of Requested. Most requests then go automatically to the first-level supervisor for approval. An exception is the request for family/benefits change; you may want to set the system up to send this type directly to a human resources (HR) official to be processed. Or when a request originates in the HR department, it may go directly to an HR official to be processed. |
|
1st Authorized |
1st |
The first-level reviewer assigns a status of 1st Authorized to send a request forward to the next review level. |
|
2nd Authorized |
2nd |
A first-level reviewer sends a request forward to the next review level by assigning a status of 2nd Authorized. |
|
Approved/Signed |
SIG |
A second-level reviewer sends a request forward to an HR official to be processed by assigning a status of Approved/Signed. |
|
Processed By Human Resources |
PRO |
Only human resources officials can assign the status of Processed By Human Resources. They first review and complete the request and may add the appropriate nature-of-action code, legal authorities, and remarks. They indicate final approval by assigning the status of PRO. The request then becomes an actual event. A status of PRO is final and can't be changed by anyone. Once a request becomes an actual event, it is then available for further consideration and processing by payroll, benefits, interface reports, and other areas. |
|
Return for More Information |
RET |
Anywhere in the process, a reviewer can request more information or clarification by assigning a status of Returned for More Information and can include a comment such as, "I need further information." The request goes back to the originator. When originators get the returned request, they add the information, reassign a status of Requested, and the process begins again. |
|
Withdrawn |
WTH |
The original creators of the request may withdraw a request if it is sent back to them for any reason. Human resources may withdraw a request when it is proven invalid or for some reason no longer is needed. Note. A request cannot be withdrawn after it has been either processed or disapproved. |
|
Disapproved |
DIS |
At any point in the process, a reviewer can disapprove a request by assigning a status of Disapproved and entering the reason in the Comments field. This causes the request to be sent back to the originator either for cancellation or for the originator to change and resubmit it. |
|
Corrected |
COR |
Only a human resources official has the authority to perform a correction after a request has completed the approval cycle and been finalized. |
|
Canceled |
CAN |
A human resources official has the authority to perform a cancellation after a request has completed the approval cycle and been finalized. The Canceled status removes the request from the active request system, leaving only the tracking record history. Or if the originator receives a returned request, the originator may assign a status of Canceled. |
See Also
Delivered Workflows for PeopleSoft HRMS
Processing of PAR Actions
The PeopleSoft Enterprise Human Resources USF functionality has separate tables for managing PAR, and these tables hold data until each action has been approved and completed by human resources. Any records held in the separate tables haven't completed the PAR process and don't exist to the rest of the system. After completion, the data is automatically updated to system tables to enable other processes, such as those in PeopleSoft Enterprise Payroll, Benefits Administration, and Time and Labor.
To support the PAR processing concept, all of these records have been effective-dated and have been tied together with common keys. Because the three records (GVT_JOB, GVT_PERS_DATA, and GVT_EMPLOYMENT) work as one, a row is inserted into all three records when a user inserts a row on the Data Control page.
Once a PAR has successfully worked its way through the approval process, is processed by human resources as completed, and has become an actual event, it is ready to be copied into the three counterpart records (JOB, PERS_DATA_EFFDT, and EMPLOYMENT). The process is accomplished instantly, and the user is unaware of the updates to the other tables.
However, if the PAR action has an effective date that is later then the system date, only JOB is updated when the action is saved. PERSONAL_DATA and EMPLOYMENT are updated only when the date of the action is equal to the system date. This is because the counterpart to GVT_JOB, which is JOB, is effective-dated. Therefore, it receives the future effective-dated action and ignores it until that date.
Initiating and Requesting Personnel Actions
Most of the various PARs are created in a similar way. A good representative example is a family/benefits change request, which is reviewed in this chapter. Other chapters of this book cover other examples of the most highly used requests, such as hiring, awards and bonuses, leave with or without pay, data changes, and termination.
The only significant differences between submitting the various requests are the action and reason codes that you assign and the data that is entered. Most of the requests involve similar steps: You begin on the Data Control page, insert a new row and indicate the desired action, and then tab to another data page in the same group to enter further information, if necessary.
For example, when you initiate a request for changing benefit choices, enter data on the Data Control page and then move to the Personal Data page. For some requests, such as a leave without pay action, however, you enter data only on the Data Control page.
You can always view data on other pages, and view summary pages, for decision-support purposes.
See Also
(USF) Processing Personnel Action Requests
Authorizing and Approving Personnel Actions
Once a request has been submitted, the PeopleSoft workflow system automatically routes the request to designated supervisors and managers for authorizations and approvals.
Supervisors and human resources officials can approve and authorize requests that cover many possible actions involving hire, return to duty, leave with or without pay, suspension, promotion, bonus, award, change in pay, and others. They can also return a request and ask for more data or disapprove it so that it is returned to the originator and its cycle ended.
If you are a designated reviewer, you see the request item in your worklist if you are using the PeopleSoft Navigator display. To authorize or approve a request, click Work It!, and the system automatically transfers you to the 1st Rqst Authorization, 2nd Rqst Authorization, or Approve Request component. You can also access the request from the Workforce Administration, Job Information menu.
You see the same page on which the initiator entered data, beginning with the Data Control page. However, the information you see is display only and unavailable for entry. Review the data on the Data Control page, including the PAR Remarks and Tracking Data, as well as data on any other page that is relevant to the request. To approve the request, change the PAR Status code on the Data Control page to the appropriate choice, such as 1st Authorized, 2nd Authorized, or Approved/Signed. The request is then routed to human resources officials for completion and processing.
If you need more information or want to disapprove the request, change the PAR Status code to Return for More Information or Disapproved.
The authorization process works exactly the same way regardless of what the request is, such as data change, award, bonus, or recruitment. Once the authorizing officials have completed their work and entered a new PAR status code, the request goes automatically to the next level in the process.
Processing Human Resources Personnel Actions
Once a Personnel Action request (PAR) has been through the initiation and request process and has passed the authorization and approval processes, it goes to the human resources office for final processing. A human resources official can submit human resources-specific actions and review and finalize personnel actions that have already been requested, authorized, approved, and are ready to become actual events.
The HR Processing pages are reserved specifically for the human resources officials and as a result contain overviews, controls, and additional navigational capacity. The HR Processing pages enable you to access personnel actions, view data, finalize actions, and print reports.
The HR Processing (USF) component is similar to the Supervisor Request, 1st Rqst Authorization, and 2nd Rqst Authorization components, however the HR Processing (USF) component contains additional PAR Status options.
Canceling or Correcting a Personnel Action Request
Once a request has the PAR status Processed by HR, it remains as a record in the system. However, it is possible to correct or cancel it by, essentially, creating a new action that references the initial request and gives it a new status. Only human resources officials may perform a correction or cancellation.
Only processed rows are available for correction or cancellation. If an employee has an unprocessed transaction, you will be unable to correct or cancel a previous transaction until all of the employee's unprocessed rows have been successfully processed.
To access a processed request that you want to correct:
Open a new request in the Data Control page of the Correct Personnel Action USF component.
Click the Insert Row button to insert a new row, and enter the correct data.
The system automatically enters a PAR Status of COR.
If you insert a row and a more current transaction exists, the Reviewed check box is displayed and is highlighted in blue. This check box serves to alert you to review the additional transaction for errors and to select the check box after you review or change it. An error message is displayed if you try to save the page without first selecting the Reviewed check box.
Note. The Reviewed check box is also displayed on the Data Control page of the HR Processing USF component.
Note. Be careful when updating data using correction mode, particularly on processed personnel actions. Federal business process specifies that if corrections are made to existing data rows, a Correction SF50 is required. In this case, do not use HR Processing USF component, but rather the Correct Personnel Action USF component.
To access a processed request that you want to cancel:
Open a new request in the Data Control page of the Cancel Personnel Action USF component.
Click the Insert Row button or click F7 to insert a new row.
The system automatically enters a PAR Status of CAN.
See Also
Printing Request for Personnel Action (SF-52) and Notice of Personnel
Action (SF-50) ReportsEmployees and supervisors can print an action request (SF-52) anytime. Human resources officials can also review a personnel action request report (SF-50) that summarizes various aspects of employee and job request data in printed form.
This section discusses how to:
Print an action request (SF-52).
Run the Personnel Action Report.
Pages Used to Print a Request for Personnel Action/Notice of Personnel
Action|
Page Name |
Definition Name |
Navigation |
Usage |
|
GVT_JOB0 |
|
Print an action request (SF-52). |
|
|
RUNCTL_PAR |
|
Print the official Notification of Personnel Action form used to notify employee and payroll office of the action, record the action in the Official Personnel Folder, and provide a chronological record of actions that have occurred. |
|
|
RUNCTL_PAR2 |
|
After filtering the data with the parameters defined on the Parameters page, use the Select Data page to select employee data for printing PARs. |
Printing an Action Request (SF-52)
Access the Data Control page (select Workforce Administration, Job Information, Add Employment Instance USF, then enter a Person ID and click the Add button).
To produce a printed Request for Personnel Action form (SF-52), click the Print SF-52 button. The system asks whether to print the SF-52 to the Web or to a file. If you choose File, you must specify the file location.
Before saving and printing this request, ensure that the employee ID is the one you want to appear on the form. An assistant processing an action on an authorized official's behalf, who wants that official's information to appear on the SF-52 and become part of the official audit trail for this action, should select the Override Opr EmplID check box and enter the employee ID and employee record number of the official for the action on the Job Tracking Info page.
If you want to print to a file, specify the name of the output file (including the drive and directory names). Once you enter these parameters, the system runs a Structured Query Report (SQR) to create the SF-52 for you. You can print an SF-50 only when the action has a status of Processed by HR.
Running the Personnel Action Report
Access the Notice of Personnel Action USF - Parameters page (Workforce Administration, Job Information, Reports, Notice of Personnel Action USF, Parameters).
|
PAR Type (personnel action request) |
This field is available for entry only if you selected the Request for Personnel Action menu item. Select the type of PAR that you want to print. |
|
Copies Requested |
This group box is available for entry only if you selected the Notification of Personnel Action menu item. Select the copies that you want to print. Available values are Employee, OPF, Payroll, and Utility. |
|
On-line |
Select if you want to immediately print the PARs you select. |
|
Within Batch Program |
Select if you want to save your filtering criteria for later processing. |
|
EmplID (employee ID), SSN (social security number), Name, PAR Status, NOA Code (nature of action), and Business Unit |
Filter actions by employee ID, employee social security number, PAR status, NOA code, or business unit. |
|
PAR Status |
To filter by PAR status, select a status. The Begin Date and End Date fields become available when you select a PAR status. |
|
Filter |
When you click this button, the system selects the records that match your filter criteria and displays them on the Select Data page. |
Access the Notice of Personnel Action USF - Select Data page (Workforce Administration, Job Information, Reports, Notice of Personnel Action USF, Select Data).
The system displays information about the PARs that it filtered based on the parameters you specified on the Parameters page. Use the check box at the beginning of each data row to select individual PARs and add them to the list in the Selected Personnel Actions to Print group box when you click the Add Selected button. Click the Add All button to add all of the PARs to the list without selecting any check boxes. These PARs print when you run the report.
If you want to remove any of the PARs in the Selected Personnel Actions to Print group box, select the check box at the beginning of each data row and click the Remove Selected button. Click the Remove All button to remove all PARs without selecting the check box on any row.
|
|
Click this button to view the values of all of the filter criteria for this PAR. |
|
Add All |
Click this button to add all PARs that are in the Filtered Personnel Actions group box to the Selected Personnel Actions to Print group box. |
|
Add Selected |
Click this button to add the selected PARs from the Filtered Personnel Actions group box to the Selected Personnel Actions to Print group box. |
|
Remove Selected |
Click this button to remove selected PARs from the Selected Personnel Actions to Print group box. |
|
Remove All |
Click this button to remove all PARs from the Selected Personnel Actions to Print group box. |
Viewing Summary Pages
To view a summary of employee data, use the dynamic inquiry pages and display-only pages that summarize data entered in other pages throughout the system, including Job Summary, Personal Data, Job Data 1 and 2, and Employment Data pages.
See Also
Viewing Summary Workforce Information
Generating a Personnel Action History Report
This section discusses how to generate the Personnel Actions History report.
The Personnel Actions History report (FGHR017) lists all employees affected by each of the job actions you enter on the Run Control page. It prints the following information:
Employee name.
Department.
Effective date.
Reason for the action.
For each employee the report lists:
Original hire date.
Total years of service.
Employee type.
Regular/temporary.
Full/part-time.
Job code and title.
Salary grade.
Compensation rate associated with the action.
Supervisor's name.
Page Used to Run the Personnel Actions History Report|
Page Name |
Definition Name |
Navigation |
Usage |
|
RUNCTL_FGHR017 |
Workforce Administration, Job Information, Reports, Personnel Actions History USF, Personnel Actions History USF |
Run the Personnel Actions History report (FGHR017). |
Generating a Wage and Separation Report
Periodically, Federal agencies are required to generate a Form ES-931 report (Request for Wage and Separation Information). State agencies use the information in this report to determine benefit eligibility for each claimant filing claims for Unemployment Compensation for Federal Employees (UCFE).
The generation of the ES-931 report is a two-part process.
Use the Setup Wage/Separation USF component to enter setup information.
Use the Print Wage/Separation USF component to generate the actual report.
This section discusses how to:
Enter ES-931 employee identification information.
Enter ES-931 annual leave information.
Enter ES-931 severance pay information.
Generate the ES-931 report.
Pages Used to Set Up and Run the ES-931 Wage and Separation Report|
Page Name |
Definition Name |
Navigation |
Usage |
|
GVT_UCFE_PG |
Workforce Administration, Job Information, Reports, Setup Wage/Separation USF, Identification |
Enter ES-931 identification information for the wage and separation report. Note. The pages in the Setup Wage/Separation USF component pre-populate the fields for which data is already available and those pre-populated fields are inaccessible. Enter data for the remaining fields since data is required in all of the fields. |
|
|
GVT_UCFE_PAY_PG |
Workforce Administration, Job Information, Reports, Setup Wage/Separation USF, Annual Leave |
Enter ES-931 annual leave information for the wage and separation report. |
|
|
GVT_UCFE_SEV_PG |
Workforce Administration, Job Information, Reports, Setup Wage/Separation USF, Severance Pay |
Enter ES-931 severance pay information for the wage and separation report. |
|
|
GVT_PRINT_ES931 |
Workforce Administration, Job Information, Reports, Print Wage/Separation USF, Print Wage/Separation USF |
Run the Print Wage/Separation report (ES931). |
Entering ES-931 Employee Identification Information
Access the Setup Wage/Separation USF - Identification page (Workforce Administration, Job Information, Reports, Setup Wage/Separation USF, Identification).
|
Request Date |
Enter the date the information was transmitted. |
|
Local Office |
Enter the numerical ID of the requesting/record holding office. |
|
Claim Date |
Enter the effective date of the claim. |
|
Print ES931 |
Click to access the Print Wage and Separation component. |
|
Does this person perform "Federal Civilian Service?" |
Select if the employee performs Federal Civilian Service. |
|
If No |
If the employee does not perform Federal Civilian Service, enter an explanation. |
|
Is payroll office address based on SF-8? |
Select if the payroll office is based on an SF-8. |
|
If No, has claimant received an SF-8? |
Select if the payroll office is not based on an SF-8. |
Defaulted Data
The information in this group box is pre-populated from existing data, if that data exists. If you need to change a value in a field that was pre-populated, you can click the Edit Information link to make the fields accessible for edit.
Entering ES-931 Annual Leave Information
Access the Setup Wage/Separation USF - Annual Leave page (Workforce Administration, Job Information, Reports, Setup Wage/Separation USF, Annual Leave).
If the employee received a lump-sum payment for terminal annual leave, select Received a lump-sum payment(s) for terminal annual leave?. If selected, and the payment was received on or after the beginning date of the base period, or if the employee is currently entitled to such a payment, enter the related data in the Leave Payment Amount group box.
Entering ES-931 Severance Pay Information
Access the Setup Wage/Separation USF - Severance Pay page (Workforce Administration, Job Information, Reports, Setup Wage/Separation USF, Severance Pay).
If the employee has received or is entitled to receive severance pay, select Received or is entitled to receive severance pay by any Federal law or agency-employee agreement. If selected, enter the related data in the Severance Pay Information group box.
Generating the ES-931 Report
Access the Print Wage/Separation USF page (Workforce Administration, Job Information, Reports, Print Wage/Separation USF,Print Wage/Separation USF).
Once you have completed the necessary setup, run the Print Wage and Separation report (ES931). This prints an ES-931 Request for Wage and Separation Information report.