| Skip Navigation Links | |
| Exit Print View | |

|
Oracle Identity Synchronization for Windows 6.0 Installation and Configuration Guide |
| Skip Navigation Links | |
| Exit Print View | |

|
Oracle Identity Synchronization for Windows 6.0 Installation and Configuration Guide |
Part I Installing Identity Synchronization for Windows
Attributes and Attribute Mapping
Parameterized Attribute Default Values
Synchronizing Passwords With Active Directory
Directory Server Password Policies
Active Directory Password Policies
Creating Accounts Without Passwords
Configuring Windows for SSL Operation
Installation and Configuration Decisions
Connector Installation and Configuring the Directory Server Plug-In
Using the Command-Line Utilities
6. Synchronizing Existing Users and User Groups
9. Understanding Audit and Error Files
Part II Identity Synchronization for Windows Appendixes
A. Using the Identity Synchronization for Windows Command Line Utilities
B. Identity Synchronization for Windows LinkUsers XML Document Sample
C. Running Identity Synchronization for Windows Services as Non-Root on Solaris
D. Defining and Configuring Synchronization User Lists for Identity Synchronization for Windows
E. Identity Synchronization for Windows Installation Notes for Replicated Environments
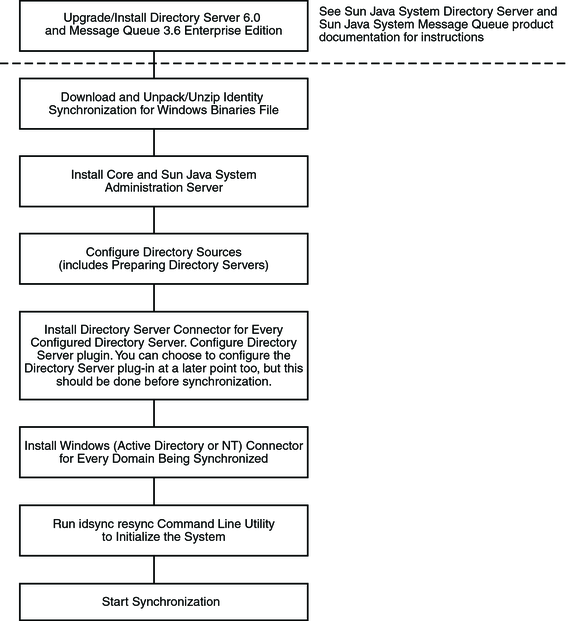
This section illustrates a single-host installation procedure for Identity Synchronization for Windows.
Figure 2-1 Single-host installation procedure

Some components must be installed in a particular order, so be sure to read all installation instructions carefully.
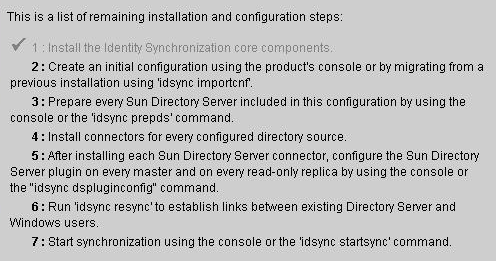
Identity Synchronization for Windows provides a “To Do” list, which is displayed throughout the installation and configuration process. This information panel lists all of the steps that you must follow to successfully install and configure the product.
Figure 2-2 To Do List for Identity Synchronization for Windows Installation and Configuration

As you go through the installation and configuration process, all completed steps in the list are grayed-out as shown in Figure 6–2.
The rest of this section provides an overview of the installation and configuration process.
When you install Core, you will be installing the following components:
Sun Java System Administration Server. Configures the Directory Server Plug-in and provides the administration framework.
Console. Provides a centralized location for performing all of the product’s component configuration and administration tasks.
Central logger. Centralizes all audit and error logging information in a central location.
System manager. Delivers configuration updates to connectors dynamically and maintains the status of each connector.
Instructions for installing Core are provided in Chapter 3, Installing Core
After installing Core, use Console to initially configure the directory sources to be synchronized and other characteristics of the deployment, all from a centralized location.
Instructions for configuring directory resources are provided in Chapter 4, Configuring Core Resources.
Before you can install Directory Server Connectors, you must prepare a Sun Java System Directory Server source for every preferred and secondary Directory Server that is being synchronized.
You can perform this task from the Console, or from the command line by using the idsync prepds subcommand.
Instructions for preparing Directory Server are provided in Preparing Sun Directory Source.
You can install any number of connectors depending on the number of configured directories in your topology. Both the Console and the installation program use the directory label to associate a connector with the directory that is synchronized. The following table describes the label naming conventions.
Table 2-1 Label Naming Conventions
|
Table 2-2 Label Naming Examples
|
Instructions for installing and configuring Connectors are provided in Chapter 3, Installing Core
After installing the connectors, plug-ins, and subcomponents, you must run the idsync resync command-line utility to bootstrap deployments with existing users. This command uses administrator-specified matching rules to do the following:
Link existing entries (for more information about linking users , see Linking Users)
Populate an empty directory with the contents of a remote directory
Bulk-synchronize attribute values (including passwords) between two existing user populations, where entries in both the Windows and Directory Server directories are uniquely identified and linked to each other
Instructions for synchronizing existing users in your deployment are provided in Chapter 6, Synchronizing Existing Users and User Groups.