| Oracle® Enterprise Data Quality for Product Data Knowledge Studio Reference Guide Release 5.6.2 Part Number E23610-03 |
|
|
View PDF |
| Oracle® Enterprise Data Quality for Product Data Knowledge Studio Reference Guide Release 5.6.2 Part Number E23610-03 |
|
|
View PDF |
Standardizing individual Item Definitions is different than assigning global standardizations as described in previous chapter. With Item Definition standardization, you select how you want the data to be standardized within the context of a specific Item Definition and the standardization only applies to that one Item Definition.
For example, you might want to standardize pen color differently from pencil color. By creating a rule for the color attribute of pens, you can ensure that the output data contains colors as they relate to pens only. A separate color rule for pencils could be defined so that the output relates only to pencil colors. These rules would not globally standardize colors for all Item Definitions, only for the pen and pencil Item Definitions; these rules would override any global standardization.
The Standardize Item tab and the associated sub-tabs provide you with all of the functionality needed to standardize your data at Item Definition level.
The Standardize Attributes sub-tab is the default when selecting the Standardize Items tab for the first time.
The Standardize Attributes sub-tab has several distinct functional representations to provide you with the ability to numerically rewrite rules, automatically rewrite rules globally, or reorder phrase productions.
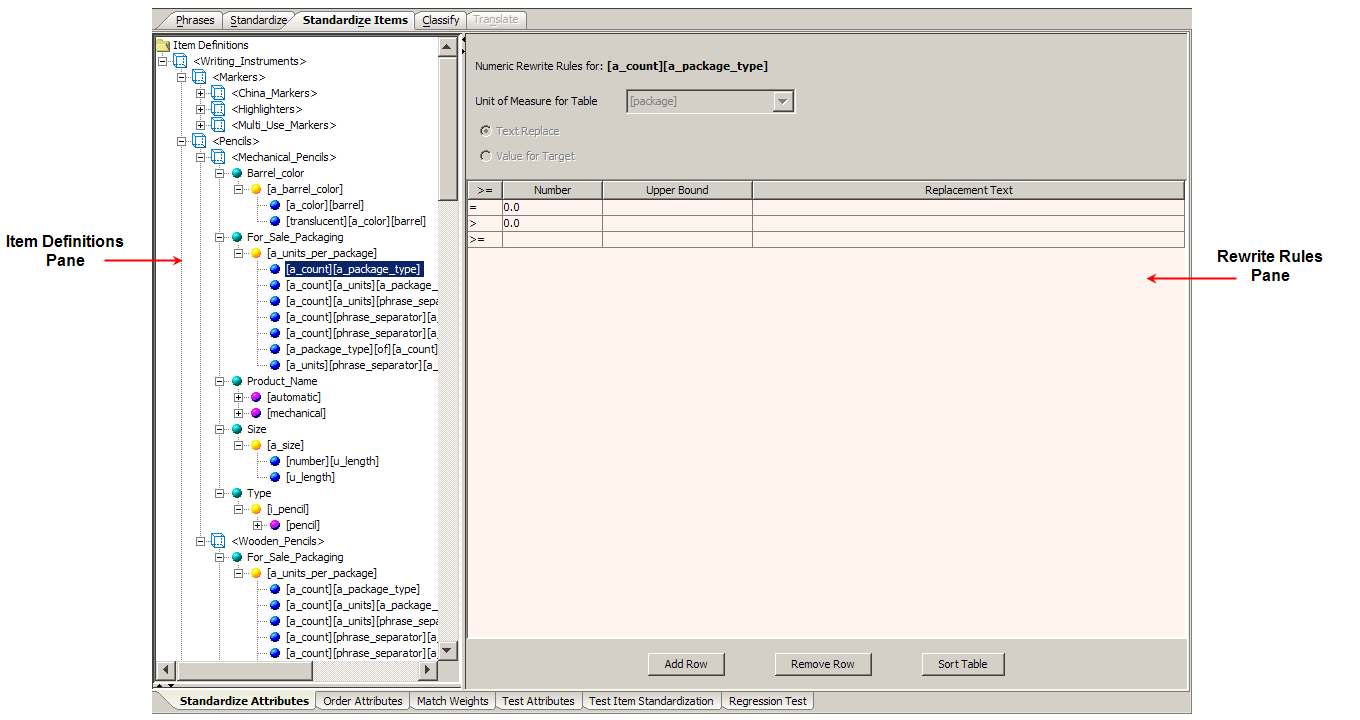
All of the Item Definitions in your data lens are displayed in the Item Definitions pane. You can select an Item Definition, attribute, phrase, or term.
The full hierarchy of the parent Item Definition is displayed though all children Item Definitions do not automatically display the underlying attributes. You must double-click on an Item Definition to expand the full attribute structure for viewing and standardizing. Alternatively, you can use the Expand Node option. However, if the parent Item Definition contains attributes (identified by a red, square icon rather than blue), this Item Definition and its children Item Definitions are automatically expanded and fully visible.
Note:
The attributes of a parent Item Definitions that only contains attributes (denoted with a red, square icon) can be standardized in the same manner as all other attributes.Once you have expanded an Item Definition, the attributes are displayed and will remain so because they have been added to the Item Definition hierarchy and are now in memory. Displaying an entire large Item Definition hierarchy requires a great deal of memory so this behavior ensures that the Item Definition pane is populated quickly and with a minimum of memory.
The behavior of the Standardize Attributes sub-tab is dependent on the selection made in this pane. For example, the selection of a term results in the appearance of the Nodes for Insertion pane and the Rewrite Rules pane changes to an Ordering Rule pane.
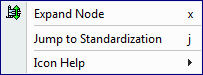
The context-sensitive menu for this pane has the following possible menu options:
| Expand Node
Use this option to expand the hierarchical structure of the current selection. Copy to… |
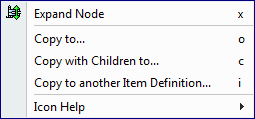 |
| Copy with Children to…
See "Sharing Item Definitions Standardizations". Copy to another Item Definition… |
|
| Jump to Standardization
Use this option to go to the Standardize Phrases sub-tab of the Standardize tab to set a global standardization rule. |
 |
The Rewrite Rules pane makes it easy for you to create standardization rules by providing four different methods that are based on the type of selection made in the Item Definitions pane.
The Numeric Rewrite Rules representation of the Rewrite Rules pane allows you to standardize number-based Item Definition attributes based on numerical values, such as standard units of measurement.
The default Numeric Rewrite Rules pane is a text replacement.
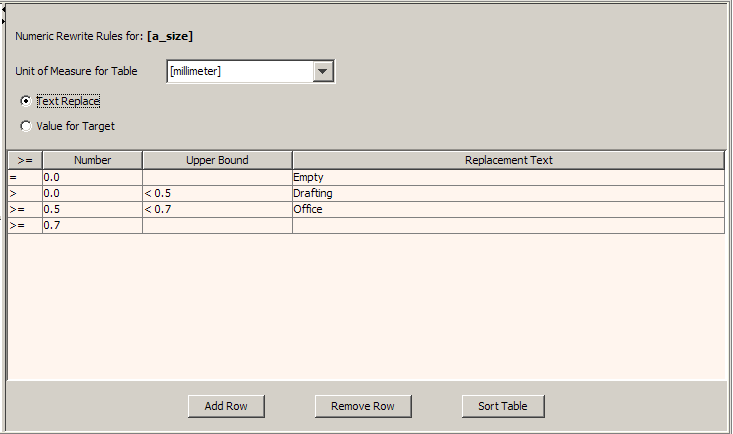
The Unit of Measure for Table list allows you to select the numerical value you want to standardize in the table below it. This list is populated with all of the units of measure in your data lens.
The buttons are used as follows:
Adds rows to the table one row at a time.
Deletes the row that is active or the bottom row. Some rows cannot be deleted.
Caution:
There is no delete verification prompt and rows cannot be restored.The table is sorted.
The Text Replace and Value for Target options allow you to choose a method of replacement for the selected rules, by text or by value.
The columns of the text replace table operate as follows:
Indicates the lower bound and cannot be edited.
The number to replace with standardized text, which is automatically populated based on the entries in the Upper Bound column.
A number at which you want this replacement rule to stop (upper bound) for the given Number. Depending on the preceding row, the fields in this column are either automatically populated or you can enter new data.
Allows you to enter the text with which the specified Number will be replaced.
The value replacement table operates similar to the text replace table.
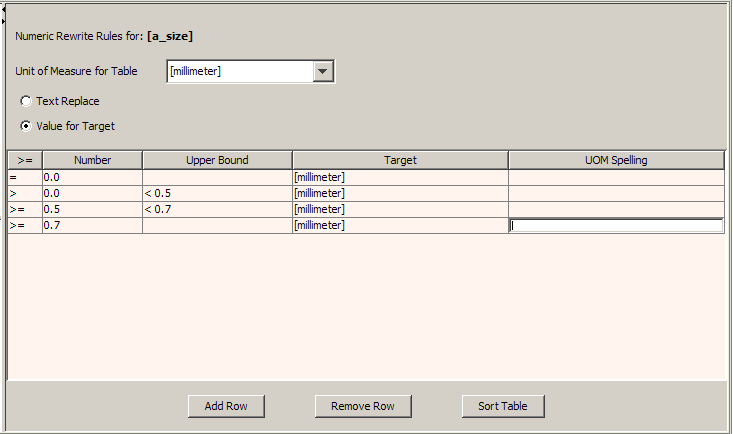
The first three columns operate as previously described. The Target and UOM Spelling columns replace the Replacement Text column so that you can provide values rather than text.
The Target column is a list of unit of measurements from which you can choose.
The UOM Spelling column allows you to enter what spelling the output data will be for the selected Target.
If you want to delete a value replacement table associated with a particular phrase, right-click on the phrase and click Reset Table.
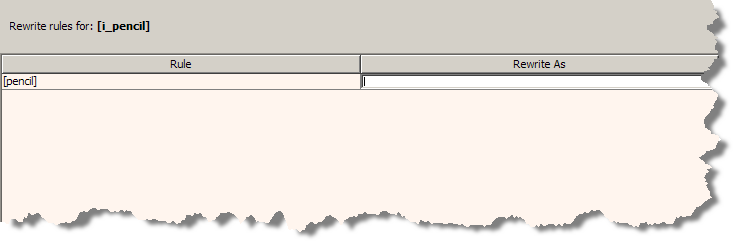
This simplified Rewrite Rules pane allows you to define new text for the selected rule by entering the replacement text into the Rewrite As field.
Selecting a term from the Item Definitions pane, changes the Numeric Rewrite Rule pane to an automatic Rewrite Rules pane to allow you to set a global standardization rule for the selected term. This functionality is identical to the Standardize Phrases sub-tab of the Standardize tab and is described in the previous chapter.
Selecting a phrase production from the Item Definitions pane, changes the Numeric Rewrite Rules pane to an Ordering Rule pane to allow you to reorder the phrase or add productions. This functionality is identical to the Standardize Phrases sub-tab of the Standardize tab and is described in the previous chapter.
The Order Attributes sub-tab allows you to define the order in which Item Definition attributes are ordered in the output data.

This pane allows you to choose only a specific Item Definition or all Item Definitions in your data lens.
Note:
The active selections in this section are based on which Item Definition you have selected.The Selection pane allows you to select which Item Definition attributes you want to match on (show) by moving attributes from the Ordered Item Definition Attributes to Show list to the Item Definition Attributes not Shown list. All of the attributes in the Ordered Item Definition Attributes to Show list will be used for matching and shown in your standardized output.
Attributes are moved between lists using the right and left arrows or by double-clicking on an attribute. The up and down arrows are used to change the match and output representation order.
The Reset All Rules button is only active when the Item Definitions folder has been selected. It can be used to reset all Null and Multiple Instance Handling settings for all of the Item Definitions in your data lens.
The Null Handling section allows you to choose how you want null attribute values processed and is applicable to all the attributes listed in the Selection pane. The processing choices for null values are as follows:
Empty attributes are allowed.
Empty attributes are replaced with the text entered in the field.
Empty values are not allowed in the data lens.
Empty values are ignored.
The Multiple Instance Handling section allows you to choose how you want multiple attribute values to be processed. The processing choices are as follows:
Multiple instances of an attribute are allowed.
Multiple instances of an attribute are replaced with the text entered in the field.
This feature is deprecated.
The first occurrence of an attribute is selected for output; all subsequent attribute values are ignored.
The unique multiple instances of an attribute are concatenated together with the specified string. Additionally, this operation sorts the attribute values (either numerically or alphabetically, depending on the nature of the attribute value.)
The Match Weights sub-tab allows you to set the number of attributes to be matched and the order the selected attributes are matched for a specific Item Definition. This sub-tab is not active until a Match Type is created as described in "Match Type".

This pane allows you to choose one Item Definition for which you want to change the match ranking.
The Selection pane allows you to select, which Item Definition attributes you want to match on from those displayed in the list. This selection occurs automatically by increasing or decreasing the number in the Number of required attributes list. The selection begins with the first item in the list and sequentially selects downward.
The up and down arrows are used to change the match ranking of the selected attributes, moving those that are most important to use for matching to the top of the list. These arrows are activated when you select one attribute from the list.
After you have identified your matching attributes in each Item Definition, your Match Type is complete. The use of these attributes to create matched items occurs within the Matching DSA.
Note:
Matching data is a complex process that is configured using the Application Studio, Knowledge Studio, as well as the Governance Studio.Duplicate and nearly duplicate data is identified and matched for an Item Definition. There are many reasons for wanting to identify duplicate data, both within and between data sets. The problem with duplicate identification is that records may not have identical forms so they cannot be found through standard string comparison methods. For example, 'Ballpoint Pen Refill Med Pt Black Ink 2 / Pk' and 'Ballpoint Pen Refill Medi, Point black, ink 2 / Pack' might refer to to the same item, even though 'Pack' is spelled differently.
The actual matching of data occurs within a DSA though the foundation for creating matches is in the data lens. The matching function is based on a comparison of attribute values. If the match-attribute values for multiple lines of data are equivalent, then the items are identified as matches.
Depending on the use case you develop, you may want to match on part number, manufacturer, and brand. In that case, you would select these three attributes to participate in the matching process.
Another use-case example is one that requires matching items based on form, fit, and function. The match could be defined based on length, width, height, color, and material.
It is important to realize the following:
matching requires both a standardization type and a match type
matching is done on attributes occurring within a given Item Definition
matching requires certain settings for null and multiple attribute handling
The Test Attributes sub-tab allows you to review your attribute standardization rules by Item Definition that are applied to your sample data to validate your results.
All of the Item Definitions in your data lens are listed for your selection.
The Show Value and Show Text options can be used to change the way the data is viewed. Select Show Text to ensure that units of measure are displayed.
You can test the attributes for any of the Item Definitions in your data lens by selecting a different Item Definition from the list. All of the data on this tab is changed to display the date related to the new Item Definition selection.
By default, only the data for active Item Definitions is displayed. For information about viewing inactive Item Definition data, see "Active vs. Inactive Item Definitions".
This table displays the original data and the same data after it has been standardized. The columns, left to right, indicate the following:
The unique number assigned to that line of data.
A number between 0 and 100 that represents the degree to which the Item Definition for the line has been standardized.
Data you have reviewed and marked as such by selecting the check box in that line of data.
The original data that was parsed by the data lens.
The remaining columns are dependent on the attributes for each Item Definition so these columns vary.
Each of the columns that contain data can be used to sort the table, both ascending and descending, by clicking on the column title. Clicking a column heading once sorts the table, by the items in the selected column, in ascending alphabetically order. Clicking the same column heading a second time sorts the table again in descending alphabetical order.
Selecting one of the lines in the Sample Data Table displays the Item Definition information for the selection in the Standardized Attribute Table.
This field contains the original data. This field can be edited and when you press Enter, you can review the immediate effects on the data lens.
The standardized version of the original data is displayed in the field; it cannot be edited.
The Attribute Separator field allows you to specify a delimiter for the attribute values.
The Append Unattributed Text check box allows you to append the data that has been recognized though is not part of the Item Definition.
Similarly, the Append Unparsed Text check box appends unparsed text to your description.
The Test Item Standardization sub-tab allows you to review the Item Definition standardization rules that you have created applied to your sample data to validate your results.
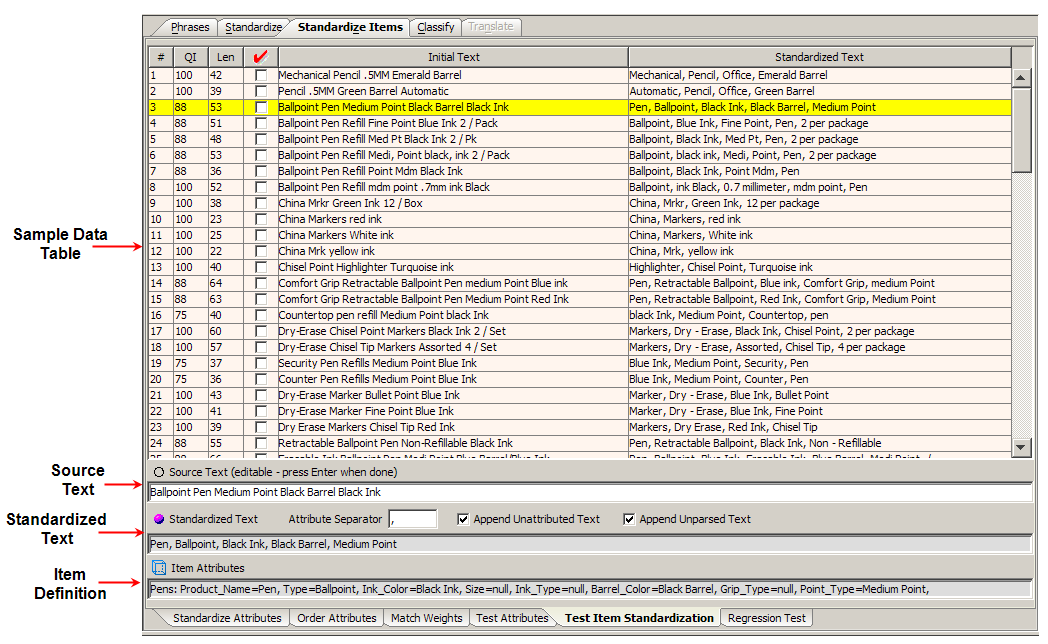
By default, only the data of active Item Definitions is displayed. For information about viewing inactive Item Definition data, see "Active vs. Inactive Item Definitions".
Several of the columns of this table are the same as those on the Test Attributes sub-tab (see "Test Attributes Sub-Tab") and this table operates the same way. The differing columns are as follows:
Indicates the character length of the original text.
Indicates the standardized original text.
The standardized version of the original data is displayed in the field; it cannot be edited.
The Attribute Separator field allows you to enter a textual separator for use between attributes.
The Append Unattributed Text check box; selecting this box appends all text that has not been attributed to your description.
Similarly, the Append Unparsed Text check box appends unparsed text to your description.
Regression testing is an important part of data standardization so that you can be sure that your data output is as you expect.
Standardize Items regression testing only works for lines that have an Item Definition. If there is no Item Definition that recognizes the line, no regressions are displayed.
If the tab is not active, set the Regression Testing Active data lens option. For more information, see "Ensuring Regression Testing is Active".
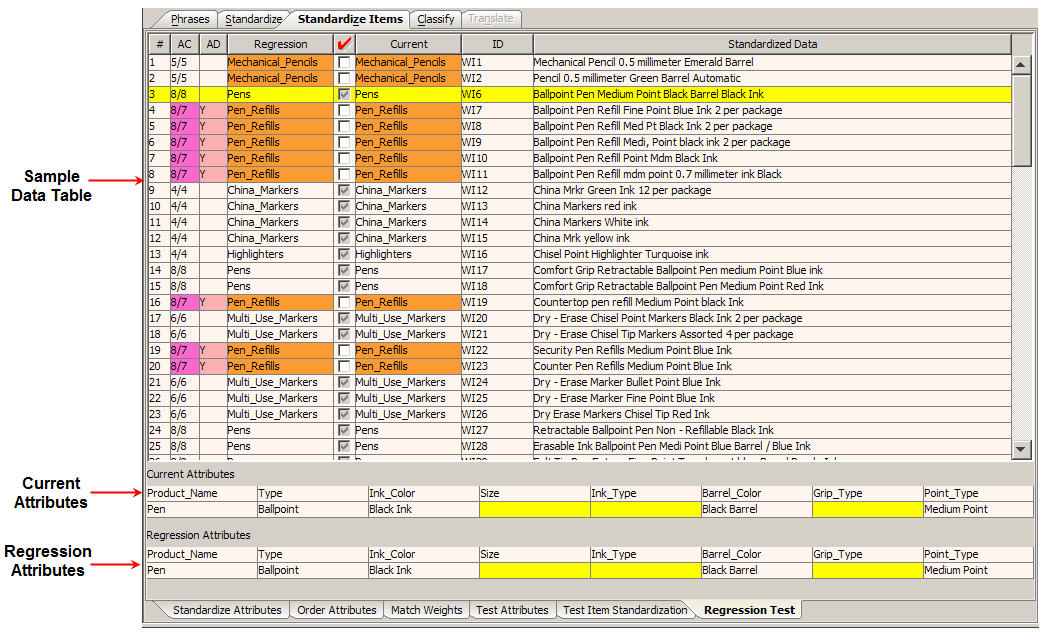
This table displays the regression and current view of the sample data and attributes.
If there is no data displayed in the Sample Data Table, the sample data has not been initialized; a regression base does not exist. For information about initializing the regression base, see "Creating and Updating the Regression Base".
The columns, left to right, indicate the following:
Line Number assigned to the line of sample data.
Attribute Count displays the attribute count for the Regression and Current Attributes.
Attribute Differences displays number of attribute differences between the Current and Regression files.
Item Definition assigned to the line of data based on the Regression file.
The red check mark or Review column indicates new or changed lines of data and the text on these lines should be reviewed. If the information in the Current Text column is correct and you want to accept the changes as valid progressions, select this check box so that the data is included in the regression testing.
The regression base is updated with the reviewed and accepted lines of text using the Update Regression Base option on the File menu.
Item Definition assigned to the line of data based on the Current file.
Unique identifier assigned to the sample data that was included as part of the sample data.
This is based on any Global Line Order standardization that may have been setup.
These sections display the current and regression attributes for the selected line of data in the Sample Data Table.
The best practice in creating a regression base is to combine your sample data into a one file. For more information, see "Combining Sample Files".
Combining files does not remove any data; it simply combines the selected sample files into a new, larger file.
Next, make single changes to your regression base sample data file, check your regression sets, and update them as appropriate. Making multiple changes can make the regressions hard to read, which increases the chance that an error is overlooked or is much harder to fix.
To create the regression base, select the Create New Regression Base option on the File menu, and then select the sample data file that you want to use for regression testing. This initializes the regression base and displays the results in the After pane.
You can update the regression base with the reviewed and accepted lines of text (as previously described in red check mark column) using the Update Regression Base option on the File menu.
Note:
You should only initialize or update the regression base if you have reviewed or accepted the sample data.To use the Enterprise DQ for Product matching functionality you must create a match schema, or match type, to be used throughout your data lens. You can create one or more match types that can be used to change how your data is matched depending on your use case.
Note:
You must configure how you want multiple instances and null values handled before you create a match type as described in"Order Attributes Sub-Tab".This feature is accessed from the Data Lens menu, by clicking Match Types…, and then clicking the Add New button.
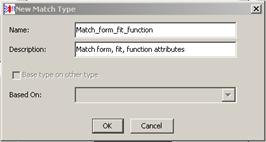
Enter the requested information to create your new match type that will be added as a selection option to the Match Types list.
The creation and selection of a Match Type is necessary to activate the Match Weights sub-tab.
|
Copyright © 2001, 2011, Oracle and/or its affiliates. All rights reserved. Legal Notices |
|