| Skip Navigation Links | |
| Exit Print View | |

|
Sun Server X2-8 (formerly Sun Fire X4800 M2) Service Manual Sun Server X2-8 (formerly Sun Fire X4800 M2) Documentation Library |
| Skip Navigation Links | |
| Exit Print View | |

|
Sun Server X2-8 (formerly Sun Fire X4800 M2) Service Manual Sun Server X2-8 (formerly Sun Fire X4800 M2) Documentation Library |
Sun Server X2-8 Service Manual Overview
Controlling Server Power Remotely
Removing and Installing Components
Preparing for Service and Operation
Removal and Installation Procedures
Removing and Installing a Power Supply (CRU)
Removing and Installing a Hard Drive (CRU)
Removing and Installing a Hard Drive Filler
Replacing the Hard Drive Backplane (FRU)
Adding, Removing, and Installing a CMOD (CRU)
CPU Module (CMOD) Designation and Population Rules
Removing and Installing a CMOD Filler
How to Replace the CMOD Battery (CRU)
Removing and Installing DIMMs (CRU)
Removing and Installing a RAID Expansion Module (CRU)
Removing and Installing a Fabric Expansion Module (CRU)
Replacing a CPU and Heatsink Assembly (FRU)
How to Remove a CPU and Heatsink Assembly (FRU)
Removing and Installing a Fan Module (CRU)
Replacing a Fan Module Controller Board (FRU)
Removing and Installing a NEM or a NEM Filler (CRU)
Removing and Installing a PCIe EM (CRU)
Removing and Installing the Service Processor Module (CRU)
Removing and Installing the Multiport Cable
Removing and Installing the Subassembly Module (FRU)
Sun Server X2-8 Service Procedures and Information
Firmware Information and Procedures
How to Access the BIOS Setup Utility
Component LED Locations and Functions
Sun Server X2-8 Specifications
How to Request Physical Media Online
Use this procedure to install a CPU. A CPU replacement kit contains a CPU, an alcohol wipe, and a syringe of thermal compound. When you replace a CPU, the heatsink is reusable. Do not discard the heatsink.
An animation of the procedure to install a CPU is available. See animation showing CPU installation.
Before You Begin
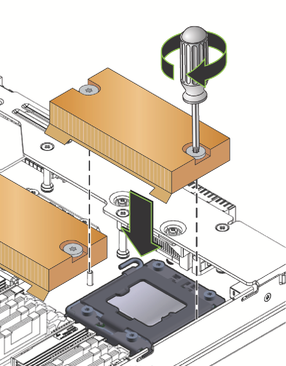
The underside of the heatsink contacts the top of the CPU.

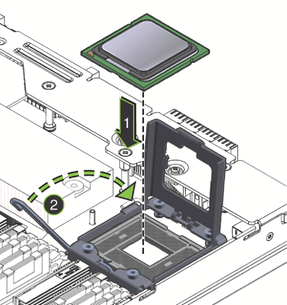
One corner of the CPU is marked with a triangle, and one corner of the socket is also marked with a triangle. These two triangles must align. When these are aligned, the keying notches in the CPU and tabs on the socket line up as well.
When properly installed, the CPU fits snugly within the socket.
 | Caution - Possible component damage. The pins in the CPU socket can be easily damaged if touched or if the CPU is installed incorrectly. Do not drop the CPU onto the socket. The CPU sits atop the socket and does not require insertion. Do not press down on the CPU. |
To ensure an even application of compound, apply the contents in the shape of an asterisk.
 | Caution - Possible thermal-related component damage. To ensure the proper transfer of heat away from the surface of the CPU, apply the entire contents of the syringe. |

 | Caution - System thermal failure or component damage. Once the bottom of the heatsink contacts the top of the CPU, do not move the heatsink. Excessive heatsink movement can cause the thermal compound to smear and become uneven. This can result in voids in the compound that can negatively impact the transfer of heat away from the CPU. |
Turn each screw one-half a turn at a time.
Next Steps