| Skip Navigation Links | |
| Exit Print View | |

|
Sun Server X2-8 (formerly Sun Fire X4800 M2) Installation Guide for Linux Operating Systems Sun Server X2-8 (formerly Sun Fire X4800 M2) Documentation Library |
| Skip Navigation Links | |
| Exit Print View | |

|
Sun Server X2-8 (formerly Sun Fire X4800 M2) Installation Guide for Linux Operating Systems Sun Server X2-8 (formerly Sun Fire X4800 M2) Documentation Library |
Oracle Hardware Installation Assistant (OHIA)
How to Erase Your Boot Hard Disk
Selecting a Media Delivery Method
Local Installation by Accessing the Console Using the Serial or Video Port
Remote Installation by Accessing the Console Using Oracle ILOM
Installing Oracle Linux From Distribution Media
Installing Red Hat Enterprise Linux
Installing RHEL From Distribution Media
Installing SUSE Linux Enterprise Server
Installing SLES From Distribution Media
Configuring a Linux Server to Support PXE Installation
How to Install and Configure a DHCP Server for PXE
How to Install Portmap on Your PXE Server
How to Configure the TFTP Service on Your PXE Server
How to Configure PXELINUX on Your PXE Server
How to Configure the NFS Service on Your PXE Server
How to Create a PXE Installation Image for Oracle Linux
How to Create a PXE Installation Image for RHEL
How to Create a PXE Installation Image for SLES
How to Create a PXE Installation Image for Oracle VM
How to Install Linux From a PXE Server
Identifying Logical and Physical Network Interface Names for Linux OS Configuration
How to Identify Logical and Physical Network Interface Names While Installing Oracle Linux or RHEL
How to Identify Logical and Physical Network Interface Names While Installing SLES
Use these steps to help you identify the logical names of your physical network ports. This information will be necessary during the installation and configuration of the operating system.
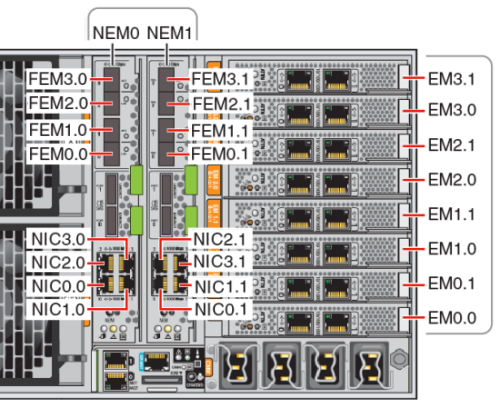
A fully loaded Sun Server X2-8 might have the following ports:
FEM: This is a Broadcom 10GbE port. These ports require a Fabric Expansion Module (FEM) installed on each CPU module for each NEM (for a total of two per CPU module).
PCIe EM: This is a PCIe ExpressModule (EM) slot. There are two assigned per CPU module. If a network interface card is installed, it can have more than one port.
NIC: This is an Intel 1GbE port. There are two assigned per CPU module.

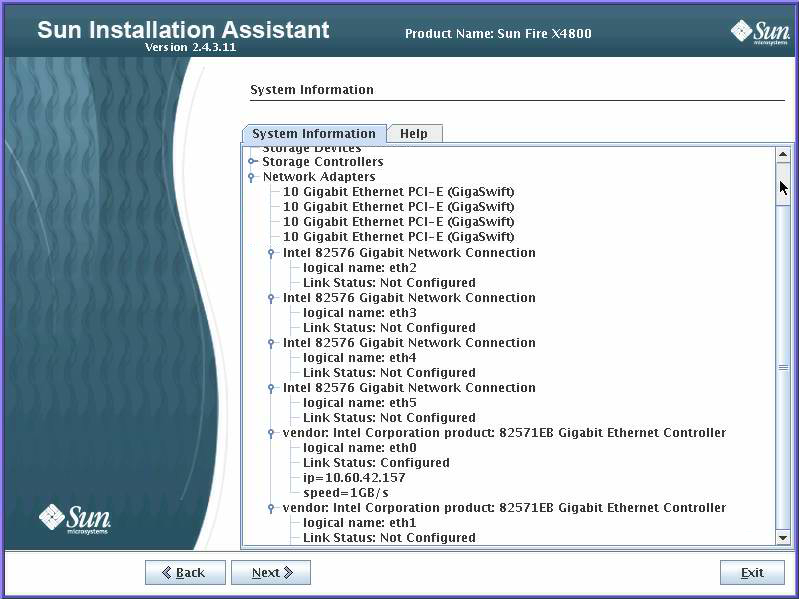
Even if you do not plan on using OHIA to assist in the operating system installation, it will provide important information in identifying installed components. For information about using OHIA, see Oracle Hardware Installation Assistant (OHIA).
Installed FEM devices are labeled as 10 Gigabit Ethernet PCI-E (GigaSwift).
Installed NIC devices labeled as Intel 82576 Gigabit Network connection.
Installed PCIe EM devices have vendor: as the label prefix. An example might be: vendor: Intel Corporation product: 82571EB Gigabit Ethernet Controller.

During system boot, ports are enumerated and assigned logical names based on the system PCIe scan order. Note that although OHIA lists the correct logical name (eth0, eth1, eth2, and so on), it does not necessarily list ports by logical name order.
|
Use this information during software installation to ensure network ports are configured correctly.