| Skip Navigation Links | |
| Exit Print View | |

|
Sun Blade X3-2B Product Documentation |
Sun Blade X3-2B Model Name Change
Getting the Latest Firmware and Software
Hardware Installation and Product Notes
About the Chassis Monitoring Module (CMM)
Replaceable Server Module Components
Replaceable Components (FRUs and CRUs)
Preparing the Sun Blade X3-2B for Service
Obtaining the Server Module Serial Number
Powering Off the Server Module
Graceful Power Off Using the Power Button
Immediate Power Off Using the Power Button
Remote Power Off Using Oracle ILOM SP CLI
Remote Power Off Using Oracle ILOM SP Web Interface
Performing ESD and Antistatic Prevention Measures
Manage the Locate LED Remotely From Oracle ILOM SP Web Interface
Manage the Locate LED Remotely From Oracle ILOM CLI
Remove the Server Module Top Cover
Removing or Inserting Filler Panels
Remove Server Module Filler Panels
Insert Server Module Filler Panels
Servicing Sun Blade X3-2B Components
Servicing a Storage Drive (CRU)
Identifying Storage Drive LEDs and Mechanical Components
About Storage Drive Failure and RAID
Remove Storage Drive Filler Panels
Insert Storage Drive Filler Panels
DIMM Population Rules and Guidelines
Remove Optional DIMM Filler Panels
Install Optional DIMM Filler Panels
Replace the System Battery (CRU)
Servicing USB Flash Drives (CRU)
Servicing a Fabric Expansion Module (CRU)
Servicing a RAID Expansion Module (CRU)
Replace a REM Battery on the REM Card
Remove the REM Storage Drive Cable
Install the REM Storage Drive Cable
Servicing a Processor and Heat Sink Assembly (FRU)
Processor Fault Remind Circuit
Clear Server Module Processor Faults
Servicing the Motherboard Assembly (FRU)
Remove and Install a Processor Cover Plate
Motherboard Assembly Replacement
Returning Sun Blade X3-2B to Operation
Install the Server Module Top Cover
Install the Sun Blade X3-2B in the Chassis
Power On Using Oracle ILOM SP CLI
Power On Using Oracle ILOM SP Web Interface
Troubleshooting the Sun Blade X3-2B
Diagnosing Server Module Hardware Faults
Troubleshooting Using LED Status Indicators
Using the DIMM and Processor Test Circuit
Troubleshooting Server Module Power States
Troubleshoot Server Module Power Issues
Firmware and Software Troubleshooting
Recovering from Corrupted Service Processor Firmware
BIOS Power-On Self-Test (POST) Checkpoints
About POST Code Checkpoint Memory Testing
View BIOS POST Code Checkpoints Using Oracle ILOM Web Interface
View BIOS POST Code Checkpoints Using Oracle ILOM CLI
POST Code Checkpoint Reference
Getting Server Firmware and Software
Firmware and Software Access Options
Available Software Release Packages
Accessing Firmware and Software
Download Firmware and Software Using My Oracle Support
The server module must be removed from the Sun Blade 6000 chassis to:
Service CRU and FRU internal system components such as: system battery, cables, rear USB drives, DIMMs, processors (CPU), REMs and FEMs.
Access Fault Remind buttons for processors and DIMMs.
Note - You do not need to remove the server module from the Sun Blade chassis to service storage drive components on the Sun Blade X3-2B front panel.
See Access Oracle ILOM Using CLI in Sun Blade X3-2B (formerly Sun Blade X6270 M3) Administration Guide.
The CLI prompt appears: –>
-> set /System/ action=prepare_to_remove
-> show /System/ health
/System
Properties:
health = Offline
->
Offline status ensures that no firmware updates are taking place before you remove the blade.
 | Caution - Component damage or data loss. Server modules should be removed only if the blue LED is lit, or if you are certain that a firmware update is not in progress. Pulling the server module out of the chassis during a firmware update might damage the server module, which might not be repairable in the field. |
See Powering Off the Server Module.
When the server module is in standby power mode, the OK LED on the front panel blinks (0.1 second on, 2.9 seconds off).
 | Caution - Component damage or data loss. Do not install a server module into the chassis until at least 20 seconds has elapsed since the server module was disengaged from the chassis mid-plane connector. |
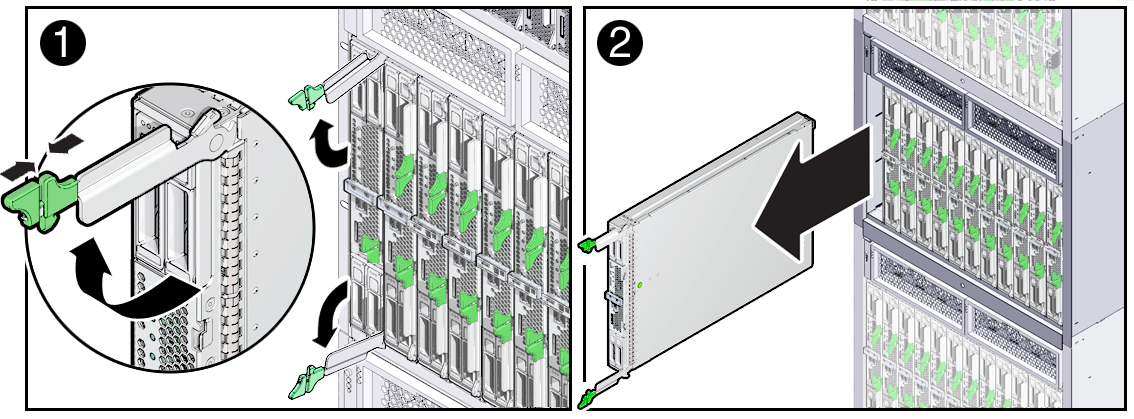
The result of this action disengages the server module, places it in a no-power state, and leaves it protruding approximately three inches from the front of the chassis.
 | Caution - Component damage or personal injury. Do not attempt to remove the server module using only the ejector levers. |

 | Caution - Component damage or data loss. Server modules should be removed only if the blue Ready to Remove LED is lit, or if you are certain that a firmware update is not in progress. Pulling the server module out of the chassis during a firmware update might damage the server module, which might not be repairable in the field. |
 | Caution - Component damage or personal injury. Blades can weigh up to 22 lbs (10kg). Use two hands to install or remove the blade from the chassis. |
See Performing ESD and Antistatic Prevention Measures.
 | Caution - Component damage. Observe the proper ESD precautions when handling the server module. Wear a securely grounded ESD wrist strap. Handle components by the edges only. Do not touch metal contacts. Damage to system components can occur through improper handling. |
See Insert Server Module Filler Panels.
 | Caution - Over-temperature condition. Always insert a server module filler panel into an empty slot within 60 seconds to reduce the possibility of server module shutdown. Do not operate the chassis with empty slots. If you operate the chassis with an empty server module slot, you might notice a reduction in system performance. Possible system and component over-temperature warnings, shutdown, and heat-related damage might be caused by empty chassis slots. |
See Also
Oracle Integrated Lights Out Manager (ILOM) 3.1 Documentation Collection
Next Steps