JavaScript is required to for searching.
Skip Navigation Links
Exit Print View
Oracle Java CAPS Adapter for DB2 Tutorials     Java CAPS Documentation
search filter icon
search icon

Document Information

Oracle Java CAPS Adapter for DB2 Tutorials

About the Oracle Java CAPS Adapter for DB2 Sample Projects

Sample Input Trigger Files and Output Files

Sample Project Data

Operations Used in the DB2 Sample Projects

About the Oracle Java CAPS Business Process Manager Project

Associating Business Process Manager Operators

Deploying JCD-Based Operations in the Business Process Manager

About the Java Collaboration Definition Sample Project

Importing Non-JBI Based Sample Projects

To Import a Non-JBI Based Sample Project

Running the SQL Script

Creating the Java Collaboration Definition-Based Project for the Oracle Java CAPS Adapter for DB2

Creating a New Project

Create a Project

Creating the OTDs

Create the DB2 Database OTD

Create the Inbound and Outbound DTD OTDs

Creating the Collaboration Definitions (Java)

Create the Java Collaborations

Using the Java Collaboration Editor to create Business Rules

Creating the Business Rules for the jcdDelete Collaboration

Create the jcdDelete Collaboration Business Rules

jcdDelete Collaboration Java Code

Creating the Business Rules for the jcdInsert Collaboration

Create the jcdInsert Collaboration Business Rules

jcdInsert Collaboration Java Code

Creating the Business Rules for the jcdPsSelect Collaboration

Using the Collaboration Editor's Java Source Editor

Create the jcdPsSelect Collaboration Business Rules

Creating the Business Rules for the jcdTableSelect Collaboration

Create the jcdTableSelect Collaboration Business Rules

jcdTableSelect Collaboration Java Code

Creating the Business Rules for the jcdUpdate Collaboration

Create the jcdUpdate Collaboration Business Rules

jcdUpdate Collaboration Java Code

Next Steps

Creating the Connectivity Maps

Adding Connectivity Maps to a Project

Add the Connectivity Maps to the Project

Populating and Binding the Connectivity Maps using the Connectivity Map Generator

Populate the Connectivity Maps using the Connectivity Map Generator.

Creating an Environment

Create the Environment

Configuring the Adapter Properties

Configuring the Connectivity Map Properties

Configure the Connectivity Map Properties

File1 Inbound Adapter Properties

File2 Outbound Adapter Properties

DB21 Outbound Adapter Properties

Configuring the Environment Properties

Configure the Environment Properties

File Adapter Environment Properties

DB2 Adapter Environment Properties

What's the Next Step?

Creating the Deployment Profile

Create the Deployment Profile

Building and Deploying the Project

Building the Project

Build the Project

Deploying the Project from NetBeans

Deploy the Project

Running the Project

Run the project

Creating the BPEL-Based Project for the Oracle Java CAPS Adapter for DB2

Creating the Business Processes

Create the bpDelete Business Process

Create the bpInsert Business Process

Create the bpPsSelect Business Process

Create the bpTableSelect Business Process

Create the bpUpdate Business Process

Using Business Process Designer to Create Business Rules

Creating the bpDelete Business Rules

Create the bpDelete Business Rules

Creating the bpInsert Business Rules

Create the bpInsert Business Rules

Creating the bpPsSelect Business Rules

Create the bpPsSelect Business Rules

Creating the bpTableSelect Business Rules

Create the bpTableSelect Business Rules

Creating the bpUpdate Business Rules

Create the bpUpdate Business Rules

Using the Java Collaboration Editor to create Business Rules

The prjDB2_JCD Project uses five Java Collaborations you created previously. To complete the Collaborations, use the Java Collaboration Editor's Business Rules Designer to create the business rules.

The Java Collaboration Editor also allows you to enter Java code to create business rules. The Java Source code is provided at the end of each Collaboration section, and can be copied into the Collaboration Editor's Java Source Editor to create the Collaboration.

This section contains the following topics:

Creating the Business Rules for the jcdDelete Collaboration

The jcdDelete Collaboration implements the Input Web Service Operation to read the TriggerDelete.in file and then delete the record emp_no = 500. The Collaboration also writes a message to JCD_Delete_output1.dat to confirm a deleted record.


Note - The where clause in the business rule reads the trigger value as a placeholder for input. This permits you to modify the query to select a specific record. Also note that all records are selected from the database when the TriggerDelete.in file is empty.


Create the jcdDelete Collaboration Business Rules

  1. From the Project window, double-click the jcdDelete Collaboration under your project's jcdALL node.

    The Java Collaboration Editor opens to the jcdDelete Collaboration.

  2. Create the Copy "Deleting record............" to FileClient_1.Text rule.
    1. From the Business Rules Designer toolbar's String menu, select Literal String.

      A String method box is added to the Business Rules Designer canvas.

    2. Double-click the value field of the String method box and enter Deleting record............ as the value.
    3. Map the output node of the String method box, to Text, under FileClient_1 in the right pane of the Business Rules Designer. To do this, click on the output node of the String method box, and drag your cursor to the Textnode, under FileClient_1 in the right pane of the Business Rules Designer.

      A visible link now connects the output node of the String method box and the Text node. The Business Rules tree now displays the new rule: Copy "Deleting record............" to FileClient_1.Text.
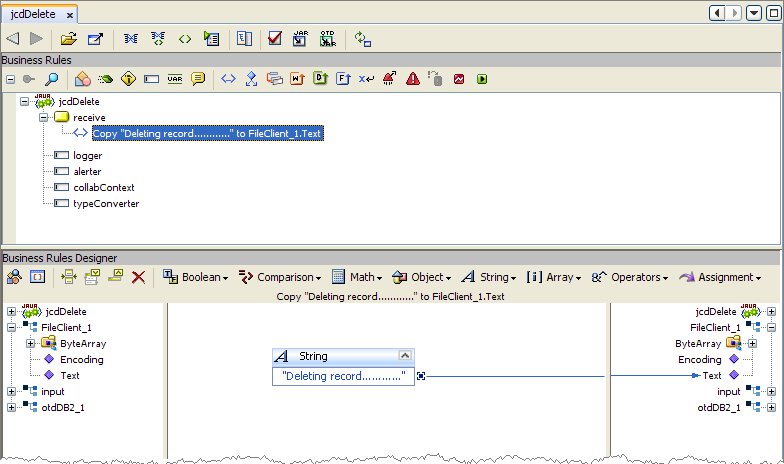

      image:Image shows the Java Collaboration Editor displaying the Copy
  3. Create the FileClient_1.write rule.
    1. Click the rule icon on the Business Rules toolbar to add a new rule in the Business Rules pane.
    2. Right-click the FileClient_1 node in the left pane of the Business Rules Designer, and choose Select method to call from the popup menu.

      The method selection window appears.

    3. Select and double-click write() from the method selection window.

      The write method box appears in the Business Rules Designer canvas. The FileClient_1.write rule is added to the Business Rules tree.


      image:Image shows the Java Collaboration Editor displaying the FileClient_1.write business rule.
  4. Create the otdDB2_1.Db_employee.delete(input.Text) rule.
    1. Click the rule icon on the Business Rules toolbar to add a new rule in the Business Rules pane.
    2. Right-click Db_employee under the otdDB2_1 node in the left pane of the Business Rules Designer, and choose Select method to call from the popup menu.

      The method selection window appears.

    3. Select delete(StringsWhere) from the method selection window.

      The delete method box appears in the Business Rules Designer canvas, and a link connects the Db_employee node in the left pane of the Business Rules Designer to the Db_employee input node of the delete method box.

    4. Map Text under the input node in the left pane of the Business Rules Designer, to the sWhere (String) input node of the delete method box.
      image:Image shows the Java Collaboration Editor displaying the otdDB2_1.Db_employee.delete(input.Text) business rule.
  5. Create the Copy "Delete Done." to FileClient_1.Text rule.
    1. Click the rule icon on the Business Rules toolbar to add a new rule in the Business Rules pane.
    2. From the Business Rules Designer toolbar's String menu, select Literal String.

      A String method box is added to the Business Rules Designer canvas.

    3. Double-click the value field of the String method box and enter Delete Done as the value.
    4. Map the output node of the String method box, to Text, under FileClient_1 in the right pane of the Business Rules Designer.
      image:Image shows the Java Collaboration Editor displaying the Copy
  6. Create the FileClient_1.write rule.
    1. Click the rule icon on the Business Rules toolbar to add a new rule in the Business Rules pane.
    2. Right-click the FileClient_1 node in the left pane of the Business Rules Designer, and choose Select method to call from the popup menu.

      The method selection window appears.

    3. Select and double-click write() from the method selection window.

      The write method box appears in the Business Rules Designer canvas. The FileClient_1.write rule is added to the Business Rules tree.

  7. Click Save All to save your current changes.

    The completed jcdDelete Collaboration definition appears as follows:
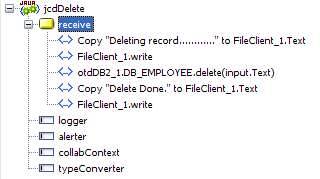

    image:Image shows the completed jcdDelete Java Collaboration Definition business rules.

jcdDelete Collaboration Java Code

The completed Java source code for the jcdDelete Collaboration appears as follows:

package prjDB2_JCDjcdALL;


public class jcdDelete
{

   public com.stc.codegen.logger.Logger logger;

   public com.stc.codegen.alerter.Alerter alerter;

   public com.stc.codegen.util.CollaborationContext collabContext;

   public com.stc.codegen.util.TypeConverter typeConverter;

   public void receive( com.stc.connector.appconn.file.FileTextMessage input,
com.stc.connector.appconn.file.FileApplication FileClient_1, 
otdDB2.OtdDB2OTD otdDB2_1 )
       throws Throwable
   {
       FileClient_1.setText( "Deleting record............" );
       FileClient_1.write();
       otdDB2_1.getDB_EMPLOYEE().delete( input.getText() );
       FileClient_1.setText( "Delete Done." );
       FileClient_1.write();
   }

}

Note - The above code has been wrapped for display purposes.


Creating the Business Rules for the jcdInsert Collaboration

The jcdInsert Collaboration implements the Input Web Service Operation to read the TriggerInsert.in. file. It then unmarshals data from the input data into the otdInputDTD_DBEmployees OTD, calls the otdDB2 OTD, and inserts records into the database via a For Loop. The Collaboration also writes a message to JCD_Insert_output1.dat to confirm an inserted record.

Create the jcdInsert Collaboration Business Rules

  1. From the Project window, double-click the jcdInsert Collaboration under your project's jcdALL node.

    The Java Collaboration Editor opens to the jcdInsert Collaboration.

  2. Create the Copy "Inserting records in to db_employee table......" to FileClient_1.Text rule.
    1. Click the rule icon on the Business Rules toolbar to add a new rule in the Business Rules pane.
    2. From the Business Rules Designer toolbar's String menu, select Literal String.

      A String method box is added to the Business Rules Designer canvas.

    3. Double-click the value field of the String method box and enter Inserting records in to db_employee table...... as the value.
    4. Map the output node of the String method box, to Text, under FileClient_1 in the right pane of the Business Rules Designer.
  3. Create the FileClient_1.write rule.
    1. Click the rule icon on the Business Rules toolbar to add a new rule in the Business Rules pane.
    2. Right-click the FileClient_1 node in the left pane of the Business Rules Designer, and choose Select method to call from the popup menu.

      The method selection window appears.

    3. Select and double-click write() from the method selection window.

      The write method box appears in the Business Rules Designer canvas. The FileClient_1.write rule is added to the Business Rules tree.

  4. Create the otdInputDTD_DB_Employee_1.unmarshalFromString(input.Text) rule.
    1. Click the rule icon on the Business Rules toolbar to add a new rule in the Business Rules pane.
    2. Right-click otdInputDTD_DB_Employee_1 in the left pane of the Business Rules Designer, and choose Select method to call from the popup menu.

      The method selection window appears.

    3. Select unmarshalFromString(String in) from the method selection window.

      The unmarshalFromString method box appears in the Business Rules Designer canvas, and a link connects the otdInputDTD_DB_Employee_1 node in the left pane of the Business Rules Designer to the Db_employee input node of the unmarshalFromString method box.
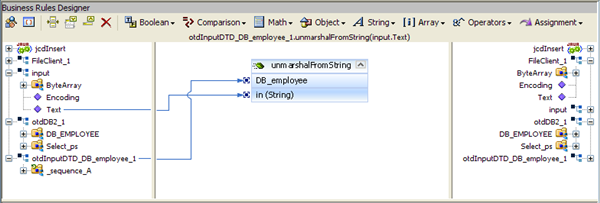
    4. Map Text under the input node in the left pane of the Business Rules Designer, to the in (String) input node of the unmarshalFromString method box.
      image:Image shows the Java Collaboration Editor displaying the otdInputDTD_DB_Employee_1.unmarshalFromString(input.Text) business rule.
  5. Create the otdDB2_1.Db_employee.insert rule.
    1. Click the rule icon on the Business Rules toolbar to add a new rule in the Business Rules pane.
    2. Right-click Db_employee under the otdDB2_1 node in the left pane of the Business Rules Designer, and choose Select method to call from the popup menu.

      The method selection window appears.

    3. Select insert() from the method selection window.

      The insert method box appears in the Business Rules Designer canvas, and a link connects the db_employee node in the left pane of the Business Rules Designer to the Db_employee input node of the insert method box.

  6. Create the For Loop: i1 is less than count of otdInputDTD_DB_Employee_1.X_sequence_A rule.
    1. Click the For Loop icon on the Business Rules toolbar to add a For Loop to the Business Rules tree.
    2. Right-click counter initialization node under the For Loop, and select Local Variable from the popup menu.

      The Create Variable dialog box appears.

    3. In the Create Variable dialog box, enter i1 as the name and select Primitive: int as the type, and click OK.

      The i1 variable is added to the Business Rules Designer.

    4. Select condition: ? under the For Loop on the Business Rules tree.
    5. Right-click i1 variable node in the left pane of the Business Rules Designer, and choose Select method to call from the popup menu.
    6. Select Less Than from the method selection window.

      The Less Than method box appears in the Business Rules Designer canvas, and a link connects the i1 variable node in the left pane of the Business Rules Designer to the number1 input node of the i1 method box.

    7. Right-click otdInputDTD_DB_Employee_1 node in the left pane of the Business Rules Designer, and choose Select method to call from the popup menu.
    8. Select countX_sequence_A() from the method selection window.

      The countX_sequence_A method box appears in the Business Rules Designer canvas, and a link connects the otdInputDTD_DB_Employee_1 node in the left pane of the Business Rules Designer to the Db_Employee input node of the countX_sequence_A method box.
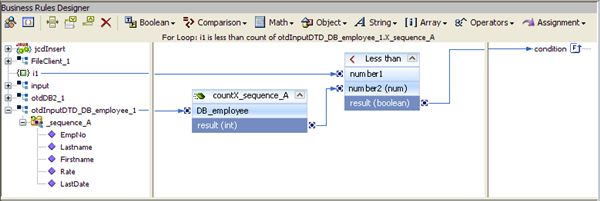
    9. Map the result (int) output node of the countX_sequence_A method box, to the number2 (num) input node of the Less Than method box.
    10. Map the result (boolean) output node of the Less Than method box, to the For Loop condition node in the right pane of the Business Rules Designer.
      image:Image shows the Java Collaboration Editor displaying the condition: i1 is less than count of otdInputDTD_DB_Employee_1.X_sequence_A business rule.
  7. Create the Copy i1 + 1 to i1 rule beneath the For Loop -> Steps node.
    1. Select the Steps node under the For Loop and click the rule icon on the Business Rules toolbar to add a new rule.
    2. Right-click the i1variable node in the left pane of the Business Rules Designer, and choose Select method to call from the popup menu.

      The method selection window appears.

    3. Select Add from the method selection window.

      The Add method box appears in the Business Rules Designer canvas, and a link connects the i1 node in the left pane of the Business Rules Designer to the value1 input node of the insert method box.

    4. Double-click the value2 field and enter 1 as the value.
    5. Map the result output node of the Add method box, to the i1 variable node in the right pane of the Business Rules Designer.
  8. Create the Copy stringToShort(otdInputDTD_DB_employee_1.X_sequence_A[i1].EmpNo) to otdDB2_1.DB_EMPLOYEE.EMP_NO rule beneath the For Loop -> rules node.
    1. Select the rules node under the For Loop in the Business Rules tree, and click the rule icon on the Business Rules toolbar to add a new rule.
    2. Map the EmpNo node, under otdInputDTD_DB_employee_1 -> sequence_A in the left pane of the Business Rules Designer, to EMP_NO node, under otdDB2_1 otdDB2_1 -> DB_EMPLOYEE in the right pane of the Business Rules Designer.

      The Business Rules Designer adds the necessary code for stringToShort type conversion.


      image:Image shows the Collaboration Editor displaying the Copy stringToShort(X_sequence_A[i1].EmpNo) to otdDB2_1.DB_EMPLOYEE.EMP_NO rule.
  9. Create the Copy otdInputDTD_DB_employee_1.X_sequence_A[i1].Lastname to otdDB2_1.DB_EMPLOYEE.LAST_NAME rule under the last rule.
    1. Click the rule icon on the Business Rules toolbar to add a new rule.
    2. Map the Lastname node, under otdInputDTD_DB_employee_1 -> sequence_A in the left pane of the Business Rules Designer, to the LAST_NAME node, under otdDB2_1 otdDB2_1 -> DB_EMPLOYEE in the right pane of the Business Rules Designer.
  10. Create the Copy otdInputDTD_DB_employee_1.X_sequence_A[i1].Firstname to otdDB2_1.DB_EMPLOYEE.FIRST_NAME rule under the last rule.
    1. Click the rule icon on the Business Rules toolbar to add a new rule.
    2. Map the Firstname node, under otdInputDTD_DB_employee_1 -> sequence_A in the left pane of the Business Rules Designer, to theFIRST_NAME node, under otdDB2_1 otdDB2_1 -> DB_EMPLOYEE in the right pane of the Business Rules Designer.
  11. Create the Copy new BigDecimal(otdInputDTD_DB_employee_1.X_sequence_A[i1].Rate) to otdDB2_1.DB_EMPLOYEE.RATE rule under the last rule.
    1. Click the rule icon on the Business Rules toolbar to add a new rule.
    2. From the Business Rules Designer toolbar, click the Class Browser button.
    3. From the Class Browser dialog box, select BigDecimal as the class, and select the BidDecimal(String val) constructor as the method. Click Select

      A BigDecimal method box appears in the Business Rules Designer Canvas.

    4. Map the Rate node, under otdInputDTD_DB_employee_1 -> sequence_A in the left pane of the Business Rules Designer, to the val (String) input node of the BigDecimal method box.
    5. Map the result (BigDecimal) output node of the BigDecimal method box to the RATE node, under otdDB2_1 otdDB2_1 -> DB_EMPLOYEE in the right pane of the Business Rules Designer.
      image:Image shows the Collaboration Editor displaying the Copy new BigDecimal(X_sequence_A[i1].Rate) to otdDB2_1.DB_EMPLOYEE.RATE rule.
  12. Create the Copy Date.valueOf(otdInputDTD_DB_employee_1.X_sequence_A[i1].LastDate) to otdDB2_1.DB_EMPLOYEE.LAST_UPDATE rule under the last rule.
    1. From the Business Rules Designer toolbar, click the Class Browser button.
    2. From the Class Browser dialog box, select Date as the class, and select the valueOf(String s) as the method. Click Select

      A Date.valueOf method box appears in the Business Rules Designer Canvas.

    3. Map the LastDate node, under otdInputDTD_DB_employee_1 -> sequence_A in the left pane of the Business Rules Designer, to the s (String) input node of the Date.valueOf method box.
    4. Map the result (Date) output node of the Date.valueOf method box to the LAST_UPDATE node, under otdDB2_1 otdDB2_1 -> DB_EMPLOYEE in the right pane of the Business Rules Designer.
  13. Create the otdDB2_1.DB_EMPLOYEE.insertRow rule under the last rule.
    1. Click the rule icon on the Business Rules toolbar to add a new rule in the Business Rules pane.
    2. Right-click DB_EMPLOYEE under the otdDB2_1 node in the left pane of the Business Rules Designer, and choose Select method to call from the popup menu.

      The method selection window appears.

    3. Select insertRow() from the method selection window.

      The insertRow method box appears in the Business Rules Designer canvas, and a link connects the DB_EMPLOYEE node in the left pane of the Business Rules Designer to the DB_EMPLOYEE input node of the insertRow method box.

  14. Create the Copy "Insert Done." to FileClient_1.Text rule under the completed For LOOP.
    1. From the Business Rules tree, select the For Loop, then click the rule icon on the Business Rules toolbar to add a new rule.

      A new rule is added to the main trunk of the Business Rules tree.

    2. From the Business Rules Designer toolbar's String menu, select Literal String.

      A String method box is added to the Business Rules Designer canvas.

    3. Double-click the value field of the String method box and enter Insert Done. as the value.
    4. Map the output node of the String method box, to Text, under FileClient_1 in the right pane of the Business Rules Designer.
  15. Create the FileClient_1.write rule.
    1. Click the rule icon on the Business Rules toolbar to add a new rule in the Business Rules pane.
    2. Right-click the FileClient_1 node in the left pane of the Business Rules Designer, and choose Select method to call from the popup menu.

      The method selection window appears.

    3. Select and double-click write() from the method selection window.

      The write method box appears in the Business Rules Designer canvas. The FileClient_1.write rule is added to the Business Rules tree.

  16. Click Save All to save your current changes.

    The completed Collaboration definition appears as follows:
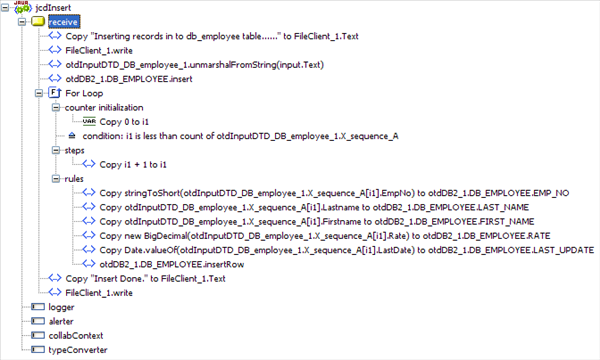

    image:Image shows the completed jcdInsert Java Collaboration Definition business rules.

jcdInsert Collaboration Java Code

The completed Java source code for the jcdInsert Collaboration appears as follows:

package prjDB2_JCDjcdALL;


public class jcdInsert
{

   public com.stc.codegen.logger.Logger logger;

   public com.stc.codegen.alerter.Alerter alerter;

   public com.stc.codegen.util.CollaborationContext collabContext;

   public com.stc.codegen.util.TypeConverter typeConverter;

   public void receive( com.stc.connector.appconn.file.FileTextMessage input, 
com.stc.connector.appconn.file.FileApplication FileClient_1, dtd.otdInputDTD630345798
.DB_employee otdInputDTD_DB_employee_1, otdDB2.OtdDB2OTD otdDB2_1 )
       throws Throwable
   {
       FileClient_1.setText( "Inserting records in to db_employee table......" );
       FileClient_1.write();
       otdInputDTD_DB_employee_1.unmarshalFromString( input.getText() );
       otdDB2_1.getDB_EMPLOYEE().insert();
       for (int i1 = 0; i1 < otdInputDTD_DB_employee_1.countX_sequence_A(); i1 += 1) {
           otdDB2_1.getDB_EMPLOYEE().setEMP_NO( typeConverter.stringToShort( 
otdInputDTD_DB_employee_1.getX_sequence_A( i1 ).getEmpNo(), "#", false, 0 ) );
           otdDB2_1.getDB_EMPLOYEE().setLAST_NAME( otdInputDTD_DB_employee_1.
getX_sequence_A( i1 ).getLastname() );
           otdDB2_1.getDB_EMPLOYEE().setFIRST_NAME( otdInputDTD_DB_employee_1.
getX_sequence_A( i1 ).getFirstname() );
           otdDB2_1.getDB_EMPLOYEE().setRATE( new java.math.BigDecimal( 
otdInputDTD_DB_employee_1.getX_sequence_A( i1 ).getRate() ) );
           otdDB2_1.getDB_EMPLOYEE().setLAST_UPDATE( java.sql.Date.valueOf( 
otdInputDTD_DB_employee_1.getX_sequence_A( i1 ).getLastDate() ) );
           otdDB2_1.getDB_EMPLOYEE().insertRow();
       }
       FileClient_1.setText( "Insert Done." );
       FileClient_1.write();
   }

} 

Note - The above code has been wrapped for display purposes.


Creating the Business Rules for the jcdPsSelect Collaboration

The jcdPsSelect Collaboration implements the Input Web Service Operation to read the TriggerPsSelect.in file. It then copies the database resultset (as noted in the prepared statement query) into the otdInputDTD_DBEmployee OTD and selects all available records from the database. The Collaboration also writes a message to JCD_PsSelect_output1.dat to confirm when records are selected, or when no records are available.

Using the Collaboration Editor's Java Source Editor

To create the third Java Collaboration, jcdPsSelect, we will use the Java Source Editor. The Java Source Editor allows you to write your business rules in the editor, or copy code into the Collaboration Editor that you have written with another tool.

jcdPsSelect Collaboration Java Code

The completed Java source code for the jcdPsSelect Collaboration appears as follows:

package prjDB2_JCD_workjcdALL;


public class jcdPsSelect
{

   public com.stc.codegen.logger.Logger logger;

   public com.stc.codegen.alerter.Alerter alerter;

   public com.stc.codegen.util.CollaborationContext collabContext;

   public com.stc.codegen.util.TypeConverter typeConverter;

   public void receive( com.stc.connector.appconn.file.FileTextMessage input, com.stc.
connector.appconn.file.FileApplication FileClient_1, dtd.otdOutputDTD262244478.
DB_employee otdOutputDTD_DB_employee_1, otdDB2.OtdDB2OTD otdDB2_1 )
       throws Throwable
   {
       FileClient_1.setText( "Selecting records from db_employee table via Prepared  
Statement select...." );
       FileClient_1.write();
       otdDB2_1.getSelect_ps().setParam1( typeConverter.
stringToShort( "0", "#", false, 0 ) );
       otdDB2_1.getSelect_ps().executeQuery();
       if (otdDB2_1.getSelect_ps().resultsAvailable()) {
           while (otdDB2_1.getSelect_ps().get$Select_psResults().next()) {
               otdOutputDTD_DB_employee_1.setEmpNo( typeConverter.shortToString
( otdDB2_1.getSelect_ps().get$Select_psResults().getEMP_NO(), "#", false, "" ) );
               otdOutputDTD_DB_employee_1.setLastname( otdDB2_1.getSelect_ps().
get$Select_psResults().getLAST_NAME() );
               otdOutputDTD_DB_employee_1.setFirstname( otdDB2_1.getSelect_ps().
get$Select_psResults().getFIRST_NAME() );
               otdOutputDTD_DB_employee_1.setRate( otdDB2_1.getSelect_ps().
get$Select_psResults().getRATE().toString() );
               otdOutputDTD_DB_employee_1.setLastDate( typeConverter.
dateToString( otdDB2_1.getSelect_ps().get$Select_psResults().
getLAST_UPDATE(), "yyyy-MM-dd hh:mm:ss", false, "" ) );
               FileClient_1.setText( otdOutputDTD_DB_employee_1.marshalToString() );
               FileClient_1.write();
           }
       } else {
           FileClient_1.setText( "No record found!" );
           FileClient_1.write();
       }
       FileClient_1.setText( "Select Done." );
       FileClient_1.write();
   }

} 

Note - The above code has been wrapped for display purposes.


Create the jcdPsSelect Collaboration Business Rules

  1. From the Project window, double-click the jcdPsSelect Collaboration under your project's jcdALL node.

    The Java Collaboration Editor opens to the jcdPsSelect Collaboration.

  2. From the Collaboration Editor toolbar, select the Source Code Mode button.

    The Collaboration displays the Business Rules window and the Java Source Editor window.

  3. Copy the code above and paste it into the Java Source Editor, replacing the current code. The above code was wrapped in 10 places for display purposes. Correct the wrapped lines of code (the wrapped lines contain no left margin) by placing your cursor at the beginning of the line and hitting backspace (or the equivalent)
  4. Once you have corrected the code, click the Commit changes button on the Java Source Editor toolbar.

    If the code contains any errors they will be listed for you in the Validation window at the bottom of the NetBeans IDE. Correct these errors if necessary, and click the Commit changes button again.

  5. Expand the business rules in the Business Rules window to see the completed Collaboration. Click the Advanced Mode button in the Collaboration Editor toolbar to open the Business Rules Designer window. Double click on a line of code in the Java Source Editor, and that rule is displayed graphically in the Business Rule Designer.
  6. Click Save All to save your current changes.

    The completed Collaboration definition appears as follows:
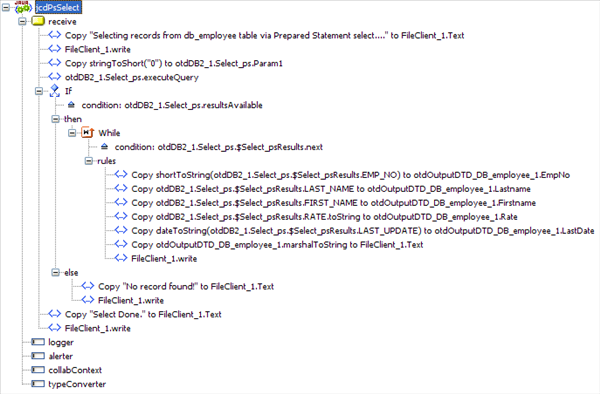

    image:Image shows the completed jcdPsSelect Java Collaboration Definition business rules.

Creating the Business Rules for the jcdTableSelect Collaboration

The jcdTableSelect Collaboration implements the Input Web Service Operation to read the TriggerTableSelect.in file. It then copies the database resultset into the otdInputDTD_DBEmployee OTD and selects all available records from the database that meet the criteria emp_no = 100. The Collaboration also writes a message to JCD_TableSelect_output1.dat to confirm when records are selected, or when no records are available.


Note - The where clause in the business rule reads the trigger value as a placeholder for input. This permits you to modify the query to select a specific record. Also note that all records are selected from the database when the TriggerTableSelect.in file is empty.


Create the jcdTableSelect Collaboration Business Rules

You can create the jcdTableSelect Java Collaboration business rules by following the steps below, or by copying the jcdTableSelect Collaboration Java Code into the Collaboration Editor's Java Source Editor as described in Using the Collaboration Editor's Java Source Editor.

  1. From the Project window, double-click the jcdTableSelect Collaboration under your project's jcdALL node.

    The Java Collaboration Editor opens to the jcdTableSelect Collaboration.

  2. Create the Copy "Selectiong records from db_employee table via Table Select........" to FileClient_1.Text rule.
    1. Click the rule icon on the Business Rules toolbar to add a new rule in the Business Rules pane.
    2. From the Business Rules Designer toolbar's String menu, select Literal String.

      A String method box is added to the Business Rules Designer canvas.

    3. Double-click the value field of the String method box and enter Selectiong records from db_employee table via Table Select........ as the value.
    4. Map the output node of the String method box, to Text, under FileClient_1 in the right pane of the Business Rules Designer.
  3. Create the FileClient_1.write rule.
    1. Click the rule icon on the Business Rules toolbar to add a new rule in the Business Rules pane.
    2. Right-click the FileClient_1 node in the left pane of the Business Rules Designer, and choose Select method to call from the popup menu.

      The method selection window appears.

    3. Select and double-click write() from the method selection window.

      The write method box appears in the Business Rules Designer canvas. The FileClient_1.write rule is added to the Business Rules tree.

  4. Create the otdInputDTD_DB_Employee_1.unmarshalFromString(input.Text) rule.
    1. Click the rule icon on the Business Rules toolbar to add a new rule in the Business Rules pane.
    2. Right-click DB_EMPLOYEE under otdDB2_1 in the left pane of the Business Rules Designer, and choose Select method to call from the popup menu.

      The method selection window appears.

    3. Select select(String where) from the method selection window.

      The select method box appears in the Business Rules Designer canvas, and a link connects the DB_EMPLOYEE node in the left pane of the Business Rules Designer to the DB_EMPLOYEE input node of the select method box.

    4. Map Text under the input node in the left pane of the Business Rules Designer, to the where (String) input node of the select method box.
  5. Add a While statement and create the condition: otdDB2_1.DB_EMPLOYEE.next rule.
    1. Click the While icon on the Business Rules toolbar to add a While statement to the Business Rules tree.
    2. Right-click DB_EMPLOYEE under otdDB2_1 in the left pane of the Business Rules Designer, and choose Select method to call from the popup menu.

      The method selection window appears.

    3. Select next() from the method selection window.

      The next method box appears in the Business Rules Designer canvas, and a link connects the DB_EMPLOYEE node in the left pane of the Business Rules Designer to the DB_EMPLOYEE input node of the next method box.

    4. Map the result (boolean) output node of the next method box, to the While condition in the right pane of the Business Rules Designer.
  6. Create the Copy shortToString(otdDB2_1.DB_EMPLOYEE.EMP_NO) to otdOutputDTD_DB_employee_1.EmpNo rule beneath the While -> rules node.
    1. Select the rules node under the While statement on the Business Rules tree, and click the rule icon on the Business Rules toolbar to add a new rule.
    2. Map the EmpNo node, under otdDB2_1 -> DB_EMPLOYEE in the left pane of the Business Rules Designer, to Emp_No node, under otdOutputDTD_DB_employee_1 in the right pane of the Business Rules Designer.

      The Business Rules Designer adds the necessary code for shortToString type conversion.

  7. Create the Copy otdDB2_1.DB_EMPLOYEE.LAST_NAME to otdOutputDTD_DB_employee_1.Lastname rule under the last rule.
    1. Click the rule icon on the Business Rules toolbar to add a new rule.
    2. Map the LAST_NAME node, under otdDB2_1 -> DB_EMPLOYEE in the left pane of the Business Rules Designer, to the Lastname node, under otdOutputDTD_DB_employee_1 in the right pane of the Business Rules Designer.
  8. Create the Copy otdDB2_1.DB_EMPLOYEE.FIRST_NAME to otdOutputDTD_DB_employee_1.Firstname rule under the last rule.
    1. Click the rule icon on the Business Rules toolbar to add a new rule.
    2. Map the FIRST_NAME node, under otdDB2_1 -> DB_EMPLOYEE in the left pane of the Business Rules Designer, to the Firstname node, under otdOutputDTD_DB_employee_1 in the right pane of the Business Rules Designer.
  9. Create the Copy otdDB2_1.DB_EMPLOYEE.RATE.toString to otdOutputDTD_DB_employee_1.Rate rule under the last rule.
    1. Click the rule icon on the Business Rules toolbar to add a new rule.
    2. Right-click the RATEnode, under otdDB2_1 -> DB_EMPLOYEE in the left pane of the Business Rules Designer, and choose Select method to call from the popup menu.

      The method selection window appears.

    3. Select toString() from the method selection window.

      The toString method box appears in the Business Rules Designer canvas, and a link connects the RATE node in the left pane of the Business Rules Designer to the BigDecimal input node of the toString method box.

    4. Map the result (String) output node of the toString method box to the Rate node, under otdOutputDTD_DB_employee_1 in the right pane of the Business Rules Designer.
  10. Create the Copy dateToString(otdDB2_1.DB_EMPLOYEE.LAST_UPDATE) to otdOutputDTD_DB_employee_1.LastDate rule.
    1. Click the rule icon on the Business Rules toolbar to add a new rule.
    2. Map the LAST_UPDATE node, under otdDB2_1 -> DB_EMPLOYEE in the left pane of the Business Rules Designer, to LastDate node, under otdOutputDTD_DB_employee_1 in the right pane of the Business Rules Designer.

      The Business Rules Designer adds the necessary code for dateToString type conversion.

  11. Create the Copy otdOutputDTD_DB_employee_1.marshalToString to FileClient_1.Text rule under the last rule.
    1. Click the rule icon on the Business Rules toolbar to add a new rule.
    2. Right-click otdOutputDTD_DB_employee_1 in the left pane of the Business Rules Designer, and choose Select method to call from the popup menu.

      The method selection window appears.

    3. Select marshalToString() from the method selection window.

      The marshalToString method box appears in the Business Rules Designer canvas, and a link connects otdOutputDTD_DB_employee_1 in the left pane of the Business Rules Designer to the DB_employee input node of the marshalToString method box.

    4. Map the result (String) output node of the marshalToString method box to the Text node, under FileClient_1 in the right pane of the Business Rules Designer.
  12. Create the FileClient_1.write rule.
    1. Click the rule icon on the Business Rules toolbar to add a new rule.
    2. Right-click the FileClient_1 node in the left pane of the Business Rules Designer, and choose Select method to call from the popup menu.

      The method selection window appears.

    3. Select and double-click write() from the method selection window.

      The write method box appears in the Business Rules Designer canvas. The FileClient_1.write rule is added to the Business Rules tree.

  13. Create the Copy "Table Select Done." to FileClient_1.Text rule.
    1. From the Business Rules tree, select the While statement, then click the rule icon on the Business Rules toolbar to add a new rule.

      A new rule is added to the main trunk of the Business Rules tree.

    2. From the Business Rules Designer toolbar's String menu, select Literal String.

      A String method box is added to the Business Rules Designer canvas.

    3. Double-click the value field of the String method box and enter Table Select Done. as the value.
    4. Map the output node of the String method box, to Text, under FileClient_1 in the right pane of the Business Rules Designer.
  14. Create the FileClient_1.write rule.
    1. Click the rule icon on the Business Rules toolbar to add a new rule in the Business Rules pane.
    2. Right-click the FileClient_1 node in the left pane of the Business Rules Designer, and choose Select method to call from the popup menu.

      The method selection window appears.

    3. Select and double-click write() from the method selection window.

      The write method box appears in the Business Rules Designer canvas. The FileClient_1.write rule is added to the Business Rules tree.

  15. Click Save All to save your current changes.

    The completed jcdTableSelect Collaboration definition appears as follows:
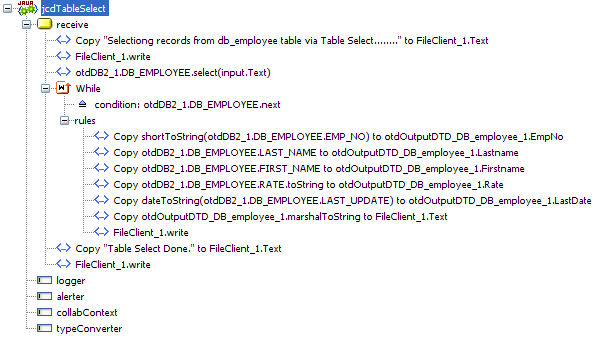

    image:Image shows the completed jcdTableSelect Java Collaboration Definition business rules.

jcdTableSelect Collaboration Java Code

The completed Java source code for the jcdTableSelect Collaboration appears as follows:

package prjDB2_JCD_workjcdALL;


public class jcdTableSelect
{

   public com.stc.codegen.logger.Logger logger;

   public com.stc.codegen.alerter.Alerter alerter;

   public com.stc.codegen.util.CollaborationContext collabContext;

   public com.stc.codegen.util.TypeConverter typeConverter;

   public void receive( com.stc.connector.appconn.file.FileTextMessage input, 
com.stc.connector.appconn.file.FileApplication FileClient_1, dtd.otdOutputDTD262244478.
DB_employee otdOutputDTD_DB_employee_1, otdDB2.OtdDB2OTD otdDB2_1 )
       throws Throwable
   {
       FileClient_1.setText( "Selectiong records from db_employee table via Table 
Select........" );
       FileClient_1.write();
       otdDB2_1.getDB_EMPLOYEE().select( input.getText() );
       while (otdDB2_1.getDB_EMPLOYEE().next()) {
           otdOutputDTD_DB_employee_1.setEmpNo( typeConverter.shortToString( otdDB2_1.
getDB_EMPLOYEE().getEMP_NO(), "#", false, "" ) );
           otdOutputDTD_DB_employee_1.setLastname( otdDB2_1.getDB_EMPLOYEE().
getLAST_NAME() );
           otdOutputDTD_DB_employee_1.setFirstname( otdDB2_1.getDB_EMPLOYEE().
getFIRST_NAME() );
           otdOutputDTD_DB_employee_1.setRate( otdDB2_1.getDB_EMPLOYEE().
getRATE().toString() );
           otdOutputDTD_DB_employee_1.setLastDate( typeConverter.dateToString
( otdDB2_1.getDB_EMPLOYEE().getLAST_UPDATE(), "yyyy-MM-dd hh:mm:ss", false, "" ) );
           FileClient_1.setText( otdOutputDTD_DB_employee_1.marshalToString() );
           FileClient_1.write();
       }
       FileClient_1.setText( "Table Select Done." );
       FileClient_1.write();
   }

} 

Note - The above code has been wrapped for display purposes.


Creating the Business Rules for the jcdUpdate Collaboration

The jcdUpdate Collaboration implements the Input Web Service Operation to read the TriggerUpdate.in. file and then update the record emp_no = 300. The Collaboration also writes a message to JCD_Update_output1.dat to confirm an updated record.


Note - The where clause in the business rule reads the trigger value as a placeholder for input. This permits you to modify the query to select a specific record. Also note that all records are selected from the database when the TriggerTableSelect.in file is empty.


Create the jcdUpdate Collaboration Business Rules

You can create the jcdTableSelect Java Collaboration business rules by following the steps below, or by copying the jcdUpdate Collaboration Java Code into the Collaboration Editor's Java Source Editor as described in Using the Collaboration Editor's Java Source Editor.

  1. From the Project window, double-click the jcdUpdate Collaboration under your project's jcdALL node.

    The Java Collaboration Editor opens to the jcdUpdate Collaboration.

  2. Create the Copy "Updating the Rate and Last_update fields .. " to FileClient_1.Text rule.
    1. Click the rule icon on the Business Rules toolbar to add a new rule in the Business Rules pane.
    2. From the Business Rules Designer toolbar's String menu, select Literal String.

      A String method box is added to the Business Rules Designer canvas.

    3. Double-click the value field of the String method box and enter Updating the Rate and Last_update fields .. as the value.
    4. Map the output node of the String method box, to Text, under FileClient_1 in the right pane of the Business Rules Designer.
  3. Create the FileClient_1.write rule.
    1. Click the rule icon on the Business Rules toolbar to add a new rule in the Business Rules pane.
    2. Right-click the FileClient_1 node in the left pane of the Business Rules Designer, and choose Select method to call from the popup menu.

      The method selection window appears.

    3. Select and double-click write() from the method selection window.

      The write method box appears in the Business Rules Designer canvas. The FileClient_1.write rule is added to the Business Rules tree.

  4. Create the otdDB2_1.DB_EMPLOYEE.update(input.Text) rule.
    1. Click the rule icon on the Business Rules toolbar to add a new rule in the Business Rules pane.
    2. Right-click DB_EMPLOYEE under otdDB2_1 in the left pane of the Business Rules Designer, and choose Select method to call from the popup menu.

      The method selection window appears.

    3. Select update(String sWhere) from the method selection window.

      The update method box appears in the Business Rules Designer canvas, and a link connects the DB_EMPLOYEE node in the left pane of the Business Rules Designer to the DB_EMPLOYEE input node of the update method box.

    4. Map Text under the input node in the left pane of the Business Rules Designer, to the sWhere (String) input node of the update method box.
  5. Add a While statement and create the condition: otdDB2_1.DB_EMPLOYEE.next rule.
    1. Click the While icon on the Business Rules toolbar to add a While statement to the Business Rules tree.
    2. Right-click DB_EMPLOYEE under otdDB2_1 in the left pane of the Business Rules Designer, and choose Select method to call from the popup menu.

      The method selection window appears.

    3. Select next() from the method selection window.

      The next method box appears in the Business Rules Designer canvas, and a link connects the DB_EMPLOYEE node in the left pane of the Business Rules Designer to the DB_EMPLOYEE input node of the next method box.

    4. Map the result (boolean) output node of the next method box, to the While condition in the right pane of the Business Rules Designer.
  6. Create the Copy new BigDecimal("22.2") to otdDB2_1.DB_EMPLOYEE.RATE rule beneath the While -> rules node.
    1. Select the rules node under the While statement on the Business Rules tree, and click the rule icon on the Business Rules toolbar to add a new rule.
    2. Right—click RATE node, under otdDB2_1 -> DB_EMPLOYEE in the right pane of the Business Rules Designer, and select Browse this type from the popup menu.

      The Class Browser appears. with BigDecimal selected as the class.

    3. From the ClassBrowser, select BigDecimal as the class, select theBigDecimal(String val) constructor as the method, and click Select.

      The BigDecimal method box appears.

    4. Double-click the val (String) field of the BigDecimal method box and enter 22.2 as the value.
    5. Map the result (BigDecimal) output node of the BigDecimal method box to the RATE node, under otdDB2_1 -> DB_EMPLOYEE in the right pane of the Business Rules Designer.
  7. Create the Copy Date.valueOf("2006-06-06") to otdDB2_1.DB_EMPLOYEE.LAST_UPDATE rule under the last rule.
    1. Click the rule icon on the Business Rules toolbar to add a new rule under your last rule.
    2. From the Business Rules Designer toolbar, click the Class Browser button.
    3. From the ClassBrowser, select Date as the class, select thevalueOf(String s) method, and click Select.

      The Date.valueOf method box appears.

    4. Double-click the s (String) field of the Date.valueOf method box and enter today's date as the value.
    5. Map the result (Date) output node of the Date.valueOf method box to the LAST_UPDATE node, under otdDB2_1 -> DB_EMPLOYEE in the right pane of the Business Rules Designer.
  8. Create the otdDB2_1.DB_EMPLOYEE.updateRow rule under the last rule.
    1. Click the rule icon on the Business Rules toolbar to add a new rule.
    2. Right-click DB_EMPLOYEE in the left pane of the Business Rules Designer, and choose Select method to call from the popup menu.

      The method selection window appears.

    3. Select updateRow() from the method selection window.

      The updateRow method box appears in the Business Rules Designer canvas, and a link connects the DB_EMPLOYEE node in the left pane of the Business Rules Designer to the DB_EMPLOYEE input node of the updateRow method box.

  9. Create the Copy "Update Done." to FileClient_1.Text rule.
    1. From the Business Rules tree, select the While statement, then click the rule icon on the Business Rules toolbar to add a new rule.

      A new rule is added to the main trunk of the Business Rules tree.

    2. From the Business Rules Designer toolbar's String menu, select Literal String.

      A String method box is added to the Business Rules Designer canvas.

    3. Double-click the value field of the String method box and enter Update Done. as the value.
    4. Map the output node of the String method box, to Text, under FileClient_1 in the right pane of the Business Rules Designer.
  10. Create the FileClient_1.write rule.
    1. Click the rule icon on the Business Rules toolbar to add a new rule in the Business Rules pane.
    2. Right-click the FileClient_1 node in the left pane of the Business Rules Designer, and choose Select method to call from the popup menu.

      The method selection window appears.

    3. Select and double-click write() from the method selection window.

      The write method box appears in the Business Rules Designer canvas. The FileClient_1.write rule is added to the Business Rules tree.

  11. Click Save All to save your current changes.

    The completed jcdUpdate Collaboration definition appears as follows:
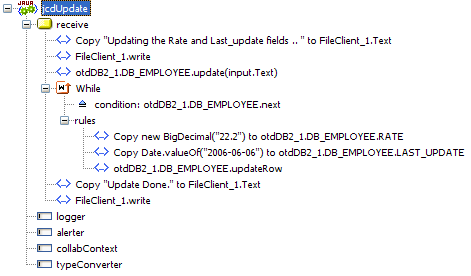

    image:Image shows the completed jcdUpdate Java Collaboration Definition business rules.

jcdUpdate Collaboration Java Code

The completed Java source code for the jcdUpdate Collaboration appears as follows:

package prjDB2_JCDjcdALL;


public class jcdUpdate
{

   public com.stc.codegen.logger.Logger logger;

   public com.stc.codegen.alerter.Alerter alerter;

   public com.stc.codegen.util.CollaborationContext collabContext;

   public com.stc.codegen.util.TypeConverter typeConverter;

   public void receive( com.stc.connector.appconn.file.FileTextMessage input, com.stc.
connector.appconn.file.FileApplication FileClient_1, otdDB2.OtdDB2OTD otdDB2_1 )
       throws Throwable
   {
       FileClient_1.setText( "Updating the Rate and Last_update fields .. " );
       FileClient_1.write();
       otdDB2_1.getDB_EMPLOYEE().update( input.getText() );
       while (otdDB2_1.getDB_EMPLOYEE().next()) {
           otdDB2_1.getDB_EMPLOYEE().setRATE( new java.math.BigDecimal( "22.2" ) );
           otdDB2_1.getDB_EMPLOYEE().setLAST_UPDATE( java.sql.Date.
valueOf( "2006-06-06" ) );
           otdDB2_1.getDB_EMPLOYEE().updateRow();
       }
       FileClient_1.setText( "Update Done." );
       FileClient_1.write();
   }

}

Note - The above code has been wrapped for display purposes.


Next Steps

For your next step, see Creating the Connectivity Maps .