Oracle® Secure Enterprise Search
Installation Guide
11g Release 1 (11.1.2.2) for Microsoft Windows (64-Bit)
E14093-03
November 2013
This Guide describes how to install Oracle Secure Enterprise Search (SES) 11g Release 1 (11.1.2.2) on 64-bit Windows operating systems.
This Guide contains the following sections:
Preinstallation Tasks
This section contains the following topics:
Oracle SES Windows Certifications
Oracle SES 11.1.2.2 is certified to run on the following Windows operating systems:
-
Windows Server 2003 (64-bit)
-
Windows Server 2003 R2 (64-bit)
-
Windows Server 2008 R1 SP1 or higher service pack (64-bit)
These are the only supported distributions and versions. Do not install Oracle SES 11.1.2.2 on other versions of Windows.
Note:
Oracle SES 11.1.2.2 is not certified on Windows Server 2008 R2.Oracle SES Browser Certifications
The Oracle SES 11.1.2.2 administration tool and default query application are certified on the following browsers:
-
Firefox 3.x
-
Internet Explorer 7.x, 8.x
-
Safari 4.x
Checking the Hardware Requirements
Oracle SES 11.1.2.2 requires a minimum of 6.6 GB of disk space. This includes 4.9 GB for the software and approximately 1.7 GB for the initial Oracle SES index. Additional Oracle SES requirements are based on the amount of data that you need to search.
For example, to index 100,000 documents:
-
4 GB disk space
-
2 GB RAM
To index 1,000,000 documents:
-
20 GB disk space
-
6 GB RAM
Checking the Software Requirements
The operating system and browsers must be among those listed in "Oracle SES Windows Certifications" and "Oracle SES Browser Certifications".
Installing a Loopback Adapter
A loopback adapter is required under either of these circumstances:
-
You are installing on a computer connected to a Dynamic Host Configuration Protocol (DHCP) network.
-
You are installing on a non-networked computer and plan to connect the computer to a network after installation.
A loopback adapter assigns a local IP for your computer. After installing a loopback adapter, you have at least two network adapters on your computer: your own network adapter and the loopback adapter.
To check if the Microsoft Loopback Adapter is installed on your computer:
-
Open a command window and enter:
ipconfig /all
If the loopback adapter is installed, its settings are displayed among other configuration settings. For example:
Ethernet adapter Local Area Connection 2:

        Connection-specific DNS Suffix  . :
        Description . . . . . . . . . . . : Microsoft Loopback Adapter
        Physical Address. . . . . . . . . : 02-00-4C-4F-4F-50
        Dhcp Enabled. . . . . . . . . . . : No
        IP Address. . . . . . . . . . . . : 192.168.123.123
        Subnet Mask . . . . . . . . . . . : 255.255.255.0
        Default Gateway . . . . . . . . . :
Following are instructions for installing and configuring the Microsoft loopback adapter.
To install the Microsoft Loopback Adapter:
-
From the Start menu, select Control Panel.
-
In the Control Panel, double-click Add Hardware to start the Add Hardware Wizard.
-
On the Welcome page, click Next.
-
On the Is the Hardware Connected page, select Yes, I have already connected the hardware. Click Next.
-
On The Following Hardware Is Already Installed On Your Computer page, select Add a new hardware device. Click Next.
-
On The Wizard Can Help You Install Other Hardware page, select Install the hardware that I manually select from a list. Click Next.
-
On the Select the Type of Hardware You Are Installing page, select Network adapters. Click Next.
-
On the Select Network Adapter page, make these selections, then click Next:
-
Manufacturer: Microsoft
-
Network Adapter: Microsoft Loopback Adapter
-
-
On The Wizard Is Ready To Install Your Hardware page, click Next.
-
On the Completing the Add Hardware Wizard page, click Finish.
To configure the Microsoft Loopback Adapter:
-
In the Control Panel, double-click Network Connections.
-
Right-click the new connection for the loopback adapter, typically named Local Area Connection 2, and select Properties.
-
On the General tab, select Internet Protocol (TCP/IP), and click Properties.
-
In the Properties dialog box:
-
IP Address: Enter a non-routable IP for the loopback adapter. Oracle recommends the following non-routable addresses:
-
192.168.x.xwherexis any value between 1 and 255 -
10.10.10.10
-
-
Subnet mask: Enter
255.255.255.0. -
Leave all other fields empty and click OK.
-
-
Click OK.
-
Click Close in the Local Area Connection dialog box associated with the new Microsoft Loopback Adapter.
-
Restart the computer.
-
Open the
C:\WINDOWS\system32\drivers\etc\hostsfile in a text editor, and add a line in the following format after thelocalhostline:IP_address hostname.domainname hostname
Where:
-
IP_addressis the non-routable IP address you entered in step 4. -
hostnameis the name of the computer. -
domainnameis the name of the domain.
For example:
10.10.10.10 mycomputer.example.com mycomputer
-
-
Check the network configuration:
-
In the Control Panel, double-click System to open the System Properties dialog box.
-
Click the Computer Name tab. For Full computer name, verify that the host name and the domain name are displayed, such as
example.oracle.com. -
Click the Change button to display the Computer Name Changes dialog box. Verify that the host name is displayed in the Computer name field, and the host name and the domain name are displayed as the Full computer name.
-
Click More to display the DNS Suffix and NetBIOS Computer Name dialog box. Verify that the Primary DNS suffix of this computer field displays the domain name.
-
Save any changes by clicking OK, or simply exit by clicking Cancel.
-
To remove the Microsoft Loopback Adapter:
-
In the Control Panel, double-click System to open the System Properties dialog box.
-
Click the Hardware tab, and then click Device Manager.
-
In the Device Manager window, expand Network adapters.
-
Right-click Microsoft Loopback Adapter and select Uninstall.
Disabling Internet Protocol version 6 (IPv6) Components
By default, the IPv6 protocol is enabled on Windows Server 2008. Under some circumstances, this may lead to the failure in starting up the WebLogic Server middle tier.
The solution to this problem is to disable certain IPv6 components, except the IPv6 loopback interface, on Windows Server 2008.
To disable the IPv6 components on Windows Server 2008:
-
Click Start, enter
regeditin the Start Search box, and then click regedit.exe in the Programs list. -
In the User Account Control dialog box, click Continue.
-
In Registry Editor, locate and then click the following registry subkey:
HKEY_LOCAL_MACHINE\SYSTEM\CurrentControlSet\Services\Tcpip6\Parameters\. -
Double-click DisabledComponents to modify the DisabledComponents entry.
Note:
If the DisabledComponents entry is unavailable, you must create it. To do this, follow these steps:-
From the Edit menu, select New, then select DWORD (32-bit) Value.
-
Enter
DisabledComponents, and then press ENTER. -
Double-click DisabledComponents.
-
-
Enter
0xffffffffto disable all IPv6 components, except the IPv6 loopback interface. -
Click OK.
For more information on disabling the IPv6 components on Windows Server 2008, refer the Microsoft website: http://support.microsoft.com/kb/929852.
Installation Tasks
This section contains the following topics:
-
About the Location of Oracle SES 11g Release 1 (11.1.2.2) Software
-
Installing on a System with an Existing Oracle SES Installation
For supplementary instructions on installing Oracle SES, see the Oracle SES tutorial:
http://www.oracle.com/pls/topic/lookup?ctx=E35215-01&id=tut_ses_administration
Installing Oracle Secure Enterprise Search
To install the Oracle Secure Enterprise Search software:
-
Ensure that you satisfy all minimum requirements, as described in "Preinstallation Tasks".
-
Log on as a member of the Administrators group to the system where Oracle SES will be installed. Close any other remote sessions owned by this user.
This user cannot belong to more than one domain in the same network.
If you are installing on a Primary Domain Controller (PDC) or a Backup Domain Controller (BDC), then log on as a member of the Domain Administrators group.
-
If you received the software for this release on DVD, then insert it in the drive, copy the zip archives into a local drive folder, and continue with step 5.
-
Download the Oracle SES software distribution. There are typically two zip file archives.
-
Extract all files from each zip archive into the same destination folder.
-
Right-click
setup.exein theses_11_1_2_2_0_windows64folder of the extracted files, and then click Run as administrator. The Installation Details page appears. -
Follow the steps of the installation wizard. See "Completing the Installation Details Page of the Installer".
-
Click Next. The installer performs the prerequisite checks and proceeds with the installation.
-
When all of the configuration tools have finished, click Exit, then click Yes to exit from Oracle Universal Installer.
A successful installation creates the following folders in the Windows Start menu:
-
Oracle - search_server_name: Contains shortcuts to the Oracle SES Administration GUI and the default search application; to start and stop Oracle SES; and to SQL*Plus, SQL Developer, and other DBA tools.
-
Oracle WebLogic: Contains shortcuts to administration tools and documentation.
Many of the SES configuration tools are opened by the default Web browser, which must be defined on the host system for the shortcuts on the Start menu to work.
Completing the Installation Details Page of the Installer
In Oracle Universal Installer, the only value that you must specify is the administrative password. The remaining fields contain default values, but you can replace them. Following are descriptions of the installation parameters:
-
Search Server Name: Name for the search server. To connect multiple Oracle SES instances to the same authorization server, each instance must have a distinct name.
-
Administrative Password and Confirm Password: The password that you will later use to log on to the Administration GUI. This password must be at least eight characters long with at least one alphabetic character and one number.
-
HTTP Port: The port on which the Oracle SES middle tier will listen. For example, if you install Oracle SES on host
mycomputer.example.comand you specify port7777, then your search page URL will be as follows:http://mycomputer.example.com:7777/search/query/search -
Software Location: The location where Oracle SES home will be created, which can be referenced using the SQL variable
ORACLE_BASE.ORACLE_BASEis the root of the directory structure where Oracle SES software and its supporting infrastructure software are installed. See "About the Location of Oracle SES 11g Release 1 (11.1.2.2) Software". -
SES Home Location: The default installed path is
%ORACLE_BASE%\seshome. This can be referenced using the SQL variableORACLE_HOME. -
Data Storage Location: This is the location where Oracle SES will store its data. The default location is
%ORACLE_BASE%\oradata. The data storage must be outside of the%ORACLE_BASE%\seshomedirectory, so that it will not be deleted during a future upgrade.
The following figure shows the Specify Installation Details page in Oracle Universal Installer.
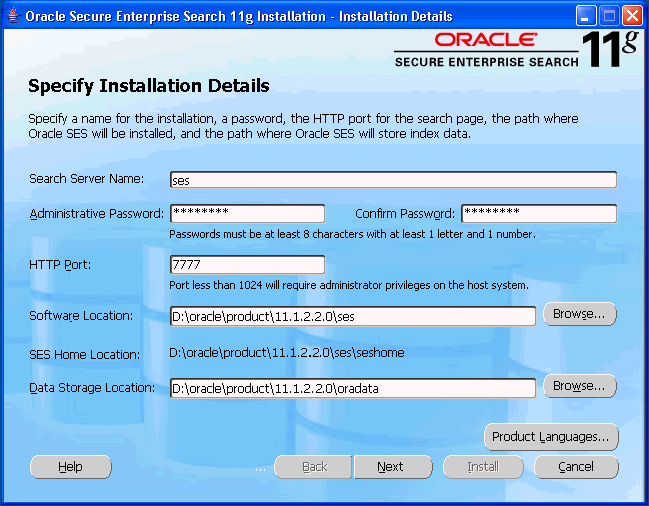
Description of the illustration install_details.gif
About the Location of Oracle SES 11g Release 1 (11.1.2.2) Software
You can reference the following locations as variables in SQL by enclosing the names in percent signs. No system variables are created in Windows to reference these locations. For convenience, you can add the paths to the PATH system variable by using the System tool in the Windows Control Panel.
-
ORACLE_BASEis the root of the folder structure where Oracle SES software and its supporting infrastructure software are installed. You can reference the location as%ORACLE_BASE%in SQL. -
ORACLE_HOMErefers to the path%ORACLE_BASE%\seshome. You can reference the location as%ORACLE_HOME%in SQL.
The most important folders under %ORACLE_BASE% directory are:
-
oracle_common: The location of required Java files
-
Oracle_WC: A portlet or portal component location
-
wlserver: WebLogic home
Installation Log Files
The installation process generates following log files in the Oracle\Inventory\logs folder, which typically is created in the C:\Program Files folder:
-
installActionstimestamp.log: Contains all informational messages generated during the installation. This log is created for both silent and interactive installations. For a successful installation, this message appears at the end of the log file:*** End of Installation Page*** The installation of Oracle Secure Enterprise Search was successful.
-
OPatchtimestamp.log: Contains an inventory of installed software following installation of an interim patch. One log file is created for each patch.
Installing on a System with an Existing Oracle SES Installation
You can install this release of Oracle SES more than once on the same system if each installation is installed in a separate Oracle home. Use different values for Search Server Name, HTTP Port, and Software Location.
Silent Installation Tasks
A silent installation has no graphical interface and no real-time interaction with the user performing the installation. A response file provides all of the user input to Oracle Universal Installer. Use silent installation when you want similar installations on more than one computer or when limited to a command line on a remote computer.
This section contains the following topics:
Performing a Silent Installation of Oracle Secure Enterprise Search
To perform a silent installation of Oracle Secure Enterprise Search:
-
Download and unzip the installation files, as described in steps 1 to 5 of "Installing Oracle Secure Enterprise Search".
-
Navigate to the Oracle SES installation folder and open
ses_11_1_2_2_0_windows64\response\server.rspfile in a text editor, such as Windows Notepad. -
In Part 1 of
server.rsp, replace all instances of<Value Required>with the appropriate values for your system, as described in "Editing the Response File". Save the file to a local folder, for exampleC:\ses_install_files\response\server.rsp. -
Open a Command window or the Run dialog box, and navigate to the SES installation folder
ses_11_1_2_2_0_windows64. -
Run a command like the following to start the installation. If you are providing a password on the command line instead of in the response file, refer to "Security Tips for Silent Installations".
setup.exe -silent -responseFile C:\ses_install_files\response\server.rsp
-
Check the log files, as described in "Verifying a Successful Silent Installation".
-
For security, use the Oracle SES Administration GUI to change the password of the Oracle SES administrator. For the response file, see "Security Tips for Silent Installations".
Editing the Response File
Part 1 of server.rsp provides placeholders for various system-specific values. For example, this is the entry for defining the ORACLE_BASE location. The commented lines, which are preceded by a hash mark (#), describe the variable. In this example, you must replace <Value Required> with the full path of the ORACLE_BASE folder.
#-------------------------------------------------------------------------------
# Name       : ORACLE_BASE
# Datatype   : String
# Description: This is the ORACLE BASE location (aka. Software Location).
# Requirement: ORACLE BASE location will hold the SES software and cannot
#              pre-exist.
#
# Example    : ORACLE_BASE = "C:\app\oracle\product\11.1.2.2"
#-------------------------------------------------------------------------------
ORACLE_BASE=<Value Required>
The following is a list of the variables that you must define in server.rsp. Additional details and examples are provided in the file:
-
ORACLE_HOME_NAME: Name of the Oracle SES instance, such as SES11122. -
ORACLE_BASE: Full path of a new folder for the Oracle SES installation. -
ORACLE_HOME: Full path of SES home, which is always%ORACLE_BASE%\seshome. -
SEARCH_DATA_STORAGE_LOCATION: Location of data files, control files, redo logs, and so forth. This location is typically%ORACLE_BASE%\oradata. -
SEARCH_ADMIN_PASSWORD: The Oracle SES administrative password. See "Security Tips for Silent Installations". -
SEARCH_HTTP_PORT: Port number for the Oracle SES Administration GUI. -
COMPONENT_LANGUAGES: The internal name for the preferred language for the Oracle SES installation. Use one of the names listed in the response file.
Security Tips for Silent Installations
During installation, response files may be copied to subdirectories in Oracle home. Oracle recommends that you do not enter passwords and confidential information in response files. Instead, you can specify the password in the setup command.
To specify the administration password in the setup command:
-
When editing
server.rsp, comment out theSEARCH_ADMIN_PASSWORDsetting by preceding it with a hash mark:# SEARCH_ADMIN_PASSWORD= <Value Required>
-
Enter the
SEARCH_ADMIN_PASSWORDsetting in the command. In this example, the password is set towelcome1.setup.exe -silent -responseFile C:\ses_install_files\response\server.rsp SEARCH_ADMIN_PASSWORD="welcome1"
If the response file contains the administration password in clear text, follow these guidelines to prevent a security breach:
-
Set the permissions on the response file so that it is readable only by the Windows user performing the silent installation.
-
Delete the response file from the system after the silent installation is complete and you have validated the installation.
Verifying a Successful Silent Installation
A silent installation creates logs that verify a successful installation:
silentInstalltimestamp.log: Indicates whether a component was installed successfully with this message:
The installation of component was successful.
The installation creates individual log files for these components: Oracle Secure Enterprise Search, Oracle Secure Enterprise Search Portlet Top Level, and Oracle AS Common Toplevel Component.
These logs are in the same location as the other log files, as described in "Installation Log Files".
Error Handling
Values for variables that are of the wrong context, format, or type are treated as if no value were specified. Variables that are outside any section are ignored. If you attempt a silent installation with an incorrect or incomplete response file, then the installation fails.
Postinstallation Tasks
This section describes the tasks to perform after installing Oracle SES and contains the following topics:
Checking for Critical Patches
After installing Oracle SES, check for a patch set or critical patch update (CPU). A CPU is a collection of patches for security vulnerabilities. It also includes non-security fixes required (because of interdependencies) by those security patches. CPUs are cumulative, and they are provided quarterly on Oracle Technology Network (OTN). For more information about CPUs, see https://support.oracle.com/
Checking for Additional Documentation and Support Services
To download release notes, installation documentation, white papers, or other collaterals, visit Oracle Technology Network (OTN). You must register online before using OTN. Registration is free and can be done at http://www.oracle.com/technetwork/community/join/overview/index.html
If you already have a user name and password for OTN, then you can go directly to the documentation section of OTN at http://www.oracle.com/technetwork/indexes/documentation/index.html
Changing the Oracle SES Middle Tier Port (Optional)
Perform these steps only if, after installation, you find there is a port number conflict requiring you to change the port number of the SES middle tier.
To change the Oracle SES middle tier port:
-
Choose a new port number that is not already in use.
-
Stop Oracle SES from the Windows Start menu by selecting Oracle - search_server_name, Stop SES.
-
Open the file
%ORACLE_HOME%\search\base_domain\config\config.xmlin a text editor.Note:
Oracle recommends that you make a backup copy of this file before editing it. -
Search for the
<listen-port>attribute. The XML statement that specifies the port number looks like the following example:<listen-port>7777</listen-port>
-
Edit the value of the attribute. The following example changes the port to 44444:
<listen-port>44444</listen-port>
-
Edit
%ORACLE_HOME%\BIN\searchctl.batand change the value of theWLS_LISTENER_PORTparameter to the new port number. -
Start Oracle SES from the Windows Start menu by selecting Oracle - search_server_name, Start SES.
Configuring Oracle Web Services Manager
Refer to Oracle Secure Enterprise Search Release Notes for configuring Oracle Web Services Manager (OWSM) for Oracle SES 11.1.2.2.
Starting and Stopping Oracle Secure Enterprise Search
You can start or stop Oracle SES from the Windows Start menu by selecting Oracle - search_server_name - Start SES or Stop SES respectively.
The tool for starting and stopping the search engine is searchctl. To start and stop Oracle SES using a batch file, specify the full path to %ORACLE_HOME%\BIN\searchctl.bat. For a full list of options (such as startall, stopall, and restartall), run searchctl in a command window.
Deinstallation Tasks
This section provides the procedure for deinstalling Oracle SES. Be sure to stop all Oracle SES services first, as described in the following procedure, so that all services and registry items are removed.
Deinstallation does not remove all the folders in Oracle base, because they may be shared by other Oracle homes.
Caution:
Deinstallation removes the contents of theoradata directory. All Oracle SES indexes and data are deleted.To deinstall Oracle SES:
-
Log on as a member of the Administrators group to the system where Oracle SES is installed. Close any other remote sessions owned by this user.
-
Stop Oracle SES from the Windows Start menu by selecting Oracle - search_server_name - Stop SES.
-
Deinstall Oracle SES:
-
From the Windows Start menu, select Oracle - search_server_name - Uninstall SES.
or
-
Open the Control Panel and select Program and Features. Select Oracle Secure Enterprise Search - <search_server_name> (remove only).
-
-
Manually remove the shortcuts directory for Oracle Weblogic Server (Oracle WebLogic
Current BEA Home) that is present under the directoryC:\Documents and Settings\user\Start Menu\Programs.
Deprecated Connectors
The following connectors are deprecated in this release, so that maintenance will be provided only when any issues are raised by you. No active development, testing, or certification will be provided for any of these connectors.
-
FileNet Image Server
-
FileNet P8 Content Engine
-
Open Text LiveLink Enterprise Server
-
Hummingbird DM
-
IBM DB2 Content Management
What to Do Next
To become familiar with Oracle Secure Enterprise Search, Oracle suggests that you complete the following tasks:
-
Follow the Oracle SES tutorial:
http://www.oracle.com/pls/topic/lookup?ctx=E35215-01&id=tut_ses_administration -
Log on to the Oracle SES Administration GUI, using the user name and password set during the installation. With the Administration GUI you can:
-
Define sources to search
-
Configure and schedule the crawling of the sources
-
Monitor the status and performance of crawling and search operations
Click the Help link on the top right corner of any page in the Administration GUI for context-sensitive help.
-
-
In a production environment, where a load balancer or other monitoring tools are used to ensure system availability, Oracle SES can also be easily monitored using the URL:
http://host:port/monitor/check.jsp. When the Oracle SES instance is available, the URL displays the message:Oracle Secure Enterprise Search instance is up.
Note:
This message is not translated to other languages, because system monitoring tools may need to byte-compare this string.If the Oracle SES instance is not available because the database server is down, but the WebLogic server middle tier is running, then the URL displays the message:
Oracle Secure Enterprise Search instance is down !!!
If the Oracle SES instance is not available because the WebLogic server middle tier is down, then the URL displays either the connection error or the HTTP error code 503.
Documentation Accessibility
For information about Oracle's commitment to accessibility, visit the Oracle Accessibility Program website at http://www.oracle.com/pls/topic/lookup?ctx=acc&id=docacc.
Oracle customers have access to electronic support through My Oracle Support. For information, visit http://www.oracle.com/pls/topic/lookup?ctx=acc&id=info or visit http://www.oracle.com/pls/topic/lookup?ctx=acc&id=trs if you are hearing impaired.
Oracle Secure Enterprise Search Installation Guide, 11g Release 1 (11.1.2.2) for Microsoft Windows (64-Bit)
E14093-03
Copyright © 2006, 2013, Oracle and/or its affiliates. All rights reserved.
This software and related documentation are provided under a license agreement containing restrictions on use and disclosure and are protected by intellectual property laws. Except as expressly permitted in your license agreement or allowed by law, you may not use, copy, reproduce, translate, broadcast, modify, license, transmit, distribute, exhibit, perform, publish, or display any part, in any form, or by any means. Reverse engineering, disassembly, or decompilation of this software, unless required by law for interoperability, is prohibited.
The information contained herein is subject to change without notice and is not warranted to be error-free. If you find any errors, please report them to us in writing.
If this is software or related documentation that is delivered to the U.S. Government or anyone licensing it on behalf of the U.S. Government, the following notice is applicable:
U.S. GOVERNMENT END USERS: Oracle programs, including any operating system, integrated software, any programs installed on the hardware, and/or documentation, delivered to U.S. Government end users are "commercial computer software" pursuant to the applicable Federal Acquisition Regulation and agency-specific supplemental regulations. As such, use, duplication, disclosure, modification, and adaptation of the programs, including any operating system, integrated software, any programs installed on the hardware, and/or documentation, shall be subject to license terms and license restrictions applicable to the programs. No other rights are granted to the U.S. Government.
This software or hardware is developed for general use in a variety of information management applications. It is not developed or intended for use in any inherently dangerous applications, including applications that may create a risk of personal injury. If you use this software or hardware in dangerous applications, then you shall be responsible to take all appropriate fail-safe, backup, redundancy, and other measures to ensure its safe use. Oracle Corporation and its affiliates disclaim any liability for any damages caused by use of this software or hardware in dangerous applications.
Oracle and Java are registered trademarks of Oracle and/or its affiliates. Other names may be trademarks of their respective owners.
Intel and Intel Xeon are trademarks or registered trademarks of Intel Corporation. All SPARC trademarks are used under license and are trademarks or registered trademarks of SPARC International, Inc. AMD, Opteron, the AMD logo, and the AMD Opteron logo are trademarks or registered trademarks of Advanced Micro Devices. UNIX is a registered trademark of The Open Group.
This software or hardware and documentation may provide access to or information on content, products, and services from third parties. Oracle Corporation and its affiliates are not responsible for and expressly disclaim all warranties of any kind with respect to third-party content, products, and services. Oracle Corporation and its affiliates will not be responsible for any loss, costs, or damages incurred due to your access to or use of third-party content, products, or services.