Oracle® Secure Enterprise Search
Installation and Upgrade Guide
11g Release 1 (11.1.2.2) for IBM AIX on POWER Systems (64-Bit)
E21906-02
November 2013
This document describes how to install and upgrade Oracle Secure Enterprise Search (Oracle SES).
This document contains the following sections:
Installing Oracle Secure Enterprise Search
This section provides the information and procedures for performing an installation of Oracle SES. This section contains the following topics:
Preinstallation Tasks
This section describes the requirements and tasks to complete before installing Oracle SES and contains the following topics:
For additional preinstallation tips, see the following Oracle SES tutorial:
http://www.oracle.com/pls/topic/lookup?ctx=E35215-01&id=tut_ses_administration
Oracle SES AIX Certifications
Oracle SES is certified to run on the following AIX operating systems:
-
AIX 5L version 5.3, TL 05, Service Pack 10 or later, 64-bit kernel
-
AIX 6L version 6.1, TL 00, Service Pack 04 or later, 64-bit kernel
Oracle SES Browser Certifications
The Oracle SES administration tool and default query application are certified on the following browsers:
-
Firefox 3.x
-
Internet Explorer 7.x, 8.x
-
Safari 4.x
General Information and Requirements for Installing Oracle Software
This section describes the general requirements for installing Oracle software and contains these sections:
About the location of Oracle SES 11g Release (11.1.2.2) software
-
ORACLE_BASEis the root of the directory structure where Oracle SES software and its supporting infrastructure software are installed. This directory path is typically stored in an environment variable. On Linux and UNIX systems, you can reference the variable as$ORACLE_BASE. (On Windows, the equivalent is%ORACLE_BASE%.) -
ORACLE_HOMErefers to the pathORACLE_BASE/seshome. The path is typically stored in an environment variable. On Linux and UNIX systems, you can reference the variable as$ORACLE_HOME. (On Windows, the equivalent is%ORACLE_HOME%.) -
In previous releases, the base path of Oracle SES was referred to as
ORACLE_HOME. In Oracle SES release 11g, the base path is referred to asORACLE_BASE. This represents the Software Location that you specify at the time of installing Oracle SES.Therefore, for Oracle SES,
ORACLE_HOMEnow refers to the pathORACLE_BASE/seshome. -
There are many other directories (or folders) under
ORACLE_BASE, which are created by the installation of Fusion Middleware components such as WebLogic. The most important directories for you to be aware of are:-
wlserver. The WebLogic home. -
Oracle_WC. A portlet or portal component. -
oracle_common. The location of a set of Java Required Files.
-
Procedures for Logging In to the System as root
Before you install Oracle software, you must complete several tasks as the root user. For logging in as the root user, complete one of the following procedures:
-
To install the software from an X Window System workstation or X terminal
-
To install the software from a PC or other system with X server software
Note:
Unless you intend to complete a silent installation, you must install the software from an X Window System workstation, an X terminal, or a PC or other system with X server software installed.To install the software from an X Window System workstation or X terminal
-
Start a local terminal session, for example, an X terminal (
xterm). -
If you are not installing the software on the local system, then enter the following command to enable the remote host to display X applications on the local X server:
xhost fully_qualified_remote_host_nameFor example:
xhost somehost.us.example.com
-
If you are not installing the software on the local system, then use the
ssh,rlogin, ortelnetcommand to connect to the system on which you want to install the software:telnet full_qualified_remote_host_name -
If you are not logged in as the
rootuser, then enter the following command to switch user toroot:$ su - password: #
To install the software from a PC or other system with X server software
-
Start the X server software.
-
Configure the security settings of the X server software to permit remote hosts to display X applications on the local system.
-
Connect to the remote system on which you want to install the software and start a terminal session on that system, for example, an X terminal (
xterm). -
If you are not logged in as the
rootuser on the remote system, then enter the following command to switch user toroot:$ su - password: #
Creating Required Operating System Group and User
Depending on whether this is the first time Oracle software is being installed on this system and on the products that you are installing, you may need to create the following group and user account:
A single Oracle Inventory group is required for all installations of Oracle software on the system. After the first installation of Oracle software, you must use the same Oracle Inventory group for subsequent Oracle software installations on that system.
Note:
As an alternative to creating local users and groups, you can create them in a directory service, for example, Network Information Services (NIS). Contact your system administrator, or refer to your operating system documentation for information about using directory services.Oracle Inventory Group (oinstall)
You must create the Oracle Inventory group the first time you install Oracle software on the system. The usual name chosen for this group is oinstall. This group owns the Oracle inventory, which is a catalog of all Oracle software installed on the system. If Oracle software is installed on the system, then the existing Oracle Inventory group must be the primary group of the oracle user. Oracle recommends that you use the group name oinstall for the Oracle Inventory group.
Oracle Software Owner (oracle)
You must create the Oracle software owner user the first time you install Oracle software on the system. The usual name chosen for this user is oracle. This user owns all of the software installed during a given installation. This user must have the Oracle Inventory group as its primary group.
In Oracle documentation, the Oracle software owner user is referred to as oracle.
Determining Oracle Inventory Group and Oracle Software Owner User
To determine whether the Oracle Inventory group and the Oracle software owner exist, and if necessary, to create them, follow the procedure in this section.
To check if oinstall group exists
-
When you install Oracle software on the system for the first time, Oracle Universal Installer creates the
oraInst.locfile. This file identifies the name of the Oracle Inventory group and the path of the Oracle Inventory directory. To determine whether theoinstallgroup exists, enter the following command:more /etc/oraInst.loc
If the output of this command shows the
oinstallgroup name, then the group exists. For example, if the output is similar to the following, thenoinstallexists:inventory_loc=/u01/app/oraInventory inst_group=oinstallThe
inst_groupparameter shows the name of the Oracle Inventory group,oinstall. -
If necessary, enter the following command to create the
oinstallgroup:/usr/sbin/groupadd oinstall -
To determine whether the
oracleuser exists and belongs to the Oracle Inventory group, enter the following command:# id oracle
If the
oracleuser exists, then this command displays information about the groups to which the user belongs. The output should be similar to the following, indicating thatoinstallis the primary group:uid=440(oracle) gid=200(oinstall) groups=201(dba),202(oper)
If the output includes a
groups=clause, then it specifies secondary groups. -
If necessary, complete one of the following actions:
-
If the
oracleuser exists, but its primary group is notoinstall, then perform the following steps:-
Enter the following command:
# smit security
-
Choose the appropriate menu items to modify the
oracleuser. -
In the Primary GROUP field, specify the Oracle Inventory group, for example
oinstall. -
In the Group SET field, specify the required secondary groups.
-
Press F10 to exit.
-
-
If the
oracleuser exists, but you want to use another existing user as the Oracle software owner or you want to create a new Oracle software owner, then ensure that the user's primary group is the Oracle Inventory group.Note:
You may need to contact your system administrator before using or modifying an existing user. -
If the
oracleuser does not exist, then create it as follows:-
Enter the following command:
# smit security
-
Choose the appropriate menu items to create the
oracleuser. -
In the Primary GROUP field, specify the Oracle Inventory group, for example
oinstall. -
In the Group SET field, specify the required secondary groups, if any.
-
Press F10 to exit.
-
Set the password of the
oracleuser:# passwd oracle
-
-
Checking the Hardware Requirements
The system must meet the following minimum hardware requirements:
Note:
The number of CPUs on the server host will affect the performance of concurrent queries over a prolonged period. Oracle recommends that you use systems with two or more CPUs for production deployments that serve 1000 or more users.Memory Requirements
The memory requirements are determined by the physical memory consumed by the database and by services such as the WebLogic server. The memory requirements for installing Oracle SES 11g Release 1 (11.1.2.2) are as follows:
-
At least 2 GB of physical RAM
To determine the physical RAM size, enter the following command:
# /usr/sbin/lsattr -E -l sys0 -a realmem
If the size of the RAM is less than the required size, then you must install more memory before continuing.
Available RAM and Swap Space Requirement
The following table describes the relationship between installed RAM and the configured swap space requirement:
| Available RAM | Swap Space Required |
|---|---|
| Between 2 GB and 8 GB | Equal to the size of RAM |
| Between 8 GB and 14 GB | 0.75 times the size of RAM |
| More than 14 GB | 10 GB |
-
To determine whether the system architecture can run the software, enter the following command:
# /usr/bin/getconf HARDWARE_BITMODE
Note:
This command displays the processor type. Verify that the processor architecture matches the Oracle software release that you want to install. If you do not see the expected output, then you cannot install the software on this system. -
To determine if the system is started in 64-bit mode, enter the following command:
# bootinfo -K
The result of this command must be 64, indicating that the 64-bit kernel is enabled.
Note:
Oracle Secure Enterprise Search 11g supports 64-bit kernel and does not provide support for 32-bit kernel applications. -
To determine the size of the configured swap space, enter the following command:
# /usr/sbin/lsps -a
If necessary, refer to the operating system documentation for information about how to configure additional swap space.
Hardware Requirements
The system must meet the following minimum hardware requirements:
Oracle SES requires a minimum of 11.2 GB of disk space to install. This includes 9.5 GB for the software and approximately 1.7 GB to create the initial Oracle SES index. Additional Oracle SES requirements are based on the amount of data that you must search.
For example, to index 100,000 documents:
-
4 GB disk space
-
2 GB RAM
To index 1,000,000 documents:
-
20 GB disk space
-
6 GB RAM
Checking the Software Requirements
A system must meet the minimum software requirements described in this section.
Operating System and Browser Requirements
The operating system and browsers must be among those listed in "Oracle SES AIX Certifications" of this document.
Kernel Requirements
The following operating system filesets are required for Oracle Secure Enterprise Search 11g:
-
bos.adt.base
-
bos.adt.lib
-
bos.adt.libm
-
bos.perf.libperfstat
-
bos.perf.perfstat
-
bos.perf.proctools
-
xlC.aix50.rte:8.0.0.7 or later (AIX 5.3)
-
xlC.rte:8.0.0.7 or later (AIX 5.3)
-
xlC.aix61.rte:9.0.0.1 or later (AIX 6.1)
-
xlC.rte:9.0.0.1 or later (AIX 6.1)
-
To determine the distribution and version of AIX installed, enter the following command:
# oslevel -s
If the operating system version is lower than AIX 5.3.0.0 Technology Level 7 SP 10, then upgrade your operating system to this level. AIX 5L version 5.3 maintenance packages are available from the following Web site:
http://www-912.ibm.com/eserver/support/fixes/
-
To determine whether the required filesets are installed and committed, enter a command similar to the following:
# lslpp -l bos.adt.base bos.adt.lib bos.adt.libm bos.perf.perfstat \
bos.perf.libperfstat bos.perf.proctools
-
To determine the supported kernel mode, enter a command similar to the following:
# getconf KERNEL_BITMODE
Note:
- The expected output of this command is 64. If you do not see the expected output, then you cannot install the software on this system.
-
Oracle Secure Enterprise Search 11g supports 64-bit kernel and does not provide support for 32-bit kernel applications.
Patch Requirement
In addition, you must verify that the following patches are installed on the system.
Note:
There may be more recent versions of the patches listed installed on the system. If a listed patch is not installed, then determine whether a more recent version is installed before installing the version listed.-
Authorized Problem Analysis Reports (APARs) for AIX 5L v5.3:
-
IY89080
-
IY92037
-
IY94343
-
IZ01060 or efix for IZ01060
-
IZ03260, or efix for IZ03260
-
APARs required for GPFS v3.1.0.10: None
The following procedure describes how to check these requirements:
-
To determine whether an APAR is installed, enter a command similar to the following:
# /usr/sbin/instfix -i -k ""IY89080 IY92037 IY94343 Iz02060 Iz03260"
If an APAR is not installed, then download it from the following Web site and install it:
Configure Shell Limits and System Configuration Parameters
Oracle recommends that you set shell limits and system configuration parameters as described in this section.
Note:
The parameter and shell limit values shown in this section are recommended values only. For production database systems, Oracle recommends that you tune these values to optimize the performance of the system. See your operating system documentation for more information about tuning kernel parameters.Configure Shell Limits
Verify that the shell limits shown in the following table are set to the values shown.
| Shell Limit (As Shown in smit) | Recommended Value |
|---|---|
| Soft FILE size | -1 (Unlimited) |
| Soft CPU time | -1 (Unlimited)
Note: This is the default value. |
| Soft DATA segment | -1 (Unlimited) |
| Soft STACK size | -1 (Unlimited) |
| Soft Real Memory size | -1 (Unlimited) |
To view the current value specified for these shell limits, and to change them if necessary:
-
Enter the following command:
# smit chuser
-
In the User NAME field, enter the user name of the Oracle software owner, for example
oracle. -
Scroll down the list and verify that the value shown for the soft limits listed in the previous table is -1.
If necessary, edit the existing value.
-
When you have finished making changes, press F10 to exit.
Configure System Configuration Parameters
The following procedure describes how to verify and set the values.
-
To verify that the maximum number of processes allowed per user is set to 2048 or greater, use the following steps:
Note:
For production systems, this value should be at least 128 plus the sum of thePROCESSESandPARALLEL_MAX_SERVERSinitialization parameters for each database running on the system.-
Enter the following command:
# smit chgsys
-
Verify that the value shown for Maximum number of PROCESSES allowed per user is greater than or equal to 2048.
If necessary, edit the existing value.
-
When you have finished making changes, press F10 to exit.
-
-
To verify that long commands can be executed from shell, use the following steps:
Note:
Oracle recommends that you set thencargssystem attribute to a value greater than or equal to 128. Thencargsattribute determines the maximum number of values that can be passed as command line arguments.-
Enter the following command:
# smit chgsys
-
Verify that the value shown for ARG/ENV list size in 4K byte blocks is greater than or equal to 128.
If necessary, edit the existing value.
-
When you have finished making changes, press F10 to exit.
-
Installing on a Port Number Less Than 1024
During installation of Oracle SES, you specify a middle tier port number. This number is included in the URL for accessing Oracle SES. For example, if you specify 7777 as the port number, then the search URL will look like this:
http://example.com:7777/search/query/search.jsp
If you wish to hide the port number in the search URL, then the port must be set to 80, which is the default port for HTTP connections. For example, if you change the middle tier port shown in the previous example to 80, then the search URL does not need to include the port number as shown in the following example:
http://example.com/search/query/search.jsp
On Linux and UNIX operating systems, only root users can bind to ports less than 1024. Since Oracle SES must be installed by a non-root user, you must install Oracle SES on port 1024 or higher and then change it later.
To change the port number later, after installation
-
During installation, specify a port greater than or equal to 1024.
-
After the installation is complete, follow the instructions in "Change the Oracle SES Middle Tier Port (Optional)" to change the port to a number less than 1024.
Checking the Oracle Base Directory
The Oracle home directory is generally a subdirectory of the Oracle base directory. Before installing Oracle SES, check to see if the ORACLE_BASE environment variable is set. If it is set, then ensure that you have write permission to that location. ORACLE_BASE should not reside within another user's directory structure.
Setting the Correct Locale
The correct environment parameters (LANG, NLS_LANG and LC_ALL) should be set before Oracle SES is installed. For file sources to successfully crawl and display multibyte environments, the locale of the system that starts the Oracle SES server must be the same as the target file system. This way, the Oracle SES crawler can "see" the multibyte files and paths. If the locale is different in the installation environment, then Oracle SES must be restarted from the environment with the correct locale. For example, for a Korean environment: Either set LC_ALL to ko_KR, or set both LC_LANG and LANG to ko_KR.KSC5601, then run searchctl restartall from an xterm. The command searchctl restartall will take about two and one half minutes to complete.
Disabling Internet Protocol version 6 (IPv6) Components
If IPv6 is enabled on the system, disable it prior to installing Oracle SES.
Installation Tasks
Oracle SES is provided through electronic download (preferred) or on physical media. Either way, the installable product image is the same.
To obtain the software and start the installer
-
Ensure that you have checked all the minimum requirements, as described in "Preinstallation Tasks" of this document.
-
Log on to the system on which you are performing the installation as the user who will install Oracle SES. Oracle SES must be installed by a non-
rootuser. -
Download the Oracle SES software distribution.
Note:
If you received the software for this release on DVD, then mount the DVD on your system as you normally would and continue with these procedures. (The DVD contains the same archives as available for electronic download.) -
Unzip the Oracle SES software.
-
There will be more than one zip archive, typically two.
-
After you download each archive, extract all from each zip archive into the same destination directory. Preserve the path information when you extract the zip files.
-
-
Change to the directory into which you unzipped the zip archives.
-
Start Oracle Universal Installer from your system prompt with the following command:
./runInstaller
The Specify Installation Details page appears for Oracle SES.
See Also:
"Installing on a System with an Existing Oracle SES Installation" in this document -
Continue with the installation procedure:
See Also:
For a tutorial on Oracle SES, see:http://www.oracle.com/pls/topic/lookup?ctx=E35215-01&id=tut_ses_administrationPerforming a Fresh Installation for Oracle SES
Oracle Universal Installer provides the Specify Installation Details page for setting parameters for the location and home for Oracle SES. You must specify the administrative password. The remaining values are set to a default, but they can be overridden.
Figure 1 Specify Installation Details page
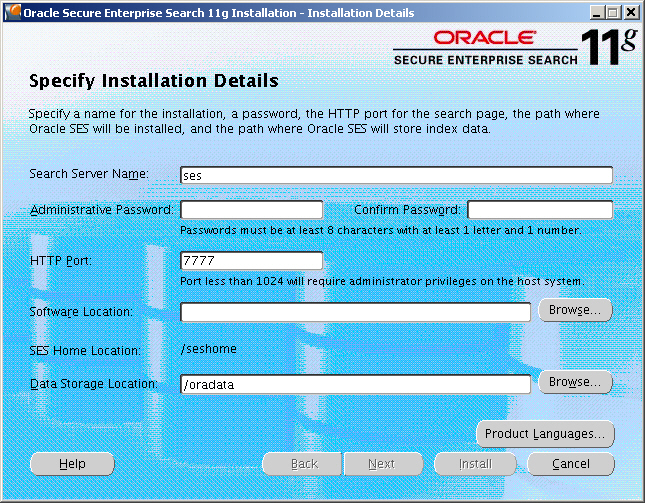
Description of "Figure 1 Specify Installation Details page"
The installation parameters are as follows:
-
Search Server Name: Name for your search server. To connect multiple Oracle SES instances to the same directory (authorization) server, each instance must have a distinct name.
-
Administrative Password and Confirm Password: The password that you will later use to log on to the Oracle SES administration tool. This password must be at least eight characters long with at least one alpha character and one number.
-
HTTP Port: The port on which the Oracle SES middle tier will listen. For example, if you install Oracle SES on host
example.comand you specify port 7777, then your search page URL will be as follows:http://example.com:7777/search/query/search
Note:
You must specify a number greater than or equal to 1024 for HTTP Port. You can change the port number after completing the installation, if needed. See "Change the Oracle SES Middle Tier Port (Optional)" and "Installing on a Port Number Less Than 1024" in this document. -
Software Location: The location where Oracle SES home will be created, which is
ORACLE_BASEby default.ORACLE_BASEis the root of the directory structure where Oracle SES software and its supporting infrastructure software are installed. See "About the location of Oracle SES 11g Release (11.1.2.2) software" in this document. -
SES Home Location: The default installed path is
ORACLE_BASE/seshome. -
Data Storage Location: The default is
ORACLE_BASE/oradata. This is the location where Oracle SES will store its data. The data storage location should be outside of theORACLE_BASE/seshomedirectory so that it will not be deleted during a future upgrade.
The following URLs indicate a successful installation:
-
Search application:
http://host:port/search/query/search -
Administration tool:
http://host:port/search/admin/index.jsp(Log on using the password specified during installation.)
Installing on a System with an Existing Oracle SES Installation
You can install this release (or previous releases) of Oracle SES more than once on the same system as long as each installation is installed in a separate Oracle home. Follow the procedures under Performing a Fresh Installation for Oracle SES. Use different values for Search Server Name, HTTP Port, and Software Location parameters.
Silent Installation Tasks
A silent installation has no graphical output and no input by the user. It is accomplished by supplying Oracle Universal Installer with a response file and specifying the -silent flag on the command line. Use silent installation when you want the same installation parameters on more than one computer. Additionally, you can use silent installation from the command line to push the installation of Oracle SES from a remote location to various computers in the organization.
This section contains these topics:
Note:
The SES Home Location for Oracle SES software is $ORACLE_BASE/seshome. Do not specify Oracle home as the location of Oracle SES. However, the silent response file must also ask for ORACLE_HOME to support the current OUI architecture.Selecting a Response File
Before performing a silent installation, you must provide information specific to your installation in a response file. The installer will fail if you attempt an installation using a response file that is not configured correctly. Response files are text files that you can create or edit in a text editor. Response files (like server.rsp) are located in the /response directory of the Oracle SES 11.1.2.2 software distribution. Edit the response file according to your requirements for silent installation.
To use a response file, you must first extract server.rsp file to your system from the Oracle SES tar or zip archive that comprises the software distribution for this release. There may be two compressed archives and you may need to look in each to find the /response directory. For example:
-
Open the tar or zip archive and find the
/responsedirectory. -
Extract the
server.rspfile to your system hard drive. -
Edit
server.rspas described in "Editing the Response File" in the next section.
Note:
Response files likeserver.rsp are located in the /response directory of the Oracle SES 11.1.2.2 software distribution.Editing the Response File
Use any text editor to edit the response file to include information specific to your system. You must specify values for variables in your response file. Each variable listed in the response file is associated with a comment, which identifies the variable type.
For example:
string = "Sample Value"
Boolean = True or False
Number = 1000
StringList = {"StringValue 1", "String Value 2"}
The values that are given as <Value Required> must be specified for silent installation.
Specifying ORACLE_HOME Properly in Response Files
You must ask for ORACLE_HOME in the silent response file due to the current OUI release 11.1 architecture. Therefore, you have to ask for both ORACLE_HOME and ORACLE_BASE. This is different from GUI behavior where you only need to ask for ORACLE_BASE (Software Location).
If you do not ask for both Oracle homes in the response file, then at install time users will need to make sure to input ORACLE_HOME as ORACLE_BASE + /seshome manually. An error pops up if users do not specify ORACLE_HOME properly.
The explanation for this is in the comment section of the response file examples.
Specifying a Response File and Starting the Installation
Before you specify a response file, ensure that all values in the response file are correct. To make Oracle Universal Installer use the response file at installation time, specify the location of the response file as a parameter when starting Oracle Universal Installer. To perform a silent installation, use the -silent parameter as follows:
./runInstaller -silent -responseFile absolute_path_and_filename
Caution:
During installation, response files may be copied to subdirectories in the Oracle home. Oracle recommends that you do not hard-code passwords and confidential information in your response files. You should prompt the user to enter passwords and anything confidential or that might pose a security risk.If you must provide passwords or other sensitive information in your response files, then for security purposes, delete them after completing and verifying the installation.
Silent Installation Log Files
The success or failure of silent installations is logged in the installActions.log file. Additionally, the silent installation creates the silentInstall.log file. The log files are created in the /oraInventory/logs directory. The silentInstallDate_Time.log file contains the following line if the installation was successful:
The installation of Oracle Secure Enterprise Search was successful.
The corresponding installActionsDate_Time.log file contains specific information regarding installation.
Security Tips for Silent Installations
The response file contains the installation password in clear text. To minimize security issues, follow these guidelines:
-
Set the permissions on the response files so that they are readable only by the operating system user performing the silent installation.
-
If possible, remove the response files from the system after the silent installation is completed.
Error Handling
Values for variables that are of the wrong context, format, or type are treated as if no value were specified. Variables that are outside any section are ignored. If you attempt a silent installation with an incorrect or incomplete response file, or if Oracle Universal Installer encounters an error, such as insufficient disk space, then the installation will fail.
Postinstallation Tasks
This section describes the tasks to perform after installing Oracle SES and contains the following topics:
Check for Critical Patches
After installing Oracle SES, check for a patch set or critical patch update (CPU). A CPU is a collection of patches for security vulnerabilities. It also includes non-security fixes required (because of interdependencies) by those security patches. CPUs are cumulative, and they are provided quarterly on Oracle Technology Network. For more information about CPUs, see https://support.oracle.com/
Check for Additional Documentation and Support Services
Up-to-date Release Notes are posted on Oracle Technology Network (OTN). You must register online before using OTN. Registration is free and can be done at http://www.oracle.com/technetwork/community/join/index.html
If you have a user name and password for OTN, then you can go directly to the documentation section of OTN at http://www.oracle.com/technetwork/indexes/documentation/index.html
Change the Oracle SES Middle Tier Port (Optional)
If needed, you can change the Oracle SES middle tier port as described in this section.
To change the Oracle SES middle tier port
-
Shut down the middle tier with the following command:
$ORACLE_HOME/bin/searchctl stopall
-
Open the file
$ORACLE_HOME/search/base_domain/config/config.xml.Note:
Oracle recommends that you back up this file before you open it in this step.-
Search for the word "listen-port." The XML statement that specifies the port number looks like the following example:
<listen-port>33333</listen-port>
-
Edit the value of the <listen-port> attribute. The following example changes the port to 44444:
<listen-port>44444</listen-port>
Note:
Make sure that the new port is not in use. -
-
Edit
$ORACLE_HOME/bin/searchctland change the value ofWLS_LISTENER_PORTto the new port value. -
If you change the port from a number greater than or equal to 1024 to a number less than 1024, then perform the following steps:
-
Start the database with the following command:
$ORACLE_HOME/bin/searchctl start_backend
-
Log in as
root. -
Grant SQL*Plus
EXECUTEpermission toroot:chmod o+x $ORACLE_HOME/bin/sqlplus
-
Run the following command:
chgrp -R root $ORACLE_BASE/jdk6
-
Start the middle tier with the following command:
$ORACLE_HOME/bin/searchctl start
-
-
If you change the port from a number less than 1024 to a number greater than or equal to 1024, then perform the following steps:
-
Log in as
root. -
Run the following commands:
chown -R <install user> $ORACLE_HOME/search/base_domain
chgrp -R <install user group> $ORACLE_HOME/search/base_domain
chgrp -R <original user group> $ORACLE_HOME/../jdk6
where
install useris the user installing Oracle SES. -
Log off the
rootuser. -
Log in as the Oracle SES installation user and perform step 6 of this procedure.
-
-
Start the middle tier with the following command:
$ORACLE_HOME/bin/searchctl startall
Define the Datasource for the Oracle Web Services Manager (OWSM) Template
This is a workaround for bug #9268418. After installing/upgrading to the Oracle SES 11.1.2.2, when you log in to the Weblogic Server, the status of the server is shown as Critical instead of OK.
To solve this issue, you need to define the datasource for the OWSM template.
To define the datasource for the OWSM template
-
Perform the following steps to create the database user and password for the OWSM connection pool.
-
Start SQL*Plus and connect as the
SYSDBAuser. -
Run the following SQL statements:
SQL> create user owsmuser identified by welcome1;

SQL> grant connect, resource to owsmuser;
-
-
Log in to the WebLogic admin console (
http://host:port/console). -
Set the domain instance to lock/edit mode.
-
In the left navigation menu, select Services > JDBC > Data Sources.
-
Replace the value of mds-owsm > Connection Pool > URL with that from EnterpriseSearchDS > Connection Pool > URL.
-
Click Save.
-
Click Activate Changes.
-
Restart the middle tier with the following command:
$ORACLE_HOME/bin/searchctl restart
Deinstallation Tasks
This section provides the procedure for deinstalling Oracle SES. Deinstallation of Oracle SES removes the contents of the oradata directory. Refer also to "Removing the Oracle SES 10.1.8.4/11.1.2.0 Home" in this document.
To deinstall Oracle SES
-
Connect as the Oracle SES installation user.
-
Shut down the middle tier and the database.
$ORACLE_HOME/bin/searchctl stopall
-
Run the deinstallation script as follows:
$ORACLE_HOME/install/deinstall_ses
-
If the Oracle SES instance was bound to a port less than 1024 and the middle tier ran as the
rootuser, then after deinstallation there could be files left under$ORACLE_HOME. After the deinstall completes, log on as the root user and delete those remaining files.
Upgrading Oracle Secure Enterprise Search
This section provides the information and procedures for upgrading from previous releases of Oracle SES, that is Oracle SES 10.1.8.4 or Oracle SES 11.1.2.0, to Oracle SES 11.1.2.2. Also discussed are preupgrade and postupgrade tasks.
Note:
-
If you are running a release of Oracle SES earlier than 10.1.8.4, then you must first upgrade to release 10.1.8.4.
-
For index optimization, this release sets smart defaults for clean installations. Since the user setting for upgrade scenarios cannot be modified, Oracle SES preserves the default settings in release 10g for the upgrade process.
-
After you upgrade to this release, the two identity plug-ins Oracle E-Business Suite release 11i and Oracle E-Business Suite release 12 are consolidated into one identity plug-in named Oracle E-Business Suite. Similarly, the two source types Oracle E-Business Suite 11i and Oracle E-Business Suite release 12 are consolidated into one source type named Oracle E-Business Suite.
This section contains the following topics:
Preupgrade Tasks
This section provides the information and tasks specific to preparing an upgrade from Oracle SES release 10.1.8.4/11.1.2.0 to Oracle SES release 11.1.2.2.
Confirm that Free Memory and Disk Space Requirements are Met
Before performing the upgrade tasks for this release of Oracle SES, at least 2 GB of free RAM and 10 GB of free disk space must be available on the system.
Note:
Depending on the number of documents to process and how many custom attributes are meta-tagged, extra space might be needed.Apply Mandatory One-Off Patches for Oracle SES 10.1.8.4
The patches described in this section are required before performing the upgrade tasks for Oracle SES 10.1.8.4.
-
Apply patch 5632264 to the Oracle SES 10.1.8.4 instance. Patch 5632264 updates the database time zone files to version 4. The time zone files for Oracle Database 11g must be version 4 or greater. After applying this patch, you must restart the Oracle SES 10.1.8.4 instance before upgrading to Oracle SES 11.1.2.2. Patch 5632264 is available on My Oracle Support (formerly OracleMetaLink) at
http://support.oracle.com.
Important:
If this one-off patch is not applied to the Oracle SES 10.1.8.4 instance, then the Oracle SES 11.1.2.2 upgrade will fail during Oracle Search Upgrade Assistant with the following error:oracle.search.config.OESException: Error while executing action: "upgrade_all" Caused by: oracle.search.config.OESException: Upgrade assistant failed. Caused by: oracle.search.config.OESException: Fatal exception. Database upgrade failed.
-
Apply patch 11798419 to the Oracle SES 10.1.8.4 instance. If this patch is not applied, then after deinstalling the Oracle SES 10.1.8.4 instance, the contents of the
oradatadirectory get deleted, which makes the new upgraded Oracle SES instance non-functional. After applying this patch, you must restart the Oracle SES 10.1.8.4 instance before upgrading to Oracle SES 11.1.2.2. Patch 11798419 is available as a zip file11798419_10184.zipand is present in the/Patchesdirectory of the Oracle SES 10.1.8.4 software distribution.
Important:
If this one-off patch is not applied to the Oracle SES 10.1.8.4 instance, then the Oracle SES 11.1.2.2 upgrade will fail after deinstalling the 10.1.8.4 instance. There is no way to recover from this failure.Apply Mandatory One-Off Patches for Oracle SES 11.1.2.0
The patches described in this section are required before performing the upgrade tasks for Oracle SES 11.1.2.0.
-
Apply patch 11798419 to the Oracle SES 11.1.2.0 instance. If this patch is not applied, then after deinstalling the Oracle SES 11.1.2.0 instance, the contents of the
oradatadirectory get deleted, which makes the new upgraded Oracle SES instance non-functional. After applying this patch, you must restart the Oracle SES 11.1.2.0 instance before upgrading to Oracle SES 11.1.2.2. Patch 11798419 is available as a zip file11798419_11120.zipand is present in the/Patchesdirectory of the Oracle SES 11.1.2.0 software distribution.
Important:
If this one-off patch is not applied to the Oracle SES 11.1.2.0 instance, then the Oracle SES 11.1.2.2 upgrade will fail after deinstalling the 11.1.2.0 instance. There is no way to recover from this failure.Back Up the existing Oracle SES Instance
There is no downgrade support from Oracle SES 11.1.2.2, so you must create a backup copy of the existing Oracle SES installation in case you need to restore the 10.1.8.4/11.1.2.0 instance.
To back up Oracle SES using the copy command
-
Create a copy of the following directories:
- Oracle base: the Oracle SES 10.1.8.4/11.1.2.0 installation directory.
- Oracle home: the Oracle SES 10.1.8.4/11.1.2.0 home directory.
oradata: the repository for data files, control files, and log files.oraInventory: the central inventory of all Oracle homes. Its location is specified in/etc/oraInst.loc
To back up Oracle SES using the tar command
-
Shut down the Oracle SES instance.
$ORACLE_HOME/bin/searchctl stopall
-
If you are not logged in as
root, then enter the following command to become therootuser:su - root
-
Change (
cd) into the backup location of the operating system and execute the following commands:tar cvf ses_orabase.tar {full path to Oracle base} tar cvf ses_orahome.tar {full path to Oracle home} tar cvf ses_orainv.tar {full path to oraInventory} tar cvf ses_oradat.tar {full path to oradata}
Upgrade OracleAS Portal Server (Optional)
If you are using the portlet feature in Oracle SES Release 10.1.8.4/11.1.2.0, then you must upgrade to OracleAS Portal Server 10.1.4.2.0, and apply Patch Set Exception (PSE) 7560661 to OracleAS Portal Release 10.1.4.2.0.
Common Preupgrade Tasks
This section contains information and procedures for preupgrade tasks for all upgrades from previous releases of Oracle SES.
Important:
Before following the procedures in this section, refer to "Apply Mandatory One-Off Patches for Oracle SES 10.1.8.4" in this document.This section contains the following topics:
Setting JOB_QUEUE_PROCESSES To Zero
During upgrading of Oracle SES, scheduled jobs should not be started, and crawl and optimization processes should not be running in the background. To prevent scheduled jobs from executing, set the JOB_QUEUE_PROCESSES parameter to 0.
To set the JOB_QUEUE_PROCESSES parameter to 0
-
Start SQL*Plus and connect as the
EQSYSuser. -
Check the current value of
JOB_QUEUE_PROCESSES, so that you can later restore it. By default,JOB_QUEUE_PROCESSESis 10, but it may be set differently in this database. Execute this query to obtain the value ofJOB_QUEUE_PROCESSES.SQL> SELECT name, value from v$parameter WHERE name='job_queue_processes';
-
Execute this SQL statement to set
JOB_QUEUE_PROCESSESto zero.SQL> ALTER SYSTEM SET job_queue_processes=0 scope=both
Note:
The postupgrade migration scripts must be run withJOB_QUEUE_PROCESSES set to 0. See "Running Postupgrade Migration Scripts". After upgrading and running the postupgrade migration scripts, restore the original value as described in "Restoring JOB_QUEUE_PROCESSES".Ensuring Adequate Disk Space and Optimizing Indexes
You must confirm that multiple factors of free space are available before performing the upgrade processes. In addition to the disk space required for a second installation, you will need sufficient resources for postupgrade index migration and other space-intensive reconfiguration. To maximize performance, you can optimize indexes and reduce fragmentation to near 0% before upgrading.
Ensuring Adequate Memory
When upgrading, if you have changed the SGA size manually, then follow the steps in this section to confirm that Oracle SES has enough memory.
Note:
You must allocate at least 2GB free memory for upgrading to Oracle SES release 11.1.2.2.To confirm that available memory for Oracle SES meets the requirements
-
Verify that Automatic Shared Memory Management is turned on by confirming that
SGA_TARGETis greater than 0. IfSGA_TARGETis set to 0, then you must restore the value to the original (which is smaller one either 40% of the physical memory size or 1536M). If you change theSGA_TARGETparameter value, then restart Oracle SES to reflect the change and to check if the Oracle SES instance can be started without any problem. -
Check the
SGA_TARGETsize with the following command:SELECT name, value/1024/1024 ||' M' FROM V$PARAMETER WHERE name = 'sga_target';
Note:
SGA_TARGETspecifies the total size of all SGA components. IfSGA_TARGETis specified as a number greater than zero, then several of the memory pools in the SGA are automatically sized. If any of those automatically tuned memory pools are individually set to nonzero values, then those values are used as minimum levels by Automatic Shared Memory Management. Other memory pools are not affected by Automatic Shared Memory Management.
Upgrading Oracle Single Sign-On Server (Optional)
If you previously configured Oracle SES release 10.1.8.4/11.1.2.0 with Oracle Single Sign-On, then you must upgrade to Oracle Single Sign-On 10.1.4.0.1 before you upgrade to Oracle SES release 11.1.2.2. After you complete the upgrade procedures for Oracle SES 11.1.2.2, you will need to reconfigure Oracle SES with Single Sign-On server. Schedule downtime accordingly during the upgrade process.
See "Upgrading Oracle HTTP Server (Optional)" for the correct version of Oracle HTTP Server to use with Oracle Single Sign-On.
Upgrading Oracle HTTP Server (Optional)
If you have enabled Oracle Single Sign-On for Oracle SES release 10.1.8.4/11.1.2.0, then ensure that the Oracle HTTP server is release 10.1.3 or 11g.
If you have enabled SSL for Oracle SES release 10.1.8.4/11.1.2.0, then ensure the Oracle HTTP server is release 11g.
Upgrading on a Port Number Less than 1024
This step is only necessary if the release of Oracle SES that you are upgrading is bound to a port number less than 1024. You must change the port to a number greater than or equal to 1024 before starting the upgrade. After the upgrade completes, you can change the port back to a number less than 1024. Follow the instructions in "Change the Oracle SES Middle Tier Port (Optional)" in this document.
Upgrade Tasks
This section contains the procedures for upgrading Oracle SES 10.1.8.4/11.1.2.0 to release 11.1.2.2.
To upgrade Oracle SES
-
Ensure that the Oracle SES 10.1.8.4/11.1.2.0 instance is running.
-
Start the Oracle Universal Installer for Oracle SES 11.1.2.2.
-
When the installation process detects the existing Oracle SES instance on the computer, it will give you the option of either upgrading the existing installation or creating a fresh installation.
-
Choose to upgrade the existing installation.
-
Follow the prompts to select:
-
The location where the Oracle SES 10.1.8.4/11.1.2.0 software is installed
-
The administrative password that was set in the Oracle SES 10.1.8.4/11.1.2.0 installation
-
The location where the new Oracle SES 11.1.2.2 software will be installed. This location must be different from the release 10.1.8.4/11.1.2.0 location. You cannot install Oracle SES 11.1.2.2 inside the Oracle home for Oracle SES release 10.1.8.4/11.1.2.0.
-
Note:
After the upgrade process is complete, do not uninstall the previous Oracle SES instance. The upgraded Oracle SES instance still refers to the control files present in the previous Oracle SES instance.Restoring Oracle SES If Upgrading Fails
If the upgrade fails, then restore the previous Oracle SES release from your backup.
To restore Oracle SES from backup using the tar command
-
Delete the Oracle home,
oradata, andoraInventorydirectories. -
If you are not logged in as
root, then enter the following command to become therootuser:su - root
-
Execute the following commands using the full path to the Oracle SES release 10.1.8.4/11.1.2.0 home:
tar xvf ses_orabase.tar
tar xvf ses_orahome.tar
tar xvf ses_orainv.tar
tar xvf ses_oradat.tar
After restoring the previous release, you can retry the Oracle SES upgrade.
Note:
If you usezip instead of tar for the backup, then create separate archives for Oracle base, home, inventory, and data directories.Silent Upgrade Tasks
A silent upgrade has no graphical output and no input by the user. To perform a silent upgrade, you provide Oracle Universal Installer with a response file and specify the -silent flag on the command line. Response files are located in the /response directory of the Oracle SES 11.1.2.2 software distribution. You must edit the response file according to your upgrade requirements.
To use a response file
-
Go to the
/responsedirectory present in the Oracle SES 11.1.2.2 software distribution. -
Copy the
upgrade.rspfile to your system hard drive. For example:cp upgrade.rsp /private/ses/response/upgrade.rsp
-
Using any text editor, replace each variable in the response file with the value specific to your system. The variables are clearly marked with the text
<ValueRequired>. Each variable has an associated comment that identifies the variable type. For example:string = "Sample Value" Boolean = True or False Number = 1000 StringList = {"StringValue 1", "String Value 2"}Be sure to delete the comments before starting the silent upgrade.
-
Go to the installation directory.
-
Run Oracle Universal Installer with the following command:
./runInstaller -silent -responseFile absolute_path_and_filename
Caution:
During upgrade, response files may be copied to the subdirectories in the Oracle home directory. If you provided passwords or other sensitive information in your response files, then delete any copies of the response files that remain in your file system.Postupgrade Tasks
This section describes the procedures that must be performed after the upgrade process completes.
This section contains the following topics:
-
Updating Configure Search Results List for CSS and XSLT (Optional)
-
Updating Configure Search Results List for CSS and XSLT (Optional)
Important:
-
The scripts
enable_SES1112_improve.sql(for 10.1.8.4 to 11.1.2.2 upgrade path) andSES_11122_post_upgrade.sql(for 11.1.2.0 to 11.1.2.2 upgrade path) must be executed immediately after the Oracle SES upgrade is completed. Do not start a crawl or an optimization before the execution of these scripts completes. -
The Data Storage Location specified in Oracle SES installation is shared by the previous Oracle SES release from which you are upgrading. For example, the 10.1.8.4/11.1.2.0 and 11.1.2.2 releases of Oracle SES use the same data storage area. If this data storage directory is inside the release 10.1.8.4/11.1.2.0 Oracle home, then be very careful not to remove this directory after upgrading to release 11.1.2.2.
-
If index migration is interrupted and fails to complete, then Searchable Content Stats will be inaccurate. Failed or abandoned attempts to migrate an index and its data will result in inaccurate reporting about what is available for search in the Oracle SES instance. In this case, this is expected behavior until a proper cleanup is performed with
eq_idx_mig.cleanup. See Oracle Secure Enterprise Search Administrator's Guide for procedures.
Running Postupgrade Migration Scripts
Oracle SES release 11.1.2.2 introduces new features over Oracle SES 10.1.8.4/11.1.2.0 that provide search performance improvements. These features are incorporated automatically in fresh installations of Oracle SES 11.1.2.2. To incorporate these features in Oracle SES 11.1.2.2 after upgrading from Oracle SES 10.1.8.4/11.1.2.0, you must run the following scripts in SQL*Plus as the EQSYS user.
Important:
Before running the postupgrade migration scripts, ensure that theJOB_QUEUE_PROCESSES parameter is set to 0, as described in "Setting JOB_QUEUE_PROCESSES To Zero". After the completion of running these scripts, set JOB_QUEUE_PROCESSES to the original value, as described in "Restoring JOB_QUEUE_PROCESSES".-
For 10.1.8.4 to 11.1.2.2 upgrade path (Mandatory script)
enable_SES1112_improve.sqlRun this script after upgrading from Oracle SES 10.1.8.4 to Oracle SES 11.1.2.2.
Script location:
$ORACLE_HOME/search/admin/scripts/enable_SES1112_improve.sqlSee the section "enable_SES1112_improve.sql" for more information.
-
For 11.1.2.0 to 11.1.2.2 upgrade path (Mandatory script)
SES_11122_post_upgrade.sqlRun this script after upgrading from Oracle SES 11.1.2.0 to Oracle SES 11.1.2.2.
Script location:
$ORACLE_HOME/search/admin/scripts/SES_11122_post_upgrade.sql -
For both the upgrade paths (Optional script)
enable_Japanese_bigram.sqlRun this script after upgrading from Oracle SES 10.1.8.4/11.1.2.0 to Oracle SES 11.1.2.2. This script activates search performance enhancements for Japanese text. Running this script is optional, that is, run this script only if your Oracle SES instance includes Japanese text, or if you anticipate future searches of Japanese text.
Script location:
$ORACLE_HOME/search/admin/scripts/enable_Japanese_bigram.sqlSee "enable_Japanese_bigram.sql" for more information.
enable_SES1112_improve.sql
This script rebuild the index structures to support performance improvement features in Oracle SES 11.1.2.2 and implements a change to the internal text index structure, which improves query performance especially for custom attribute search.
This script may take several hours to run, depending on the size of the index, number of documents to be indexed, and the number of custom attributes. This script generates log files enable_bigio.log and zone_to_field.log in the $ORACLE_HOME/ctx/log directory. First, enable_bigio.log is generated, and then zone_to_field.log is generated.
Important:
The script enable_SES1112_improve.sql has significant disk space requirements. You may need to allocate additional tablelspace before you run this script. This script will give you a warning message if there is not enough free space. At that point, you can cancel, allocate additional space, and rerun the script. If there is insufficient temporary tablespace, the script will display an error message. If this should occur, you should add a temp file toOES_TEMP tablespace and rerun the script. To add a temp file to OES_TEMP tablespace:
SQL>ALTER TABLESPACE OES_TEMP
           ADD TEMPFILE 'filePath/OES_TEMP_02.dbf' SIZE 10M
           AUTOEXTEND ON;
For filePath, specify the path to OES_TEMP_01.dbf. You can find this path with the following query:
SQL> SELECT file_name FROM dba_temp_files
            WHERE tablespace_name = 'OES_TEMP';
enable_Japanese_bigram.sql
This script enables bi-gram token generation for Japanese text. Bi-gram lexing improves the performance of Japanese document indexing. If there is no Japanese text in your Oracle SES instance, or if cache files are not preserved, the script updates index metadata to use the bi-gram lexer for future Japanese indexing.
The script checks if all the cached files exist for crawled Japanese documents. If there are missing files, a warning message is displayed with the number of missing cached files. If you choose to proceed, the script will re-index the cached files only. You cannot search Japanese documents while this script is running.
Important:
Theenable_Japanese_bigram.sql script will re-index Japanese documents only if cache files are preserved. Before running this script, you should ensure that cache files exist for all crawled Japanese documents and that the "clear cached files after indexing" crawling option is disabled. If cache files are not preserved and there are Japanese documents in your Oracle SES instance, you must run a full recrawl after the script completes. Otherwise Japanese search will not work. The script will list all the data sources that need a full crawl. Run a full crawl for these data sources. At the end of the script, you may be advised to check the CTXSYS.CTX_INDEX_ERRORS view to see if indexing encountered any errors. If some of your documents do not have cached files, then indexing raises ORA-22288 and the error is logged in the view. However, you can ignore the error because these data sources need to be crawled again.Restoring JOB_QUEUE_PROCESSES
To prepare for the upgrade process, the JOB_QUEUE_PROCESSES parameter was set to 0 before the upgrade. After you run the migration scripts, as described in "Running Postupgrade Migration Scripts", you must restore the original value of the JOB_QUEUE_PROCESSES parameter. (You will need the original value of this parameter that existed before the preupgrade steps in order to complete this procedure.)
To reset the JOB_QUEUE_PROCESSES parameter
-
Start SQL*Plus and connect as the
EQSYSuser. -
Execute the following SQL statement, and specify the original value of
JOB_QUEUE_PROCESSESforn.SQL> ALTER SYSTEM SET job_queue_processes=n scope=both;
Note:
If you do not restoreJOB_QUEUE_PROCESSES after running the postupgrade scripts, crawling and optimization will fail.Updating Configure Search Results List for CSS and XSLT (Optional)
This section describes how to modify your custom CSS and XSLT if you made changes in Oracle SES 10.1.8.4/11.1.2.0, or you want to enable advanced result configuration in Oracle SES 11.1.2.2.
In the Configure Search Results List section in the Advanced Configuration under Global Settings, the default CSS now includes the CSS classname ses-results-list at the beginning of each selector.
Note that in the following examples, the dot (.) before a name denotes a class selector in CSS. You will have to prepend the class ses-results-list to the beginning of each selector.
For example, if a CSS rule uses two selectors in Oracle SES 10.1.8.4/11.1.2.0 as in this example:
.infoSrcGroup,
.infoSrcPath
{
  font-size: 12pt;
}
then, in Oracle SES 11.1.2.2, each selector should have .ses-results-list prepended as follows:
.ses-results-list .infoSrcGroup,
.ses-results-list .infoSrcPath
{
  font-size: 12pt;
}
In addition, the default XSLT has been slightly modified in this release. The previous default XSLT content contained the following section:
              <!-- Links link -->
              <a class="cacheUrl" href="{eqlinksurl}">
                <xsl:call-template name="translate">
                  <xsl:with-param name="strKey" select="''LINKS''" />
                </xsl:call-template>
              </a>
The new XSLT corrects the class attribute value, resulting in the following section:
              <!-- Links link -->
              <a class="linksUrl" href="{eqlinksurl}">
                <xsl:call-template name="translate">
                  <xsl:with-param name="strKey" select="''LINKS''" />
                </xsl:call-template>
              </a>
Configuring Secure Sockets Layer for Oracle SES (Optional)
When Oracle SES is fronted by an Oracle HTTP Server, Oracle recommends that Oracle SES be configured to require Secure Sockets Layer (SSL) with client-side authentication for communication with the Oracle HTTP Server. If you have configured SSL for Oracle SES release 10.1.8.4/11.1.2.0, then you must manually reconfigure SSL for Oracle SES 11.1.2.2. You configure SSL through the admin console in WebLogic. The steps for configuring SSL are described in Oracle Secure Enterprise Search Administrator's Guide.
Configuring Oracle Single Sign-On for Oracle SES (Optional)
If you configured Oracle Single Sign-On (SSO) for Oracle SES release 10.1.8.4/11.1.2.0, then you must upgrade SSO before upgrading to Oracle SES 11.1.2.2, as described in "Upgrading Oracle Single Sign-On Server (Optional)".
After upgrading, you must manually reconfigure SSO for Oracle SES 11.1.2.2. You configure SSO through the admin console in WebLogic. The steps for configuring SSO are described in Oracle Secure Enterprise Search Administrator's Guide.
Configuring Oracle SES Portlet (Optional)
If you configured a portlet on an Oracle SES release 10.1.8.4/11.1.2.0 instance that was registered and working with Oracle Application Server Portal (OracleAS Portal), then upgrade OracleAS Portal, as described in "Upgrade OracleAS Portal Server (Optional)". After the upgrade, follow the configuration steps, which are described in "Configuring an OracleAS Portal for a Secure Portlet" in Oracle Secure Enterprise Search Administrator's Guide.
Migrating to Secure Cache
This applies to upgrade from Oracle SES release 10g (10.1.8.4) to Oracle SES release 11g (11.1.2.2). In Oracle SES release 10g, the document cache is stored in plain text in disk files managed by the operating system. In Oracle SES release 11g, the cache files are stored as LOBs within Oracle Database in the Secure Cache storage area. (One exception is the Mailing List data source, which still uses storage managed by the operating system.)
Important:
The Mailing List data source uses storage on the operating system. Therefore, all new Mailing List sources must use the same cache location as the default parent Mailing List source.
The default location of the Secure Cache is the OES_ASSM2 tablespace. When you upgrade to Oracle SES 11g (11.1.2.2), the cache files for data sources created in Oracle SES 10g are not automatically migrated to the Secure Cache. Oracle SES continues to store the cache for earlier data sources within the file system, but uses the Secure Cache for all new data sources. To migrate Oracle SES 10g data sources to the Secure Cache, you must run several migration routines. The migration process works on one data source at a time. During migration, crawling operations are suspended, but query services are uninterrupted. When migration is complete, the cache files for the data source are deleted from the file system.
To migrate to Secure Cache
-
You can use the
GET_CACHE_LOCATIONfunction to determine which data sources are cached in the file system and which are cached in the database Secure Cache. The function returns the cache location for a given data source. Supply the numeric identifier of the data source as an argument.return_value := EQ_CACHE.GET_CACHE_LOCATION(dsid)
The return values of
EQ_CACHE.GET_CACHE_LOCATIONare:Return Value (VARCHAR2) Description OSThe cache for this data source is in the file system. DBThe cache for this data source is in the database Secure Cache. -
Execute the
EQ_CACHE.PREPARE_MIGRATIONprocedure to set up a migration status tracking table. This procedure must be called once for all cache migrations. You can query the migration status table to find the status of cache migration. The migration status table is described in Table 1, "EQ$CACHE_MIGRATION Migration Status Table" in this document. -
Stop the schedule for the data source you want to migrate.
-
Execute the
MIGRATE_TO_SECURE_CACHEfunction to migrate a data source. Supply the numeric identifier of the data source as an argument.return_value := EQ_CACHE.MIGRATE_TO_SECURE_CACHE (dsid)
The return values of
EQ_CACHE.MIGRATE_TO_SECURE_CACHEare:Return Value (NUMBER) Description 0 The migration was successful. 1 This data source has been migrated. No action is taken. 2 The schedule is running for this data source. No action is taken. -
Repeat steps 3 and 4 for each data source that was created before you upgraded to this release of Oracle SES.
-
When all data sources have been migrated, run the
CLEANUP_MIGRATIONprocedure to drop the status tracking table for cache migration.
The Migration Status Table
The EQ_CACHE.PREPARE_MIGRATION procedure creates a table called eq$cache_migration, which contains status information about the migration process. The columns of the table are described in Table 1.
Table 1 EQ$CACHE_MIGRATION Migration Status Table
| Column Name | Data Type | NULL? | Description |
|---|---|---|---|
|
mig_id |
NUMBER |
NOT NULL |
Migration sequence number |
|
ds_id |
NUMBER |
NOT NULL |
Data source ID |
|
task_id |
NUMBER |
Task ID |
|
|
task_desc |
VARCHAR2(100) |
Description of the task |
|
|
status |
VARCHAR2(30) |
Status of the task |
|
|
check_point |
VARCHAR(50) |
Checkpoint within a task. Default is NULL |
|
|
error |
VARCHAR2(1000) |
Error message. Default is NULL |
|
|
time_stamp |
DATE |
Timestamp of the record |
Example 1 Migrate a Data Source to Secure Cache
Start SQL*Plus and connect as the EQSYS user. Execute the following SQL statements.
SQL> exec eq_adm.use_instance(1);

SET SERVEROUTPUT ON;
DECLARE
  status NUMBER;
  dsid NUMBER := 9;
BEGIN
  EQ_CACHE.PREPARE_MIGRATION;
  status := EQ_CACHE.MIGRATE_TO_SECURE_CACHE (dsid);
  DBMS_OUTPUT.PUT_LINE('migration returned with status '||status);
  EQ_CACHE.CLEANUP_MIGRATION;
END;
/
Removing the Oracle SES 10.1.8.4/11.1.2.0 Home
After you have verified that the upgraded Oracle SES release 11.1.2.2 instance is working, you may remove the Oracle SES release 10.1.8.4/11.1.2.0 home.
To remove the Oracle SES 10.1.8.4/11.1.2.0 home
-
If
oradatais not within the Oracle SES 10.1.8.4/11.1.2.0 home:-
Go to the Oracle SES 11.1.2.2 home and shut down the Oracle SES instance (to facilitate the execution of the deinstallation script).
-
Go to the Oracle SES 10.1.8.4/11.1.2.0 home and run the
deinstall_sesscript in theinstalldirectory.Important:
For the upgrade from Oracle SES 11.1.2.0 to Oracle SES 11.1.2.2, do not manually remove the Oracle SES 11.1.2.0 directoriesadminandflash_recovery_areaafter running thedeinstall_sesscript.
-
-
If
oradatais within the Oracle SES 10.1.8.4/11.1.2.0 home:-
Go to the Oracle SES 10.1.8.4/11.1.2.0 home and enter this command from the oui/bin directory:
runInstaller -detachHome ORACLE_HOME=your_SES_10.1.8.4/11.1.2.0_ORACLE_Home -
Run an operating system command to remove all the directories from the Oracle SES 10.1.8.4/11.1.2.0 home except the path that holds
oradata.Important:
Iforadatais located in the Oracle SES 10.1.8.4/11.1.2.0 home, then you should not remove the 10.1.8.4/11.1.2.0 home. Even after upgrade, the location oforadatadoes not change. Additionally, do not remove the Oracle SES 11.1.2.0 directoriesadminandflash_recovery_areaafter upgrading to Oracle SES 11.1.2.2.
-
Starting and Stopping Oracle Secure Enterprise Search
The command for starting and stopping the search engine in Oracle SES is searchctl. The executable is located in the $ORACLE_HOME/bin directory:
$ORACLE_HOME/bin/searchctl
The command syntax is as follows.
| Command | Description |
|---|---|
searchctl start |
Start the Oracle SES middle tier |
searchctl startall |
Start the Oracle SES middle tier and the database |
searchctl stop |
Shut down the Oracle SES middle tier |
searchctl stopall |
Shut down the Oracle SES middle tier and the database |
searchctl restart |
Restart the Oracle SES middle tier |
searchctl restartall |
Restart the Oracle SES middle tier and the database |
On Linux and UNIX platforms, you must supply the Oracle SES administrative password when running searchctl commands. If you have shut down both the database and the middle tier with the searchctl stopall command, then to successfully start them both, run searchctl startall. If the Middle Tier Port is less than 1024, then the following commands must be run by the root user:
-
searchctl start/stop -
searchctl startall -
searchctl stopall -
searchctl restartall
Note:
The root user must belong to the DBA group to properly run thesearchctl startall/stopall/restartall command.Deprecated Connectors
The following connectors are deprecated in this release, so that maintenance will be provided only when issues are raised by existing customers. No active development, testing, or certification will be provided for any of these connectors.
-
FileNet Image Server
-
FileNet P8 Content Engine
-
Open Text LiveLink Enterprise Server
-
Hummingbird DM
-
IBM DB2 Content Management
What To Do Next
To become familiar with Oracle Secure Enterprise Search, Oracle suggests that you complete the following tasks:
-
Follow the Oracle SES tutorial at:
http://www.oracle.com/pls/topic/lookup?ctx=E35215-01&id=tut_ses_administration -
Log on to the Oracle SES administration tool using the user name and password set in the installation. Click the Help link in the top right corner of any page in the administration tool for context-sensitive help. With the administration tool, you can:
-
Define sources to search
-
Configure and schedule the crawling of the sources
-
Monitor the status and performance of crawling and search
-
-
In a production environment, where a load balancer or other monitoring tools are used, Oracle SES can also be monitored through the following URL:
http://host:port/monitor/check.jsp. The URL should return the following message: Oracle Secure Enterprise Search instance is up. If Oracle Secure Enterprise Search is not available, then the URL returns either a connection error or the HTTP error code 503.
Additional Resources
To download free release notes, installation documentation, white papers, or other collateral, visit Oracle Technology Network (OTN). You must register online before using OTN. Registration for OTN is free and can be done at
http://www.oracle.com/technetwork/community/join/index.html
If you have a user name and password for OTN, then you can go directly to the documentation section of OTN at
http://www.oracle.com/technetwork/indexes/documentation/index.html
Oracle Support Services
If you purchased Oracle Product Support, you can call Oracle Support Services for assistance. Oracle Support Services include phone assistance, version updates, and access to our service offerings. You have access to phone support 24 hours a day, 7 days a week. In the U.S.A., you can call Product Support at 1-800-223-1711.
Make sure you have your CSI (CPU Support Identifier) number ready when you call. Keep the CSI number for your records, because it is your key to Oracle Support Services. The Oracle Store sends the CSI number to you in an e-mail alert when it processes your order. If you do not have your CSI number and you are in the U.S.A., you can look up your CSI number by accessing our online Order Tracker, which provides detailed order information. Go to the Oracle Store and click on Order Tracker located above the top navigation bar.
For Oracle Support Services locations outside the U.S.A., call your local support center for information about how to access support. To find the local support center in your country, visit the Support Web Center at
At the Support Web Center you will find information on Oracle Support Services, such as:
-
Contact information
-
Instructions on how to access electronic services
-
Helpful Web sites
-
Support resources
-
Oracle Support Portfolio
-
Oracle Support Services news
With Oracle Product Support, you have round-the-clock access to My Oracle Support (formerly OracleMetaLink), the Oracle Support Services Premier Web Support offering. My Oracle Support (formerly OracleMetaLink) offers you access to installation assistance, product documentation, and a technical solution knowledge base.
It has technical forums, where you can post questions about your Oracle products and receive answers from Oracle Technical Support Analysts and other Oracle users. The questions and answers remain posted for the benefit of all users.
My Oracle Support (formerly OracleMetaLink) options include:
-
Service Request (SR) access
-
Patch downloads
-
Bug database query access
-
Product life-cycle information
You can access My Oracle Support (formerly OracleMetaLink) at
Documentation Accessibility
For information about Oracle's commitment to accessibility, visit the Oracle Accessibility Program website at http://www.oracle.com/pls/topic/lookup?ctx=acc&id=docacc.
Oracle customers have access to electronic support through My Oracle Support. For information, visit http://www.oracle.com/pls/topic/lookup?ctx=acc&id=info or visit http://www.oracle.com/pls/topic/lookup?ctx=acc&id=trs if you are hearing impaired.
Oracle Secure Enterprise Search Installation and Upgrade Guide, 11g Release 1 (11.1.2.2) IBM AIX on POWER Systems (64-Bit)
E21906-02
Copyright © 2006, 2013, Oracle and/or its affiliates. All rights reserved.
This software and related documentation are provided under a license agreement containing restrictions on use and disclosure and are protected by intellectual property laws. Except as expressly permitted in your license agreement or allowed by law, you may not use, copy, reproduce, translate, broadcast, modify, license, transmit, distribute, exhibit, perform, publish, or display any part, in any form, or by any means. Reverse engineering, disassembly, or decompilation of this software, unless required by law for interoperability, is prohibited.
The information contained herein is subject to change without notice and is not warranted to be error-free. If you find any errors, please report them to us in writing.
If this is software or related documentation that is delivered to the U.S. Government or anyone licensing it on behalf of the U.S. Government, the following notice is applicable:
U.S. GOVERNMENT END USERS: Oracle programs, including any operating system, integrated software, any programs installed on the hardware, and/or documentation, delivered to U.S. Government end users are "commercial computer software" pursuant to the applicable Federal Acquisition Regulation and agency-specific supplemental regulations. As such, use, duplication, disclosure, modification, and adaptation of the programs, including any operating system, integrated software, any programs installed on the hardware, and/or documentation, shall be subject to license terms and license restrictions applicable to the programs. No other rights are granted to the U.S. Government.
This software or hardware is developed for general use in a variety of information management applications. It is not developed or intended for use in any inherently dangerous applications, including applications that may create a risk of personal injury. If you use this software or hardware in dangerous applications, then you shall be responsible to take all appropriate fail-safe, backup, redundancy, and other measures to ensure its safe use. Oracle Corporation and its affiliates disclaim any liability for any damages caused by use of this software or hardware in dangerous applications.
Oracle and Java are registered trademarks of Oracle and/or its affiliates. Other names may be trademarks of their respective owners.
Intel and Intel Xeon are trademarks or registered trademarks of Intel Corporation. All SPARC trademarks are used under license and are trademarks or registered trademarks of SPARC International, Inc. AMD, Opteron, the AMD logo, and the AMD Opteron logo are trademarks or registered trademarks of Advanced Micro Devices. UNIX is a registered trademark of The Open Group.
This software or hardware and documentation may provide access to or information on content, products, and services from third parties. Oracle Corporation and its affiliates are not responsible for and expressly disclaim all warranties of any kind with respect to third-party content, products, and services. Oracle Corporation and its affiliates will not be responsible for any loss, costs, or damages incurred due to your access to or use of third-party content, products, or services.