Release 11g (11.1.1)
Part Number E18861-01
Contents
Previous
Next
| Oracle Fusion Middleware User's Guide for Oracle Business Intelligence Publisher Release 11g (11.1.1) Part Number E18861-01 | Contents | Previous | Next |
This chapter covers the following topics:
Use the Schedule Report Job page to schedule a report job.
Navigate to the Schedule Report Job page in any of the following ways:
From the Home page: From the Create region select Report Job
From the catalog: Navigate to the report you wish to schedule, then select the Schedule link.
From the Report Viewer: Click Actions then click Schedule.
From the global header: Click New then click Report Job.
The Schedule Report Job page contains four tabs to define the options for your report job: General, Output, Schedule, and Notification.
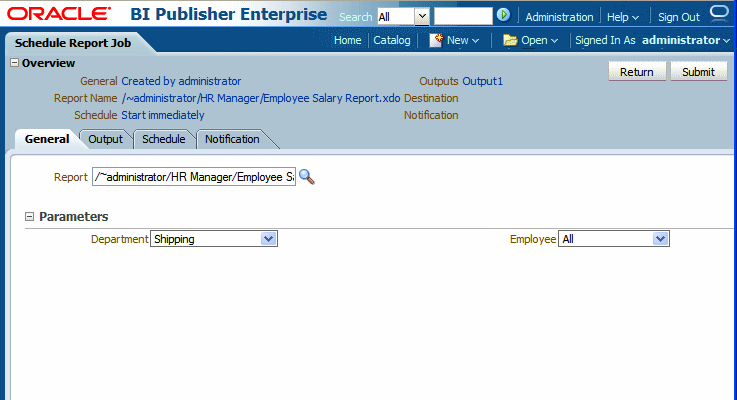
The General tab is shown in the following figure:

Enter the following general information for your report job:
| Field | Description |
|---|---|
| Report | If you accessed the schedule page from the report, this field will display the report path and name. If you accessed the schedule page from the Create region or the global header, click Choose to browse for and select the report you wish to schedule. |
| Parameters | If the report definition includes parameters, these will be displayed. Enter the values you wish to use for this job.
Note: Date parameters can be incremented. See Incrementing Date Parameters. |
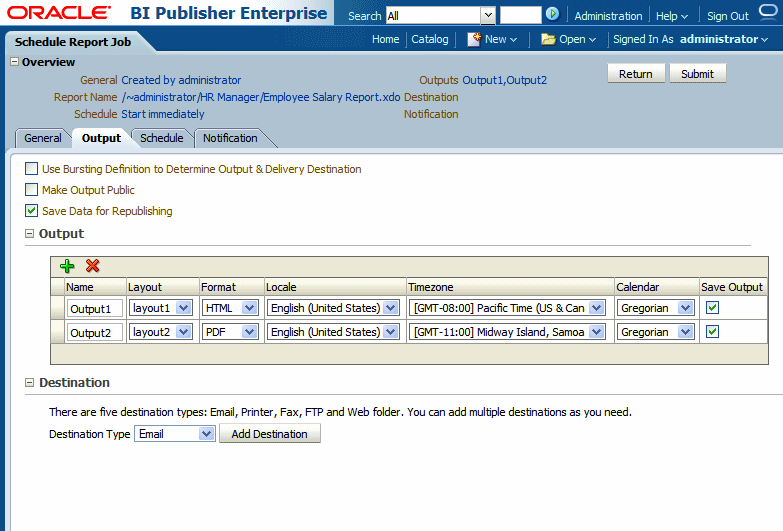
The Output tab has two regions: Output and Destination. Each scheduled job can have multiple output files with distinct characteristics. Each output file can have multiple destinations. The Output tab is shown in the following figure:

Make selections for the following options:
| Option | Description |
|---|---|
| Use Bursting Definition to Determine Output and Delivery Destination | Select this box to use the report bursting definition for output and delivery. Once selected, all other fields on this page are disabled for selection. Note that this box is only available for selection if the report has a bursting definition. For more information on report bursting, see Scheduling a Report to be Burst. |
| Make Output Public | Select this box to make this job output available to all users with permission to access this report. Users with access can view the report from the Report Job History page. |
| Save Data for Republishing | Select this box to save the XML data that is generated for this job. You can access and download the saved data from the Report Job History page (see Viewing and Managing Report Job History) or choose to republish this data, selecting a new layout and output options. |
The Output Table enables you to create multiple report documents for one or more layouts using a combination of output format, locale, time zone and calendar. To add outputs for this job, click the Add toolbar button to add an entry to the table.
| Field | Description |
|---|---|
| Name | Enter a name for this output, or accept the default. |
| Layout | Choose the layout to apply to this output. |
| Format | Choose the document output format. Output format is the type of document that is generated, for example, PDF, HTML, or Excel. The options available here are specified in the report definition.
Tip: If you require that the output be viewed as HTML and the report will contain images, charts, or other linked files, be sure to select output type MHTML to include the referenced files in the output. |
| Locale | Select the language-territory combination for this report output. This field defaults to the Report Locale defined in the user Preferences (see Setting Preferences).
Note: If the layout does not have an available translation for the selected locale, BI Publisher will apply a locale fallback logic to select the layout. For more information, see Locale Selection Logic, Oracle Fusion Middleware Report Designer's Guide for Oracle Business Intelligence Publisher. The appropriate number and date formatting will be applied independently of the template translation. |
| Timezone | Select the time zone that you want to use for this report output. The time zone defaults to the time zone defined in the user Preferences (see Setting Preferences). |
| Calendar | Choose the calendar to apply to this output. |
| Save Output | Select this box if you want the report output saved. You must select this option if you want to view your report from the Report Job History page. |
Enter the delivery details in the Destination region. To deliver a report document to multiple destinations, select the Add Destination button and continue adding destinations as needed.
Note: Delivery servers are set up in the Administration interface. For more information, see Setting Up Delivery Servers, Oracle Fusion Middleware Administrator's Guide for Oracle Business Intelligence Publisher.
If you do not require a destination, leave this region blank. Select the Save Output check box to view the output from the Report Job History page. See Viewing Report History.
For each destination you add, select from the Output list which documents to send to this destination.

Then enter the appropriate fields for each destination type:
Enter multiple e-mail addresses separated by a comma. Enter any Message text that you want to include with the report.
Select the Printer Group and the Printer, enter the Number of copies, and select Single sided or Double sided (the printer must support duplex printing for this option to take effect), then optionally select the printer Default Tray from which to print the report, and the Print Range pages to print if you do not wish to print the entire report.
Select the Fax server to deliver the report and enter the Fax number to which to send the report.
Select the FTP Server the server to deliver the report and enter valid Username and Password credentials.
Remote Directory - enter the directory to which to deliver the document (example: /pub/). If no value is entered, the document will be delivered to the login directory.
Remote File Name - enter the file name for BI Publisher to assign to the delivery document on the remote server. (Example: myreport.pdf)
To assign a file name dynamically using a date expression, see Defining a Destination File Name Dynamically Using a Date Expression.
Use Secure FTP - select the box to use secure FTP.
Select the Web Folder Server where you want the report delivered and enter valid Username and Password credentials.
Remote Directory - enter the directory to which to deliver the document (example: /pub/). If no value is entered, the document will be delivered to the login directory.
Remote File Name - enter the file name for BI Publisher to assign to the delivery document on the remote server. (Example: myreport.pdf)
To assign a file name dynamically using a date expression, see Defining a Destination File Name Dynamically Using a Date Expression.
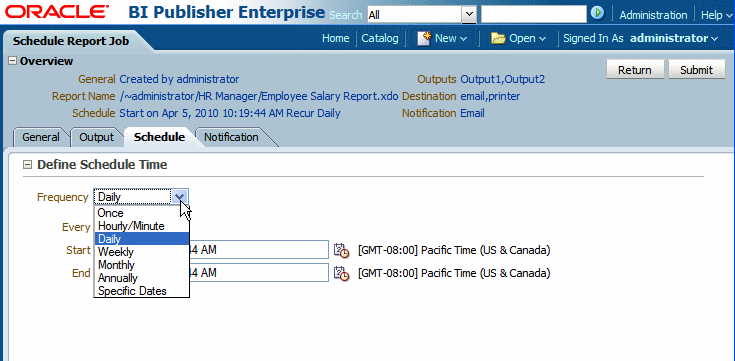
Use the Schedule tab to define the frequency for your report job. The Schedule tab is shown in the following figure:

Choose from the following recurrence pattern options:
Select Run Now or use the date selector to enter the specific Start date and time.
Every - select Hour(s) or Minute(s) and enter the appropriate integer value for the increment.
Start - use the date selector to enter the date and time to start running this job.
End - (optional) use the date selector to enter an end date and time for this job.
Every - enter the increment in days. For example, to run the report every day enter 1; to run the report every other day, enter 2.
Start - use the date selector to enter the date and time to start running this job. The time selected will determine the time that the job is executed each day it runs.
End - (optional) use the date selector to enter an end date and time for this job.
Every - enter the increment in weeks and select the desired day or days of the week. For example, to run the report every Tuesday and Thursday, enter 1, then select Tuesday and Thursday. To run the report every other Wednesday, enter 2, and select Wednesday.
Start - use the date selector to enter the date and time to start running this job. The time selected will determine the time that the job is executed for each run.
End - (optional) use the date selector to enter an end date for this job.
Every - select each month that the job will execute.
On - select either a day of the week, for example: 1st Monday of every month; or select a specific day of the month, for example: 15.
Start - use the date selector to enter the date and time to start running this job. The time selected will determine the time that the job is executed for each run.
End - (optional) use the date selector to enter an end date for this job.
Every - enter the increment in years that the job will execute.
On - select either a day and a month, for example: Day 1 of January; or select a day of the week of the month, for example: First Monday of January.
Start - use the date selector to enter the date and time to start running this job. The time selected will determine the time that the job is executed for each run.
End - (optional) use the date selector to enter an end date for this job.
Add Date - use the date selector to enter the specific date and time to run the job. Add multiple specific dates as needed.
A notification is a message that a job has finished processing. BI Publisher supports three notification statuses that you can subscribe to:
Completed
Completed with warnings
Failed
BI Publisher supports two methods of notification: e-mail and HTTP.
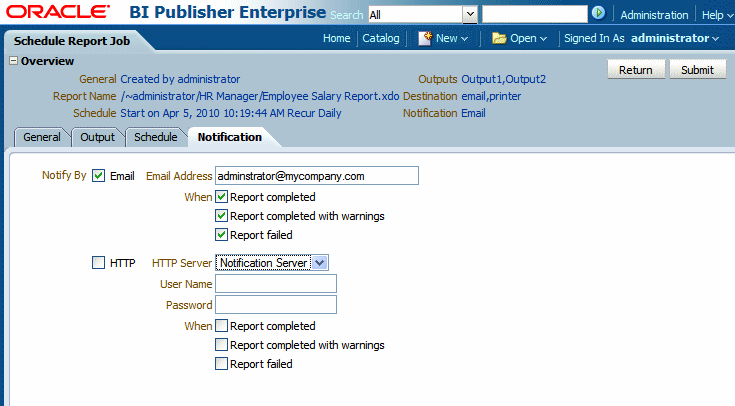
Use the Notification tab to configure notifications for a job.

To enable an e-mail notification.
Select the report completion status or statuses for which you want to be notified, and enter a comma-separated list of addresses to which to send the notification.
To enable an HTTP notification:
Select the report completion status or statuses for which you want the notification to be sent. Select the server to which to send the HTTP notification. Enter the user name and password for the server, if required.
Note that the HTTP server must be set up as a delivery option by the Administrator for the HTTP notification to be available. For more information, see Adding an HTTP Server, Oracle Fusion Middleware Administrator's Guide for Oracle Business Intelligence Publisher.
Select Submit. This will invoke the Submit Job dialog with confirmation details for you to review. Enter a name for this job and click Submit.
To suspend or delete a job, navigate to the Manage Report Jobs page as follows: On the global header, click Open and then click Report Jobs. See Viewing and Managing Report Jobs.
To monitor a running or job see the results, navigate to Report Job History page as follows: On the global header, click Open and then click Report Job History. See Viewing Report Job History and Saved Output.
Note: Bursting is the splitting of the report data into multiple blocks based on a key field in the data and then applying specific parameters for the layout and delivery for each block of data. For example, a customer invoice report can be burst to deliver each customer's invoice to their own e-mail address. A bursting definition for a report is set up in the report's data model. For more information, see Adding a Bursting Definition, Oracle Fusion Middleware Data Modeling Guide for Oracle Business Intelligence Publisher.
If your report has been enabled for bursting, the Use Bursting Definition to Determine Output & Delivery Destination box on the Output tab will be enabled. If you select this option, the Output and Destination options for the job will be disabled because output and destination details are supplied by the bursting definition.
Enable a report to use a bursting definition on the Report Properties dialog of the report editor. For more information see Configuring Report Properties, Oracle Fusion Middleware Report Designer's Guide for Oracle Business Intelligence Publisher.
This section includes the following topics:
If your scheduled report includes date parameters, when you enter the values for the dates for the schedule, these values are not updateable. Therefore, every time a scheduled instance of the report is run, the same date parameters will be used. If you require that the date parameters be incremented for each run, then you can enter an expression in the date parameter field of the scheduler to calculate the date each time the report job executes.
For example, assume you create a schedule for a report that runs every Monday to capture data from the previous week. Each week you need the date parameters passed to the report to increment to the first and last days of the previous week.
Enter one of the following functions using the syntax shown to calculate the appropriate date at the scheduled runtime for the report:
{$SYSDATE()$} - current date (the system date of the server on which BI Publisher is running)
{$FIRST_DAY_OF_MONTH()$} - first day of the current month
{$LAST_DAY_OF_MONTH()$} - last day of the current month
{$FIRST_DAY_OF_YEAR)$} - first day of the current year
{$LAST_DAY_OF_YEAR)$} - last day of the current year
The date function calls in the parameter values are not evaluated until the report job is executed by the Scheduler.
You can also enter expressions using the plus sign "+" and minus sign "-" to add or subtract days as follows:
{$SYSDATE()+1$}
{$SYSDATE()-7$}
For our example, to capture data from the previous week, each time the schedule runs, enter the following in the report's date parameter fields:
Date From: {$SYSDATE()-7$}
Date To: {$SYSDATE()-1$}
Note: The date functions can also be set up as default parameter values in the data model. In this case, every time a user views the report from the report viewer, the date parameters will be calculated according to the expression supplied for the default value. See Adding Parameters, Oracle Fusion Middleware Data Modeling Guide for Oracle Business Intelligence Publisher.
When entering the remote file name for a Web folder or FTP destination you can enter a date expression to have BI Publisher dynamically include a date expression in the file name. The date is set at runtime, using the server time zone.
The supported date expressions are:
| Expression | Description |
|---|---|
| %y | Displays the year in four digits: Example: 2011 |
| %m | Displays the month in two digits: 01-12 (where 01 = January) |
| %d | Displays the date in two digits: 01-31 |
| %H | Displays the hour in two digits based on 24-hour day: 00-24 |
| %M | Displays the minute in two digits: 00 - 59 |
| %S | Displays the number of seconds in two digits: 00 - 59 |
| %l | Displays milliseconds in three digits: 000 - 999 |
Creating a File Name That Appends a Date
To create a file name that appends the day, month, and year, such as:
myfile_01_11_2010.pdf
Enter the following:
myfile_%d_%m_%y.pdf
Creating a File Name That Prefixes a Date and Appends a Time
To create a file name that prefixes the day, month, and year and appends the hour and minute, such as:
01_01_2010_myfile_22_57.pdf
Enter the following:
%d_%m_%y_myfile_%H_%M.pdf
Note: If your file name includes an undefined expression, such as my_file_%a%b%c.pdf, the file will be created as named: "my_file_%a%b%c.pdf".
![]()
Copyright © 2010, 2011, Oracle and/or its affiliates. All rights reserved.