B Using Adobe Acrobat Capture
This section covers the following topics:
B.1 Configuring Adobe Acrobat Capture
If you are using the Adobe Acrobat Capture 3.0 software with Kofax Capture Export Component and Kofax Capture, you need to perform some additional setup tasks.
Note:
Adobe Acrobat Capture must be installed on a different system than the release station for Kofax Capture.Note:
After configuring Adobe Acrobat Capture, the application must be left running at all times.Adobe Acrobat Capture must be configured to watch for files and process them. This section covers the following topics:
B.1.1 Creating a Watch Directory
Acrobat Capture uses a Watch directory to find output files from Kofax Capture. The Watch directory can be any directory that the Kofax Capture release station and the Adobe Acrobat Capture workstation have access to, with this exception: do not set the location to be the Ascent\Images\OracleUCMScan\ directory.
Follow these steps to create a Watch directory in the default installation directory of Acrobat Capture:
-
Navigate to
Program Files\Adobe\Adobe Acrobat Capture 3.0\. -
Create a new directory named Watch.
B.1.2 Creating a Workflow
You will create a workflow to configure Adobe Acrobat Capture for use with Kofax Capture. The type of workflow you create depends on the type of file you are using to create the PDF:
B.1.3 Creating a TIFF Workflow
Use the following procedure to configure Adobe Acrobat Capture for use with Kofax Capture.
-
On the Windows taskbar, click the Start button, then select Programs, then select Adobe, then select Acrobat Capture 3.0, then select the applicable version.
-
On the Configure tab, select Workflow, and right-click Insert Workflow.
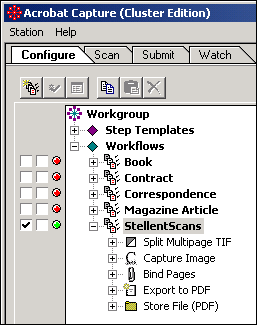
You will create a workflow that looks like the figure below.

-
Select the new workflow name, and right-click Insert Steps.
-
Set Insert Step to Split Multipage TIF, and click Insert.
-
Set Insert Step to Capture Image, and click Insert.
-
Set Insert Step to Bind Pages, and click Insert.
-
Set Insert Step to Export to PDF, and click Insert.
-
Set Insert Step to Store File (PDF), and click Insert.
-
Click Done.
-
Select the far-left check box to run the workflow.

-
Select the Watch tab, and click the Watched folder icon.

The Watched Folder Properties dialog is displayed.
-
Set Location: to the Watch directory that you created in the preceding procedure. If you created the Watch directory in the default installation directory of Acrobat Capture, this is
Program Files\Adobe\Adobe Acrobat Capture 3.0\Watch\.Note:
If you set up the Watch directory on a networked drive, use UNC paths (for example,\\hostserver\..\Watch) to the Watch directory. Do not use mapped drives. -
Set Submit Files to Workflow: to the new workflow that you created in step 3 (in this example, OracleUCMScans).
-
Click OK.
Note:
The Adobe Acrobat Capture application must be running at all times so that it can process the Watched Folder contents whenever new files are submitted to it.
B.1.4 Creating a JPG Workflow
Use the following procedure to configure Adobe Acrobat Capture for use with Kofax Capture.
-
On the Windows taskbar, click the Start button, then select Programs, then select Adobe, then select Acrobat Capture 3.0, then select the applicable version.
-
On the Configure tab, select Workflow, and right-click Insert Workflow.
You will create a workflow that looks like the example below.

-
Select the new workflow name, and right-click Insert Steps.
-
Set Insert Step to Capture Image, and click Insert.
-
Set Insert Step to Bind Pages, and click Insert.
-
Set Insert Step to Export to PDF, and click Insert.
-
Set Insert Step to Store File (PDF), and click Insert.
-
Click Done.
-
Select the far-left check box to run the workflow.

-
Select the Watch tab, and click the Watched folder icon.

The Watched Folder Properties dialog is displayed.
-
Set Location: to the Watch directory that you created in the preceding procedure. If you created the Watch directory in the default installation directory of Acrobat Capture, this is
Program Files\Adobe\Adobe Acrobat Capture 3.0\Watch\.Note:
If you set up the Watch directory on a networked drive, use UNC paths (for example,\\hostserver\..\Watch) to the Watch directory. Do not use mapped drives. -
Set Submit Files to Workflow: to the new workflow that you created in step 3 (in this example, OracleUCMScansPDF).
-
Click OK.
Note:
The Adobe Acrobat Capture application must be running at all times so that it can process the Watched Folder contents whenever new files are submitted to it.
B.2 Checking In Adobe Acrobat Capture PDF Files
This section covers the following topics:
B.2.1 Setting Up the Computer Running Adobe Acrobat Capture
On the computer running Adobe Capture:
-
Create a local directory to store the PDF file.
For example:
c:\OracleUCMScans -
Share that directory.
For example:
Share c:\OracleUCMScans as "OracleUCMScans" -
In Adobe Capture, set the UNC path in Store File properties.
For example:
\\<AdobeCaptureComputerName>\OracleUCMScans -
In Store File properties, select No Renaming of Duplicates.
B.2.2 Setting Up the Primary/Alternate File Formats
To set up the primary/alternate file formats:
-
Navigate to the Server tab on the Oracle Content Server Release Setup dialog.
-
Choose Adobe Acrobat Capture PDF from either the Primary or Alternate drop-down list.
Note:
The Adobe Acrobat Capture PDF option only works if:-
Adobe Acrobat Capture PDF has been selected as the Image file type on the Image Format tab of the Oracle Content Server Release Setup dialog. See "Selecting Adobe Acrobat Capture PDF Output File Types".
-
Adobe Acrobat Capture has been installed and properly configured to work with Kofax Capture. See "Configuring Adobe Acrobat Capture".
-
B.2.3 Setting Up the Image Files Release Directory
In the setup for Oracle Content Server for Kofax Capture:
-
Set the Image Files Release directory on the Document Storage tab to the UNC path of the location used by Adobe Capture to store the PDF file.
For example:
\\<AdobeCaptureComputerName>\OracleUCMScans -
Publish the batch class before the new settings can be used in a batch.