11 Working with Navigation
Navigation enables the users of your portal to see what information the portal provides and to get to that information quickly and easily.
This chapter describes how to define your portal navigation model in WebCenter Spaces and how to use built-in navigation task flows to visualize that model in page templates. It includes the following sections:
Portal designers with advanced navigation requirements can use development tools, such as JDeveloper, to build navigation models and then upload them to WebCenter Spaces. For more information, see Section 11.2.5, "Using JDeveloper to Build Your Navigation Model."
Similarly, page template designers can use those same development tools to build the navigation UI directly into page templates and upload those templates to WebCenter Spaces. For more information, see Section 11.3.3, "Using JDeveloper to Visualize Your Navigation."
For generic information about adding and editing different types of resources, see Chapter 10, "Working with the Resources that Compose a Portal or Community."
This chapter is intended for Portal designers with the application permission Application-Navigations-Create, Edit, and Delete.
To build navigation models for a particular Space, you need the permission Space-Resources-Create, Edit, and Delete Resources (standard permission model) or Space-Navigations-Create, Edit, and Delete Navigations (advanced permission model).
To add navigation to page templates, you also need the appropriate page template permissions, that is, Application-Page Templates-Edit to edit an application-wide page template, and either Space-Resources-Edit Resources or Space-Page Templates-Edit to edit a page template for a particular Space.
See Also:
For information about roles and permissions, see Chapter 20, "Understanding WebCenter Spaces Security."11.1 What You Should Know About Navigation
Navigation is a fundamental aspect of your portal. Users need to be able to see what is available in the portal, move around the portal, and orient themselves within the portal.
Navigation is essentially a set of links pointing to the content of the portal, or to external resources. Examples of navigation include:
-
A series of tabs or menus along the top of each page
-
A tree structure or list of links on the side of each page
-
A trail of breadcrumbs showing the path a user has taken to reach the current location in the portal
In WebCenter Spaces, you can break navigation down into two main concepts:
-
The navigation model defines the content, structure, and metadata of the navigation. For more information, see Section 11.1.1, "What You Should Know About Navigation Models."
-
The navigation visualization determines how the navigation appears on the pages of the portal, say as a menu, a tree, or breadcrumbs. For more information, see Section 11.1.2, "What You Should Know About Navigation Visualization."
11.1.1 What You Should Know About Navigation Models
When you create the navigation model, you specify the resources to which users can navigate. You can link together information from multiple sources, such as Spaces, pages, content repositories, and even external web pages. You can also introduce folders and separators to make navigations easier to use. You can include nested navigation models within a navigation model to delegate development of the navigation across multiple teams, or to control access to different items in the navigation.
Navigation models can include the following resources:
-
Spaces (individual Spaces and Space hierarchies)
-
Pages (individual pages and page hierarchies)
-
Content (individual content items or the results of a content query)
-
Other navigation models
-
Portlets
-
Task flows
-
External applications
-
External links
The navigation model is aware of the security policies that have been applied to the elements (pages, link, task flows, and so on) that the navigation model controls. If the current user is not authorized to see a particular page, the navigation model, by default hides any navigational links to that page. Navigation model metadata can also be determined contextually using EL expressions. These expressions are evaluated at runtime to determine exactly which pieces of the navigation model are rendered in the navigation UI and to whom.
WebCenter Spaces includes three built-in navigation models to get you started:
-
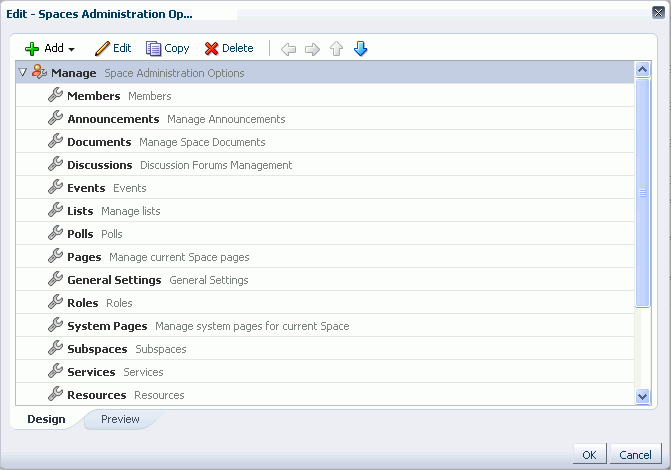
Spaces Administration Options—This navigation model contains administration options for Spaces or the Home Space (Figure 11-1). The links displayed when the navigation is rendered on a page vary depending on whether it appears in a Space or in a Home Space and on the permissions of the current user. By default, this navigation model includes a Manage dropdown menu to provide access to administration settings.
Figure 11-1 The Spaces Administration Options Navigation Model
Description of "Figure 11-1 The Spaces Administration Options Navigation Model"
-
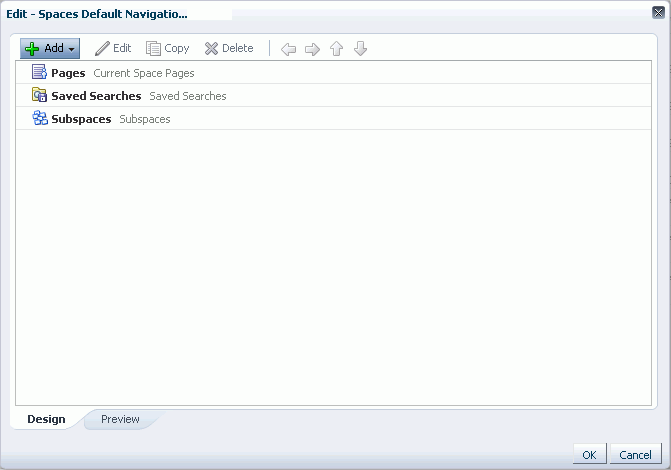
Spaces Default Navigation Model—This navigation model contains the default top level entries for navigation in a Space. It includes links to the current Space pages, and links to any saved searches and Subspaces (Figure 11-2).
Figure 11-2 The Spaces Default Navigation Model
Description of "Figure 11-2 The Spaces Default Navigation Model"
-
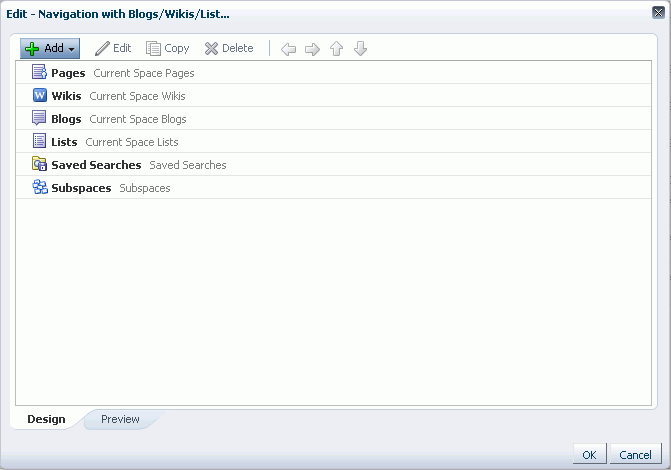
Spaces Navigation with Blogs/Wikis/Lists Submenus—This navigation model is similar to the Spaces Default Navigation Model, except it also includes links to any blogs, wikis, and lists for the current Space (Figure 11-3).
Figure 11-3 The Navigation with Blogs/Wikis/Lists Navigation Model
Description of "Figure 11-3 The Navigation with Blogs/Wikis/Lists Navigation Model"
You can use these built-in navigations as they are, create copies of them and edit them to support your own requirements, or create a completely new navigation model for your portal.
Note:
You cannot edit the built-in navigation models. If you want to edit these navigation models, you must first create a copy, which you can then edit.Just like other WebCenter Spaces resources, portal designers can build navigation models that are available to the whole application (application-level resources) and navigation models that are scoped to a particular Space (Space-level resources).
If the navigation model functionality provided by WebCenter Spaces does not meet your requirements, you can create the navigation model in a development tool, such as JDeveloper, and upload the model to WebCenter Spaces using the Resource Manager. For more information, see Section 11.2.5, "Using JDeveloper to Build Your Navigation Model."
11.1.2 What You Should Know About Navigation Visualization
The navigation visualization determines how the navigation model should appear in the portal. For example, the navigation could be provided as a set of tabs along the top of each page, or perhaps as a tree-like structure down the side of the page.
WebCenter Spaces provides the following built-in navigation task flows that page template designers can add to page templates to quickly visualize a navigation model across the entire portal:
-
Navigation Tree task flow—Tree navigations display navigational links in a hierarchical structure and often contain multiple-level hierarchies (Figure 11-4). Tree navigations can provide relatively simple access to a complex structure and quite often appear on the left in page templates.
Figure 11-4 The Navigation Tree Task Flow

Description of "Figure 11-4 The Navigation Tree Task Flow"
-
Navigation Menu task flow—Menu navigations display navigational links as a series of tabs, menus, bars, buttons, choices, or as a list (Figure 11-5). Menu navigation is appropriate when linking to WebCenter pages, Spaces, and documents, and where the number of items is known, such that there is enough room to display all the options that are available.
Figure 11-5 The Navigation Menu Task Flow

Description of "Figure 11-5 The Navigation Menu Task Flow"
-
Navigation Breadcrumb task flow—Breadcrumb navigations display a series of horizontal or vertical links that show users their current position in the navigation hierarchy (Figure 11-6). Breadcrumbs are particularly useful for deep hierarchies, say four levels or more, and when users might want to get back to a specific place.
Figure 11-6 The Navigation Breadcrumb Task Flow

Description of "Figure 11-6 The Navigation Breadcrumb Task Flow"
See Also:
For information about how to add these built-in navigation task flows to your page templates, see Section 11.3, "Rendering Navigation in Your Portal."For information about the different properties you can set for the built-in navigation task flows, see Section 11.3.2, "Setting Navigation Task Flow Properties."
WebCenter Spaces also provides the Spaces Browser task flow, which displays all the Spaces that are available to you. This includes Spaces for which you are the moderator, Spaces in which you are a member, Spaces that are public and available to non-WebCenter Spaces users, and Spaces that are private, which you must be invited to join. For more information, see Section 51.16, "Working with the Space Task Flows."
If the built-in task flows do not sufficiently satisfy the navigation requirements of your portal, page template designers can also edit page templates in a development tool, for example, JDeveloper, to build the navigation UI directly into the page templates themselves, then upload them to WebCenter Spaces to use there.
For more information, see Section 11.3.3, "Using JDeveloper to Visualize Your Navigation."
11.2 Building a Navigation Model
The first step in providing navigation for your portal is to define the navigation model; that is, defining the structure and content of the navigation. You do this by creating the basic navigation model, adding navigation items to it, and setting the properties of those navigation items.
This section includes the following subsections:
11.2.1 Creating a Navigation Model
You can either create an entirely new navigation model or create a copy of an existing navigation model to use as a starting point for your navigation model.
You can create navigation models at the application level or at the Space level. Application-level navigation models are available for use in all Spaces, unless the Space has been specifically excluded. For more information, see Section 10.4.2, "Setting Properties on a Resource." Space-level navigation models are available for use only in the Space in which they are created.
To create a navigation model:
-
Navigate to the Resources page of your application or the Space in which you want to create the navigation model, as described in Section 10.1.4, "Accessing Resources."
-
In the left navigation panel, under Structure, select Navigations.
-
On the menu bar, click Create.
-
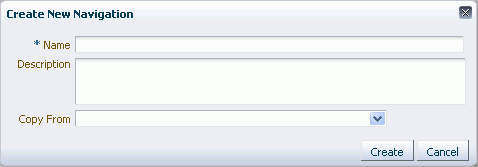
In the Create New Navigation dialog (Figure 11-8), in the Name field, enter a name for the navigation model.
Figure 11-8 The Create New Navigation Dialog
Description of "Figure 11-8 The Create New Navigation Dialog"
-
In the Description field, enter a description for the navigation model.
The description is displayed below the name in the Resources page and as a tool tip when selecting a navigation model. You should ensure that the description helps page template designers determine if they want to use this particular navigation model.
-
From the Copy From list, select an existing navigation model to use as the starting point for your new navigation model, if desired. If you leave this blank, a new empty navigation model is created.
Tip:
You can also create a copy of an existing navigation model by selecting the existing navigation on the Resources page, clicking Edit and then Copy on the menu bar, and providing a name and description for the new navigation model. -
Click Create.
The newly created navigation model is listed on the Resources page. The gray circle icon next to the navigation model indicates that it is not yet published and hence is not available to other users. For information about publishing a navigation model, see Section 10.4.3, "Showing and Hiding Resources."
11.2.2 Editing a Navigation Model
After creating the basic navigation model, the next step is to define exactly what to include in it. The resources that you include in the navigation model determine what users can navigate to when the model is displayed on a page.
This section includes the following subsections:
-
Section 11.2.2.1, "Adding Resources to a Navigation Model Using the Edit Dialog"
-
Section 11.2.2.2, "Editing the Source Code of a Navigation Model"
11.2.2.1 Adding Resources to a Navigation Model Using the Edit Dialog
The Edit dialog provides various options for adding resources to your navigation model.
This section includes the following subsections:
-
Section 11.2.2.1.1, "Adding a Document to a Navigation Model"
-
Section 11.2.2.1.2, "Adding Content Based on the Results of a Query to a Navigation Model"
-
Section 11.2.2.1.4, "Adding a List of Pages to a Navigation Model"
-
Section 11.2.2.1.5, "Adding a List of Subspaces to a Navigation Model"
-
Section 11.2.2.1.6, "Nesting a Navigation Model Within a Navigation Model"
-
Section 11.2.2.1.7, "Organizing Navigation Items in a Navigation Model"
-
Section 11.2.2.1.8, "Setting Display Options for Navigation Items"
11.2.2.1.1 Adding a Document to a Navigation Model
You can add a document from your content repository to the navigation model. Selecting a document in the navigation displays that document in the page.
Note:
You can also include a set of documents that match particular query criteria in a navigation model. For more information, see Section 11.2.2.1.2, "Adding Content Based on the Results of a Query to a Navigation Model."To add a document:
-
Navigate to the Resources page of your application or the Space that contains the navigation model to which you want to add the navigation item, as described in Section 10.1.4, "Accessing Resources."
-
In the left navigation panel, under Structure, select Navigations.
-
In the main panel, select the navigation model to which you want to add the navigation item.
-
From the Edit menu, choose Edit.
-
In the Edit dialog, from the Add menu, choose Content Item.
Tip:
To create a navigation item within a folder, select the folder first and then click Add.Figure 11-9 The Add Content Item Menu Option
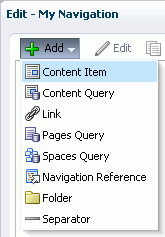
Description of "Figure 11-9 The Add Content Item Menu Option"
-
In the Target tab, in the Name field, enter a name for the navigation item. This name is displayed in the navigation when it is rendered on a page.
Tip:
All fields in the Edit dialog provide access to an Expression Language (EL) editor, which you can use to select or specify a variable value instead of a constant value. Click the Edit icon next to a field to open the editor. For more information about using the editor and for common EL expressions, see Appendix B, "Expression Language Expressions."Figure 11-10 The Edit Navigation Item Dialog for a Content Item
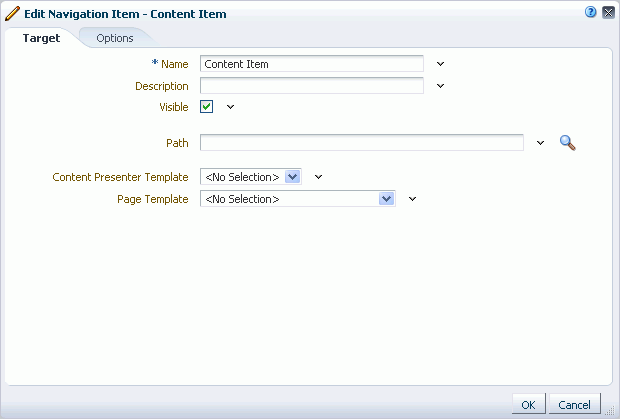
Description of "Figure 11-10 The Edit Navigation Item Dialog for a Content Item"
-
In the Description field, enter a brief description of the navigation item.
-
Select Visible if you want to display the navigation item when the navigation model is rendered on a page.
Alternatively, you can specify an EL expression to determine under which conditions the navigation item displays in the navigation. For example, to specify that the navigation item should be visible only to users with the Moderators role, using the following EL expression:
#{WCSecurityContext.userInScopedRole['Moderator']} -
In the Path field, enter the path for the content item. If you do not know the path, click the Select icon to browse the content repository for available content.
Note:
You can also select a content folder, in which case, you should also select a Content Presenter display template that expects a folder and renders all the content from that folder. -
From the Content Presenter Template dropdown list, select the Content Presenter display template to use to render the content item when it is selected in the navigation.
See Also:
For more information about Content Presenter, see Chapter 40, "Publishing Content Using Content Presenter." -
From the Page Template dropdown list, select the page template to use to display the navigation item when it is selected in the navigation.
Select <No Selection> to use the Space or application default page template.
-
In the Options tab, set the display options for the navigation item. For more information, see Section 11.2.2.1.8, "Setting Display Options for Navigation Items."
-
In the Parameters tab enter values, as desired, for any parameters supported by the selected page template. If the selected page template does not support any parameters, the Parameters tab is not displayed.
-
Click OK to create the navigation item.
-
Click OK to close the Edit dialog.
11.2.2.1.2 Adding Content Based on the Results of a Query to a Navigation Model
You can add a Content Query navigation item to the navigation model to include all documents that match specific search criteria.
See Also:
To add a single document, or all documents within a particular folder to the navigation model, see Section 11.2.2.1.1, "Adding a Document to a Navigation Model."To add a content query to a navigation model:
-
Navigate to the Resources page of your application or the Space that contains the navigation model to which you want to add the navigation item, as described in Section 10.1.4, "Accessing Resources."
-
In the left navigation panel, under Structure, select Navigations.
-
In the main panel, select the navigation model to which you want to add the navigation item.
-
From the Edit menu, choose Edit.
-
In the Edit dialog, from the Add menu, choose Content Query.
Tip:
To create a navigation item within a folder, select the folder first and then click Add.Figure 11-11 The Add Content Query Menu Option
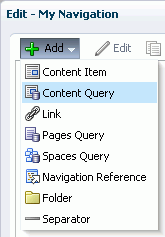
Description of "Figure 11-11 The Add Content Query Menu Option"
-
In the Target tab, in the Name field, enter a name for the navigation item. This name is displayed in the navigation when it is rendered on a page.
Tip:
All fields in the Edit dialog provide access to an Expression Language (EL) editor, which you can use to select or specify a variable value instead of a constant value. Click the Edit icon next to a field to open the editor. For more information about using the editor and for common EL expressions, see Appendix B, "Expression Language Expressions."Figure 11-12 The Edit Navigation Item Dialog for a Content Query
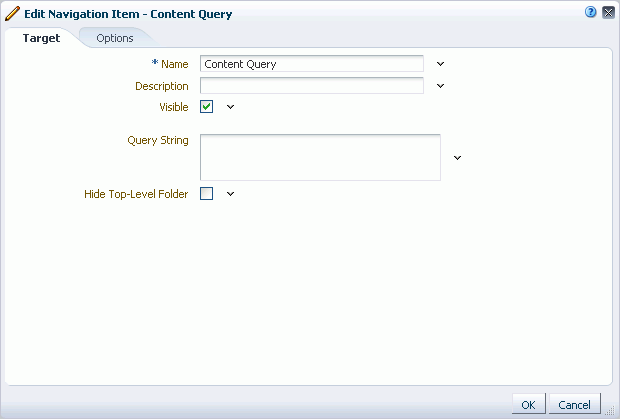
Description of "Figure 11-12 The Edit Navigation Item Dialog for a Content Query"
-
In the Description field, enter a brief description of the navigation item.
-
Select Visible if you want to display the navigation item when the navigation model is rendered on a page.
Alternatively, you can specify an EL expression to determine under which conditions the navigation item displays in the navigation. For example, to specify that the navigation item should be visible only to users with the Moderators role, using the following EL expression:
#{WCSecurityContext.userInScopedRole['Moderator']} -
In the Query String field, enter the query criteria to identify the content to include in the navigation model, for example:
select * from cmis:document WHERE cmis:name LIKE 'Foo%'
For more information about how to format the query and for more examples, see the Oracle Fusion Middleware Content Management REST Service Developer's Guide.
-
Select Hide Top-Level Folder to display the results of the query directly in the navigation rather than displaying them under a folder.
-
In the Options tab, set the display options for the navigation item. For more information, see Section 11.2.2.1.8, "Setting Display Options for Navigation Items."
-
Click OK to create the navigation item.
-
Click OK to close the Edit dialog.
11.2.2.1.3 Adding a Spaces Page, Portlet, Task Flow, External Application, or Web Page to a Navigation Model
You can add links to individual resources, such as pages, portlets, task flows, external applications, and web pages.
See Also:
The Link navigation item type enables you to include a link to a single page in the navigation. For information about how to include an entire page hierarchy, see Section 11.2.2.1.4, "Adding a List of Pages to a Navigation Model."To add a link to a Spaces page, portlet, task flow, external application, or web page:
-
Navigate to the Resources page of your application or the Space that contains the navigation model to which you want to add the navigation item, as described in Section 10.1.4, "Accessing Resources."
-
In the left navigation panel, under Structure, select Navigations.
-
In the main panel, select the navigation model to which you want to add the navigation item.
-
From the Edit menu, choose Edit.
-
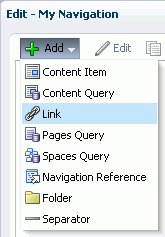
In the Edit dialog, from the Add menu, choose Link (Figure 11-13).
Tip:
To create a navigation item within a folder, select the folder first and then click Add.Note:
If you provide navigation directly to a portlet or task flow, users cannot customize that portlet or task flow. If you want users to be able to customize the portlet or task flow, add it to a page and create a navigation item for that page. -
In the Target tab, in the Name field, enter a name for the navigation item. This name is displayed in the navigation when it is rendered on a page.
Tip:
All fields in the Edit dialog provide access to an Expression Language (EL) editor, which you can use to select or specify a variable value instead of a constant value. Click the Edit icon next to a field to open the editor. For more information about using the editor and for common EL expressions, see Appendix B, "Expression Language Expressions."Figure 11-14 The Edit Navigation Item Dialog for a Link
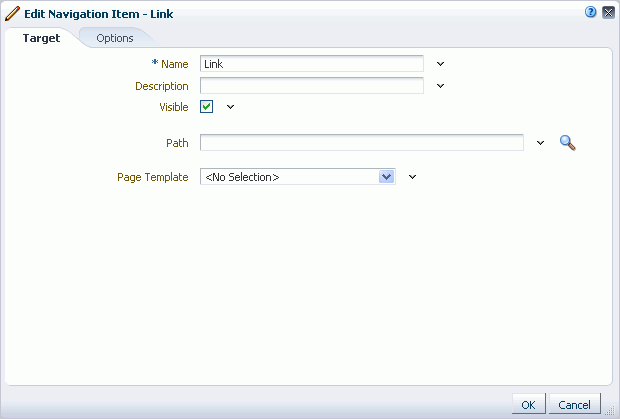
Description of "Figure 11-14 The Edit Navigation Item Dialog for a Link"
-
In the Description field, enter a brief description of the navigation item.
-
Select Visible if you want to display the navigation item when the navigation model is rendered on a page.
Alternatively, you can specify an EL expression to determine under which conditions the navigation item displays in the navigation. For example, to specify that the navigation item should be visible only to users with the Moderators role, using the following EL expression:
#{WCSecurityContext.userInScopedRole['Moderator']} -
In the Path field, enter the URL of the web page or click the Select icon to browse for available Spaces pages, portlets, task flows, or external applications to include in the navigation model.
Note:
In the Select dialog, the Select button is active only when you select an item that can be included in the navigation model. For example, if you expand the Portlets node and select a portlet producer, then the Select button is disabled. If you expand the portlet producer node and select a portlet, then the Select button is enabled. -
From the Page Template dropdown list, select the page template to use to display the navigation item when it is selected in the navigation.
Select <No Selection> to use the Space or application default page template.
-
In the Options tab, set the display options for the navigation item. For more information, see Section 11.2.2.1.8, "Setting Display Options for Navigation Items."
-
In the Parameters tab enter values, as desired, for any parameters supported by the selected page, task flow, or portlet, or by the page template. If the selected page, portlet, or task flow does not support parameters, or if the selected page template does not support parameters, then the Parameters tab is not displayed.
-
Click OK to create the navigation item.
-
Click OK to close the Edit dialog.
11.2.2.1.4 Adding a List of Pages to a Navigation Model
You can add a list of pages to the navigation model by selecting the starting point for the list and specifying the criteria to use to determine the pages to display. For example, you can include all the pages in a specific Space, all the Wiki pages in the current Space, or all Home Space pages. All pages below the selected starting point that match the criteria are included in the navigation model.
See Also:
If you just want to include a single page in the navigation model, use the Link navigation item type. For more information, see Chapter 11, "Adding a Spaces Page, Portlet, Task Flow, External Application, or Web Page to a Navigation Model."To add a list of pages:
-
Navigate to the Resources page of your application or the Space that contains the navigation model to which you want to add the navigation item, as described in Section 10.1.4, "Accessing Resources."
-
In the left navigation panel, under Structure, select Navigations.
-
In the main panel, select the navigation model to which you want to add the navigation item.
-
From the Edit menu, choose Edit.
-
In the Edit dialog, from the Add menu, choose Pages Query.
Tip:
To create a navigation item within a folder, select the folder first and then click Add.Figure 11-15 The Add Pages Query Menu Option
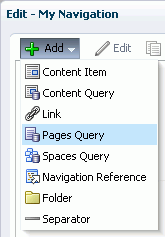
Description of "Figure 11-15 The Add Pages Query Menu Option"
-
In the Target tab, in the Name field, enter a name for the navigation item. This name is displayed in the navigation when it is rendered on a page.
Tip:
All fields in the Edit dialog provide access to an Expression Language (EL) editor, which you can use to select or specify a variable value instead of a constant value. Click the Edit icon next to a field to open the editor. For more information about using the editor and for common EL expressions, see Appendix B, "Expression Language Expressions."Figure 11-16 The Edit Navigation Item Dialog for a Pages Query
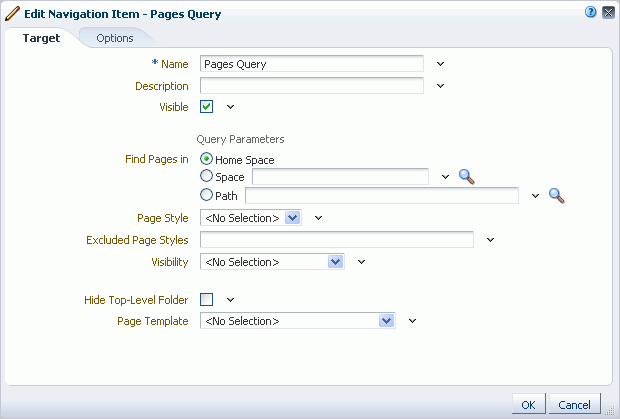
Description of "Figure 11-16 The Edit Navigation Item Dialog for a Pages Query"
-
In the Description field, enter a brief description of the navigation item.
-
Select Visible if you want to display the navigation item when the navigation model is rendered on a page.
Alternatively, you can specify an EL expression to determine under which conditions the navigation item displays in the navigation. For example, to specify that the navigation item should be visible only to users with the Moderators role, using the following EL expression:
#{WCSecurityContext.userInScopedRole['Moderator']} -
In the Find Pages in radio group, select:
-
Home Space to add the current user's Home Space and all its subpages to the navigation model.
-
Space to add the home page of a specific Space and all its subpages to the navigation model. Enter the name of the Space, or click the Select Space icon to select from all available Spaces. In the Select Space dialog, you can list all available Spaces or you can filter the list of Spaces to those that you have joined, those that you moderate, or those that are public.
-
Path to add a specific page and all its subpages to the navigation model. Enter the path of the page, or click the Select Page icon to select from all available pages.
-
-
From the Page Style dropdown list, select the style of page to include in the navigation model. For example, if you select Wiki, only pages that use the Wiki page style are included in the navigation model.
Selecting <No Selection> displays all pages, regardless of style.
-
In the Excluded Page Styles field, specify the styles of pages to exclude from the navigation model by entering a comma-separated list of page style paths, for example:
/oracle/webcenter/siteresources/scopedMD/s8bba98ff_4cbb_40b8_beee_296c916a23ed/
pageStyle/gsr1b60e8a7_2e23_48ff_9571_31ede592de1a/TemplateWiki.jspx,
/oracle/webcenter/siteresources/scopedMD/s8bba98ff_4cbb_40b8_beee_296c916a23ed/
pageStyle/gsr1b60e8a7_2e23_48ff_9571_31ede592de1b/TemplateBlog.jspx
Tip:
You can find the path of a page style by selecting it in the Resources page and clicking About in the menu bar.Any pages that use the page styles specified here are not included in the navigation.
-
From the Visibility dropdown list, select whether to include pages even if they have been flagged as hidden in the Personalize Pages page.
Selecting <No Selection> displays all pages, regardless of visibility.
-
Select Hide Top-Level Folder to display the subpages in the hierarchy directly in the navigation rather than displaying them under a folder for the parent page.
-
From the Page Template dropdown list, select the page template to use to display the navigation item when it is selected in the navigation.
Select <No Selection> to use the Space or application default page template.
-
In the Options tab, set the display options for the navigation item. For more information, see Section 11.2.2.1.8, "Setting Display Options for Navigation Items."
-
In the Parameters tab enter values, as desired, for any parameters supported by the page template. If the selected page template does not support any parameters, the Parameters tab is not displayed.
-
Click OK to create the navigation item.
-
Click OK to close the Edit dialog.
11.2.2.1.5 Adding a List of Subspaces to a Navigation Model
You can include a list of all the Subspaces of a particular Space in your navigation model. You can also include all the pages in those Subspaces, or specify a query to further refine which Subspaces to include in the list.
To add a list of Subspaces:
-
Navigate to the Resources page of your application or the Space that contains the navigation model to which you want to add the navigation item, as described in Section 10.1.4, "Accessing Resources."
-
In the left navigation panel, under Structure, select Navigations.
-
In the main panel, select the navigation model to which you want to add the navigation item.
-
From the Edit menu, choose Edit.
-
In the Edit dialog, from the Add menu, choose Spaces Query.
Tip:
To create a navigation item within a folder, select the folder first and then click Add.Figure 11-17 The Add Spaces Query Menu Option
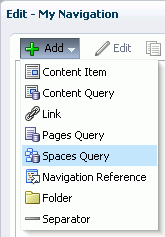
Description of "Figure 11-17 The Add Spaces Query Menu Option"
-
In the Target tab, in the Name field, enter a name for the navigation item. This name is displayed in the navigation when it is rendered on a page.
Tip:
All fields in the Edit dialog provide access to an Expression Language (EL) editor, which you can use to select or specify a variable value instead of a constant value. Click the Edit icon next to a field to open the editor. For more information about using the editor and for common EL expressions, see Appendix B, "Expression Language Expressions."Figure 11-18 The Edit Navigation Item Dialog for a Spaces Query
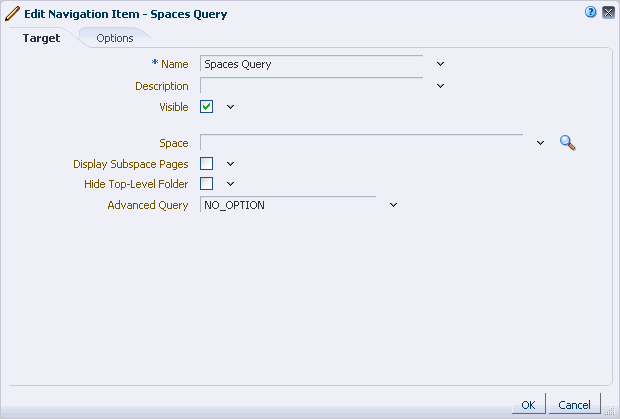
Description of "Figure 11-18 The Edit Navigation Item Dialog for a Spaces Query"
-
In the Description field, enter a brief description of the navigation item.
-
Select Visible if you want to display the navigation item when the navigation model is rendered on a page.
Alternatively, you can specify an EL expression to determine under which conditions the navigation item displays in the navigation. For example, to specify that the navigation item should be visible only to users with the Moderators role, using the following EL expression:
#{WCSecurityContext.userInScopedRole['Moderator']} -
In the Space field, enter the name of the Space for which you want to display Subspaces, or click the Select Space icon to select from the available Spaces.
If you leave the field empty, then the current Space is used.
-
Select Display Subspace Pages to also include the pages within the Subspaces in the navigation.
-
Select Hide Top-Level Folder to display the Subspaces directly in the navigation rather than displaying them under a folder for the parent Space.
-
In the Advanced Query field, enter an EL expression to further refine the list of Subspaces included in the navigation model. For example, you might want to include only community Subspaces, or Subspaces with a particular string in the title. For more information about using the Expression Language editor and for descriptions of common EL expressions, see Appendix B, "Expression Language Expressions."
-
In the Options tab, set the display options for the navigation item. For more information, see Section 11.2.2.1.8, "Setting Display Options for Navigation Items."
-
Click OK to create the navigation item.
-
Click OK to close the Edit dialog.
11.2.2.1.6 Nesting a Navigation Model Within a Navigation Model
You can nest navigation models within each other. For example, if you have a complex navigation model, it might be easier to break it down into several separate models and then nest them all within a single overarching navigation model. You can also use nested navigation models to delegate the development of navigation models to different users or to control access to different parts of the navigation.
For example, if you are creating a navigation model for a Space that contains several Subspaces, you may want to delegate the management of the navigation models for the Subspaces to the Subspace moderators. You can then include navigation references to the Subspace navigation models within the main Space navigation model. In this way, the person who is most familiar with the content of the Subspace creates the navigation model, without having to have access to other areas of the Space.
To nest navigation models:
-
Navigate to the Resources page of your application or the Space that contains the navigation model to which you want to add the navigation item, as described in Section 10.1.4, "Accessing Resources."
-
In the left navigation panel, under Structure, select Navigations.
-
In the main panel, select the navigation model to which you want to add the navigation item.
-
From the Edit menu, choose Edit.
-
In the Edit dialog, from the Add menu, choose Navigation Reference.
Tip:
To create a navigation item within a folder, select the folder first and then click Add.Figure 11-19 The Add Navigation Reference Menu Option
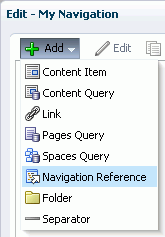
Description of "Figure 11-19 The Add Navigation Reference Menu Option"
-
In the Target tab, in the Name field, enter a name for the navigation item. This name is displayed in the navigation when it is rendered on a page.
Tip:
All fields in the Edit dialog provide access to an Expression Language (EL) editor, which you can use to select or specify a variable value instead of a constant value. Click the Edit icon next to a field to open the editor. For more information about using the editor and for common EL expressions, see Appendix B, "Expression Language Expressions."Figure 11-20 The Edit Navigation Item Dialog for a Navigation Reference
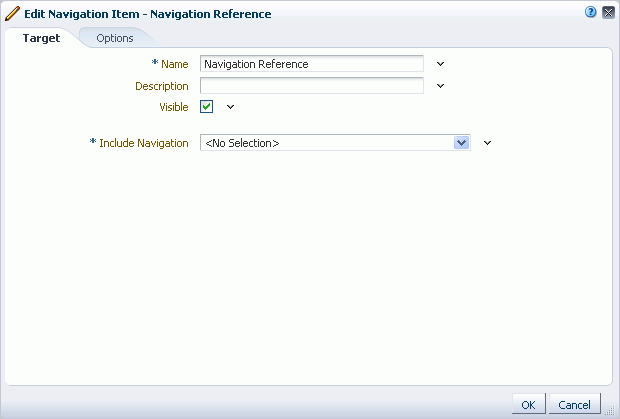
Description of "Figure 11-20 The Edit Navigation Item Dialog for a Navigation Reference"
-
In the Description field, enter a brief description of the navigation item.
-
Select Visible if you want to display the navigation item when the navigation model is rendered on a page.
Alternatively, you can specify an EL expression to determine under which conditions the navigation item displays in the navigation. For example, to specify that the navigation item should be visible only to users with the Moderators role, using the following EL expression:
#{WCSecurityContext.userInScopedRole['Moderator']} -
From the Include Navigation dropdown list, select the navigation model that you want to nest within this navigation model.
-
In the Options tab, set the display options for the navigation item. For more information, see Section 11.2.2.1.8, "Setting Display Options for Navigation Items."
-
Click OK to create the navigation item.
-
Click OK to close the Edit dialog.
11.2.2.1.7 Organizing Navigation Items in a Navigation Model
You can add folders to your navigation model to create subsets of navigation items or to group similar navigation items. You can also add separators to divide the navigation model into distinct groupings of navigation items. Folders and separators enable you to break up the items in the navigation when it is rendered on in a page, making it easier to locate items.
In addition to folders and separators, you can also organize items within the navigation model by moving them up and down in relation to each other and even indenting items to indicate hierarchy.
You can also rearrange items within the navigation model by dragging them up and down in relation to each other and dragging them inside other items to indicate hierarchy.
To organize navigation items:
-
Navigate to the Resources page of your application or the Space that contains the navigation model to which you want to add the navigation item, as described in Section 10.1.4, "Accessing Resources."
-
In the left navigation panel, under Structure, select Navigations.
-
In the main panel, select the navigation model to which you want to add the navigation item.
-
From the Edit menu, choose Edit.
-
To add a separator, in the Edit dialog, from the Add menu, choose Separator.
Figure 11-21 The Add Separator Menu Option
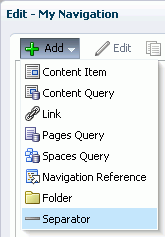
Description of "Figure 11-21 The Add Separator Menu Option"
A separator is added at the end of the navigation model. You can move the separator to the desired location as described later in this procedure.
-
To add a folder:
-
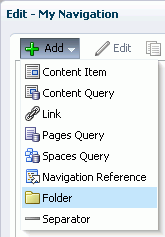
In the Edit dialog, from the Add menu, choose Folder.
Tip:
To create a navigation item within a folder, select the folder first and then click Add. -
In the Target tab, specify a Name and Description for the navigation item.
Tip:
All fields in the Edit dialog provide access to an Expression Language (EL) editor, which you can use to select or specify a variable value instead of a constant value. Click the Edit icon next to a field to open the editor. For more information about using the editor and for common EL expressions, see Appendix B, "Expression Language Expressions."Figure 11-23 The Edit Navigation Item Dialog for a Folder
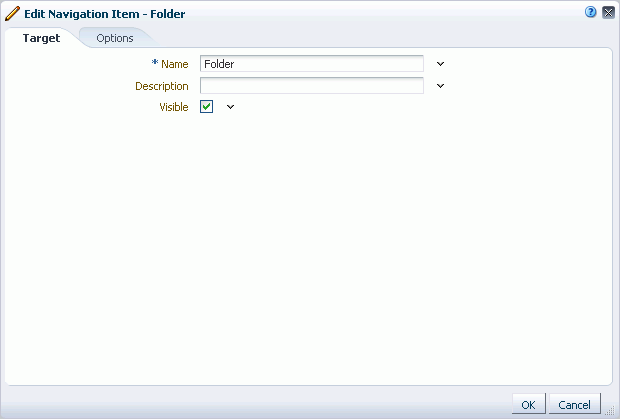
Description of "Figure 11-23 The Edit Navigation Item Dialog for a Folder"
-
Select Visible if you want to display the navigation item when the navigation model is rendered on a page.
Alternatively, you can specify an EL expression to determine under which conditions the navigation item displays in the navigation. For example, to specify that the navigation item should be visible only to users with the Moderators role, using the following EL expression:
#{WCSecurityContext.userInScopedRole['Moderator']} -
In the Options tab, set the display options for the navigation item. For more information, see Section 11.2.2.1.8, "Setting Display Options for Navigation Items."
-
Click OK to create the navigation item.
The folder is added at the end of the navigation model. You can move the folder to the desired location as described in the next step.
-
-
To move a navigation item within the navigation model, select the item and click the Move Up or Move Down icon as many times as necessary until the item is in the desired location.
-
To indent one navigation item (child item) under another item (parent item), move the child item so that it is immediately below the parent item, select the child item and click the Indent icon.
-
To move an indented item so that it is no longer indented below another item, select the item and click the Outdent icon.
-
Click OK to close the Edit dialog.
11.2.2.1.8 Setting Display Options for Navigation Items
You can specify various display options for navigation items to determine their appearance and behavior when the navigation is rendered on a page.
The display options available depend on the type of the navigation item.
-
Navigate to the Resources page of your application or the Space that contains the navigation model to which you want to add the navigation item, as described in Section 10.1.4, "Accessing Resources."
-
In the left navigation panel, under Structure, select Navigations.
-
In the main panel, select the navigation model that contains the navigation item for which you want to specify display options.
-
From the Edit menu, choose Edit.
-
Select the navigation item.
-
From the menu bar, click Edit.
-
In the Options tab, in the Access Key field, enter a key mnemonic (single character) that can be used to access the navigation item without using the mouse.
Tip:
All fields in the Edit dialog provide access to an Expression Language (EL) editor, which you can use to select or specify a variable value instead of a constant value. Click the Edit icon next to a field to open the editor. For more information about using the editor and for common EL expressions, see Appendix B, "Expression Language Expressions."Figure 11-24 The Options Tab of the Edit Navigation Item Dialog
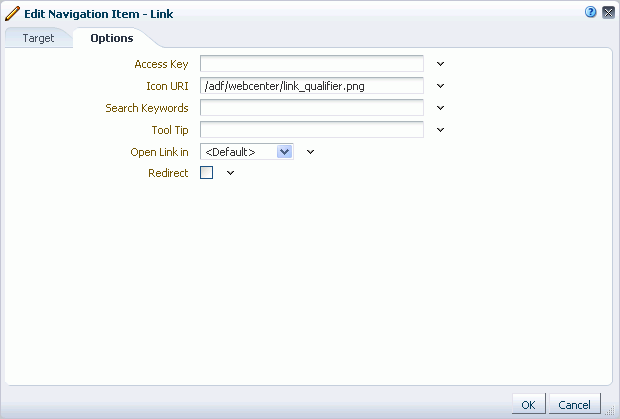
Description of "Figure 11-24 The Options Tab of the Edit Navigation Item Dialog"
-
In the Icon URI field, enter a path and file name of an image to use to represent the navigation item.
-
In the Search Keywords field, enter keywords to facilitate searching of the navigation item.
-
In the Tool Tip field, enter some brief descriptive text to display when users hover the mouse over the navigation item.
-
In the External ID field, enter an ID to enable a direct reference to the navigation item from a static link in the page.
Navigation items in the application's default navigation model with this attribute defined can be accessed using
/faces/wcnav_externalId/externalIdfrom anaf:goLinkcomponent in a page or using/wcnav_externalId/externalIdfrom an External Link navigation item in the navigation model. The alternative is to access the node by its hierarchy, which is faster, but may change as the application develops.Note:
To directly access a node in the default navigation model for a particular Space, you must specify the Space by setting thewc.contextURLparameter, for example:/faces/wcnav_externalId/myNavigationItem?wc.contextURL=/spaces/myProjectSpace
To directly access a node in a non-default navigation model, you must specify the path of the navigation model by setting the
wcnav.modelPathURL parameter, for example:/faces/wcnav_externalId/myNavigationItem?wcnav.model= /oracle/webcenter/siteresources/scopedMD/ s7f446cab_f622_4b68_a83e_b7eaf28b52ec/navigation/ gsr0271c712_721a_4565_9f0e_755784a7093b/myNavigation.xml
Depending on where you are using the link, you may need to encode the URL parameters, for example,
%2Fspaces%2FmyProjectSpace. -
From the Open Link in dropdown list, select how to display the navigation item when it is selected, either in the same browser window, a new window, or a popup.
The options available depend on the type of navigation item.
-
Select Redirect to redirect to the URL specified for the navigation item. If you do not select this checkbox, then the URL is rendered within an IFRAME in the current page template.
Note:
This display option is available for all navigation items except for Navigation Reference, Folder, and Separator.For Link navigation items that point to business role pages (for example, the My Profile page), the Redirect option has no effect; clicking the link always displays the page in the Home Space.
For Link navigation items that point to a page in a different Space, selecting Redirect opens the page inside the Space to which the page belongs. Deselecting Redirect opens the page in the current Space.
11.2.2.2 Editing the Source Code of a Navigation Model
If you prefer working in source code, you can use the Edit Source option.
To edit the source code of a navigation model:
-
Navigate to the Resources page of your application or the Space that contains the navigation model that you want to edit, as described in Section 10.1.4, "Accessing Resources."
-
In the left navigation panel, under Structure, select Navigations.
-
In the main panel, select the navigation model that you want to edit.
-
From the Edit menu, choose Edit Source.
The Edit Source dialog (Figure 11-25) displays the source code of the navigation model.
Figure 11-25 The Edit Source Dialog for a Navigation Model
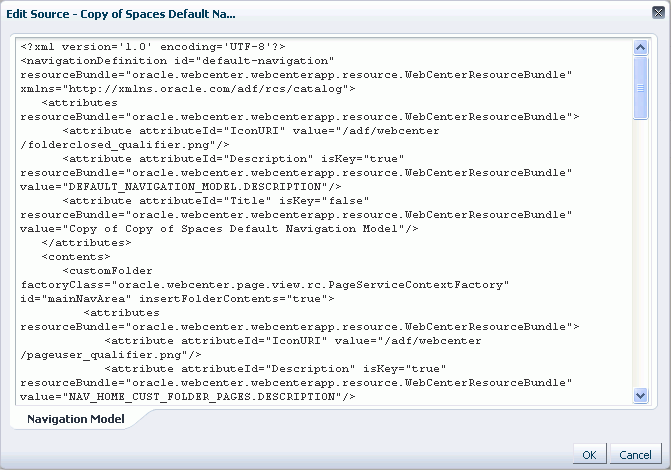
Description of "Figure 11-25 The Edit Source Dialog for a Navigation Model"
-
Edit the code as required.
The XML syntax in the code is validated and an error message is displayed if you miss any tags or add them incorrectly. Validation is not provided for non-XML files.
You might prefer to copy the code from the dialog and paste it into an editor of your choice, for example, JDeveloper, where further validation can be performed. After editing the code, you can then copy it and paste it back into the Edit Source dialog.
Tip:
To make more full use of JDeveloper's capabilities for editing navigation models, you might prefer to download the navigation model from WebCenter Spaces and import it into JDeveloper for editing. For more information, see Section 11.2.5, "Using JDeveloper to Build Your Navigation Model." -
Click OK.
11.2.3 Managing a Navigation Model
This section includes the following subsections:
11.2.3.1 Showing and Hiding a Navigation Model
When you create a navigation model, by default it is hidden. A hidden navigation model is not available for use in the application, the Home Space, or any other Space. To make a navigation model available, it must be marked as shown. Further, for a navigation model created at the application level, you can control whether it is available to any, all, or selected Spaces in the application.
For generic information about hiding and showing resources, see Section 10.4.3, "Showing and Hiding Resources."
For generic information about resource availability in Spaces, see Section 10.4.2, "Setting Properties on a Resource."
11.2.3.2 Setting Properties on a Navigation Model
You can control a navigation model's display attributes and availability by setting the model's properties in the Edit Properties dialog. Setting navigation model properties follows the same procedure as any other resource. For more information, see Section 10.4.2, "Setting Properties on a Resource."
To view the properties associated with a navigation model, use the About menu option.
11.2.3.3 Setting Security on a Navigation Model
You can control whether all users or only specific users or groups can access the navigation model that you created in your application or Space. Setting access to a navigation model follows the same procedure as any other resource. For more information, see Section 10.4.4, "Setting Security for a Resource."
11.2.3.4 Copying a Navigation Model
You can make a copy of a page template by selecting it and choosing Copy from the Edit menu on the Resources - Navigations page. Copying a navigation model follows the same procedure as any other resource. For more information, see Section 10.4.1, "Copying a Resource."
11.2.3.5 Deleting a Navigation Model
Provided you are assigned the required permissions, you can delete any custom navigation model. Deleting a navigation model follows the same procedure as deleting any other resource. For more information, see Section 10.4.5, "Deleting a Resource."
11.2.4 Selecting the Default Navigation Model
The default navigation model provides a convenient way to select the navigation model that is used by default at the application or Space level. Page template designers can then reference this default navigation model without having to know its actual name. For example, in navigation EL expressions, the default navigation model is often referenced, such as in:
#{navigationContext.defaultNavigationModel}
To specify the navigation model to use as the application-level default navigation model, perform the steps in Section 5.9, "Choosing a Default Navigation."
To specify a different navigation model to use as the default for a specific Space, perform the steps in Section 51.4.12, "Changing the Navigation for a Space."
11.2.5 Using JDeveloper to Build Your Navigation Model
You may want to create a navigation model that is beyond the editing capabilities of WebCenter Spaces. For example, using JDeveloper to create you navigation model enables you to use source control and also provides wizards and other tools to help you build more advanced navigation models. To do this, you have several options:
-
Use the Edit Source option to edit the source code of the navigation model. You can edit the source code directly in the Edit Source dialog or you can copy the contents of the dialog to JDeveloper for editing and then copy the edited code back into the dialog. For more information, see Section 11.2.2.2, "Editing the Source Code of a Navigation Model."
-
Download an existing WebCenter Spaces navigation model, import the navigation model into JDeveloper for editing, and then upload it back to WebCenter Spaces.
-
Create a completely new navigation model in JDeveloper and upload it to WebCenter Spaces.
The steps to download and upload navigation models from WebCenter Spaces are described in Section 10.5, "Using JDeveloper to Build WebCenter Spaces Resources."
Oracle WebCenter provides a special JDeveloper workspace (DesignWebCenterSpaces.jws) for developing WebCenter Spaces resources, such as navigation models. The workspace offers a design environment in which to create and edit your navigation models, and also enables you to upload your navigation models to WebCenter Spaces for testing. For more information and to download the JDeveloper workspace, see the section "Developing WebCenter Spaces Resources" in the Oracle Fusion Middleware Developer's Guide for Oracle WebCenter.
For information about specific considerations for creating navigation models for use in WebCenter Spaces, see the section "Working with WebCenter Spaces Navigation Models" in the Oracle Fusion Middleware Developer's Guide for Oracle WebCenter.
11.3 Rendering Navigation in Your Portal
One of the key parts of a page template is the navigation visualization. This determines how the navigation looks and behaves in your portal. You can also add navigation visualization to a page, but typically you add it to a page template so that it can be defined in one place and propagated consistently across the whole portal.
This section includes the following subsections:
-
Section 11.3.1, "Adding Built-in Navigation Task Flows to Page Templates"
-
Section 11.3.3, "Using JDeveloper to Visualize Your Navigation"
11.3.1 Adding Built-in Navigation Task Flows to Page Templates
WebCenter provides several built-in navigation task flows to enable you to quickly add navigation to your portal.
Note:
By default the Resource Catalog for pages does not include the built-in navigation task flows because the recommended method of providing navigation is through your page templates. If you want to be able to add the navigation task flows to a page, you must create a custom Resource Catalog that includes the task flows. For more information, see Section 16.2, "Creating Resource Catalogs."Typically, you first add the desired task flow to the page template and then select the navigation model to use to drive the content of the navigation. This is the method described in this section. However, if you are using a custom Resource Catalog that includes navigation models, you can start by selecting the navigation model and then choosing which task flow to use to visualize that model. Navigation models are not included in the default page template Resource Catalog.
As well as the task flows described in this section, which you associate with navigation models, WebCenter Spaces also provides the Spaces Browser task flow, which you can use to enable users to navigate to different Spaces. For more information, see Section 51.16, "Working with the Space Task Flows."
Additional navigation task flows are available for download from Oracle Technology Network at:
http://www.oracle.com/technetwork/middleware/webcenter/samples-196325.zip
The zip file contains the following navigation task flows:
-
List Navigation—Renders a navigation model in a vertical list format. Folders and their items are rendered as dropdown menus. Empty folders are not rendered.
-
Menu with Links Navigation—Renders a navigation model in a horizontal menu format. For top level navigation items, folders are rendered as dropdown menus, navigable links with no children are rendered as a top level link. Empty folders are not rendered.
-
Tree Navigation—Renders a navigation model in a vertical collapsed tree format.
Download the zip file and extract its contents locally. You can then upload one or more of the EAR files to your application, as described in Section 10.5.3, "Uploading a Resource." The task flows are then available in the Resource Catalog under Mash-Ups, Task Flows.
To add a built-in navigation task flow to a page template:
-
Open the page template in edit mode.
For more information, see Section 12.3, "Editing a Page Template."
-
Click Add Content in the target region to open the Resource Catalog.
-
Navigate to the section of the Resource Catalog that contains the built-in navigation task flows.
Tip:
The presence or location of this component depends on how the Resource Catalog is configured. For example, in the default Page Templates Resource Catalog, next to Template Development, click Open to expose a list that includes a Navigations folder. Click Open next to this folder to display the list of built-in navigation task flows. -
Click Add next to the task flow that you want to add to your page.
-
Click Close to exit the Resource Catalog.
-
Hover the mouse over the task flow and, in the menu that pops up, click the Edit icon (wrench) for the task flow.
Tip:
Ensure that you click the Edit icon for the task flow and not the one for the region that contains the task flow. -
In the Component Properties dialog, click the Parameters tab.
-
From the Navigation dropdown list, select the navigation model that you want to associate with the task flow.
-
Set any other properties as desired.
For information about the other properties available for the different navigation task flows, see Section 11.3.2, "Setting Navigation Task Flow Properties."
For some examples of the effects of these properties, see Section 11.3.2.3, "Using Properties to Configure Navigation Task Flow Instances."
-
Click OK.
11.3.2 Setting Navigation Task Flow Properties
The navigation task flows have associated properties, which users with sufficient privileges can access from the Component Properties dialog in Oracle Composer (Figure 11-26).
Figure 11-26 Navigation Tree Task Flow - Component Properties
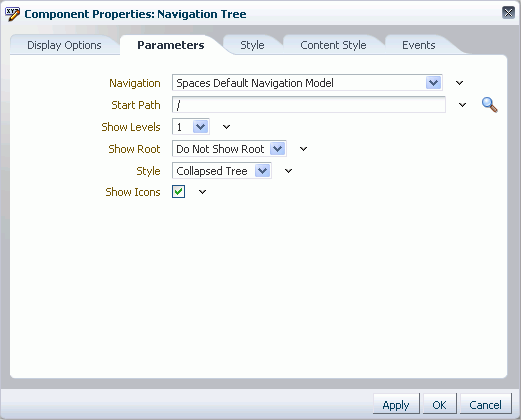
Description of "Figure 11-26 Navigation Tree Task Flow - Component Properties"
This section provides an overview of the navigation task flow properties and steps you through examples of configuring a task flow instance using property values. This section includes the following subsections:
For information about accessing the Component Properties dialog, see Section 17.5.2.3, "Setting Component Properties."
The following sections provide information about properties of the Activity Graph service task flows and describe the properties on the Parameters tab:
-
Section 11.3.2.1, "What You Should Know About Navigation Task Flow Properties."
-
Section 11.3.2.3, "Using Properties to Configure Navigation Task Flow Instances."
11.3.2.1 What You Should Know About Navigation Task Flow Properties
When you set property values on a navigation task flow, you are affecting only the task flow instance on which the value is set. Other instances of the same task flow are not affected by such changes.
The properties on the Parameters tab of the Component Properties dialog control the default task flow content. For descriptions of the parameters on this tab, see Section 11.3.2.2, "Navigation Task Flow Parameters." For some task flows, parameters on this tab facilitate the wiring of the task flow to page parameters and page definition variables. These properties are unique to the task flow type and are covered in this section. For information about wiring pages and components, see Chapter 19, "Wiring Pages, Task Flows, Portlets, and UI Components."
Changes to the properties on the Display Options, Style, and Content Style tabs affect the appearance and behavior of the task flow for all users. These properties are common to all task flows For more information, see Section 17.5.2, "Setting Properties on Page Components."
The content of the Events tab depends on the events supported by the task flow. For more information, see Section 17.5.2.8, "Working with Component Contextual Events."
All properties on the Parameters and Display Options tabs provide access to an Expression Language (EL) editor, which you can use to select or specify a variable value instead of a constant value. Click the Edit icon next to a property field to open the editor. For more information about using the editor and for descriptions of common EL expressions, see Appendix B, "Expression Language Expressions."
11.3.2.2 Navigation Task Flow Parameters
The following tables describe the parameters that are unique to each of the built-in navigation task flows.
Table 11-1 describes the parameters for the Navigation Breadcrumb task flow.
Table 11-1 Navigation Breadcrumb Task Flow Parameters
| Parameter | Description |
|---|---|
|
Specifies whether to display breadcrumbs horizontally or vertically. |
|
|
The navigation model to associate with this task flow. |
|
|
Specifies whether to show the start node in the breadcrumbs. |
|
|
The level in the navigation model at which to start the navigation. You can enter a path or an EL expression or click the Select Path icon to select the start node. Valid values are:
For more information, see Section 11.3.2.3.2, "Selecting the Start Path for Your Navigation." |
Table 11-2 describes the parameters for the Navigation Menu task flow.
Table 11-2 Navigation Menu Task Flow Parameters
| Parameter | Description |
|---|---|
|
The navigation model to associate with this task flow. |
|
|
The style for rendering the second level of navigation items. Valid values are: Do Not Display, Tabs, Bar, Buttons, Choice, List Notes:
|
|
|
Specifies whether to render icons for each resource. |
|
|
The level in the navigation model at which to start the navigation. You can enter a path or an EL expression or click the Select Path icon to select the start node. Valid values are:
For more information, see Section 11.3.2.3.2, "Selecting the Start Path for Your Navigation." Note: The Navigation Menu task flow is limited to showing a maximum of two levels of resources. |
|
|
The style for rendering the first level of resources. Valid values are Tabs, Bar, Buttons, Choice, List, Menu, Menu with Sub-Menus Notes:
|
Table 11-3 describes the parameters for the Navigation Tree task flow.
Table 11-3 Navigation Tree Task Flow Parameters
| Parameter | Description |
|---|---|
|
The navigation model to associate with this task flow. |
|
|
Specifies whether to render icons for each resource. |
|
|
The number of levels shown when the tree is initially rendered. Valid values are:
Note: This option applies only if the tree is rendered with the Style property set to Collapsed Tree. If the Style property is set to Expanded Tree then all nodes are shown expanded regardless of the value of this property. |
|
|
Specifies whether to render the start node in the tree. Valid values are:
|
|
|
The level in the navigation model at which to start the navigation. You can enter a path or an EL expression or click the Select Path icon to select the start node. Valid values are:
For more information, see Section 11.3.2.3.2, "Selecting the Start Path for Your Navigation." |
|
|
The style of the navigation. Valid values are:
|
11.3.2.3 Using Properties to Configure Navigation Task Flow Instances
This section includes the following subsections:
11.3.2.3.1 Sample Navigation Model
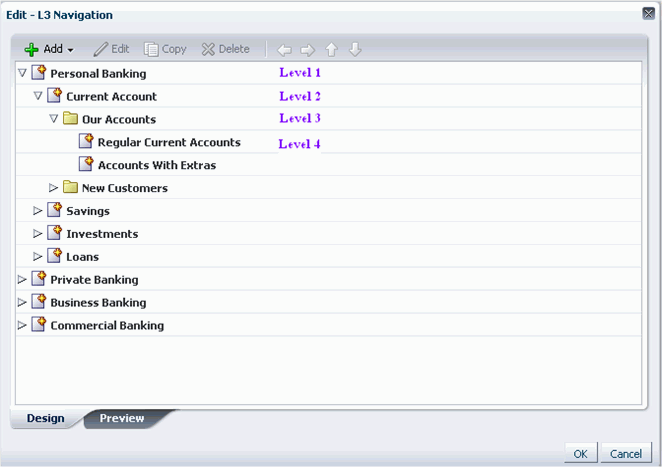
The following sections use examples based on the sample navigation model shown in Figure 11-27.
11.3.2.3.2 Selecting the Start Path for Your Navigation
To select the start path for your navigation:
-
Create your navigation model, as described in Section 11.2, "Building a Navigation Model."
-
Add the Navigation Menu task flow to your application's page template, as described in Section 11.3.1, "Adding Built-in Navigation Task Flows to Page Templates."
-
In the Parameters tab of the Component Properties dialog, next to the Start Path field, click the Select Path icon.
-
In the Select Start Path dialog, select:
-
Start at the Currently Selected Page Path to use the currently selected page as the starting point of the navigation. This populates the Start Path property with the following EL expression:
#{navigationContext.navigationModel['modelPath=path'].currentSelection.prettyUrl}where
pathis the path to the navigation model XML file (omitting the trailing.xml), for example:#{navigationContext.navigationModel['modelPath=/oracle/webcenter/portalapp/navigations/myNavigation'].currentSelection.prettyUrl}In our banking application example, if this option is selected, when the user navigates to the Current Accounts page, the navigation looks as shown in Figure 11-28.
Figure 11-28 Start at the Currently Selected Page Path

Description of "Figure 11-28 Start at the Currently Selected Page Path"
-
Start at This Level of the Currently Selected Page Path to use the nth level of the path to the currently selected page as the starting point of the navigation (where n is the number specified in the field next to this option). This populates the Start Path property with the following EL expression:
#{navigationContext.navigationModel['modelPath=path'].currentSelection.prettyUrlPath[level]}where
pathis the path to the navigation model XML file (omitting the trailing.xml) andlevelis the number specified in the field.In our banking application example, if this option is selected with the value of 1, when the user navigates to the Personal Banking page, and then the Current Accounts page, the navigation starts at the first level of this path, that is, Personal Banking (Figure 11-29).
Figure 11-29 Start at Specified Level of the Currently Selected Page Path

Description of "Figure 11-29 Start at Specified Level of the Currently Selected Page Path"
-
Select Page Path to use a specific page as the starting point of the navigation. This populates the Start Path property with the path to the selected page.
-
11.3.2.3.3 Rendering Navigation as a Tree
To render your navigation model as a tree:
-
Create your navigation model, as described in Section 11.2, "Building a Navigation Model."
-
Add the Navigation Menu task flow to your application's page template, as described in Section 11.3.1, "Adding Built-in Navigation Task Flows to Page Templates."
-
Select the Start Path for the navigation when it is rendered on the page, as illustrated in Section 11.3.2.3.2, "Selecting the Start Path for Your Navigation."
-
From the Show Levels dropdown list, select how many levels to expand when the tree is initially rendered with the Collapsed Tree style.
Note:
If the navigation is rendered using the Expanded Tree style, this option is ignored and the navigation is rendered will all nodes fully expanded. -
From the Show Root dropdown list, select whether to display the start node in the tree.
For example, if the start node is Current Account, select:
-
Show Tree Root to include the Current Account node in the tree (Figure 11-30).
-
Do Not Show Root to not include the Current Account node (Figure 11-31).
-
Show Root As Box to include the Current Account node as the header of a box that contains the rest of the navigation(Figure 11-32).
-
-
From the Style dropdown list, select what style to use for the tree.
-
Collapsed Tree displays the tree initially collapsed according to the levels specified by the Show Levels property.
-
Expanded Tree displays the tree with all levels completely expanded.
-
List displays the tree as a flat list of the top-level resources. If any of the top-level resources are folders, they are displayed as dropdown menus that display the contents of the folders.
Using our banking example, if the start node is Personal Banking, a tree navigation with the List style looks like Figure 11-33.
Figure 11-33 List Style Tree with No Folders

Description of "Figure 11-33 List Style Tree with No Folders"
However, if the start node is Current Account (which contains two folders), it looks like Figure 11-34.
Figure 11-34 List Style Tree with Folders

Description of "Figure 11-34 List Style Tree with Folders"
-
-
Select Show Icons to display the icons associated with the navigation items in the tree (Figure 11-35).
11.3.2.3.4 Rendering Navigation as a Menu
To render your navigation model as a menu:
-
Create your navigation model, as described in Section 11.2, "Building a Navigation Model."
-
Add the Navigation Menu task flow to your application's page template, as described in Section 11.3.1, "Adding Built-in Navigation Task Flows to Page Templates."
-
Select the Start Path for the navigation when it is rendered on the page, as illustrated in Section 11.3.2.3.2, "Selecting the Start Path for Your Navigation."
-
From the Style dropdown list, select how you want to display the first level of navigation items in the menu. Using our sample banking application, we can illustrate the different options for this property:
-
Tabs
-
Bar
-
Buttons
Figure 11-38 Buttons Menu Navigation Style

Description of "Figure 11-38 Buttons Menu Navigation Style"
-
Choice
Figure 11-39 Choice Menu Navigation Style

Description of "Figure 11-39 Choice Menu Navigation Style"
-
List
-
Menu
-
-
From the Second Level Style dropdown list, select the style to use for the second level of resources in the navigation.
Note:
Menu navigations can render only two levels of resources. -
Select Show Icons to display the icons associated with the navigation items in the menu.
11.3.2.3.5 Rendering Navigation as Breadcrumbs
To render your navigation model as breadcrumbs:
-
Create your navigation model, as described in Section 11.2, "Building a Navigation Model."
-
Add the Navigation Menu task flow to your application's page template, as described in Section 11.3.1, "Adding Built-in Navigation Task Flows to Page Templates."
-
Select the Start Path for the navigation when it is rendered on the page, as illustrated in Section 11.3.2.3.2, "Selecting the Start Path for Your Navigation."
-
Select Show Root to display the start node in the breadcrumbs.
-
From the Display Style dropdown list, select whether to display the breadcrumbs vertically or horizontally, for example Figure 11-42 shows breadcrumbs displayed horizontally.
Figure 11-43 shows breadcrumbs displayed vertically.
11.3.2.3.6 Linking Navigation Task Flows
You may want to include more than one area of navigation in your portal. For example, you might want to include tabs along the top of the page, displaying the top level of your navigation model, and a second tree structure down the side of the page. You can link the navigation task flows together so that the tree navigation reflects the selected navigation item in the tabbed menu.
The following procedure shows how to do this using our banking example.
To link navigation task flows:
-
Create your navigation model, as described in Section 11.2, "Building a Navigation Model."
-
Add the Navigation Menu task flow to a region along the top of your application's page template, as described in Section 11.3.1, "Adding Built-in Navigation Task Flows to Page Templates."
-
Add the Navigation Tree task flow to a region along the side of your application's page template, as described in Section 11.3.1, "Adding Built-in Navigation Task Flows to Page Templates."
-
Hover the mouse over the Navigation Menu task flow and, in the menu that pops up, click the Edit icon (wrench) for the task flow.
Tip:
Ensure that you click the Edit icon for the task flow and not the one for the region that contains the task flow. -
In the Component Properties dialog, click the Parameters tab.
-
From the Navigation dropdown list, select the desired navigation model, or enter an EL expression.
-
In the Start Path parameter, enter
/to start at the root of the navigation model. -
From the Style dropdown list, select Tabs.
-
From the Second Level Style dropdown list, select Do Not Display.
This restricts this part of the navigation to display only the top level of the navigation model. The rest of the navigation model is displayed in the tree navigation.
-
Click OK.
-
Hover the mouse over the Navigation Tree task flow and, in the menu that pops up, click the Edit icon (wrench) for the task flow.
Tip:
Ensure that you click the Edit icon for the task flow and not the one for the region that contains the task flow. -
In the Component Properties dialog, click the Parameters tab.
-
From the Navigation dropdown list, select the same navigation model as is used for the Navigation Menu task flow, or enter the same EL expression.
-
Next to the Start Path field, click the Select Path icon.
-
In the Select Start Path dialog, select Start at the Currently Selected Page Path and click OK.
This ensures that the tree navigation displays the navigation for whatever has been selected in the menu navigation.
-
From the Show Root dropdown list, select Do Not Show Root.
The root of the navigation model is displayed in the tabs at the top of the page, so there is no need to duplicate it here.
-
Click OK.
-
Save and close the page template.
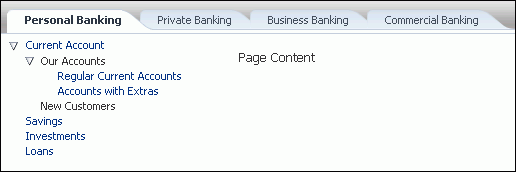
Figure 11-44 shows how the above procedure might work for our banking example. Selecting the Personal Banking tab at the top of the page displays the rest of the navigation model (from Personal Banking down) on the side of the page.
Figure 11-44 Linking Navigation Task Flows
Description of "Figure 11-44 Linking Navigation Task Flows"
11.3.3 Using JDeveloper to Visualize Your Navigation
The navigation task flows provided by WebCenter Spaces enable you to quickly visualize your navigation in your application. However, you may find that these task flows do not quite match your navigation requirements. If you find this is the case, you can use JDeveloper to edit the page templates you create in WebCenter Spaces and add the navigation UI directly to the templates using the navigation EL APIs provided by WebCenter. You can then upload these edited page templates back into WebCenter Spaces. You can also create your page templates entirely in JDeveloper before uploading them to WebCenter Spaces. The WebCenter Spaces seeded page templates were created in this way.
The steps to download and upload page templates from WebCenter Spaces are described in Section 10.5, "Using JDeveloper to Build WebCenter Spaces Resources."
For information about specific considerations for creating page templates for use in WebCenter Spaces, see the section "How to Create and Manage WebCenter Spaces Page Templates" in the Oracle Fusion Middleware Developer's Guide for Oracle WebCenter.
For information about how to programmatically add navigation UI to your page templates using JDeveloper, see the section "Programmatically Adding Navigation to a Page Template" in the Oracle Fusion Middleware Developer's Guide for Oracle WebCenter.
11.4 AviTrust Employee Portal: An Example of Delegated Navigation
AviTrust is a fictional financial organization that uses Oracle WebCenter for both its external facing web site and its internal employee portal.
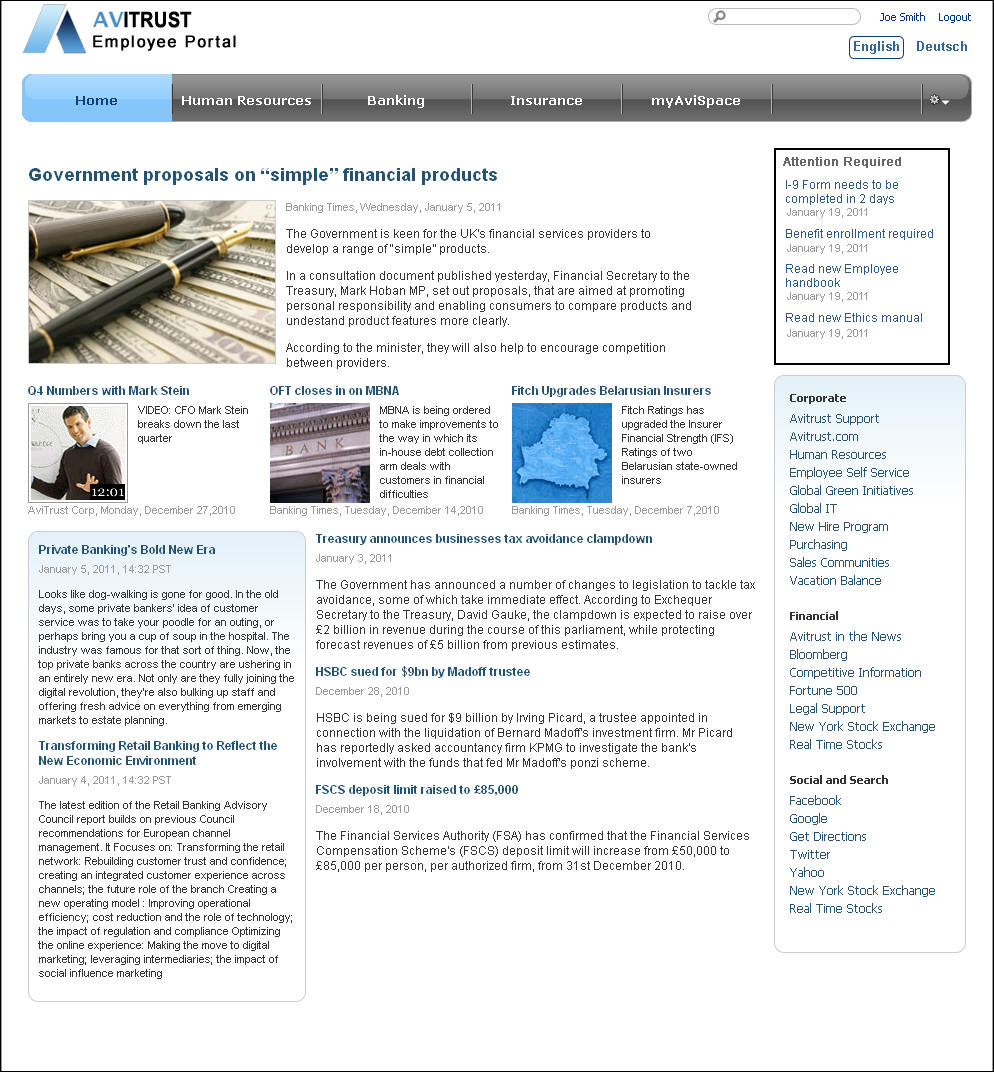
The AviTrust employee portal is created using WebCenter Spaces (Figure 11-45).
Figure 11-45 The AviTrust Employee Portal Home Page
Description of "Figure 11-45 The AviTrust Employee Portal Home Page"
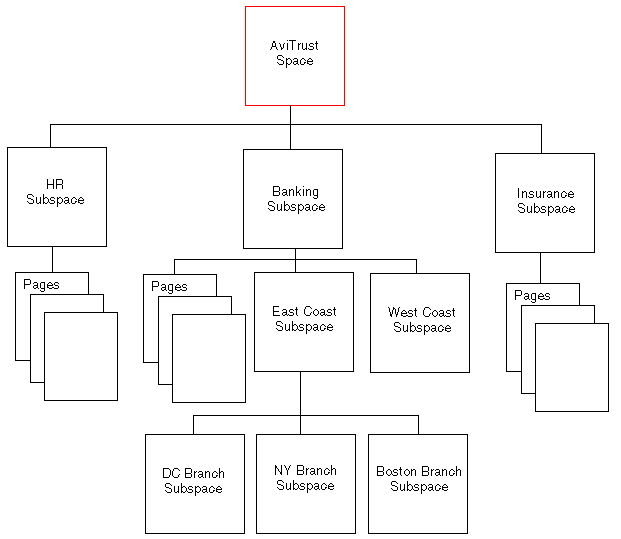
The AviTrust employee portal consists of a single Space containing several Subspaces. Some of these Subspaces in turn have their own Subspaces (Figure 11-46).
Figure 11-46 Structure of the AviTrust Employee Portal
Description of "Figure 11-46 Structure of the AviTrust Employee Portal"
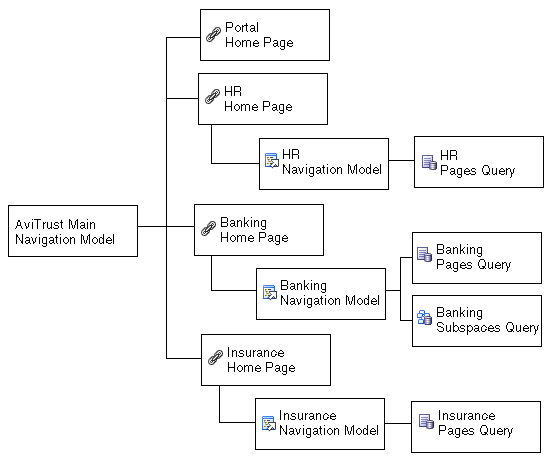
To provide navigation around the portal, the administrator could create a single navigation model and maintain complete control over the structure and content. However, as the Subspaces are each maintained by individual department representatives, the administrator is probably not the best person to determine the navigation that is required through those Subspaces; the department representatives are much more familiar with the content. Rather than have multiple users attempting to update the same navigation model, the administrator can create several navigation models: one for the main navigation, and one for each of the different Subspaces. Each of the Subspace navigation models includes only those navigation items applicable to that particular area of the portal. The main navigation model can then include the Subspace navigation models by reference.
For example, the Banking navigation model includes a list of the pages within the Banking Subspace and a list of its Subspaces (East Coast, West Coast, DC Branch, NY Branch, and Boston Branch). These navigation items are then included in the main navigation model by referencing the Banking navigation model (Figure 11-47).
Figure 11-47 Structure of the AviTrust Employee Portal Navigation
Description of "Figure 11-47 Structure of the AviTrust Employee Portal Navigation"
Delegating the design of the navigation model in this way means that the department representatives can determine the navigation within their own specific areas of the portal, leading to more meaningful structure and removing the bottleneck of a single navigation model or a single navigation designer.
The following example steps through the process performed by the portal administrator and department representatives to create the navigation for the AviTrust Employee Portal.
Note:
While this example assumes the existence of a partially constructed AviTrust Employee Portal, it is still possible to go through it by creating any portal with the structure shown in Figure 11-46.To create the navigation for the AviTrust employee portal:
-
Log in to the AviTrust Employee Portal as an administrator.
-
Click the Administration link.
-
Click the Resources tab.
-
In the left panel of the Resources Manager, click Navigations.
-
Click Create to create a new navigation model.
-
In the Create New Navigation dialog, in the Name field, enter
AviTrust Intranet Navigation Model. -
In the Description field, enter
Main navigation model for the AviTrust Employee Portal. -
Leave the Copy From dropdown list empty to create the navigation model from scratch.
Figure 11-48 shows the completed dialog.
Figure 11-48 Create the Main AviTrust Navigation Model
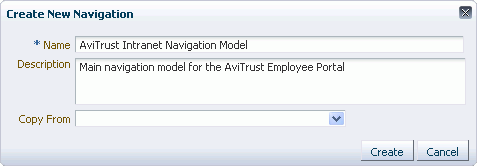
Description of "Figure 11-48 Create the Main AviTrust Navigation Model"
-
Click Create.
This is the main, top-level navigation model for the portal.
-
Next you must create the navigation models for individual departments represented in the portal.
Each of these navigation models must be created at the Subspace level, this is so that the appropriate departmental representatives can manage them.
-
First, let's create the navigation model for the HR department.
Go to the Human Resources Subspace.
-
Display the Space administration pages.
Note:
The way you access the Space administration pages depends on the page template in use. For example, in a top navigation template, you may access Space administration pages through a Manage menu.You can also navigate to these pages using the direct URL provided in Section A.3, "User Interface URLs for Space Pages."
-
Click the Resources tab.
-
In the left panel of the Resources Manager, click Navigations.
-
Click Create to create a new navigation model.
-
Create a navigation model for the HR department with the following details:
-
Name:
HRNav -
Description:
Navigation model for the HR Subspace -
Copy From: Leave blank
-
-
Next, let's create the navigation model for the Banking department.
Go to the Banking Subspace.
-
Display the Space administration pages.
Note:
The way you access the Space administration pages depends on the page template in use. For example, in a top navigation template, you may access Space administration pages through a Manage menu.You can also navigate to these pages using the direct URL provided in Section A.3, "User Interface URLs for Space Pages."
-
Click the Resources tab.
-
In the left panel of the Resources Manager, click Navigations.
-
Click Create to create a new navigation model.
-
Create a navigation model for the Banking department with the following details:
-
Name:
BankingNav -
Description:
Navigation model for the Banking Subspace -
Copy From: Leave blank
-
-
The next step is to design the navigation models for the individual Subspaces.
Note:
When implementing delegated navigation development, the following steps would be performed by the moderators of the Subspaces. However, for the purposes of this example, we will continue through the steps as the administrator. -
With the new Banking navigation model selected, click the Edit menu, and then choose Edit.
-
The Banking navigation model includes a list of the pages within the Subspace. To do this, you can add a Pages Query navigation item.
In the Edit - BankingNav Model dialog, click the Add menu and choose Pages Query.
-
In the Edit Navigation Item - Pages Query dialog, in the Name field, enter
Banking Pages. -
In the Description field, enter
List of pages in the Banking Subspace. -
In the Find Pages in radio group, make sure that Space is selected because we want to list the pages in a Space (the Banking Subspace).
The Banking Subspace is already specified in the adjacent field.
-
From the Visibility dropdown list, select Show only visible items, to ensure that any hidden pages are not included in the navigation.
-
Select Hide Top-Level Folder so that the pages are listed directly, rather than under a folder for the Space.
Figure 11-49 shows the completed dialog.
Figure 11-49 The Pages Query in the AviTrust HR Navigation Model
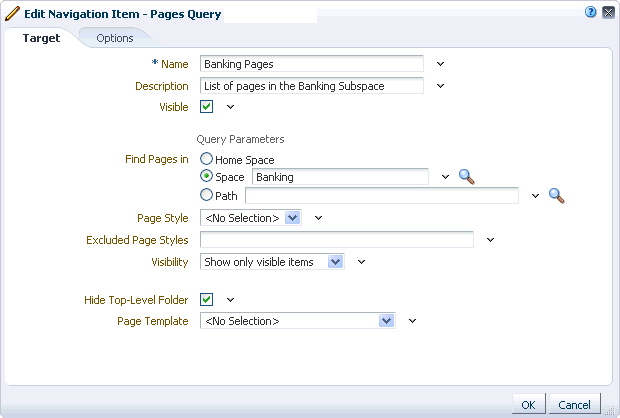
Description of "Figure 11-49 The Pages Query in the AviTrust HR Navigation Model"
-
Click OK.
-
The Banking Subspace also contains several Subspaces that should be listed in the navigation model. To do this, you can add a Spaces Query navigation item.
In the Edit - BankingNav dialog, click the Add menu and choose Spaces Query.
-
In the Edit Navigation Item - Spaces Query dialog, in the Name field, enter
Banking Spaces Query. -
In the Description field, enter
List of Subspaces in the Banking Subspace. -
Next to the Visible field, click the Expression Builder icon, and then choose Expression Builder.
-
Select Type a value or expression, and enter the following EL expression in the field:
#{!empty spaceContext.currentSpace}This means that the Subspace is visible when the navigation model is rendered, only if the Subspace is not empty.
-
Next to the Space field, click the Select Space icon.
-
In the Select Space dialog, select Banking and click OK.
-
Select Hide Top-Level Folder so that the Subspaces are listed directly, rather than under a folder for the Space.
Figure 11-50 shows the completed dialog.
Figure 11-50 The Subspaces Query in the AviTrust Banking Navigation Model
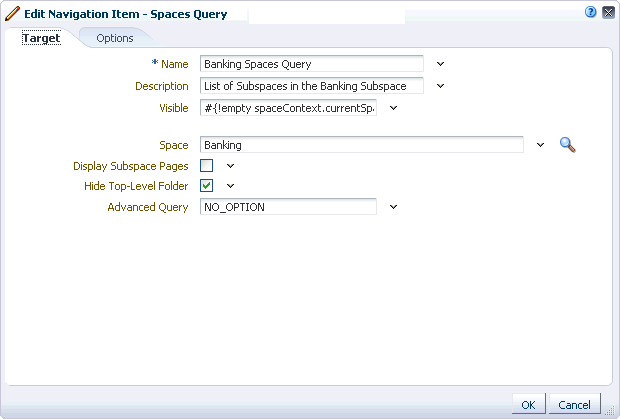
Description of "Figure 11-50 The Subspaces Query in the AviTrust Banking Navigation Model"
-
Click OK.
-
Click the Preview tab to check that the Banking pages and Subspaces are listed (Figure 11-51).
Figure 11-51 Preview of the AviTrust Banking Navigation Model
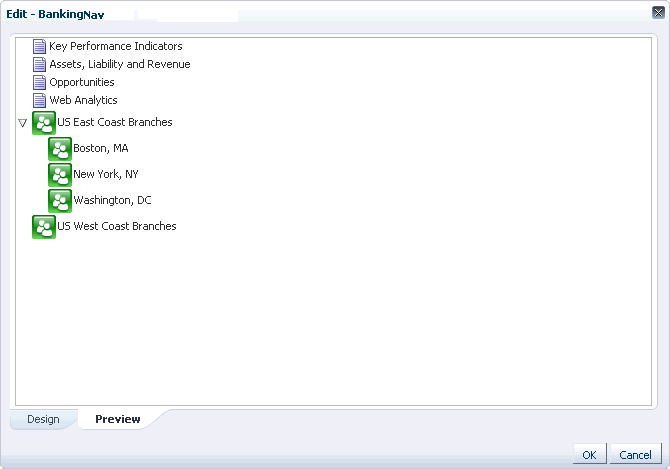
Description of "Figure 11-51 Preview of the AviTrust Banking Navigation Model"
-
Click OK.
-
With the navigation model still selected, click the Edit menu and then choose Show.
This makes the navigation model available to use in your application.
-
Now, lets design the HR navigation model.
Note:
Again, for real delegated navigation development, the following steps would be performed by the Space moderator.Go to the Human Resources Subspace.
-
Display the Space administration pages.
Note:
The way you access the Space administration pages depends on the page template in use. For example, in a top navigation template, you may access Space administration pages through a Manage menu.You can also navigate to these pages using the direct URL provided in Section A.3, "User Interface URLs for Space Pages."
-
Click the Resources tab.
-
In the left panel of the Resources Manager, click Navigations.
-
Select HRNav, click the Edit menu, and then choose Edit.
-
The HR navigation model consists of a list of the pages within the HR Subspace. To do this, as with the Banking navigation model, you can add a Pages Query navigation item.
In the Edit - HRNav Model dialog, click the Add menu and choose Pages Query.
-
In the Edit Navigation Item - Pages Query dialog, in the Name field, enter
HR Pages. -
In the Description field, enter
List of pages in the HR Subspace. -
In the Find Pages in radio group, make sure that Space is selected because we want to list the pages in a Space (the HR Subspace).
The HR Subspace is already specified in the adjacent field.
-
From the Visibility dropdown list, select Show only visible items, to ensure that any hidden pages are not included in the navigation.
-
Select Hide Top-Level Folder so that the pages are listed directly, rather than under a folder for the Space.
Figure 11-52 shows the completed dialog.
Figure 11-52 The Pages Query in the AviTrust HR Navigation Model
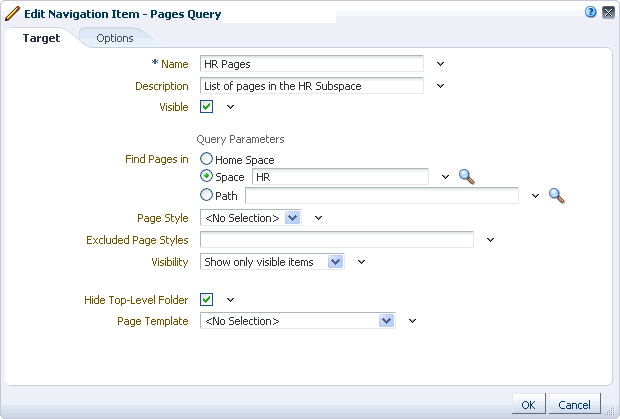
Description of "Figure 11-52 The Pages Query in the AviTrust HR Navigation Model"
-
Click OK.
-
Click the Preview tab to check that the Human Resources pages are listed (Figure 11-53).
Figure 11-53 Preview of the AviTrust HR Navigation Model
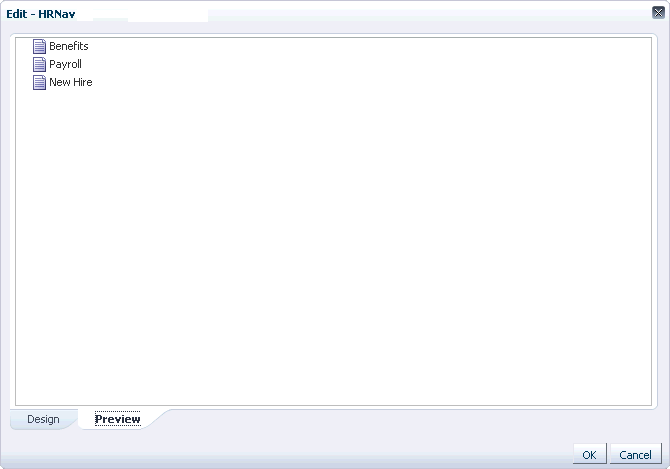
Description of "Figure 11-53 Preview of the AviTrust HR Navigation Model"
-
Now that you have created and populated the department-level navigation models, you can move on to the main navigation model.
Click the Back to the Space link.
-
Click the Administration link.
-
Click the Resources tab.
-
In the left panel of the Resources Manager, click Navigations.
-
Select the AviTrust Intranet Navigation Model.
-
Click the Edit menu, and then choose Edit.
-
First, let's add a link to the home page of the portal.
In the Edit - AviTrust Intranet Navigation Model dialog, click the Add menu and choose Link.
-
In the Edit Navigation Item - Link dialog, in the Name field, enter
Home. -
In the Description field, enter
Link to the AviTrust Employee Portal home page. -
In the Path field, enter the path of the portal home page, for example:
page://oracle/webcenter/page/scopedMD/s730ab705_4b08_438c_ab2a_7ad3b3b0fcf1/
PortalSiteHome.jspx
Figure 11-54 shows the completed dialog.
Figure 11-54 The Home Link in the AviTrust Main Navigation Model
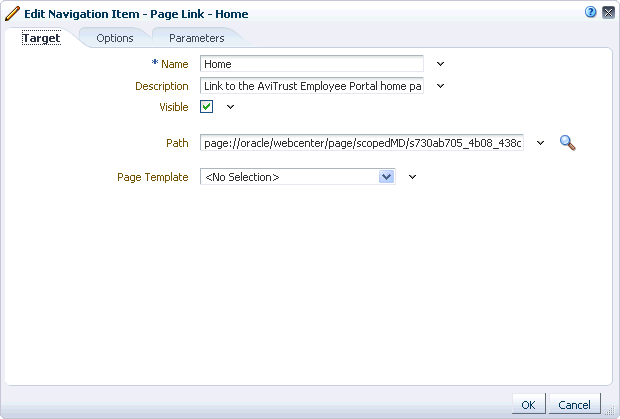
Description of "Figure 11-54 The Home Link in the AviTrust Main Navigation Model"
-
Click OK.
-
Next, the navigation model should link to the home page of the HR Subspace.
Click the Add menu and choose Link.
-
In the Edit Navigation Item - Link dialog, in the Name field, enter
Human Resources. -
In the Description field, enter
Link to the HR Subspace home page. -
In the Path field, enter the path of the HR Subspace home page, for example:
page://oracle/webcenter/page/scopedMD/s712f1d65_900c_418e_be91_b40b27617b47/
Page4.jspx
-
Now, add the reference to the HR navigation model to include it in the main navigation model.
Click the Add menu and choose Navigation Reference.
-
In the Edit Navigation Item - Navigation Reference dialog, in the Name field, enter
Human Resources Navigation Reference. -
In the Description field, enter
Embedded HR navigation model. -
Next to the Include Navigation dropdown list, click the Expression Builder icon, then choose Expression Builder.
-
In the Expression Editor dialog, select Type a value or expression.
-
In the field below, enter the path to the HR navigation model, for example:
/oracle/webcenter/siteresources/scopedMD/s712f1d65_900c_418e_be91_b40b27617b47/
navigation/gsr10267cfe_95d0_49df_bca4_1da5f9094082/Navigation.xml
Tip:
To obtain the path of the navigation model, select it in the Resource Manager for the HR Subspace, choose Edit Properties from the Edit menu, and then copy the value from the Metadata File field.Figure 11-55 shows the completed dialog.
Figure 11-55 The Expression to Identify the HR Navigation Model
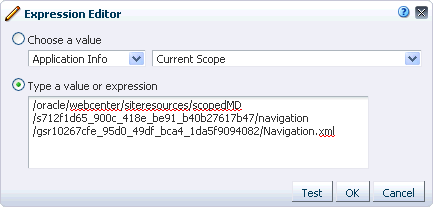
Description of "Figure 11-55 The Expression to Identify the HR Navigation Model"
-
Click OK to return to the Edit Navigation Item - Navigation Reference dialog.
Figure 11-56 shows the completed dialog.
Figure 11-56 The Navigation Reference to the HR Navigation Model
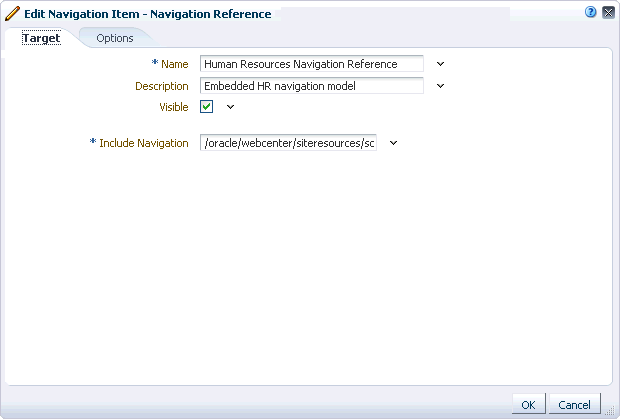
Description of "Figure 11-56 The Navigation Reference to the HR Navigation Model"
-
Click the Indent icon to move the navigation reference under the HR home link.
-
Repeat steps 68 to 72 to add a link to the Banking home page.
-
Repeat steps 73 to 80 to add a navigation reference to the Banking navigation model
-
Indent the Banking navigation reference under the Banking home link.
-
Repeat steps 68 to 72 to add a link to the Insurance home page.
-
Click the Preview tab to check the main navigation model (Figure 11-57).
Figure 11-57 Preview of the Main AviTrust Navigation Model
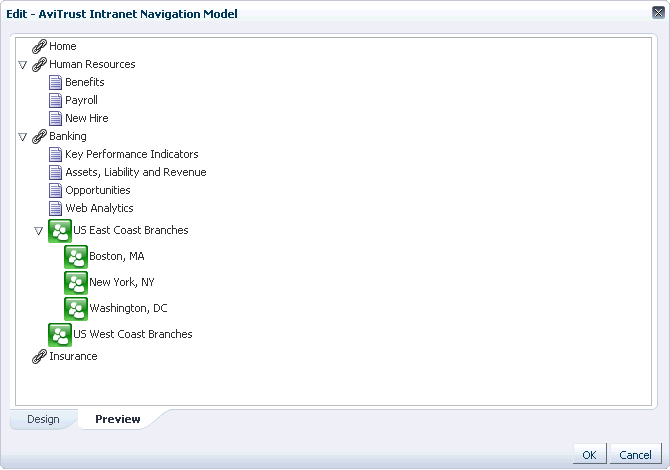
Description of "Figure 11-57 Preview of the Main AviTrust Navigation Model"
-
Click OK.
-
With the navigation model still selected, click the Edit menu and then choose Show.
This makes the navigation model available to use in your application.
-
The next step would be to visualize this navigation within the portal, typically by adding some navigation UI to your portal's page template.
For more information about visualizing portal navigation, see Section 11.3, "Rendering Navigation in Your Portal."
